Cascading Reports and Ad Hoc Grids
Data source types: Oracle Analytics Cloud - Essbase, Oracle Planning and Budgeting Cloud, Oracle Financial Consolidation and Close Cloud, Oracle Tax Reporting Cloud
You can create separate reports for any or all of the members of one or more dimensions in a report based on an ad hoc grid or Smart Slice query and cascade these reports separately across the worksheets of an Excel workbook. For reports created in the Report Designer, you can also cascade reports across slides in a PowerPoint presentation. Worksheets or slides are created as needed to accommodate all reports.
Formulas, comments and other text, Smart Slice function grids, charts, tables, and sliders are included in cascaded reports.
Oracle Analytics Cloud - Essbase only: Cascading is supported for multiple-grid worksheets.
Note:
When extensions are enabled in Oracle Smart View for Office, cascading a report with a large number of members can cause Excel to stop responding. You may disable any extensions that are installed from the Smart View Options dialog box, Extensions tab. After disabling, restart Excel and repeat the cascade operation.
Watch this tutorial video to get acquainted with cascading while connected to Oracle Planning and Budgeting Cloud.
To cascade an ad hoc grid or Smart Slice report:
-
Open an ad hoc grid or Smart Slice report on the worksheet.
-
From the Essbase ribbon or from the data provider ad hoc ribbon (for example, Planning Ad Hoc), select Cascade, and then one of the following:
-
Same Workbook to use the current workbook
-
New Workbook to use a new workbook
-
Different Workbooks to cascade each report to a different workbook
-
-
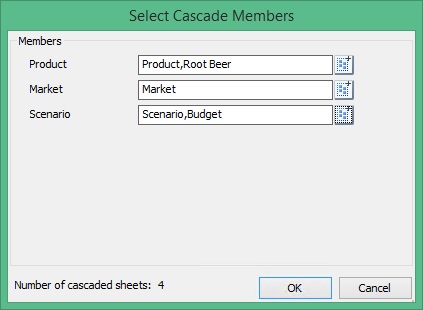
In Select Cascade Members, click
 next to each dimension to launch Member Selection, where you select the members from each dimension for which you want to create reports.
One report will be generated for each member you select. A message indicating the number of reports to be generated appears in the bottom left of the dialog.
In the example dialog box below, members were selected for the "Product", "Market", and "Scenario" dimensions. The message indicates that four cascaded sheets will be generated.

-
Click OK to begin cascading.
Depending on your earlier cascade selection, the resulting reports are created on separate worksheets in the current workbook or in a new one. Each worksheet tab is named for the dimensions and members of the report it contains. Click a worksheet tab to view a report.
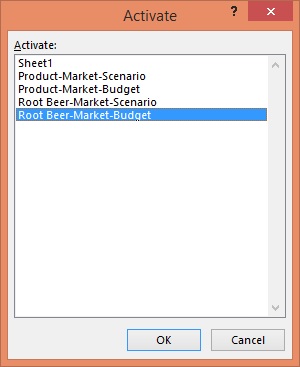
To see a list of all the worksheets, right-click the left or right arrow at the bottom left of Excel:

In our example using the "Product", "Market", and "Scenario" dimensions, the following reports were created:

To display a specific report, select the report in the list, and then click OK.
Note:
-
To enable worksheet tab naming, do not use more than 31 characters or any the following characters for dimension or member names: ( ) : \ / ? * [ ].
-
Cascading may be very slow for large grids.
-
When extensions are enabled in Smart View, cascading a report with a large number of members can cause Excel to stop responding. You may disable any extensions that are installed from the Smart View Options dialog box, Extensions tab. After disabling, restart Excel and repeat the cascade operation.
