Working with Connections and Remote Libraries
Overview
Connections in Narrative Reporting enables you to define access to Reports data sources and Remote Libraries.
-
Connections streamline the creation and maintenance of Reports data sources and provide a single area of credentials maintenance for multiple cubes in an application.
Note:
Data source artifacts in the Library can still optionally be used to maintain connections to cubes; however this can also be done in Connections.
-
Connections also allow you to access reporting artifacts in Oracle Fusion Cloud Enterprise Performance Management platform instances on the same domain via Remote Libraries. In the Narrative Reporting Library, users can browse remote libraries for reporting artifacts to open, or to copy Reports from the Cloud EPM Platform to Narrative Reporting.
Supported artifacts include Reports and Report Snapshots, Books, Bursting, Microsoft Office files, and PDFs.
-
Only the Service Administrator role can create and maintain Connections. Both the Narrative Reporting and Connections Administrator ID need to be native users and not Single Sign-On (SSO). For more information, see Managing User Credentials for SSO-Enabled Cloud EPM and Oracle Enterprise Data Management Cloud Environments in Getting Started Guide for Administrators .
-
When users access a report in Narrative Reporting, their User ID is passed to the data source, so their cube access permissions (data and member security) are applied to the report results.
Connections support all Reports data sources: Cloud EPM platform (Enterprise Profitability and Cost Management, FreeForm, Planning and Planning Modules, Financial Consolidation and Close, Tax Reporting), Essbase Cloud, Fusion ERP, Profitability and Cost Management (PCM).
-
Cloud EPM Platform Connections: You can access cubes for reporting and Remote Libraries.
-
Essbase, Fusion ERP, Profitability and Cost Management (PCM) Connections: You can access cubes for reporting only.
When creating a Connection, you select the connection type (based on the data source type) and enter the Server Name and Admin Credentials, as well as other fields, depending on the data source. You can also optionally select cubes to be added as data sources. The data source artifacts in the Library use the Connections as parent artifact "containers", where you can select a Connection to use and select a cube from that connection.
For Cloud EPM Platform connections, you can optionally enable a Remote Library for users to access reporting content from these connections in Narrative Reporting.

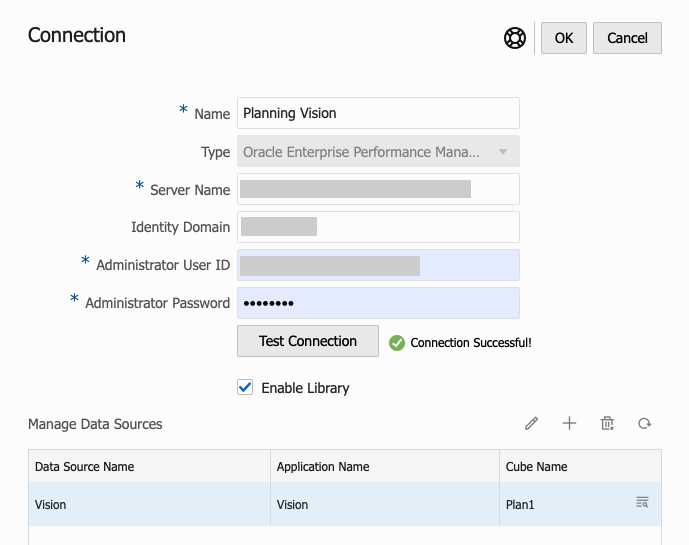
The Connection dialog, where you can create and edit Connections. For the Cloud EPM Platform connection, you can Enable Library to expose a Remote Library to the end-users. Under Manage Data Sources, you can create and manage data sources for Reports.

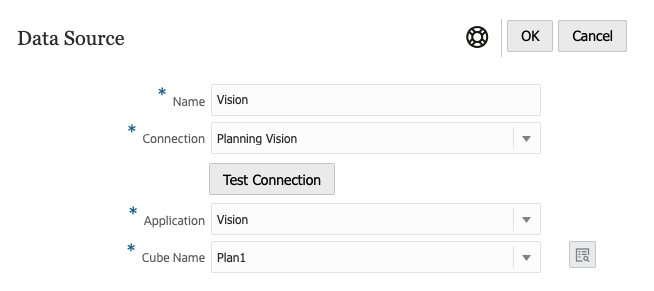
The Data Source dialog, where you can alternately create Connections to specific cubes. Cube connections can also be defined in the Connections dialog.

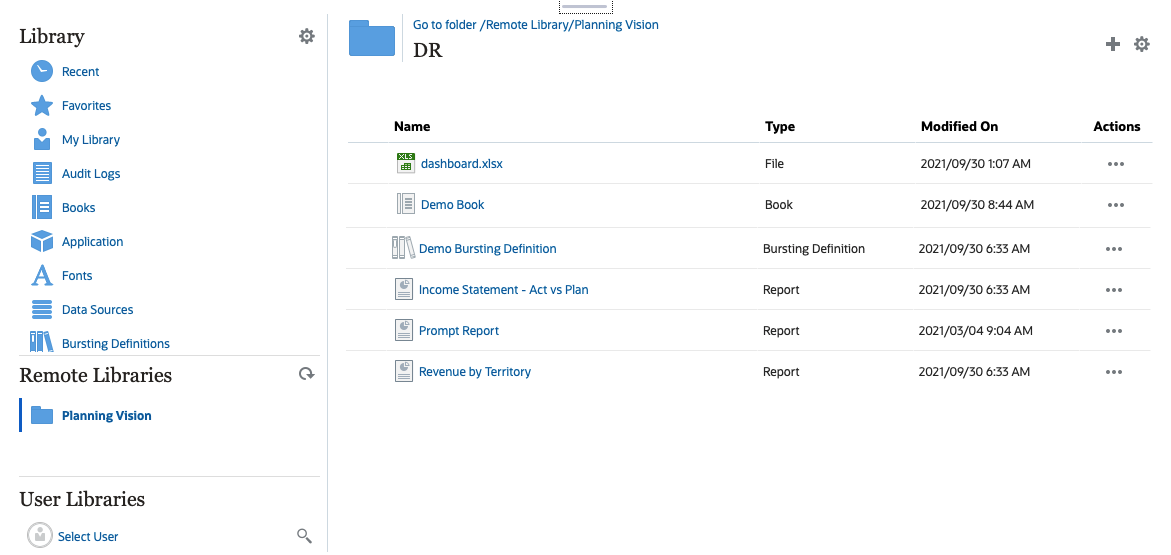
A Remote Library to an Cloud EPM Platform instance allows accessing reporting artifacts.
-
Narrative Reporting users accessing a Remote Library need to be a user and must have access permissions to artifacts on the Connections.
-
Remote Libraries cannot be enabled to access other Narrative Reporting instances, only Cloud EPM Platform instances (Enterprise Profitability and Cost Management, FreeForm, Planning and Planning Modules, Financial Consolidation and Close, Tax Reporting).
-
You cannot edit any of the artifacts in a Remote Library. You can only open any of the artifacts or copy Reports. Artifacts can only be edited directly in the Cloud EPM instance and not from the Remote Libraries in Narrative Reporting.
Note:
Remote Libraries should only be enabled when they are regularly used and accessed, where the credentials defined in Connections are always valid. When the Library and related cards (For example: Reports, Books, and so on) are accessed for the first time in a session, the system performs checks on all Connections with Remote Libraries enabled. If the remote connection cannot be accessed due to expired credentials or an unavailable instance, there may be significant performance degradation when accessing the Library and related cards.
It is recommended to only enable Remote Libraries for Connections where regular access to reporting artifacts is required, also keep the Connection credentials up to date and do not leave stale or unused Connections defined with Enable Library selected.
Creating and Editing Connections
To create a Connection:
-
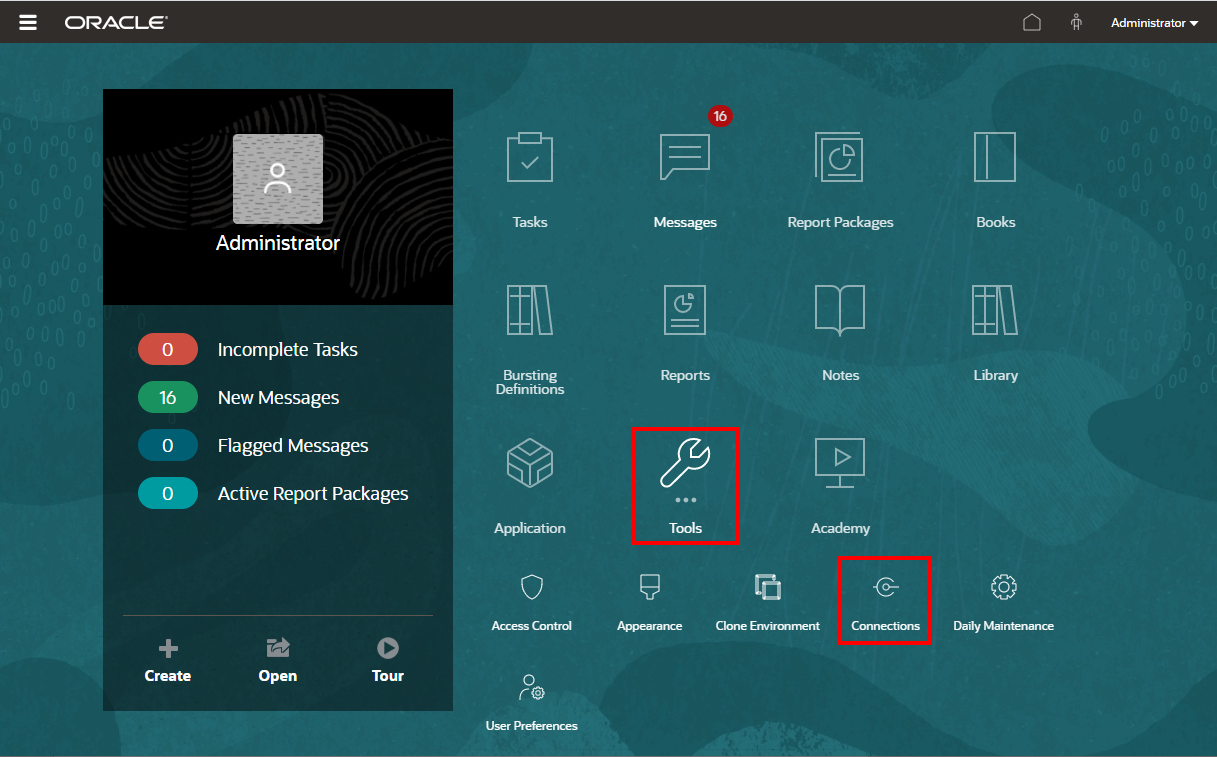
On the Narrative Reporting Home page, under the Tools icon, you can select Connections.

-
In the Manage Connections, click
 to add new connections.

-
In Name, enter a descriptive identifier for the connection, such as a combination of the data source and server.
-
In Type, select the type of data source:
-
Oracle Fusion Enterprise Performance Management, used for:
-
Enterprise Profitability and Cost Management
-
FreeForm
-
Planning and Planning Modules
-
Financial Consolidation and Close
-
Tax Reporting
-
-
Oracle Essbase
-
Oracle Fusion Cloud EPM Profitability and Cost Management
-
Oracle Fusion Cloud Essbase
-
Oracle Essbase On-premises Deployment
-
-
In Server Name, enter the data source server name with no protocol or URL. For example, for Cloud EPM, if data source URL is:
https://<servername>/HyperionPlanning, the server name is:<servername>. -
(Oracle Fusion Cloud Essbase and Oracle Essbase On-premises Deployment only): In Essbase Server Name, enter the name of the Essbase server. By default for Fusion Applications, the server name is "Essbase_FA_Cluster" and for Essbase APS, the server name is "EssbaseCluster-1".
-
In Identity Domain, enter the identity domain of the data source pod.
Note:
-
Not required for Oracle Essbase, Oracle Fusion Cloud Essbase or Oracle Essbase On-premises Deployment.
-
Not required for Cloud EPM deployments on Oracle Cloud Infrastructure (OCI).
-
-
Enter the administrator User ID and Password. The administrator User ID needs to be a Service/System Administrator role at the data source level, BI Administrator role for Fusion Applications.
Note:
-
Both the Narrative Reporting and Connections Administrator ID need to be native users and not Single Sign-On (SSO). For more information, see Managing User Credentials for SSO-Enabled Cloud EPM and Oracle Enterprise Data Management Cloud Environments in Getting Started Guide for Administrators .
-
You must log in to Narrative Reporting with the administrator credentials for the data source that you want to create a connection to. For example, if your Planning Modules administrator is PlanAdmin, you must log in to Narrative Reporting with the PlanAdmin credentials to create a data source connection to the Planning Modules data source. Enter User ID and Password credentials used for native authentication at the source. Single Sign-on with Identity Assertion technologies is not supported.
-
-
Click Test Connection.

(Oracle Essbase only): Click Yes on the dialog box to trust the connection. This setting is stored so that you do not have to answer the question again.
-
For Cloud EPM connections, optionally select Enable Library to expose a Remote Library.
-
To select cubes to be added as data sources:
-
Under Manage Data Sources, click
 Add Data Sources to add one or more cubes to
connect Reports to.
-
For each cube, enter a Data Source Name, select the Application and Cube names.

After selecting a cube, you can click on
 to preview the dimension list.
-
In the Manage Data Sources toolbar, you can: Edit an existing data source, create a New data source, Delete a data source and Refresh the view.
-
Click OK to add the Connection. The connection will appear in the list under the Manage Connections.
-
To Edit a Connection:
In Manage Connections, select the Connection, and then select Edit from the Actions menu. When you edit a connection, you can change the Connection Name and Server, as well as the Application and Cube names.
Note:
-
Changing the Connection Name does not affect any report objects that use the connection.
-
Changing the Server, Application, or Cube names causes any report objects that use the connection to point to the new destination.
-
For security purposes, you must re-enter the administrator credentials when editing the connection.
Migrating Connections from One Environment to Another
You can migrate Connections from one environment to another in Manage Connections by exporting one or more Connections to a ZIP file and importing the ZIP file into another environment.
To export a Connection:
-
In Manage Connections, select one or more Connections to export. In Actions
 , select Export. If only one Connection is
selected, you can select Export from the selection Connection’s
Action
 menu.
menu.
-
In Select Folder for Export File, select a destination Library folder and click OK. The ZIP file will be exported to the selected folder.
-
You can navigate to the destination Library folder and download the exported ZIP file to your local machine.
To import a Connection:
-
In Manage Connections, in the select Actions
 , select Import.
-
In the Import dialog, select Local and browse to the export ZIP file that you want to import.
-
Select Overwrite Existing Objects to replace any existing artifact with the new imported artifact.
-
Select OK.
-
The import process will run in the background. Check Messages to view the notification once the import is complete.
-
Once the import process is complete, you will need to edit each Connection and re-enter the administrator credentials, as the credentials are not included in the export ZIP file.