Introduction
This 60-minute tutorial shows you how to migrate an existing Profitability and Cost Management application to a separate instance of Enterprise Profitability and Cost Management. The sections build on each other and should be completed sequentially.
Objectives
Enterprise Profitability and Cost Management includes improved versions of all the great modeling and allocation capabilities available in Profitability and Cost Management and integrates them with Oracle EPM platform features like data forms, dashboards, reports, Data Exchange, Smart View dimension management, and more. If you have an existing Profitability and Cost Management application, you can migrate it to Enterprise Profitability and Cost Management to take advantage of these enhanced platform features and functionality, and seamlessly integrate your Profitability data with other Oracle EPM Cloud platform business processes like Planning and Tax Reporting. Oracle provides a migration template for you to control the conversion of your existing application.
This tutorial teaches you the differences between Profitability and Cost Management and Enterprise Profitability and Cost Management applications, and covers the following steps of the migration process:
- Download the migration template from Profitability and Cost Management.
- Customize the migration template to convert metadata and data from Profitability and Cost Management to Enterprise Profitability and Cost Management.
- Upload the customized template to your Profitability and Cost Management inbox.
- Validate the migration template and perform the migration. During this step, the system generates an application snapshot and data extract that are compatible with Enterprise Profitability and Cost Management. You can then either manually upload the snapshot and data to an Enterprise Profitability and Cost Management instance, or allow the system to automatically complete the migration.
Note:
See the Learn More section for links to documentation, overviews, and tutorials on using Enterprise Profitability and Cost Management.Prerequisites
- Have Service Administrator access to the EPM Cloud Service instance with the Profitability and Cost Management application you want to migrate.
- Have Service Administrator access to a second EPM Cloud Service instance with the Enterprise Profitability and Cost Management business process enabled. This instance should not already have an application created.
Note:
An EPM Cloud Service instance allows you to deploy and use one of the supported business processes. To deploy another business process, you must request another EPM Enterprise Cloud Service instance or remove the current business process.Quick Links
If you've already created your migration template and you're looking for instructions on how to validate, perform, or troubleshoot migrations, here are some handy links to later sections of the tutorial:
Task 1: Comparing Profitability and Cost Management an Enterprise Profitability and Cost Management
Understanding the basic differences and similarities between Profitability and Cost Management and Enterprise Profitability and Cost Management will help you understand the changes required for migrating your application.
Environment
| Profitability and Cost Management | Enterprise Profitability and Cost Management |
|---|---|
| Single application per environment | Single application per environment |
| Single ASO database |
|
| Duplicate member outline supported | Duplicate member outlines not supported |
Dimension Requirements
| Profitability and Cost Management | Enterprise Profitability and Cost Management |
|---|---|
| 1 to 4 user-defined POV dimensions required | Years, Period, Scenario, and Version POV dimensions required |
| Balance and Rule system dimensions required | PCM_Balance and PCM_Rule system dimensions required |
| Account and Entity dimensions required | |
| Currency dimension (required only for multicurrency applications) | |
| Custom dimensions | Custom dimensions |
| Attribute dimensions | Attribute dimensions |
Rules and Modeling
| Profitability and Cost Management | Enterprise Profitability and Cost Management |
|---|---|
| Allocation and custom calculation rules supported | Allocation and custom calculation rules supported |
| Rules reside in one or more POVs Note: Users can run rules against data in the POV where the rules are stored, or run rules stored in a different POV against any data POV. |
Rules reside in models Note: Users can run rules from a model against one or many data POVs, making it unnecessary to copy rules for every POV combination. |
| Rule member name is the system-assigned Rule Number | PCM_Rule member name is the rule name |
| Users cannot edit the Rule dimension | Users can add attributes and UDAs to members in the PCM_Rule dimension |
What is Migrated from Profitability and Cost Management
- Dimensions: Source dimensions are mapped and migrated to destination dimensions. This includes adding any required dimensions for the destination that are missing in the source, optionally mapping existing members from the source to default members in the target, and renaming duplicate members in the source with prefixes to enforce the unique member name requirement in the destination.
- Rules: POV-based rules are mapped and migrated to named models in the destination.
- Data: Data is mapped to the destination dimension members and migrated to the calculation cube.
What is not Migrated from Profitability and Cost Management
- Data management: Data Management load profiles created in the source are not migrated to the destination. You will need to create any necessary load profiles and data integrations for your new application in Enterprise Profitability and Cost Management after migration.
- Analytics: Reports and other analytics such as profit curves created for your Profitability and Cost Management application cannot be migrated and must be recreated using the tools in Enterprise Profitability and Cost Management.
- Model views: Model views do not exist in Enterprise Profitability and Cost Management; it uses EPM Platform data forms for data entry, profit curves, allocation trace, dashboards, infolets, and rule balancing operations. You'll need to create the data forms required to support your needs in Enterprise Profitability and Cost Management after migrating your application.
- Security: Enterprise Profitability and Cost Management uses the Oracle Cloud EPM platform's member and cell-level security model. Additionally, any native user Groups and Roles are not migrated. You will need to recreate your security—including metadata and data access, user group assignments, and user role assignments—using the tools in Enterprise Profitability and Cost Management after migration.
Task 2: Generating and Downloading the Migration Template
The migration template is an XML file that you customize to contain the dimension mapping, model artifact, and data mapping instructions that the migration process uses to convert your Profitability and Cost Management application to an import format that's compatible with Enterprise Profitability and Cost Management. You generate and download the template from your Profitability and Cost Management instance and then customize it for your application. The examples shown in this tutorial use the Profitability and Cost Management sample application, BksML30. Install the sample application in your Profitability and Cost Management instance if you want to follow along with the example, or substitute information from your own application to try your own migration.
- Log in as a Service Administrator to your Profitability and Cost Management instance.
- Click Application, then click Migrate to EPCM.
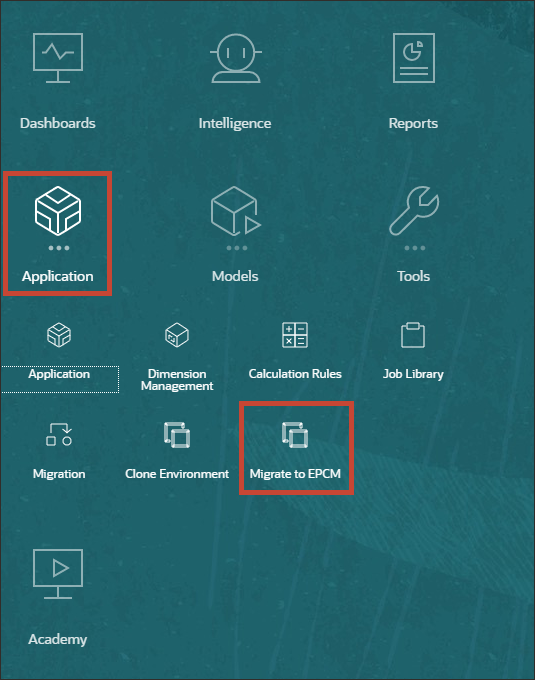
- Click Generate Template.
- Save the template to your file system with the name
<YourPCMApplicationName>_Export.xml. For the BksML30 sample application, name the templateBksML30_Export.xml.Note:
If you want to review a completed template for BksML30, download this file to your file system. You can also use this completed template to test the migration process using the sample application in later steps. - Open the template in a text or XML editor to start customizing.
Task 3: Customizing the Migration Template for Your Application
The migration process generates two migration files in the correct format for Enterprise Profitability and Cost Management: an application snapshot and a data extract. The sections of the migration template support the mappings required to generate migration files from your current application:
<epcmappname>: Optional: Specify a name for your Enterprise Profitability and Cost Management application (used to build the application snapshot)<dimensions>: Map source dimensions to target dimensions (used to build the application snapshot)<duplicatememberprefixes>: (Optional) Address the conversion of duplicate member names to unique member names (used to build the application snapshot)<rename_dimension_mapping>: (Optional) Rename dimensions to comply with naming restrictions in Enterprise Profitability and Cost Management or because you want to change the name in the new application.<rename_member_mapping>: (Optional) Rename members to comply with naming restrictions in Enterprise Profitability and Cost Management or because you want to change the name in the new application.<modelpovs>: Convert groups of POV-specific rules into Models (used to build the application snapshot)<datapovs>: (Optional) Convert existing POVs of data to data compatible with your new Enterprise Profitability and Cost Management application (used to create the data extract)
EPCM Application Name Section
This section of the template lets you specify a new name for your Enterprise Profitability and Cost Management application. If you want to use the same name as your Profitability and Cost Management application, you can leave this section blank.
Enter your Enterprise Profitability and Cost Management application name between the <epcmappname> tags. If you're converting the BksML30 sample application enter:
<epcmappname>BksEPCM</epcmappname>
Note:
Application names can be no longer than 8 characters and must adhere to application naming conventions. For more information, see Naming Restrictions for Applications and Databases.Dimensions Section
This section of the template represents the six required non-system dimensions in Enterprise Profitability and Cost Management, plus the optional Currency dimension for multicurrency applications. Each dimension contains default members that you can either map to members in your existing dimensions or allow the migration process to add without mapping.
If a required dimension doesn't exist in your current application, leave the mapping blank; the migration process creates missing required dimensions automatically.
Similarly, if your Profitability and Cost Management dimension doesn't contain members that correspond to the default Enterprise Profitability and Cost Management dimension members, leave those mappings blank; the migration process creates the default members automatically.
WARNING:
Enterprise Profitability and Cost Management applications have the following restricted prefixes for member names: FCCS_, OCX_, OEP_, OPF_, OWP_, PCM_, and TRCS_. Members in your source application that start with a restricted prefix will be automatically renamed by removing the prefix during migration.Account Dimension
The Account dimension in Enterprise Profitability and Cost Management includes the default member All Accounts as the first Gen2 member under Account.
In this section, you include mappings for the dimension name and default member.
| Account Dimension Section | Valid Values | Examples |
|---|---|---|
| pcm_dimname | Account dimension name in Profitability and Cost Management | <pcm_dimname>Account</pcm_dimname>
|
| member_mapping | Optional mapping for default Account members in Enterprise Profitability and Cost Management | <member_mapping> <pcm_member>Total Accounts</pcm_member> <epcm_member>All Accounts</epcm_member> </member_mapping> |
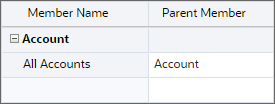
BksML30 includes a custom dimension named Account, but the dimension doesn't include a member that corresponds to the All Accounts member in Enterprise Profitability and Cost Management. Create these mappings for the BksML30 account dimension:
<account_dimension>
    <!-- Please input PCMCS(Source) dimension name which need to be mapped to EPCM(Destination) Account dimension -->
    <pcm_dimname>Account</pcm_dimname>
    <!-- This section provides feasibility to map PCMCS members to EPCM default members -->
    <member_mapping>
    	<pcm_member></pcm_member>
        <epcm_member>All Accounts</epcm_member>
    </member_mapping>
</account_dimension>
| BksML30 Account dimension | Converted to Enterprise Profitability and Cost Management |
|---|---|
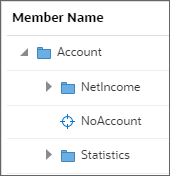 |
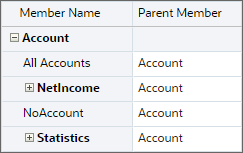 |
Entity Dimension
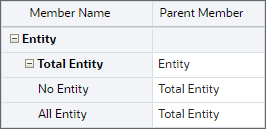
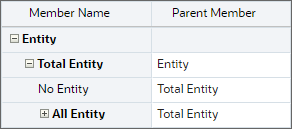
The Entity dimension in Enterprise Profitability and Cost Management includes three default members: Total Entity (Gen2 child under Entity), No Entity (Gen3 child under Total Entity), and All Entity (Gen3 child under Total Entity).
In this section, you include mappings for the dimension name and default members.
| Entity Dimension Section | Valid Values | Examples |
|---|---|---|
| pcm_dimname | Entity dimension name in Profitability and Cost Management (This can be any dimension you want to map to the default Entity dimension, for example, Departments or Cost Centers) |
<pcm_dimname>Departments</pcm_dimname>
|
| member_mapping | Optional mapping for default Entity members in Enterprise Profitability and Cost Management | <member_mapping> <pcm_member></pcm_member> <epcm_member>Total Entity</epcm_member> </member_mapping> <member_mapping> <pcm_member>No Department</pcm_member> <epcm_member>No Entity</epcm_member> </member_mapping> <member_mapping> <pcm_member>Total Departments</pcm_member> <epcm_member>All Entity</epcm_member> </member_mapping> |
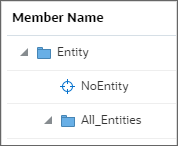
BksML30 includes a custom dimension named Entity. The dimension doesn't include a member that corresponds to the Total Entity member in Enterprise Profitability and Cost Management, but it does have members that map to No Entity and All Entity. Create these mappings for the BksML30 entity dimension:
<entity_dimension>
    <!-- Please input PCMCS(Source) dimension name which need to be mapped to EPCM(Destination) Entity dimension -->
    <pcm_dimname>Entity</pcm_dimname>
    <!-- This section provides feasibility to map PCMCS members to EPCM default members -->
    <member_mapping>
    	<pcm_member></pcm_member>
        <epcm_member>Total Entity</epcm_member>
    </member_mapping>
    <member_mapping>
    	<pcm_member>NoEntity</pcm_member>
        <epcm_member>No Entity</epcm_member>
    </member_mapping>
    <member_mapping>
    	<pcm_member>All_Entities</pcm_member>
        <epcm_member>All Entity</epcm_member>
    </member_mapping>
</entity_dimension>
| BksML30 Entity dimension | Converted to Enterprise Profitability and Cost Management |
|---|---|
 |
 |
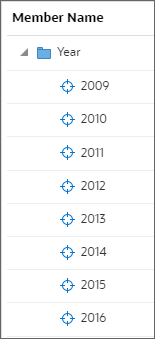
Years Dimension
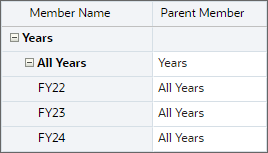
The Years dimension in Enterprise Profitability and Cost Management includes the default member All Years as the first Gen2 member under Years.
Numeric year members (for example, 2022) from Profitability and Cost Management are automatically converted to the format FY## in Enterprise Profitability and Cost Management (for example, FY22) and positioned as Gen3 children under All Years.
In this section, you include mappings for the dimension name and default member.
| Entity Dimension Section | Valid Values | Examples |
|---|---|---|
| pcm_dimname | Years dimension name in Profitability and Cost Management | <pcm_dimname>Year</pcm_dimname>
|
| member_mapping | Optional mapping for default Years member in Enterprise Profitability and Cost Management | <member_mapping> <pcm_member></pcm_member> <epcm_member>All Years</epcm_member> </member_mapping> |
BksML30 includes a POV dimension named Year. The dimension doesn't include a member that corresponds to the All Years member in Enterprise Profitability and Cost Management. Create these mappings for the BksML30 year dimension:
<year_dimension>
<!-- Please input PCMCS(Source) dimension name which need to be mapped to EPCM(Destination) Year dimension -->
<pcm_dimname>Year</pcm_dimname>
<!-- This section provides feasibility to map PCMCS members to EPCM default members -->
<member_mapping>
	<pcm_member></pcm_member>
	<epcm_member>All Years</epcm_member>
</member_mapping>
</year_dimension>
| BksML30 Year dimension | Converted to Enterprise Profitability and Cost Management |
|---|---|
 |
 |
Note:
The migration process includes all years for which you have data, plus two years on either side of the earliest and latest years you have data. For example, BksML30 has data only for 2016, so the migration creates years for FY14 through FY18.Period Dimension
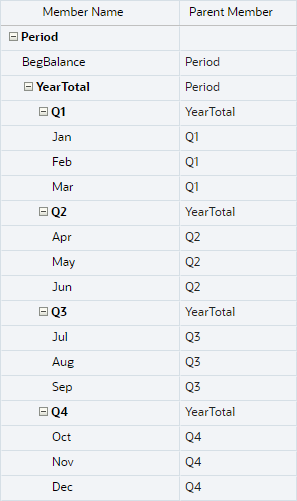
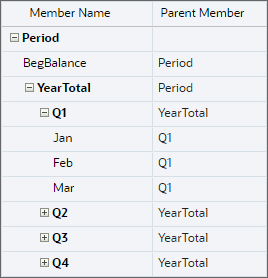
The Period dimension in Enterprise Profitability and Cost Management includes default members BegBalance and YearTotal (Gen2 children under Period). You can map these members to existing Profitability and Cost Management members.
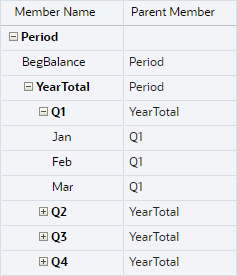
Additionally, the dimension is built with period members based on how you customize the period frequency and other period options:
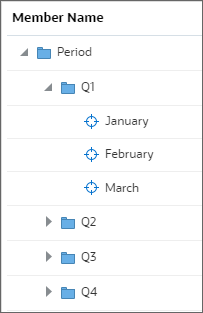
- Monthly frequency: Q1, Q2, Q3, Q4, Jan, Feb, Mar, Apr, May, Jun, Jul, Aug, Sep, Oct, Nov, Dec
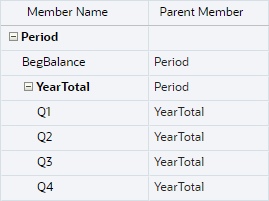
- Quarterly frequency: Q1, Q2, Q3, Q4
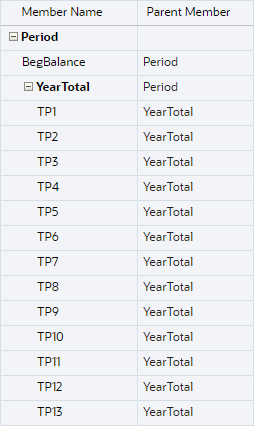
- Custom frequency: Specified number of periods with specified period prefix (for example, if 13 periods are specified with a period prefix of TP, default members TP1-TP13 are created)
| Period Dimension Section | Valid Values | Examples |
|---|---|---|
| pcm_dimname | Period dimension name in Profitability and Cost Management | <pcm_dimname>Periods</pcm_dimname> |
| frequency | MONTHLY, QUARTERLY, CUSTOM | <frequency>MONTHLY</frequency> |
| custom_period_prefix | Any prefix (valid for Custom frequency only) | <custom_period_prefix>TP</custom_period_prefix> |
| no_of_custom_periods | Any integer (valid for Custom frequency only) | <no_of_custom_periods>13</no_of_custom_periods> |
| fiscal_start_month | Jan, Feb, Mar, Apr, May, Jun, Jul, Aug, Sep, Oct, Nov, Dec (valid for Monthly frequency only) |
<fiscal_start_month>May</fiscal_start_month> |
| calendar_start_year | PreviousCalendarYear, SameCalendarYear (indicates how the Period dimension interacts with the Year dimension, valid for Monthly frequency only, not necessary for Fiscal Start Month of Jan) |
<calendar_start_year>PreviousCalendarYear</calendar_start_year> |
| member_mapping | Optional mapping for default Period members in Enterprise Profitability and Cost Management | <member_mapping> <pcm_member>Beginning Balance</pcm_member> <epcm_member>BegBalance</epcm_member> </member_mapping> <member_mapping> <pcm_member>YearTot</pcm_member> <epcm_member>YearTotal</epcm_member> </member_mapping> |
The following table shows examples of XML for the Period dimension and the Period dimension that is created for Enterprise Profitability and Cost Management during the migration process:
| Period dimension description and XML | Resulting Period dimension |
|---|---|
|
This creates a monthly period dimension with a fiscal start of June and calendar start of Previous Calendar Year (e.g., June of 2022 is the start of the FY23 fiscal calendar): <period_dimension> <pcm_dimname>Periods</pcm_dimname> <!-- choose between MONTHLY, QUARTERLY or CUSTOM --> <frequency>Monthly</frequency> <custom_period_prefix></custom_period_prefix> <no_of_custom_periods></no_of_custom_periods> <!-- choose any one among Jan-Dec --> <fiscal_start_month>Jun</fiscal_start_month> <!-- choose between PreviousCalendarYear or SameCalendarYear --> <calendar_start_year>PreviousCalendarYear</calendar_start_year> <member_mapping> <pcm_member>Beginning Balance</pcm_member> <epcm_member>BegBalance</epcm_member> </member_mapping> <member_mapping> <pcm_member>YearTot</pcm_member> <epcm_member>YearTotal</epcm_member> </member_mapping> </period_dimension> |
 |
|
This creates a monthly period dimension with a fiscal start of January, no calendar start year parameter is required: <period_dimension> <pcm_dimname>Periods</pcm_dimname> <!-- choose between MONTHLY, QUARTERLY or CUSTOM --> <frequency>Monthly</frequency> <custom_period_prefix></custom_period_prefix> <no_of_custom_periods></no_of_custom_periods> <!-- choose any one among Jan-Dec --> <fiscal_start_month>Jan</fiscal_start_month> <!-- choose between PreviousCalendarYear or SameCalendarYear --> <calendar_start_year></calendar_start_year> <member_mapping> <pcm_member></pcm_member> <epcm_member>BegBalance</epcm_member> </member_mapping> <member_mapping> <pcm_member></pcm_member> <epcm_member>YearTotal</epcm_member> </member_mapping> </period_dimension> |
 |
|
This creates a quarterly period dimension: <period_dimension> <pcm_dimname>Periods</pcm_dimname> <!-- choose between MONTHLY, QUARTERLY or CUSTOM --> <frequency>Quarterly</frequency> <custom_period_prefix></custom_period_prefix> <no_of_custom_periods></no_of_custom_periods> <!-- choose any one among Jan-Dec --> <fiscal_start_month></fiscal_start_month> <!-- choose between PreviousCalendarYear or SameCalendarYear --> <calendar_start_year></calendar_start_year> <member_mapping> <pcm_member></pcm_member> <epcm_member>BegBalance</epcm_member> </member_mapping> <member_mapping> <pcm_member></pcm_member> <epcm_member>YearTotal</epcm_member> </member_mapping> </period_dimension> |
 |
|
This creates a custom 13-period dimension, and prefixes each period with TP: <period_dimension> <pcm_dimname>Periods</pcm_dimname> <!-- choose between MONTHLY, QUARTERLY or CUSTOM --> <frequency>Custom</frequency> <custom_period_prefix>TP</custom_period_prefix> <no_of_custom_periods>13</no_of_custom_periods> <!-- choose any one among Jan-Dec --> <fiscal_start_month></fiscal_start_month> <!-- choose between PreviousCalendarYear or SameCalendarYear --> <calendar_start_year></calendar_start_year> <member_mapping> <pcm_member>Beginning Balance</pcm_member> <epcm_member>BegBalance</epcm_member> </member_mapping> <member_mapping> <pcm_member>YearTot</pcm_member> <epcm_member>YearTotal</epcm_member> </member_mapping> </period_dimension> |
 |
BksML30 includes a POV dimension named Period. It uses a monthly frequency and a fiscal year start of January. The dimension doesn't include members that correspond to the BegBalance and YearTotal members in Enterprise Profitability and Cost Management. Create these mappings for the BksML30 period dimension:
<period_dimension>
    <!-- Please input PCMCS(Source) dimension name which need to be mapped to EPCM(Destination) Period dimension -->
    <pcm_dimname>Period</pcm_dimname><frequency>MONTHLY</frequency>
    <custom_period_prefix></custom_period_prefix>
    <no_of_custom_periods></no_of_custom_periods>
    <!-- choose any one among Jan-Dec -->
    <fiscal_start_month>Jan</fiscal_start_month>
    <!-- choose between PreviousCalendarYear or SameCalendarYear -->
    <calendar_start_year></calendar_start_year>
    <!-- This section provides feasibility to map PCMCS members to EPCM default members -->
    <member_mapping>
    	<pcm_member></pcm_member>
    	<epcm_member>BegBalance</epcm_member>
   	</member_mapping>
    <member_mapping>
    	<pcm_member></pcm_member>
        <epcm_member>YearTotal</epcm_member>
	</member_mapping>
</period_dimension>
| BksML30 Period dimension | Converted to Enterprise Profitability and Cost Management |
|---|---|
 |
 |
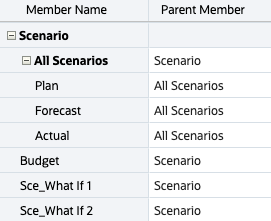
Scenario Dimension
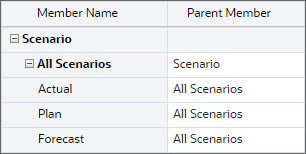
The Scenario dimension in Enterprise Profitability and Cost Management includes four default members: All Scenarios (Gen2 child under Scenario), and the members Actual, Plan, and Forecast as Gen3 children under All Scenarios.
In this section, you include mappings for the dimension name and default members.
| Scenario Dimension Section | Valid Values | Examples |
|---|---|---|
| pcm_dimname | Scenario dimension name in Profitability and Cost Management | <pcm_dimname>Scenario</pcm_dimname>
|
| member_mapping | Optional mapping for default Scenario members in Enterprise Profitability and Cost Management | <member_mapping> <pcm_member></pcm_member> <epcm_member>All Scenarios</epcm_member> </member_mapping> <member_mapping> <pcm_member>Plan1</pcm_member> <epcm_member>Plan</epcm_member> </member_mapping> <member_mapping> <pcm_member>Actual</pcm_member> <epcm_member>Actual</epcm_member> </member_mapping> <member_mapping> <pcm_member></pcm_member> <epcm_member>Forecast</epcm_member> </member_mapping> |
BksML30 includes a POV dimension named Scenario. The dimension doesn't include members that correspond to the All Scenarios, Plan, or Forecast members in Enterprise Profitability and Cost Management, but it does include a member that corresponds to Actual. Create these mappings for the BksML30 scenario dimension:
<scenario_dimension>
    <!-- Please input PCMCS(Source) dimension name which need to be mapped to EPCM(Destination) Scenario dimension -->
    <pcm_dimname>Scenario</pcm_dimname>
    <!-- This section provides feasibility to map PCMCS members to EPCM default members -->
    <member_mapping>
    	<pcm_member></pcm_member>
        <epcm_member>All Scenarios</epcm_member>
    </member_mapping>
        <member_mapping>
    	<pcm_member></pcm_member>
        <epcm_member>Plan</epcm_member>
    </member_mapping>
        <member_mapping>
    	<pcm_member>Actual</pcm_member>
        <epcm_member>Actual</epcm_member>
    </member_mapping>
        <member_mapping>
    	<pcm_member></pcm_member>
        <epcm_member>Forecast</epcm_member>
    </member_mapping>
</scenario_dimension>
| BksML30 Scenario dimension | Converted to Enterprise Profitability and Cost Management |
|---|---|
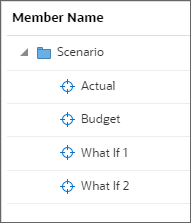 |
 |
Note:
The scenarios What If 1 and What If 2 conflict with default members of the Version dimension in Enterprise Profitability and Cost Management. The conversion in this case includes instructions from the Duplicate Member Prefixes section, covered later in this tutorial.Version Dimension
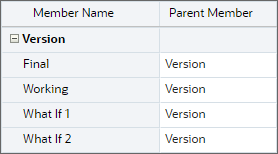
The Version dimension in Enterprise Profitability and Cost Management includes four default members at Gen2 under Version: Final, Working, What If 1, and What If 2.
In this section, you include mappings for the dimension name and default members.
| Version Dimension Section | Valid Values | Examples |
|---|---|---|
| pcm_dimname | Version dimension name in Profitability and Cost Management | <pcm_dimname>Draft</pcm_dimname>
|
| member_mapping | Optional mapping for default Version members in Enterprise Profitability and Cost Management | <member_mapping> <pcm_member></pcm_member> <epcm_member>Final</epcm_member> </member_mapping> <member_mapping> <pcm_member></pcm_member> <epcm_member>Working</epcm_member> </member_mapping> <member_mapping> <pcm_member></pcm_member> <epcm_member>What If 1</epcm_member> </member_mapping> <member_mapping> <pcm_member></pcm_member> <epcm_member>What If 2</epcm_member> </member_mapping> |
BksML30 does not include a dimension that corresponds to Version. In this case, leave the mappings blank and let the migration process create the default dimension in Enterprise Profitability and Cost Management. Create these mappings for the BksML30 version dimension:
<version_dimension>
<!-- Please input PCMCS(Source) dimension name which need to be mapped to EPCM(Destination) Version dimension -->
<pcm_dimname></pcm_dimname>
<!-- This section provides feasibility to map PCMCS members to EPCM default members -->
<member_mapping>
	<pcm_member></pcm_member>
	<epcm_member>Final</epcm_member>
</member_mapping>
<member_mapping>
	<pcm_member></pcm_member>
	<epcm_member>Working</epcm_member>
</member_mapping>
<member_mapping>
	<pcm_member></pcm_member>
	<epcm_member>What If 1</epcm_member>
</member_mapping>
<member_mapping>
	<pcm_member></pcm_member>
	<epcm_member>What If 2</epcm_member>
</member_mapping>
</version_dimension>
Currency Dimension
In Enterprise Profitability and Cost Management, multicurrency is an optional application-level setting that can only be selected when the application is created, either manually or during a migration. You cannot convert an existing single-currency Enterprise Profitability and Cost Management application to multicurrency.
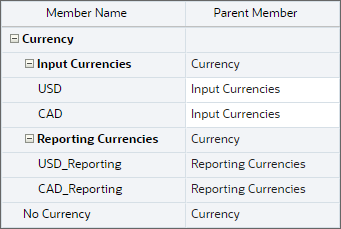
Multicurrency applications include the Currency dimension and three default members at Gen 2 under Currency: Input Currencies, Reporting Currencies, and No Currency. The dimension also includes a member under Input Currencies for each individual currency you set up, and at minimum the default currency name under Reporting Currencies. You can choose to include additional currencies under Reporting Currencies as well. For example, this multicurrency application with USD and CAD currencies includes the members USD and CAD under Input Currencies and USD_Reporting and CAD_Reporting under Reporting Currencies.
Note:
Currency members like USD, GPB, JPY and so on, do not require mapping if they match the standard currency members in Enterprise Profitability and Cost Management; members are added automatically under the Input Currencies member in Enterprise Profitability and Cost Management. You can manually flag currencies as reporting currencies in Enterprise Profitability and Cost Management after migration. Non-standard currency members in your source application must be mapped to the currency names you want to use in Enterprise Profitability and Cost Management.Unmapped non-standard currency members in your source application will cause validation errors when you validate your template.
In this section, you include mappings for the dimension name, default members, and individual currencies that don't map to standard currency members.
| Currency Dimension Section | Valid Values | Examples |
|---|---|---|
| pcm_dimname | Currency dimension name in Profitability and Cost Management | <pcm_dimname>Currencies</pcm_dimname>
|
| member_mapping | Optional mapping for default Currency members in Enterprise Profitability and Cost Management | <member_mapping> <pcm_member></pcm_member> <epcm_member>Input Currencies</epcm_member> </member_mapping> <member_mapping> <pcm_member></pcm_member> <epcm_member>Reporting Currencies</epcm_member> </member_mapping> <member_mapping> <pcm_member>None</pcm_member> <epcm_member>No Currency</epcm_member> <member_mapping> <pcm_member>AGR</pcm_member> <epcm_member>AGR</epcm_member> </member_mapping> |
Currency Dimension Use Cases
If your Profitability and Cost Management application has a currency dimension:
- Create a multicurrency application in Enterprise Profitability and Cost Management: Map your source dimension to the target Currency dimension, including any necessary member mappings. Currency members are added under Input Currencies. USD is automatically selected as the default application currency. You can flag additional currencies as reporting currencies after migrating.
- Create a single-currency application in Enterprise Profitability and Cost Management: Do not include mappings for your Currency dimension in the migration template. Your existing Currency dimension is added as a custom dimension in Enterprise Profitability and Cost Management and you will not have access to built-in tools like exchange rate templates and currency conversion rules.
If your Profitability and Cost Management application does not have a currency dimension:
- Create a single-currency application in Enterprise Profitability and Cost Management: Leave the mappings in this section blank.
- Create a multicurrency application in Enterprise Profitability and Cost Management: Add a mapping only for the Currency dimension name in this section:
<currency_dimension>
	<pcm_dimname>Currency</pcm_dimname>
	<member_mapping>
		<pcm_member></pcm_member>
		<epcm_member>Input Currencies</epcm_member>
	</member_mapping>
	<member_mapping>
		<pcm_member></pcm_member>
		<epcm_member>Reporting Currencies</epcm_member>
	</member_mapping>
	<member_mapping>
		<pcm_member>None</pcm_member>
		<epcm_member>No Currency</epcm_member>
	</member_mapping>
</currency_dimension>
The system will create the default Currency dimension in Enterprise Profitability and Cost Management, including all standard currency members. USD is automatically selected as the default application currency, and all data is assigned to the USD member during migration.WARNING:
This is an application redesign. You will need to manually update all rules in Enterprise Profitability and Cost Management to reference a member from the Currency dimension after migrating.
BksML30 does not include a currency dimension. In this case, leave the mappings blank and the migration process will create a single-currency application in Enterprise Profitability and Cost Management:
<currency_dimension>
    <!-- Please input PCMCS(Source) dimension name which need to be mapped to EPCM(Destination) Version dimension -->
    <pcm_dimname></pcm_dimname>
    <!-- This section provides feasibility to map PCMCS members to EPCM default members -->
    <member_mapping>
    	<pcm_member></pcm_member>
        <epcm_member>Input Currencies</epcm_member>
    </member_mapping>
        <member_mapping>
    	<pcm_member></pcm_member>
        <epcm_member>Reporting Currencies</epcm_member>
    </member_mapping>
        <member_mapping>
    	<pcm_member></pcm_member>
        <epcm_member>No Currency</epcm_member>
</currency_dimension>
All Dimension Mappings for BksML30
<dimensions>
	<account_dimension>
		<!-- Please input PCMCS(Source) dimension name which need to be mapped to EPCM(Destination) Account dimension -->
		<pcm_dimname>Account</pcm_dimname>
		<!-- This section provides feasibility to map PCMCS members to EPCM default members -->
		<member_mapping>
			<pcm_member></pcm_member>
			<epcm_member>All Accounts</epcm_member>
		</member_mapping>
	</account_dimension>
	<entity_dimension>
		<!-- Please input PCMCS(Source) dimension name which need to be mapped to EPCM(Destination) Entity dimension -->
		<pcm_dimname>Entity</pcm_dimname>
		<!-- This section provides feasibility to map PCMCS members to EPCM default members -->
		<member_mapping>
			<pcm_member></pcm_member>
			<epcm_member>Total Entity</epcm_member>
		</member_mapping>
		<member_mapping>
			<pcm_member>NoEntity</pcm_member>
			<epcm_member>No Entity</epcm_member>
		</member_mapping>
		<member_mapping>
			<pcm_member>All_Entities</pcm_member>
			<epcm_member>All Entity</epcm_member>
		</member_mapping>
	</entity_dimension>
	<year_dimension>
		<!-- Please input PCMCS(Source) dimension name which need to be mapped to EPCM(Destination) Year dimension -->
		<pcm_dimname>Year</pcm_dimname>
		<!-- This section provides feasibility to map PCMCS members to EPCM default members -->
		<member_mapping>
			<pcm_member></pcm_member>
			<epcm_member>All Years</epcm_member>
		</member_mapping>
	</year_dimension>
	<period_dimension>
		<!-- Please input PCMCS(Source) dimension name which need to be mapped to EPCM(Destination) Period dimension -->
		<pcm_dimname>Period</pcm_dimname>
		<!-- choose between MONTHLY, QUARTERLY or CUSTOM -->
		<frequency>MONTHLY</frequency>
		<custom_period_prefix></custom_period_prefix>
		<no_of_custom_periods></no_of_custom_periods>
		<!-- choose any one among Jan-Dec -->
		<fiscal_start_month>Jan</fiscal_start_month>
		<!-- choose between PreviousCalendarYear or SameCalendarYear -->
		<calendar_start_year></calendar_start_year>
		<!-- This section provides feasibility to map PCMCS members to EPCM default members -->
		<member_mapping>
			<pcm_member></pcm_member>
			<epcm_member>BegBalance</epcm_member>
		</member_mapping>
		<member_mapping>
			<pcm_member></pcm_member>
			<epcm_member>YearTotal</epcm_member>
		</member_mapping>
	</period_dimension>
	<scenario_dimension>
		<!-- Please input PCMCS(Source) dimension name which need to be mapped to EPCM(Destination) Scenario dimension -->
		<pcm_dimname>Scenario</pcm_dimname>
		<!-- This section provides feasibility to map PCMCS members to EPCM default members -->
		<member_mapping>
			<pcm_member></pcm_member>
			<epcm_member>All Scenarios</epcm_member>
		</member_mapping>
		<member_mapping>
			<pcm_member></pcm_member>
			<epcm_member>Plan</epcm_member>
		</member_mapping>
		<member_mapping>
			<pcm_member>Actual</pcm_member>
			<epcm_member>Actual</epcm_member>
		</member_mapping>
		<member_mapping>
			<pcm_member></pcm_member>
			<epcm_member>Forecast</epcm_member>
		</member_mapping>
	</scenario_dimension>
	<version_dimension>
		<!-- Please input PCMCS(Source) dimension name which need to be mapped to EPCM(Destination) Version dimension -->
		<pcm_dimname></pcm_dimname>
		<!-- This section provides feasibility to map PCMCS members to EPCM default members -->
		<member_mapping>
			<pcm_member></pcm_member>
			<epcm_member>Final</epcm_member>
		</member_mapping>
		<member_mapping>
			<pcm_member></pcm_member>
			<epcm_member>Working</epcm_member>
		</member_mapping>
		<member_mapping>
			<pcm_member></pcm_member>
			<epcm_member>What If 1</epcm_member>
		</member_mapping>
		<member_mapping>
			<pcm_member></pcm_member>
			<epcm_member>What If 2</epcm_member>
		</member_mapping>
	</version_dimension>
	<currency_dimension>
		<!-- Please input PCMCS(Source) dimension name which need to be mapped to EPCM(Destination) Currency dimension -->
		<pcm_dimname></pcm_dimname>
		<!-- This section provides feasibility to map PCMCS members to EPCM default members -->
		<member_mapping>
			<pcm_member></pcm_member>
			<epcm_member>Input Currencies</epcm_member>
		</member_mapping>
		<member_mapping>
			<pcm_member></pcm_member>
			<epcm_member>Reporting Currencies</epcm_member>
		</member_mapping>
		<member_mapping>
			<pcm_member></pcm_member>
			<epcm_member>No Currency</epcm_member>
		</member_mapping>
	</currency_dimension>
</dimensions>
Note:
Notice that because BksML30 does not include Version or Currency dimensions, theversion_dimension and currency_dimension mappings are left blank.
Duplicate Member Prefixes Section
Enterprise Profitability and Cost Management does not support duplicate member names. If your Profitability and Cost Management application includes duplicate members, the migration uses the prefixes specified for the dimensions in this section to rename them. If your current application does not include duplicate members, you can leave this section blank.
WARNING:
Default members from added dimensions may conflict with member names in existing dimensions, creating a duplicate member error even if you don't use duplicate members in your existing application. In these cases, you can either add a duplicate member prefix for the dimension or rename members in the<rename_member_mapping> section. The duplicate member prefixes section also includes the <prefix_all> tag, with options of Yes and No. If this tag is marked Yes for the dimension, all members of the dimension will be prefixed, not just the duplicate members. The default is No.| Required Dimensions plus Currency | Default Members Added |
|---|---|
| Years | All Years, Year members in the format FY## (for example, FY22) |
| Period |
|
| Scenario | All Scenarios, Actual, Plan, Forecast |
| Version | Final, Working, What If 1, What If 2 |
| Account | All Accounts |
| Entity | Total Entity, No Entity, All Entity |
| Currency | Input Currencies, Reporting Currencies, No Currency |
BksML30 includes the Scenario members What If 1 and What If 2. These are also default member names in the Version dimension in Enterprise Profitability and Cost Management. When the migration creates a Version dimension for the new application, there is a conflict with the Scenario members from the existing application unless you specify a prefix for the Scenario members. Complete this sections for BksML30:
<duplicatememberprefixes>
	<dimension>
		<name>Scenario</name>
		<duplicateprefix>Sce_</duplicateprefix>
		<prefix_all>NO</prefix_all>
	</dimension>
</duplicatememberprefixes>
If you're customizing the template for your own application, include additional <dimension> tag sections inside the <duplicatememberprefixes> tag for each dimension that contains duplicate member names in your current application. In the following example, duplicate Scenario members will be prefixed with Sce_ and all Entity members will be prefixed with Ent_:
<duplicatememberprefixes>
	<dimension>
		<name>Scenario</name>
		<duplicateprefix>Sce_</duplicateprefix>
		<prefix_all>NO</prefix_all>
	</dimension>
	<dimension>
		<name>Entity</name>
		<duplicateprefix>Ent_</duplicateprefix>
		<prefix_all>YES</prefix_all>
	</dimension>
</duplicatememberprefixes>
Rename Dimensions and Members
There are a few reasons you might want to rename dimensions or members in Enterprise Profitability and Cost Management:
- A member or dimension name matches a default member or dimension name in Enterprise Profitability and Cost Management, but you don't want to map it to the default member.
- You want to use a different name for a dimension or member in Enterprise Profitability and Cost Management than you did in Profitability and Cost Management.
- You have dimension or member names in Profitability and Cost Management that don't conform to the naming restrictions for dimensions, members, and aliases in Enterprise Profitability and Cost Management.
WARNING:
If your existing dimension and member names do not conform to naming conventions in Enterprise Profitability and Cost Management, the template validation process, described in Validating the Migration Template, does not identify these invalid names. Errors due to naming conventions may appear at two different points during your migration:- When the application export is imported to Enterprise Profitability and Cost Management, either as part of the migration process or manually
- After the application is created, when you perform a database refresh
Rename Dimension Mapping Section
In this section, you can optionally rename dimensions.
| Example | Example Code |
|---|---|
| You have a dimension named Entity that you don't want to map to the default Entity dimension in Enterprise Profitability and Cost Management. |
<rename_dimension_mapping> <artifact_name> <pcm_name>Entity</pcm_name> <epcm_name>LegalEntities</epcm_name> </artifact_name> </rename_dimension_mapping> |
| You have a dimension named Cost Centers that you want to rename Departments in Enterprise Profitability and Cost Management. |
<rename_dimension_mapping> <artifact_name> <pcm_name>Cost Centers</pcm_name> <epcm_name>Departments</epcm_name> </artifact_name> </rename_dimension_mapping> |
| You have a dimension named Data Type, which is a reserved name in Enterprise Profitability and Cost Management. |
<rename_dimension_mapping> <artifact_name> <pcm_name>Data Type</pcm_name> <epcm_name>DataType</epcm_name> </artifact_name> </rename_dimension_mapping> |
| You have all three of the preceding conditions. |
<rename_dimension_mapping> <artifact_name> <pcm_name>Entity</pcm_name> <epcm_name>LegalEntities</epcm_name> </artifact_name> <artifact_name> <pcm_name>Cost Centers</pcm_name> <epcm_name>Departments</epcm_name> </artifact_name> <artifact_name> <pcm_name>Data Type</pcm_name> <epcm_name>DataType</epcm_name> </artifact_name> </rename_dimension_mapping> |
Rename Member Mapping Section
In this section, you can optionally rename members.
| Example | Example Code |
|---|---|
| You have a Scenario member named Actual that you don't want to map to the default Actual scenario in Enterprise Profitability and Cost Management. |
<rename_member_mapping> <artifact_name> <pcm_name>Actual</pcm_name> <epcm_name>ActualScenario</epcm_name> </artifact_name> </rename_member_mapping> |
| You have an Account member named Margin Percent that you want to rename GM% in Enterprise Profitability and Cost Management. |
<rename_member_mapping> <artifact_name> <pcm_name>Margin Percent</pcm_name> <epcm_name>GM%</epcm_name> </artifact_name> </rename_member_mapping> |
| You have a Geography member named LOCAL, which is a reserved name in Enterprise Profitability and Cost Management. |
<rename_member_mapping> <artifact_name> <pcm_name>LOCAL</pcm_name> <epcm_name>LocalGeo</epcm_name> </artifact_name> </rename_member_mapping> |
| You have all three of the preceding conditions. |
<rename_member_mapping> <artifact_name> <pcm_name>Actual</pcm_name> <epcm_name>ActualScenario</epcm_name> </artifact_name> <artifact_name> <pcm_name>Margin Percent</pcm_name> <epcm_name>GM%</epcm_name> </artifact_name> <artifact_name> <pcm_name>LOCAL</pcm_name> <epcm_name>LocalGeo</epcm_name> </artifact_name> </rename_dimension_mapping> |
Renaming Dimensions and Members for BksML30
BksML30 has an attribute dimension, Region, with a member Direct. Direct is a reserved name in Enterprise Profitability and Cost Management, which you can map to a new name in the migration template. Complete these sections for BksML30:
<rename_dimension_mapping>
	<artifact_name>
		<pcm_name></pcm_name>
		<epcm_name></epcm_name>
	</artifact_name>
</rename_dimension_mapping>

<rename_member_mapping>
	<artifact_name>
		<pcm_name>Direct</pcm_name>
		<epcm_name>Direct Sales</epcm_name>
	</artifact_name>
</rename_member_mapping>
Note:
When you run the migration, dimensions and members in these sections are renamed in the application snapshot (in both the dimensions and rules) and in the exported data file.Model POVs Section
In this section, you map rules stored in Profitability and Cost Management POVs to models in Enterprise Profitability and Cost Management. Include a set of <pov> tags in this section for each unique set of POV-specific rules in your current application.
Tip:
If you have copied the same set of rules to multiple POVs in your current application, you don't need to create multiple models in Enterprise Profitability and Cost Management to manage them—rules stored in a single model can be run against multiple POVs.Because each model in Enterprise Profitability and Cost Management is meant to store a unique set of rules, you may end up with significantly fewer models in Enterprise Profitability and Cost Management than you have sets of POV-specific rules in Profitability and Cost Management. For example, you may have one model for calculating Actual data, another model for calculating Plan data, and a third for calculating What If scenarios.
In BksML30, the rules for calculating Actual data are stored under the 2016, January, Actual POV and the rules for calculating What If scenarios are stored under the 2016, June, What If 1 and 2016, June, What If 2 POVs. Complete this section for BksML30:
<modelpovs>
	<pov>
    	<pcmpov>2016,January,Actual</pcmpov>
        <epcmmodelname>10 Actual Model</epcmmodelname>
	</pov>
    <pov>
    	<pcmpov>2016,June,What If 1</pcmpov>
        <epcmmodelname>80 What If Best Case Model</epcmmodelname>
	</pov>
    <pov>
    	<pcmpov>2016,June,What If 2</pcmpov>
        <epcmmmodelname>90 What If Worst Case Model</epcmmodelname>
	</pov>
</modelpovs>
Tip:
When validating the template, the system checks that the unique POV combination exists in the Profitability and Cost Management source application; a specific dimension order is not required for the<pcmpov> input. Data POVs Section
In this section, you list the source and destination POVs for the data you want to migrate to your new application. During the migration process, this section generates a separate TXT file of converted data values that can be loaded into your new application. Include a <pov> section for each POV of data that you want to migrate to Enterprise Profitability and Cost Management.
Tip:
You don't have to migrate all of your existing data POVs; you can choose a limited set of data to migrate (for example, just Actual data for the current year).In both the <srcpov> and <destpov> sections, dimensions must be listed in this order: Years, Period, Scenario, Version. If your source POV does not include one or more of the destination POV dimensions, include a comma separator for the missing dimensions. For example, if your source POV does not include Scenario or Version, the input is <srcpov>Years,Period,,</srcpov>.
Additionally, if your source POV is missing one or more dimensions, you must still select a member for the missing dimension in your destination POV. For example, because BksML30 doesn't include a Version dimension, you must map the source POV data to a default version member in Enterprise Profitability and Cost Management:
<srcpov>2016,January,Actual,</scrpov>
<destpov>FY16,Jan,Actual,Working</destpov>
For each POV you migrate, you can also set the <include_calculated_data> flag to Yes if you want to migrate both input and calculated data. The default setting is No.
Note:
You can leave the<datapovs> section blank if you want to migrate data later or import it to Enterprise Profitability and Cost Management using a different method.
To migrate all input data for the 2016 Actual POVs and June 2016 What If POVs, complete this section for BksML30:
	<datapovs>
		<pov>
        	<srcpov>2016,January,Actual,</srcpov>
           <destpov>FY16,Jan,Actual,Working</destpov>
			<include_calculated_data>No</include_calculated_data>
		</pov>
		<pov>
        	<srcpov>2016,February,Actual,</srcpov>
            <destpov>FY16,Feb,Actual,Working</destpov>
			<include_calculated_data>No</include_calculated_data>
		</pov>
		<pov>
			<srcpov>2016,March,Actual,</srcpov>
            <destpov>FY16,Mar,Actual,Working</destpov>
			<include_calculated_data>No</include_calculated_data>
		</pov>
		<pov>
			<srcpov>2016,April,Actual,</srcpov>
            <destpov>FY16,Apr,Actual,Working</destpov>
			<include_calculated_data>No</include_calculated_data>
		</pov>
		<pov>
			<srcpov>2016,May,Actual,</srcpov>
			<destpov>FY16,May,Actual,Working</destpov>
			<include_calculated_data>No</include_calculated_data>
		</pov>
		<pov>
			<srcpov>2016,June,Actual,</srcpov>
			<destpov>FY16,Jun,Actual,Working</destpov>
			<include_calculated_data>No</include_calculated_data>
		</pov>
		<pov>
			<srcpov>2016,July,Actual,</srcpov>
			<destpov>FY16,Jul,Actual,Working</destpov>
			<include_calculated_data>No</include_calculated_data>
		</pov>
		<pov>
			<srcpov>2016,August,Actual,</srcpov>
			<destpov>FY16,Aug,Actual,Working</destpov>
			<include_calculated_data>No</include_calculated_data>
		</pov>
		<pov>
			<srcpov>2016,September,Actual,</srcpov>
			<destpov>FY16,Sep,Actual,Working</destpov>
			<include_calculated_data>No</include_calculated_data>
		</pov>
		<pov>
			<srcpov>2016,October,Actual,</srcpov>
			<destpov>FY16,Oct,Actual,Working</destpov>
			<include_calculated_data>No</include_calculated_data>
		</pov>
		<pov>
			<srcpov>2016,November,Actual,</srcpov>
			<destpov>FY16,Nov,Actual,Working</destpov>
			<include_calculated_data>No</include_calculated_data>
		</pov>
		<pov>
			<srcpov>2016,December,Actual,</srcpov>
			<destpov>FY16,Dec,Actual,Working</destpov>
			<include_calculated_data>No</include_calculated_data>
		</pov>
		<pov>
			<srcpov>2016,June,What If 1,</srcpov>
			<destpov>FY16,Jun,What If 1,Working</destpov>
			<include_calculated_data>No</include_calculated_data>
		</pov>
		<pov>
			<srcpov>2016,June,What If 2,</srcpov>
			<destpov>FY16,Jun,What If 2,Working</destpov>
			<include_calculated_data>No</include_calculated_data>
		</pov>
	</datapovs>
Saving the Template
Save the completed template to your file system.
Task 4: Uploading the Migration Template
In this step, you upload the completed migration template to your Profitability and Cost Management inbox.
- Log in as a Service Administrator to your Profitability and Cost Management instance.
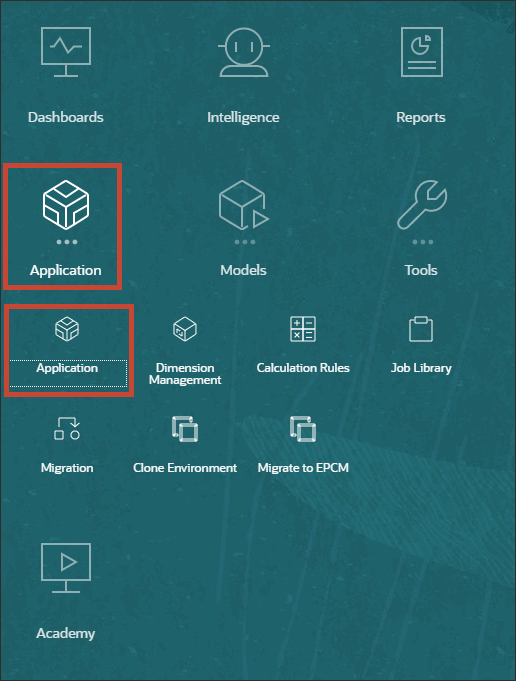
- Click Application to expand the cluster, then click the Application icon in the cluster.
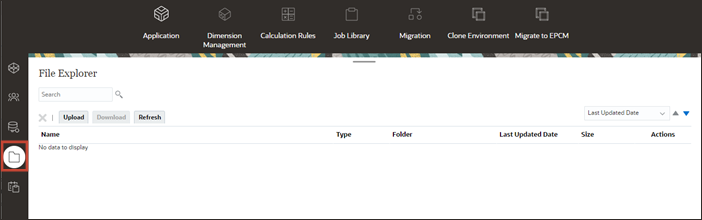
- Select the File Explorer vertical tab.
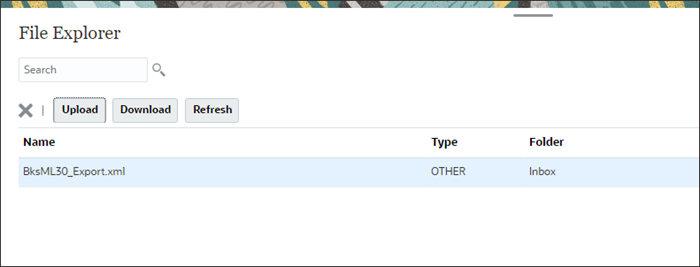
- Click Upload.
- For File Name, browse to select the completed migration template file from your file system.
- For Folder Location, select Inbox.
- Click OK to upload the file.
Tip:
You can also use theuploadFile command in EPM Automate to upload the template to the inbox: epmautomate uploadFile "FILE_NAME" profitinboxFILE_NAME is the name of the file, including absolute path if the file is not in the directory from which you are running EPM Automate.
Remember that the file name for the template must use the format <sourceappname>_Export.xml. Task 5: Migrating to Enterprise Profitability and Cost Management
Opening the Migration Screen
In the top row of icons, select Migrate to EPCM.
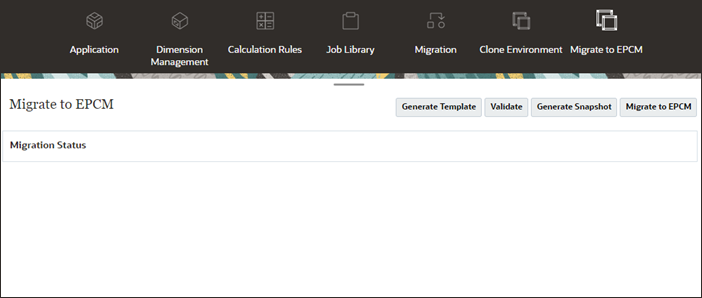
In addition to the Generate Template button, the Migrate to EPCM screen includes buttons for three migration-related actions:
| Action | Result |
|---|---|
| Validate |
|
| Generate Snapshot |
|
| Migrate to EPCM |
|
Validating the Migration Template
You can validate your migration template as a standalone step. Although the other migration actions also validate your template before completing their other tasks, it's a best practice to do this standalone validation first.
- Click Validate.
- Wait for the system to process your template. When complete, in the Migration Status section, you'll see a message of either "Success" or "Failed" for Validate Input.
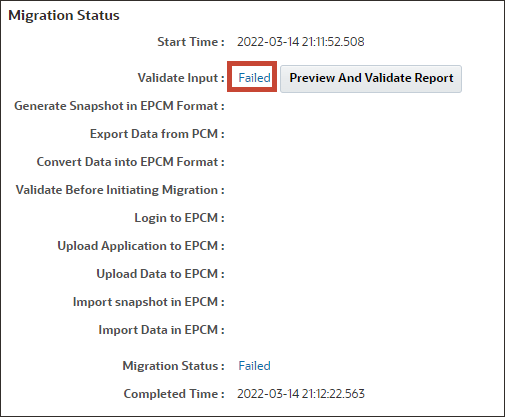
- If you receive a Success message, skip ahead to the next section. If you receive a Failed message, continue with the next steps.
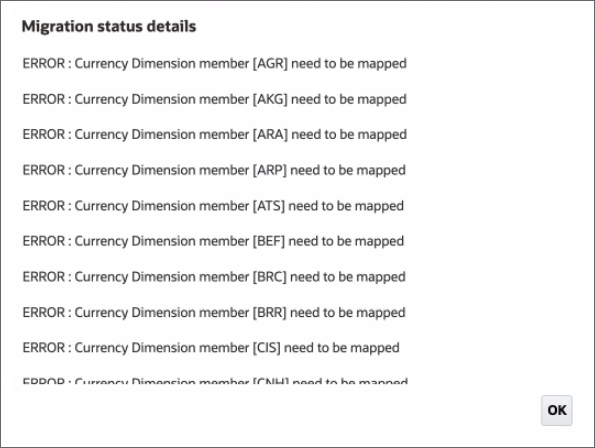
- Click the Failed link to see more information about the error. In this example, the validation failed because the format of a period member is incorrect:
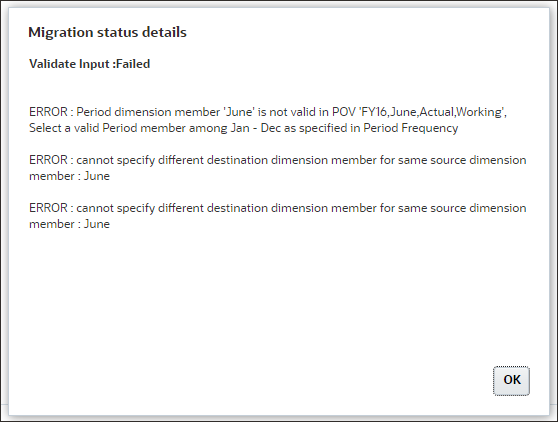
Text of the failure message - Click OK to close the message box.
- If necessary, update your template to correct any errors, then upload it to your inbox again, overwriting the old version.
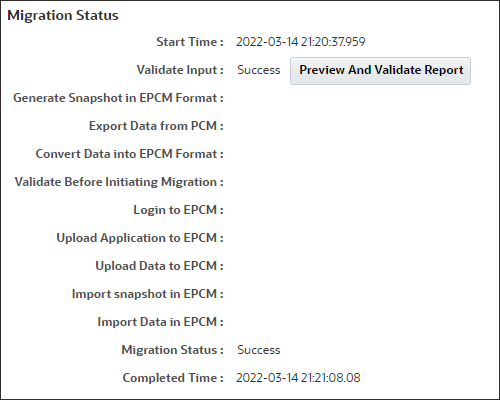
- Run the validation again. Repeat this process until you receive a "Success" message for Validate Input.
Here are some common failure messages for template validation:
Error: Period dimension member XXXX is not valid in POV 'Year,Month,Scenario,Version', Select a valid Period member among Jan - Dec as specified in Period Frequency: The period in the<destpov>section does not use the correct format.Error: Year uses the incorrect format [Jan] where [FYXX] is expected]: Dimensions in either the<srcpov>or<destpov>input are not in the correct order.Error: dimension member XXXX is duplicate after migrating to EPCM format, should add a prefix for dimensions [Dimension Name]: The member name is reserved in Enterprise Profitability and Cost Management. You can either add a duplicate member prefix to the dimension or map the member to a new name.Error: dimension member XXXX is duplicate, should add a prefix for dimensions [Dimension Name 1, Dimensions Name 2, ..., Dimension Name N]: The member exists in two or more dimensions. You can either add duplicate member prefixs to all but one of the conflicting dimensions, or map the duplicate member to a new name.
Viewing the Preview and Validate Report
The Preview and Validate report lists the changes that will be made to your Profitability and Cost Management application during the migration process, based on the entries in your migration template.
- Click Preview And Validate Report.
- Save the report to your local drive.
- Browse to your save location and open
Preview_and_Validation_Report.txtin a text editor. This is the Preview and Validation Report for BksML30:Duplicate dimension members between PCMCS and EPCMCS ---------------------------------------------------- EPCM default member [Scenario].[All Scenarios].[Actual] has collision with PCM [Scenario].[Actual] EPCM default member [Version].[What If 1] has collision with PCM [Scenario].[What If 1] EPCM default member [Version].[What If 2] has collision with PCM [Scenario].[What If 2] Duplicate dimension member prefix mappings ------------------------------------------ Scenario: Sce_ Renamed dimensions ------------------ YEAR -> Years RULE -> PCM_Rule BALANCE -> PCM_Balance Renamed members --------------- Balance: [Adjustment In] -> PCM_Adjustment In Balance: [Adjustment Out] -> PCM_Adjustment Out Balance: [Allocation In] -> PCM_Allocation In Balance: [Allocation Offset Amount] -> PCM_Allocation Offset Amount Balance: [Allocation Out] -> PCM_Allocation Out Balance: [CalculatedDriverValue] -> PCM_CalculatedDriverValue Balance: [Input] -> PCM_Input Balance: [Net Balance] -> PCM_Net Balance Balance: [Net Change] -> PCM_Net Change Balance: [OutFlow] -> PCM_OutFlow Balance: [Remainder] -> PCM_Remainder Balance: [ScratchAllocation In] -> PCM_ScratchAllocation In Balance: [ScratchAllocation Out] -> PCM_ScratchAllocation Out Balance: [System] -> PCM_System Entity: [All_Entities] -> All Entity Entity: [NoEntity] -> No Entity Region: [Direct] -> Direct Sales Rule: [Calculation Rules] -> PCM_Calculation Rules Rule: [NoRule] -> PCM_NoRule Scenario: [What If 1] -> Sce_What If 1 Scenario: [What If 2] -> Sce_What If 2 Migrating Essbase data for following POV groups ----------------------------------------------- [Year].[2016],[Period].[Q2].[June],[Scenario].[What If 1] [Year].[2016],[Period].[Q2].[June],[Scenario].[What If 2] [Year].[2016],[Period].[Q3].[August],[Scenario].[Actual] [Year].[2016],[Period].[Q2].[May],[Scenario].[Actual] [Year].[2016],[Period].[Q1].[January],[Scenario].[Actual] [Year].[2016],[Period].[Q2].[April],[Scenario].[Actual] [Year].[2016],[Period].[Q3].[July],[Scenario].[Actual] [Year].[2016],[Period].[Q1].[March],[Scenario].[Actual] [Year].[2016],[Period].[Q4].[December],[Scenario].[Actual] [Year].[2016],[Period].[Q4].[October],[Scenario].[Actual] [Year].[2016],[Period].[Q3].[September],[Scenario].[Actual] [Year].[2016],[Period].[Q2].[June],[Scenario].[Actual] [Year].[2016],[Period].[Q4].[November],[Scenario].[Actual] [Year].[2016],[Period].[Q1].[February],[Scenario].[Actual] Rule details of Model - 2016,June,What If 1 ------------------------------------------- Total RuleSet - 7 Total Rules - 21 Rule details of Model - 2016,June,What If 2 ------------------------------------------- Total RuleSet - 7 Total Rules - 21 Rule details of Model - 2016,January,Actual ------------------------------------------- Total RuleSet - 7 Total Rules - 21 Modified Custom Calculation Formulas ------------------------------------ Model Name - 80 What If Best Case Model ----------------------------------------- Utilities Expense Adjustment: [Adjustment In]:= ([Input],[Rule]) * .15; -> [PCM_Adjustment In]:= ([PCM_Input],[PCM_Rule]) * .15; Model Name - 90 What If Worst Case Model ------------------------------------------ Utilities Expense Adjustment: [Adjustment In]:= ([Input],[Rule]) * .25; -> [PCM_Adjustment In]:= ([PCM_Input],[PCM_Rule]) * .25; Model Name - 10 Actual Model ------------------------------ Utilities Expense Adjustment: [Adjustment In]:= ([Input],[Rule]) * .15; -> [PCM_Adjustment In]:= ([PCM_Input],[PCM_Rule]) * .15;
Generating an Application Snapshot and Data Extract
You can use the Generate Snapshot option to generate your application snapshot and data extract. These files are saved to your application outbox. You can then download them to your file system and upload them to an Enterprise Profitability and Cost Management instance later.
Tip:
If the full migration process as described in Performing a Full Migration fails with connection errors or for other reasons, you can use this method to copy the generated application snapshot and data export files to your Enterprise Profitability and Cost Management instance as a workaround.- Click Generate Snapshot.
- Wait for the system to validate your template and generate files in your inbox. When the process is complete, you'll see "Success" or "Failed" status messages for Validate Input, Generate Snapshot in EPCM Format, Export Data from PCM, and Convert Data into EPCM Format.

- As with the validation process, a Failed status message gives you a link that provides more information about the error. If necessary, troubleshoot any errors and then try generating the snapshot again.
- To view the files that were generated in your inbox, click Application, then select the File Explorer vertical tab.
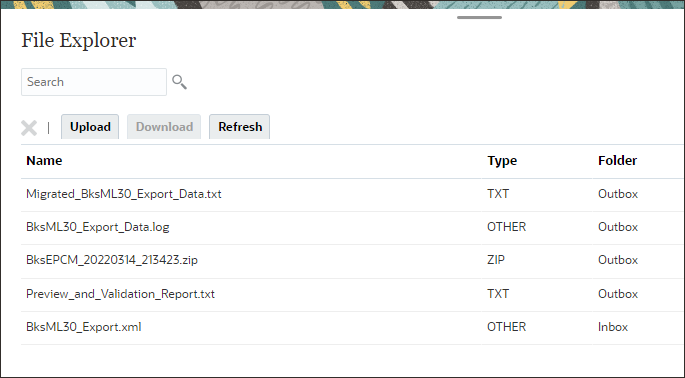
- In addition to your migration template and the Preview and Validation report, three files have been added to the outbox:
Migrated_<ApplicationName>_Export_Data.txt: Data converted from the specified Profitability and Cost Management POVs to the new Enterprise Profitability and Cost Management application structure (The data is exported in Essbase format, and you can manually load it to your new application using the Import Data action on the Application Overview page.)<ApplicationName>_<ExportDate>_<ExportTime>.zip: An Enterprise Profitability and Cost Management application snapshot, migrated from your Profitability and Cost Management application<ApplicationName>_Export_Data.log: A log file detailing the migration process (This log file can help you troubleshoot errors.)
- Optional: Download the application snapshot and data export files to your local drive. You can upload the application snapshot to an Enterprise Profitability and Cost Management instance and import it using the Migrate option on the landing page. After the application is imported, you can import the data export file from the Actions menu in the Application Overview screen.
Performing a Full Migration
Use this option to connect directly to an Enterprise Profitability and Cost Management instance. After generating the application snapshot and data extract, the process continues and uploads the application and data to your specified instance.
Note:
If you choose not to download your application snapshot and data export to manually upload to Enterprise Profitability and Cost Management, this step will do it for you.- Click Migrate to EPCM to return to the migration screen.
- Click the Migrate to EPCM button.
- In the Migration Status Details dialog, enter the target URL and the Service Administrator username and password for your Enterprise Profitability and Cost Management instance.
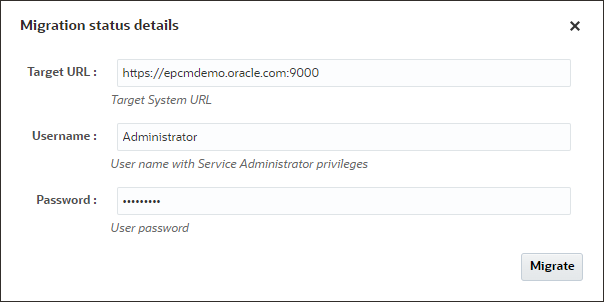
Note:
These details vary based on your instance and should not match the screenshot. - Click Migrate to start the migration process. During this process, the system does the following:
- Validates the migration template
- Generates a new application snapshot and stores it in your application outbox (this does not overwrite existing application snapshots in your outbox)
- Generates a data export file and stores it in your application outbox (this overwrites existing data exports in your outbox)
- Connects to your Enterprise Profitability and Cost Management instance and uploads the most recent application snapshot and data export
- Imports the application snapshot to your Enterprise Profitability and Cost Management instance
- Imports the data to your Enterprise Profitability and Cost Management instance
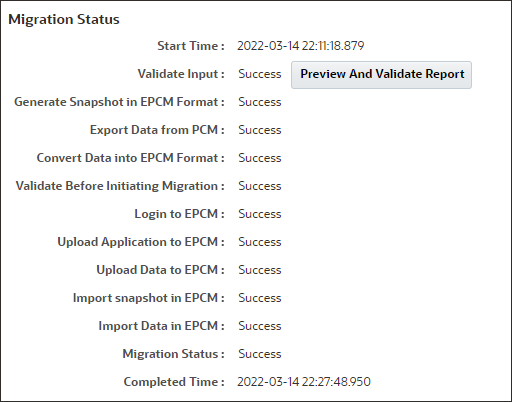
- In the Migration Status section, you can see Success or Failed messages for each of these steps. If any steps failed, click the message link for more details and to start troubleshooting.
WARNING:
If a different application exists on your destination instance or if you are performing a second migration of the same application to fix errors in an earlier migration, you should first remove migrated data files and the existing application as described in Repeating the Migration.Repeating the Migration
If your migration completes partially or completes with errors, you may need to modify your template and try again. However, if an earlier migration created an application in Enterprise Profitability and Cost Management, you should clean up your Enterprise Profitability and Cost Management instance by removing migrated data files and then removing the application before migrating again.
Cleaning Up your Enterprise Profitability and Cost Management Instance
- Sign in to your Enterprise Profitability and Cost Management instance as a Service Administrator.
- Click Application, then click Overview.
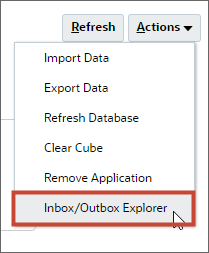
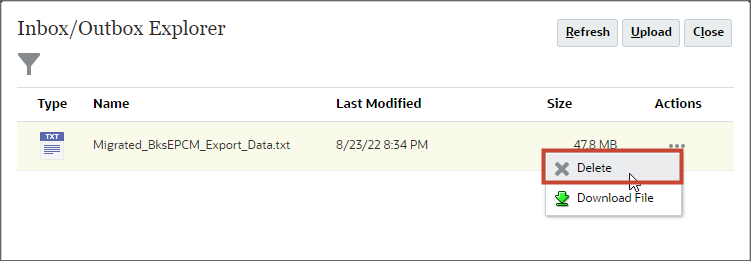
- Click Actions, then select Inbox/Outbox Explorer.
If an earlier migration uploaded a data file to Enterprise Profitability and Cost Management, it is listed in the Inbox/Outbox Explorer asMigrated_<AppName>_Export_Data.txt. If no data file is listed, continue to Step 6 to remove the application.. - Select the migrated data file. Click in the Actions column, then select Delete.
- At the confirmation message, click Yes.
Note:
If you don't remove the migrated data file before removing the application, then the next time you migrate from Profitability and Cost Management the step for uploading migrated data to Enterprise Profitability and Cost Management will fail. - Click Close to return to the Application Overview page.
- Click Actions, then select Remove Application.
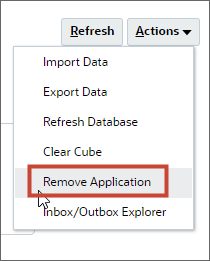
Note:
This option is only available if you're signed in as a Service Administrator. - At the confirmation message, click Yes.
Making Changes and Migrating Again
- Edit your migration template as needed and save the changes.
- Sign in to your Profitability and Cost Management instance as a Service Administrator.
- Use the File Explorer screen to upload your updated migration template to the application inbox. When prompted, select to overwrite the existing file.
- Navigate to the Migrate to EPCM page and repeat your migration tasks.
Tip:
Validate your migration template again before performing a full migration.
Task 6: Validating Migration Results
Sign in to your Enterprise Profitability and Cost Management instance as a Service Administrator.
Validate Dimensions
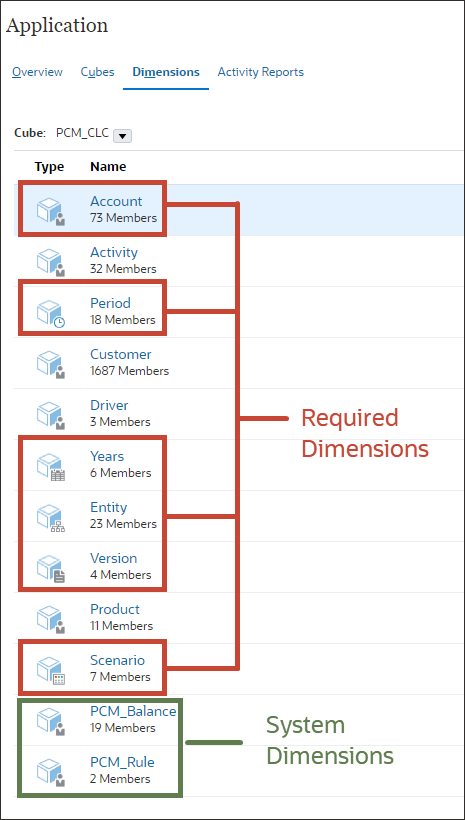
- Click Application, then click Overview.
- Select the Dimensions tab. Notice that the six required dimensions for Enterprise Profitability and Cost Management (Account, Period, Years, Entity, Version, and Scenario) were either mapped from Profitability and Cost Management or added. For BksEPCM, the Version dimension was added. The Balance and Rule system dimensions were automatically renamed PCM_Balance and PCM_Rule. The remaining dimensions are represented as custom dimensions.
- Click Scenario to open the dimension manager. For BksEPCM, the scenarios What If 1 and What If 2 were renamed with the dimension prefix Sce_What If 1 and Sce_What If 2 to avoid collisions with default Version dimension members.
- Click Cancel.
- If you're migrating your own application, check any dimensions that you specified in the
<duplicatemembernames>section of the migration template to verify their prefixes.Note:
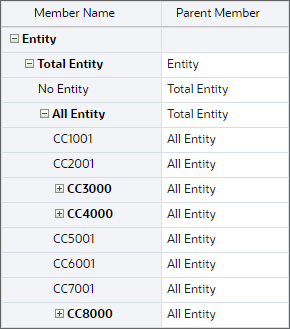
Only duplicate member names in the dimension are assigned the duplicate member prefix. BksEPCM does not include any duplicate member names. - View any dimensions where you included specific member mappings or member renames in your migration template to verify the mappings were successful. For example, the BksML30 entity member All_Entities was mapped to All Entity in BksEPCM. Entities in the hierarchy under All_Entities in BksML30 were correctly migrated under the All Entity member in BksEPCM:
Additionally, the BksML30 Region attribute member Direct was renamed Direct Sales in BksEPCM: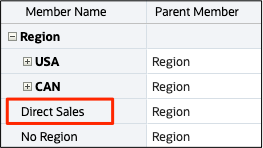
- Return to the home page.
Notice that the non-mapped scenario members (Budget, Sce_What If 1, and Sce_What If 2) were added as Gen2 members under Scenario, and the default scenarios are located under the Gen2 member All Scenarios. At this point, you can manually move the non-mapped scenarios under the All Scenarios member or leave them in place.
Validate Model and Rule Migration
- Click Modeling, then click Models. For BksEPCM, the three POVs specified in the
<modelpovs>section of the migration template were converted to models.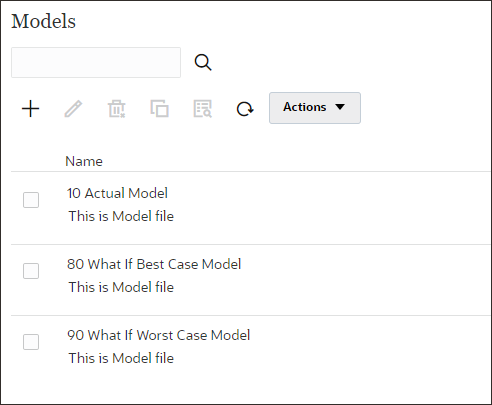
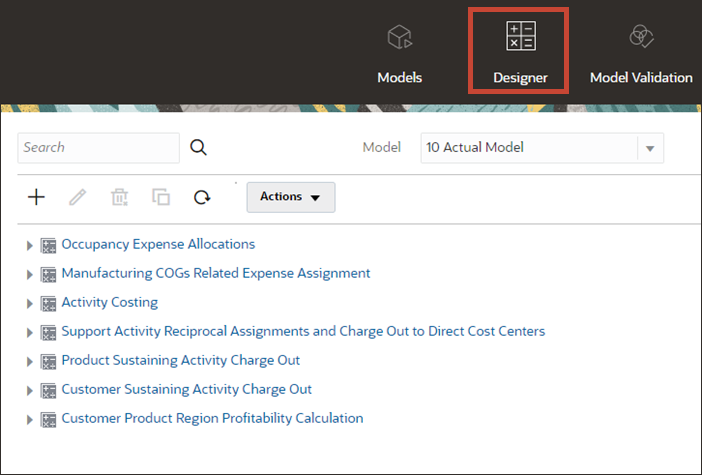
- Click Designer.
- In the Model drop-down list, select a model to view its associated rule sets and rules.
Validate Models
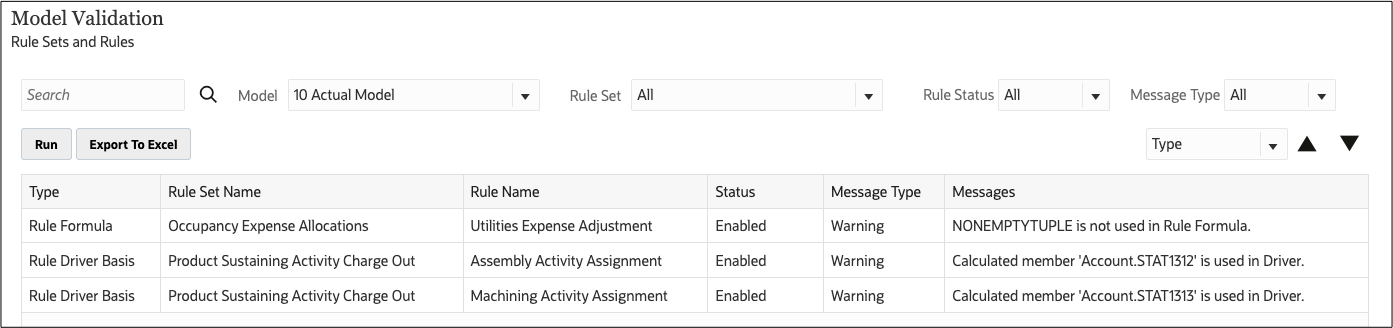
- Click Model Validation.
- In the Model drop-down list, select a model.
- Click Run. The system validates the rules in the model against your dimensions. A successful validation returns no errors and three warnings.
The warnings indicate that some rules do not follow best practices, but they will still run.
Note:
If you converted a single-currency application to multicurrency, your rules will not validate. You will need to modify your rules to include a currency dimension member before validation. - Repeat these steps for each model you migrated. Use any error messages to troubleshoot problems with your rules.
Run Calculations for Migrated POV Data
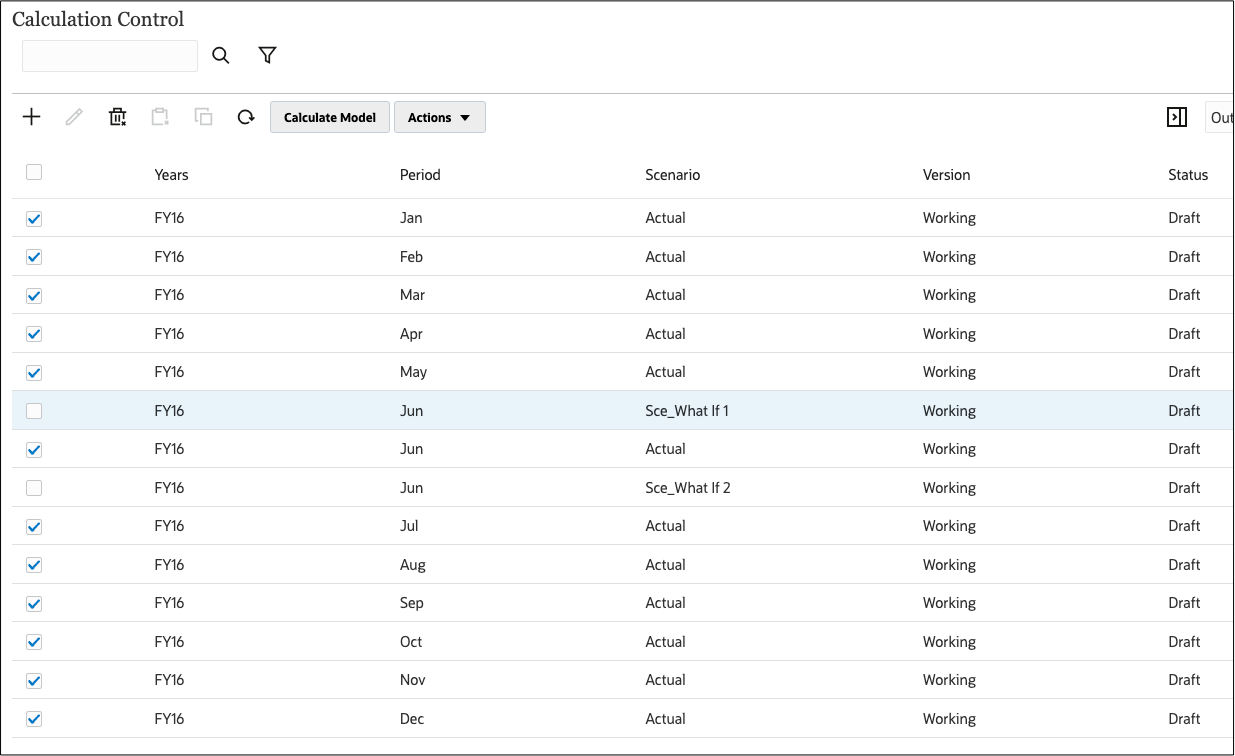
- Click Calculation Control.
Note:
This screen lists POVs for which you have migrated data. - Select the POVs where you want to run calculations from one of your models. You can click the checkbox in the header row to select all available POVs. For BksEPCM, select all of the Actual scenario POVs.
- Click Calculate Model.
- In the Model drop-down list, select the model containing the rules to run against the selected POVs. For BksEPCM, select 10 Actual Model.
- Add an optional job comment.
- Under Processing Options, select the following:
- Deselect the Clear Calculated Data option.
- Select Run Calculation.
- Select Optimize for Reporting.
- For Processing Range, select All Rules.
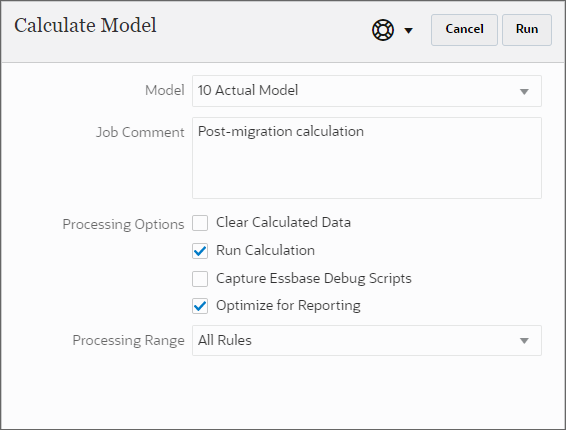
- Click Run.
- The calculation job is submitted. Click OK to close the information message.
- To check the calculation status, click Jobs.
Note:
The system submits separate calculation jobs for each selected POV. - If jobs are still in progress, click Refresh until the status for all calculation jobs is Completed.

- Return to the Calculation Control screen and repeat this process for any other POVs that require different calculation models.
View Calculation Information and Reports
- Click Calculation Analysis.
- Select a POV calculation to perform one of the following actions:
- To generate a report of calculation statistics: Select Actions, then select Calculation Statistics Report, then select your output format.
- To generate documentation for the model used for the calculation: Select Actions, then select Model Snapshot Documentation Report, then select your output format.
- To run the calculation again: Select Actions, then select Rerun Calculation.
Rule Balancing
Before you can view calculation information on the Rule Balancing screen, you need to create data forms to use for rule balancing. To get started creating a data form:
- Click the Navigator icon at the upper-right corner of the screen.
- Under Create and Manage, select Forms.
- Optionally, select or create a folder in the library panel for the form. For example, create a folder called Rule Balancing to store all your rule balancing forms.
- Click Actions, then select Create simple form.
- On the Properties tab, name the form.
Tip:
It's a good practice to use a common naming convention for your Rule Balancing data forms, so they're easy to find in the Data Form list. For example, name Rule Balancing data forms with a prefix of Balancing.
- Select the Layout tab to set up your form layout.
- Using the arrow icons next to the dimension names (
 ), drag dimensions from the Point of View section to Rows or Columns to adjust your form layout.
You should create data forms for Rule Balancing as similarly as possible to the Model Views in your Profitability and Cost Management application so you can compare calculation results in your source and target applications. Rule Balancing data forms will vary based on your models and which slice of the calculation process you want to focus on, but should have this basic layout:
), drag dimensions from the Point of View section to Rows or Columns to adjust your form layout.
You should create data forms for Rule Balancing as similarly as possible to the Model Views in your Profitability and Cost Management application so you can compare calculation results in your source and target applications. Rule Balancing data forms will vary based on your models and which slice of the calculation process you want to focus on, but should have this basic layout:
- Rows: Rules from the PCM_Rule dimension (for example,
ILvl0Descendants(PCM_Rule)). - Columns: Allocation measures from the PCM_Balance dimension (for example,
ILvl0Descendants(PCM_Net Balance)). - Point of View: All other dimensions. On the Rule Balancing page, you will be able to select any POV dimension members (Year, Period, Scenario, and Version), regardless of the selection you make in the data form layout. All other dimensions should be set to focus on the slice of the calculation process that you want to review in the form, and will not be visible on the Rule Balancing page.
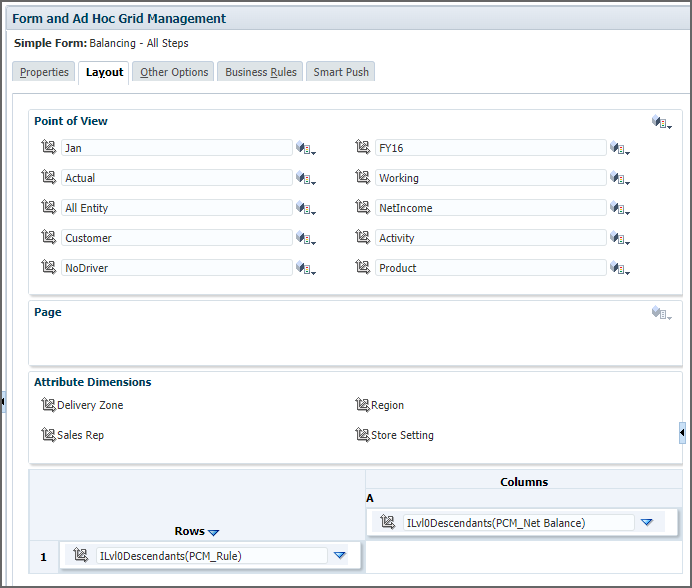
Description of the data form layout - Rows: Rules from the PCM_Rule dimension (for example,
- Click Finish to save and close the form.
Tip:
For more information on creating data forms, see the tutorial video Designing Forms in Cloud EPM Planning or the hands-on tutorial Designing Forms and Managing Task Lists in Planning. Enterprise Profitability and Cost Management uses the same EPM Platform data forms as Planning.
To perform Rule Balancing:
- After creating Rule Balancing forms, from the home page, select Modeling, then select Rule Balancing.
- In the POV, select the POV members for the calculation you want to verify.
- For Data Form, click the default form name to open the data form library browser.
- Select a Rule Balancing data form, then click OK.
- In necessary, click Refresh.
- Compare your calculation results to the Rule Balancing screen using the corresponding Model View in your Profitability and Cost Management application.
Post-Migration Tasks
Remember, the migration process can't migrate some of your Profitability and Cost Management artifacts. To fully complete your migration, you need to complete the following tasks in Enterprise Profitability and Cost Management:
- Set up security
- Create data forms for Rule Balancing, data entry, and to support profit curves, allocation traces, dashboards, and infolets
- Create dashboards, infolets, profit curves, and custom reports
- Create data integrations and data maps
- For multicurrency applications, flag input currency members to be included in reporting currencies
Related Links
- Enterprise Profitability and Cost Management on Oracle Help Center
- Overview of Enterprise Profitability and Cost Management (video)
- Getting Started with Enterprise Profitability and Cost Management (video)
- Models and Modeling in Enterprise Profitability and Cost Management (video)
- Analyze Data in Enterprise Profitability and Cost Management (video)
- Creating Enterprise Profitability and Cost Management Applications (video)
Acknowledgements
- Author - Lisa Dowling Toland (Senior Principal Curriculum Developer)
- Contributors - Don Bean (Director, EPM Product Management), Greg Hall (Senior Manager, EPM Development), Malyadri Suram (Director, EPM Development)
More Learning Resources
Explore other labs on docs.oracle.com/learn or access more free learning content on the Oracle Learning YouTube channel. Additionally, visit education.oracle.com/learning-explorer to become an Oracle Learning Explorer.
For product documentation, visit Oracle Help Center.
Migrating from Profitability and Cost Management to Enterprise Profitability and Cost Management
F52403-07
February 2024
Copyright © 2024, Oracle and/or its affiliates.