- Administering Oracle Fusion Field Service
- Add Working Time to a Calendar
Add Working Time to a Calendar
Working time differs from shifts in that it represents start and stop times that may differ from the pre-defined shifts. Use working time when resources work a different number of hours than they normally do or when they work at a different time of the day than the other resources.
- Click the hamburger icon and click Calendars.
The calendar appears for the resources in your group or bucket.
- For the resource for which you
want to modify the calendar, click the shift for the required date.
The modify calendar dialog box appears for the selected resource and date.
-
Fill up these fields:
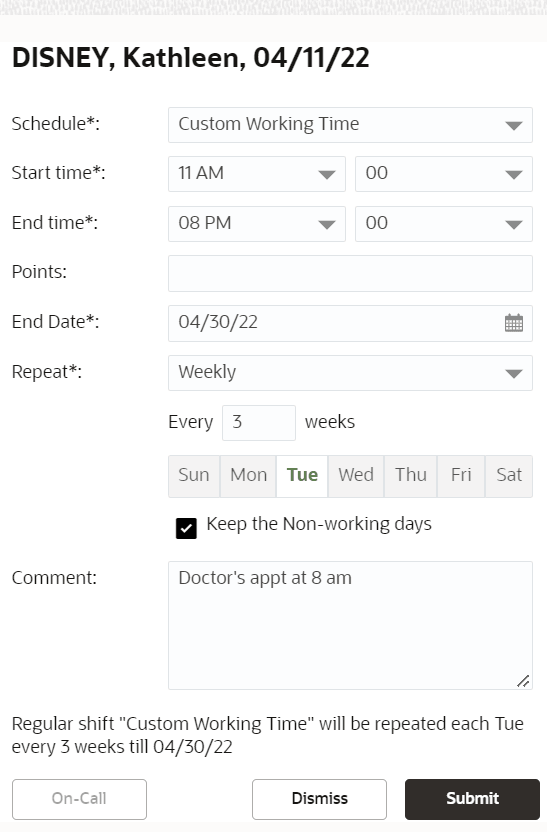
This screenshot shows the dialog box where you add the custom working time:Field name Action Schedule Select Custom Working Time from the drop-down list. Note: You can create only one on-call shift per day. If you create a second on-call shift, the first one is deleted. You can remove an on-call shift if you assign a schedule for a resource. You can't remove an on-call shift, if you assign a regular shift, custom working time, or non-working time. You cannot remove an on-call shift, which is part of a Schedule.Start Time Enter the time when the resource's work is to begin. End Time Enter the time when the resource's day ends. Points If you are using points to cap activity assignments, you can enter them here. These points work the same way as points associated with a shift. Comments Enter any comments that you would like to provide for the change in timings. End Date Select the end date for the schedule. Repeat Select the frequency (Daily, Weekly, Yearly) at the new working time must be repeated. Enter the number of days or select the day of the week on which you want the new working time to be repeated. If you have selected Yearly, select the end date for the recurrence of the new working time. The end date of the new schedule is displayed below the field. You cannot add recurrence for a schedule and for Non-Working Time.
Keep the Non-working days Select this check box to retain the existing non-working days in the resource’s calendar. This check box is selected by default. 
-
Click Submit.
The new schedule is displayed on the calendar.