The Applications page acts as a single page to configure and view
all applications in Oracle Field Service.
Important: This information only applies to Oracle Field
Service environments. You can verify whether you've Oracle Field
Service or Oracle Fusion Field Service, by signing in and checking
on the About page.
You
can use the Applications page to create applications to transfer data to
their Oracle Autonomous Database instances. Also, you can configure real-time data
transmission for Oracle Field Service entities. The data is transferred to the
Oracle Autonomous Database instances when the events corresponding to the entities are
triggered in Oracle Field Service.To complete real-time data
integration:
-
Sign in to Oracle Field Service Manage.
-
Click .
-
In the Applications page, click Add
Application to configure a new application.
The Add Application dialog box for an Oracle Autonomous
Database application is displayed.
-
Select Oracle Autonomous Database from the
Application Type drop-down list and enter the details in these
fields:
-
Application Name: Type a name for the Oracle Autonomous
Database application. Here's a screenshot of the Add Application
dialog box:

-
URL: Type the URL of the ORDS endpoint in the format:
http://identifier.adb.region.oraclecloudapps.com. Make sure that the access rule
ora_p2_httpssl is enabled in Oracle Autonomous Database. For more information on
enabling the access rule, see the Oracle Database Cloud Service documentation.
-
Alias: Type the schema alias for the ORDS-enabled schema.
If you're connecting to a Pluggable Database (PDB), use the format:
<PDB_Name>/<schema_name>.
If you're not connecting to a PDB, use the format: <schema_name>.
Prerequisite: You must REST enable the Oracle database schema on which you
want to use the REST Enabled SQL service. To REST enable the Oracle Database schema,
you can use SQL Developer or the PL/SQL API. For more information, see the Oracle
Database Cloud Service documentation.
-
User Name: Type the name of the ORDS user with roles: SQL
developer or Oracle database schema name. For more information, see the Oracle
Database Cloud Service documentation.
Before using the REST Enabled SQL service, you must authenticate against the
Oracle database schema on which you want to run the SQL statements. Following types of
authentications are available:
- First Party Authentication (Basic Authentication): For this authentication,
create a user in ORDS with the SQL Developer role. This ORDS user can run SQL for
any Oracle database schema that's REST-enabled.
- Schema Authentication: For this authentication, use the Oracle database schema
name in uppercase and the Oracle database schema password (for example, HR and
HRPassword). This user type can run SQL for the specified schema.
-
Password: Type the ORDS user's password with SQL Developer
role or the Oracle database schema password
-
Confirm Password: Retype the password.
-
Click Add.
After a successful channel is created using ORDS, the
Applications page shows the Oracle Autonomous Database application.
You can add, delete, and change application configurations from the
Applications page, if you've the permission to access such
applications.
-
Click the Oracle Autonomous Database application to configure it:
-
Click Add New to create a new entity.
-
In the Add configuration dialog box, specify the required
details:
-
Entity: Select a list of Oracle Field Service
fields that you want to view.
-
Table Name: Enter the table name that you want to create in
the new application.
-
Data Transfer: Select one of these options:
-
Once Daily: Data is transferred to the Oracle Autonomous
Database instance once in a day as per the daily extraction period configured in
Oracle Field Service.
-
Real-time: Data transfer from Oracle Field Service to Oracle Autonomous Database occurs in near real
time.
- Click Submit.
The entity is added to the channel with the specified
details.
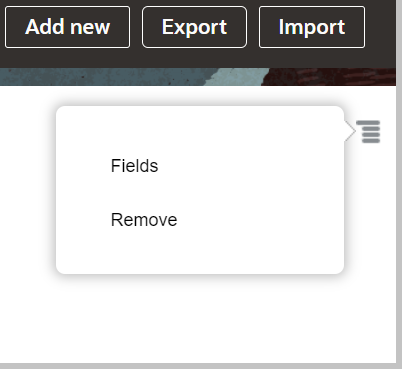
-
To add fields to the entity, click the Properties icon corresponding to that row and
select Fields from the drop-down list.
This image shows the Properties icon drop-down list option to configure fields:
- Click the Plus icon and select the
required field that you want to add to the entity.
- Click Add and Click OK.
The selected fields are added as columns to the corresponding tables in the Oracle
Autonomous Database instance.
Results:
After you add a new application:
-
The Applications page displays the updated list of applications.
-
Monitoring data or information displayed in the Applications page is reset every day (24
hours).
-
The data processing and transmission depends on the volume of data stored. You might expect
a delay in transferring big volumes of data for real-time data transfer. Also, the daily
transmission starts as per the daily extraction period specified in Oracle Field Service.
-
The data transfer for the entities, namely, Activity, Inventory, ActivityLink, Resources,
Users, and Route entities isn't started immediately when the user opts for real-time
data transfer.
The real-time data transfer for the entities is started only from the next day after the
first run of the daily extraction process is completed.
Consider the following configurations for the new application:
-
Chat Fields and Chat Message Fields entities are configured.
-
Real-time data transfer method is selected.
-
The Oracle Field Service environment is connected to the application
environment.
Note that the total number of chat messages and total number of helpdesk messages are
displayed in that environment. If a user logs in to the Oracle Field Service
environment and sends a helpdesk chat request, then the total number of chat messages and
total number of helpdesk messages are incremented in the environment. However, if a
one-to-one chat is started between the users, then the total number of chat messages is
incremented in the environment.