Validating Metadata
Metadata validation warnings in Financial Consolidation and Close alert you to potential issues with aggregation operators, data storage properties, and other issues that may impact performance.
The metadata validation warnings alert you to potential issues with aggregation operators, data storage properties, and other issues that may impact performance.
Optimal consolidation performance requires that metadata properties of each dimension in the application are set correctly. Incorrect metadata properties may cause consolidation errors, leading to poor performance.
Examples of metadata property validation include the default and Consol cube data storage properties, whether the Consolidation operator is valid, and whether a Parent member is Dynamic Calc or Label Only, or has a member formula.
A Best Practice is to validate metadata by running an on-demand Metadata Validation report, and by checking metadata in the Dimension Editor.
Note:
If you have problems with your application, be sure to validate metadata and correct all errors before contacting Oracle Support.
To review metadata validation recommendations, see Recommendations for Metadata Issues.
Using the Simplified Dimension Editor to Review and Fix Errors
To validate metadata from the Simplified Dimension Editor:
-
On the Home page, click Application and then click Overview.
-
Click the Dimensions tab and then click the name of the dimension that you want to evaluate, for example, Account.
The Edit Member Properties screen for the selected dimension is displayed.
-
Click Zoom in All Levels

. -
Click Validate Metadata Definition

or from the Actions menu, select Validate Metadata Definition.A validation pane, which lists the validation errors in the current dimension, is displayed at the bottom of the screen.
-
Use Fix Validation Errors to select and fix each validation error. Click Apply to apply changes to the metadata property value. Click Save after fixing all validation errors.
To view a list of valid member properties, see Editing Member Properties in the Simplified Dimension Editor.
- Click Cancel to return to the Dimensions tab.
- Repeat these steps for each dimension.
- From Actions, select Refresh Database. Run consolidation to check if performance has improved.
Validating Metadata During the Database Refresh Process
Use the Validate Metadata setting as part of the database refresh process to scan for and automatically resolve member identity (ID) mismatches between the business process and Oracle Essbase. See Refreshing the Database.
Caution: Selecting Validate Metadata might add additional time to the refresh process.
In certain cases, the identity of a member changes in a way that causes it to be not fully recognized in the multi-dimensional database used by the application. When a member’s identity is not fully correctly established within all parts of the system, it could sometimes cause hierarchy issues like incorrect member ordering, or it could miss children underneath that member, or miss some siblings, or miss certain properties, and so on. Selecting Validate Metadata detects such members and automatically resolves their identity, allowing these members as well as their hierarchies along with properties and siblings, to be fully and correctly recognizable and usable within all the parts of the system.
Viewing the Report Detailing Member Movement and Deletion
After making member ID corrections, members might be deleted or moved. A report file detailing any member movement (to a different parent) or deletion is generated and placed in the Outbox in a csv (comma-delimited) file format. Review the report to reaggregate some of the stored parent members where the child hierarchy may have changed.
For example:
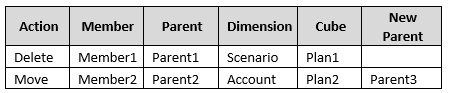
If a correction is made, the system generates a CSV file to the Outbox folder, and
the filename is automatically generated with the application name followed by
_autocorrect.csv; for example,
vision_autocorrect.csv. No file is created if no issue was
addressed. If a previous *_autocorrect.csv file exists and a
correction is made during a subsequent run, this file is overwritten.
After running the Refresh Database job with the Validate Metadata setting, you can download the export file from the Outbox.
To download files:
-
Click Application, and then click Jobs.
-
Under Recent Activity, click the job.
-
At the top of Job Details, click the Export File option to select a download location.