Before you Begin
This 30-minute hands-on tutorial shows you how to review and update supplemental data.
Background
Supplemental Data Manager helps you organize, update, edit, and manage supplemental data, typically financial transactions. It provides a robust ad hoc data collection process useful for footnotes, disclosures, and supporting details. It extends data collection to include transactional details for the consolidated balances within your business process.
What Do You Need?
An EPM Cloud Service instance allows you to deploy and use one of the supported business processes. To deploy another business process, you must request another EPM Enterprise Cloud Service instance or remove the current business process.
- Have Service Administrator access to EPM Enterprise Cloud Service. The instance should not have a business process created.
- Have created users in Oracle Identity Management named user1, user2, and user3. You should create the users before loading snapshots. (Artifacts for Supplemental Data Management in the sample application include these user names, so these users need to be present.)
- Upload and import this snapshot into your instance.
Note:
For more information on uploading and importing migration snapshots, refer to the Administering Migration for Oracle Enterprise Performance Management Cloud documentation. - Upload and import this additional snapshot with sample data for Supplemental Data Manager.
Assigning security roles
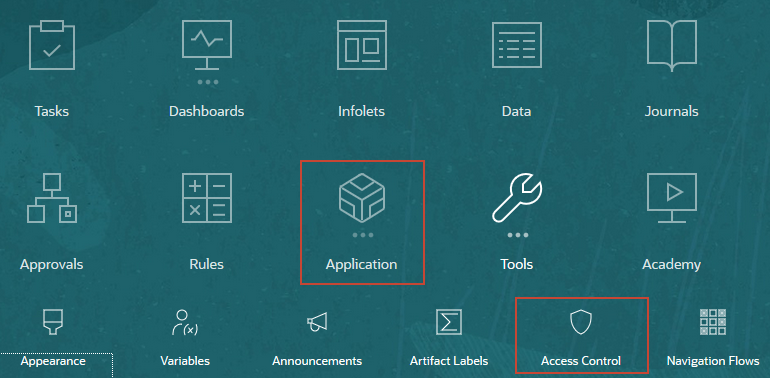
- On the Home page. click Tools, then Access Control.
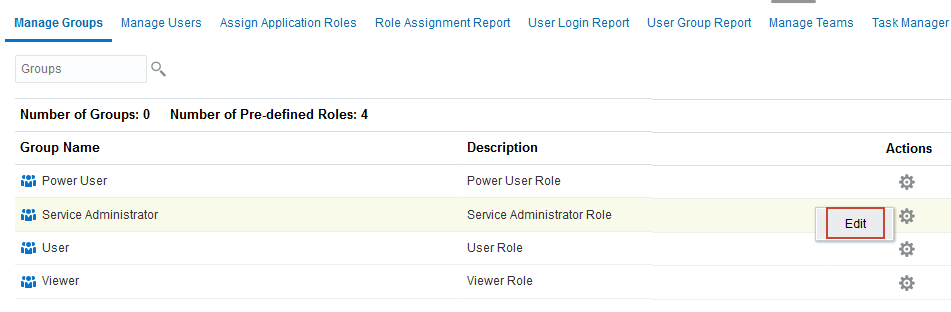
- On the Manage Groups tabs, for the Service Administrator security group, click the Actions icon and select Edit.
- Click
 (Search) to display the users. Move user1, user2, and user3 from the Available Users list to the Assigned User list.
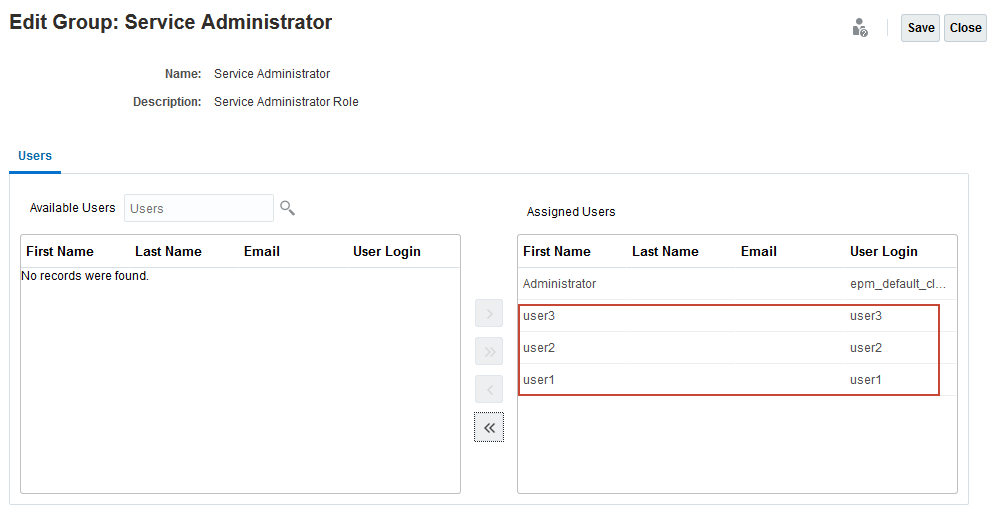
- Click Save to return to the Manage Groups tab.
- Click
 (Home) to return to the Home page.
 - Sign out of Financial Consolidation and Close.
In this section, you assign access to user1, user2, and user3. The User, Power User, and Service Administrator roles can access Supplemental Data artifacts. For the purposes of this tutorial, you assign all the users to the Service Administrator group as a convenience, so that you do not need to assign access to individual data forms, entities, or accounts.
Viewing tasks
- Sign in to Financial Consolidation and Close as user2 with the password you assigned in Oracle Identity Management.
- In the Task Panel on the Home page, set Year to 2020 and Period to Apr.
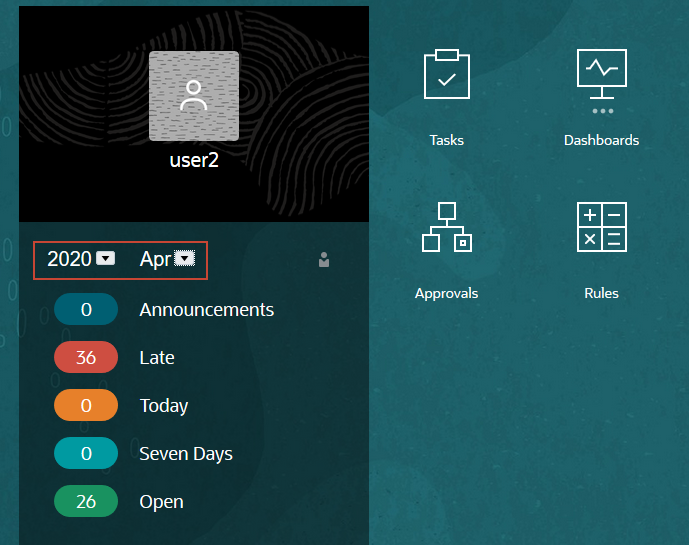
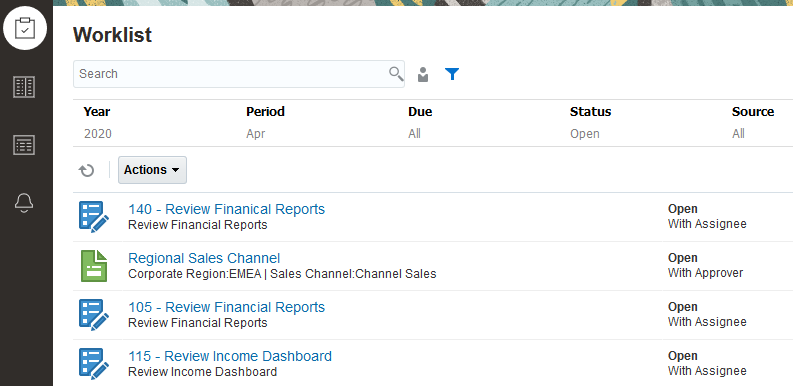
- Note that there are Open tasks that need to be addressed. Click Open in the Task Panel. This launches the Worklist filtered to 2020, Apr, and Open. Because you are logged in as a Service Administrator, the list shows you tasks for all users by default. Task for Supplemental Data are indicated by a green icon
 .
.
- To filter the list to show only tasks for which you are responsible, click
 (My Tasks).

Entering and posting form data
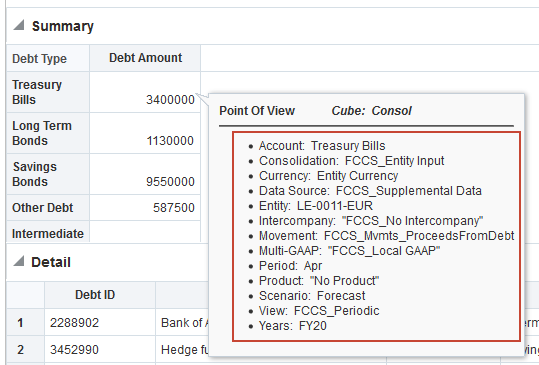
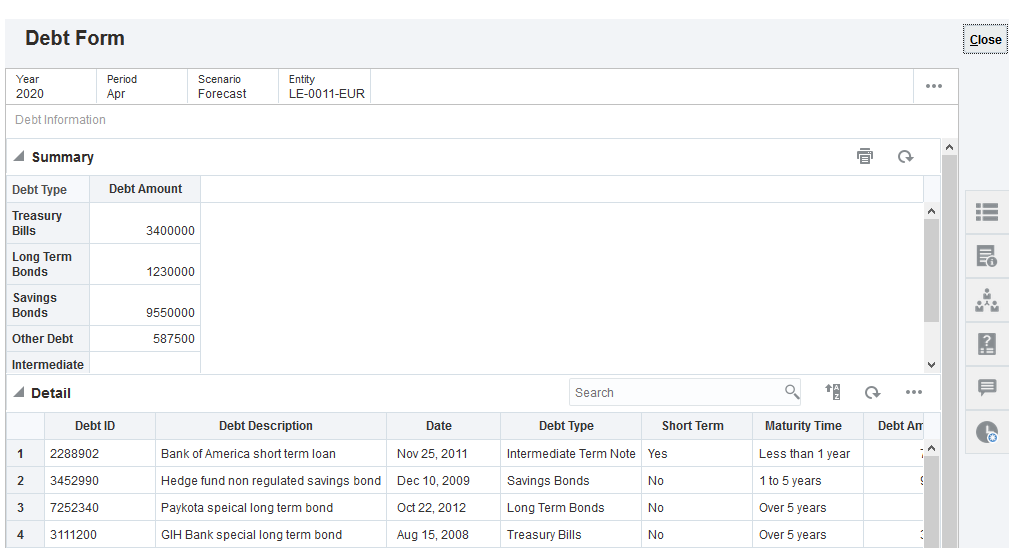
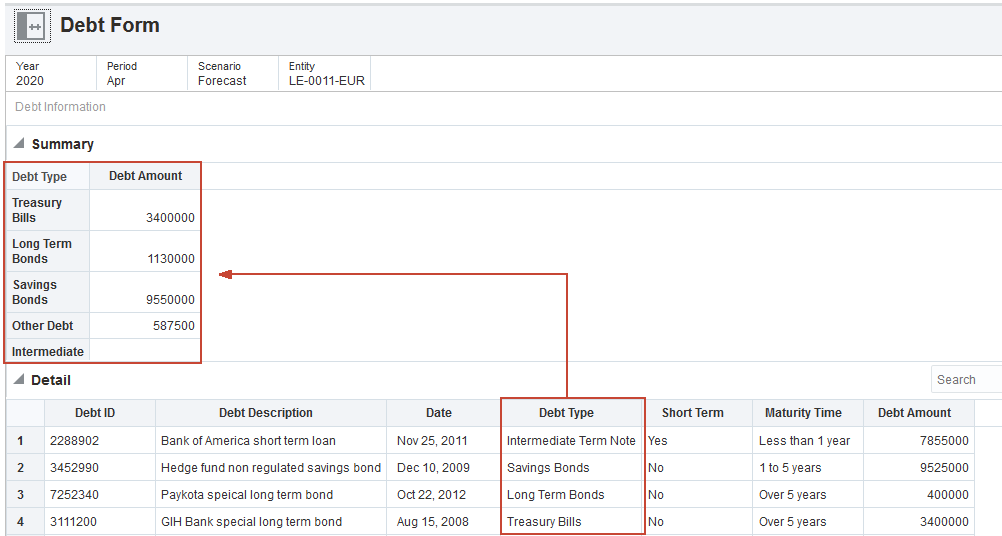
- Click on Debt Form for entity LE-0011-EUR in the Worklist to open the form.

- In the Summary section, hover the cursor over the cell for Treasury Bills > Debt Amount until the Point of View pop-up box displays. The target POV to which the data will be posted in Financial Consolidation and Close is displayed.
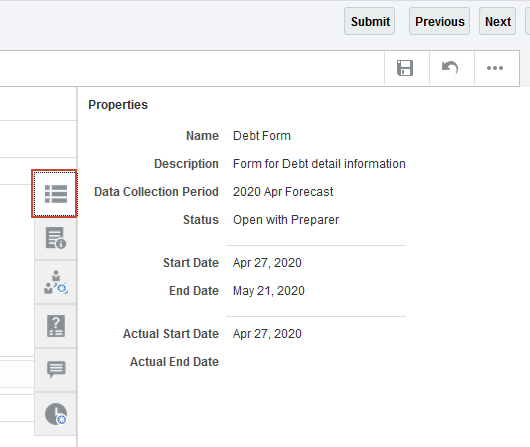
- Click the Properties tab on the right to expand the Properties drawer and review the task properties. Click on the selected tab to collapse the task drawer.
- Click on the Instructions tab
 to view the form instructions.
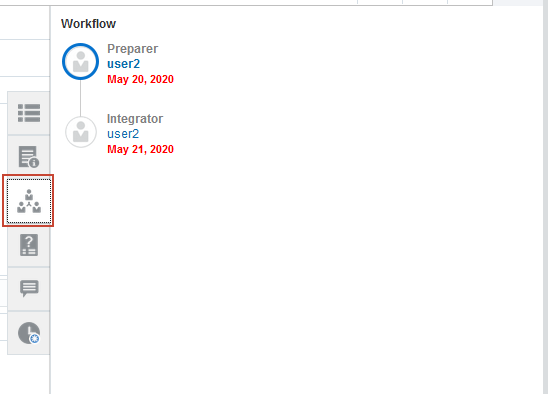
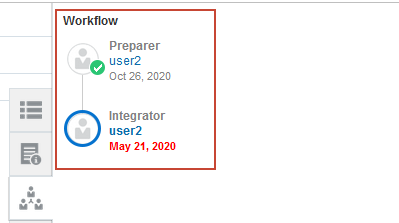
 - Click on the Workflow tab to view the workflow path. User2 is assigned as both the Preparer and the Integrator. The Preparer enters form data, and the Integrator posts the data to Financial Consolidation and Close.
- Optional: Click on the remaining drawer tabs to review the additional task information.
- In the Detail section, edit the data by double-clicking the Debt Amount cell for row 3 in the table. Replace the existing value with 500000.

- Note the current value for Long Term Bonds in the Summary section, then, in the upper right, click the Save icon. The line-item is saved and the total for Long Term Bonds in the Summary section is updated.

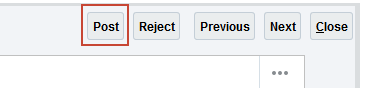
- Click Submit to advance the workflow.
- Click the Workflow tab. The Preparer task is marked as complete and the Integrator task is active. Notice that the Submit button has change to a Post button.
- Click Post.
- At the Information prompt, click Close.
- Click the X in the upper right corner of the form to close the form.
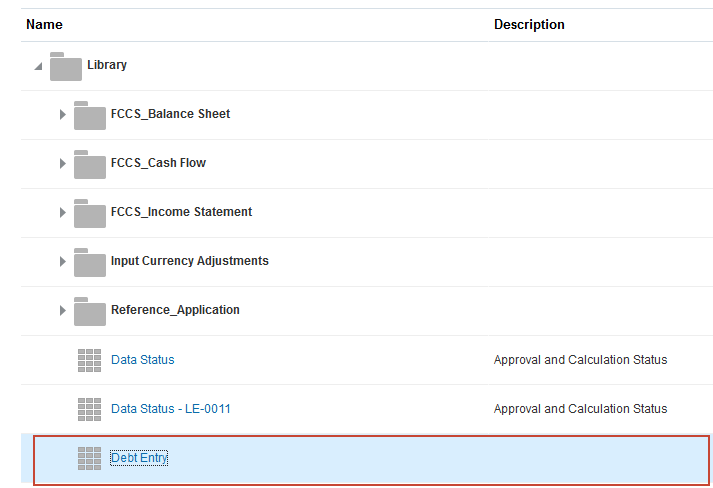
- Click Data.

- In the form list, click Debt Entry.
- The form displays the data you posted from the Debt Form in Supplemental Data for April for Legal Entity 0011 (EUR).

- Right-click a cell in the Apr column to display the pop-up menu and select Supplemental Data.
A view-only version of the Debt Form for April in Supplemental Data is displayed with the line-item detail.
- Click X to close the Supplemental Data form, and then click X on the tab for the Debt Entry form to close the form.
- Click (Home) to return to the Home page.
In the section, you enter line-item detail data in the Debt form, and then post summarized data to accounts in Financial Consolidation and Close.
On the top of the Form, you can see the Point Of View for the data. The line-items in the Detail section are summarized by Debt Type in the Summary section. The totals displayed in the Summary section are posted to accounts in Financial Consolidation and Close.
Filtering the Supplemental Data Tasks list
The Supplemental Data Tasks list on the Tasks page provides powerful filtering capabilities. In this section, you apply filters to the Supplemental Data Tasks list.
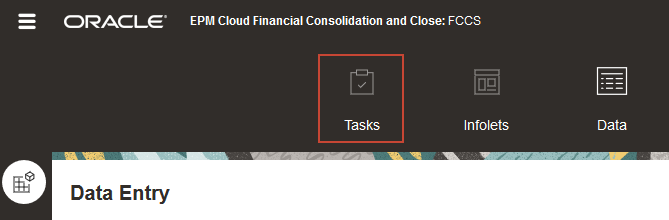
- Click Tasks.
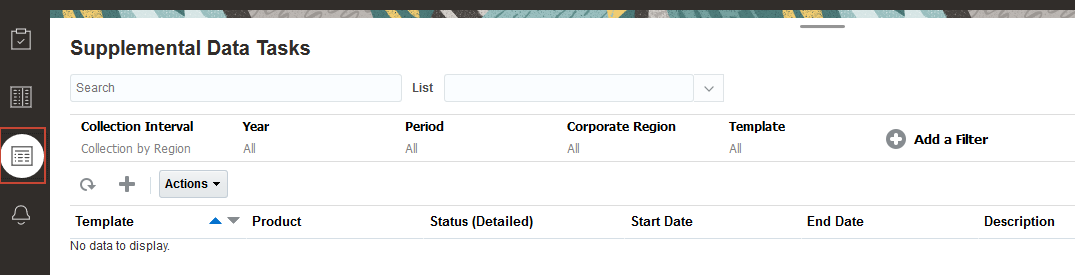
- In the vertical tabs, click Supplemental Data Tasks.
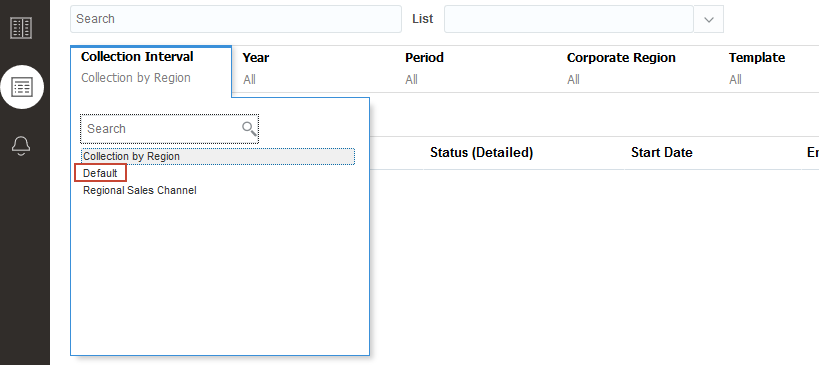
- In the filters area, click Collection Interval, then click Default.
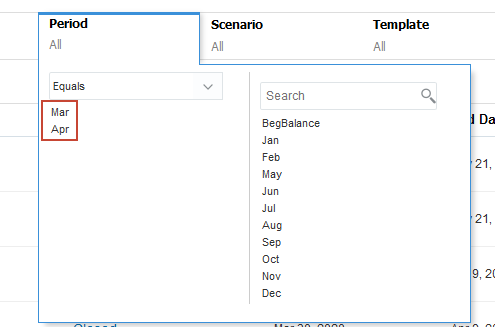
- Click Period, select Mar and Apr, then press Enter.
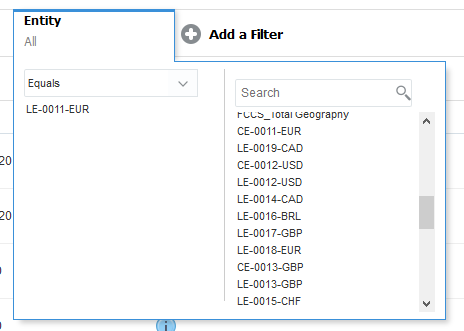
- Click Add Filter, then select Entity. Scroll the list of entities and select LE-0011-EUR, then press Enter.
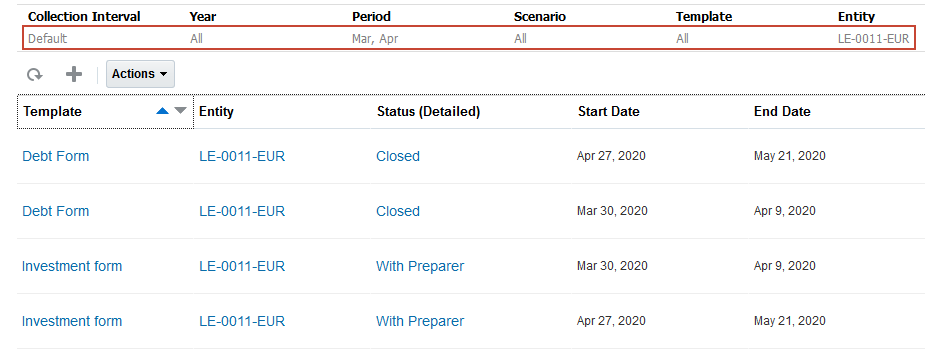
- The list is filtered by your selections.
Viewing Supplemental Data dashboards
In this section, you review your data collection process using predefined task and data analysis dashboards.
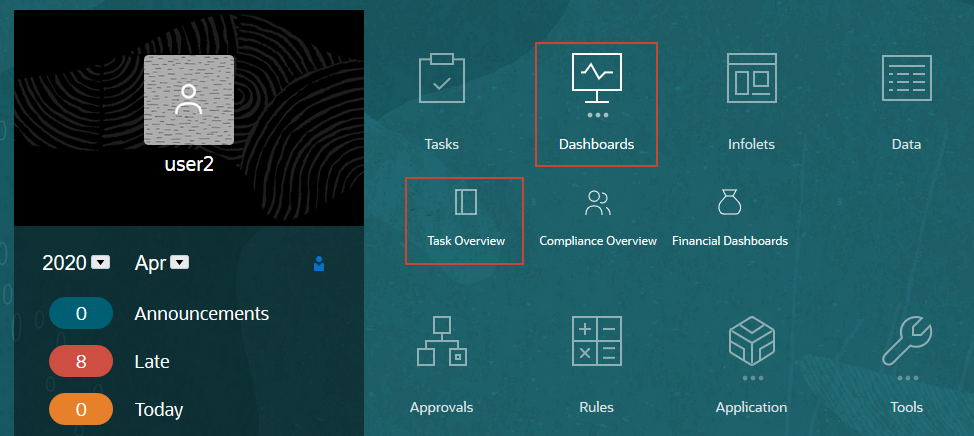
- Click (Home) to return to the Home page.
- Click Dashboards, and then Task Overview.
- In the POV. select 2020, Mar.
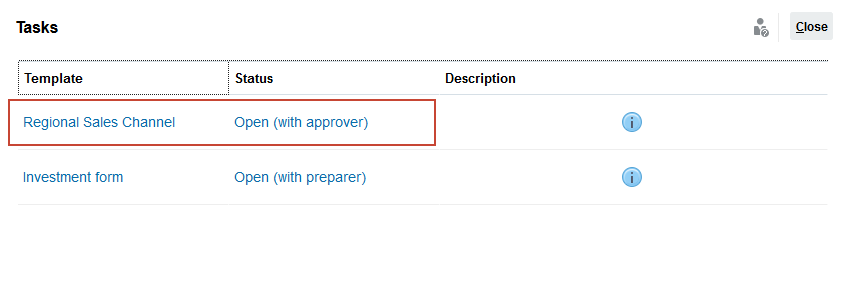
- In the Supplemental Data bar, click the Incomplete box.
- A list of incomplete tasks is displayed. The status of Regional Sales Channel is Open (with approver). Click Regional Sales Channel to open the form.
- In the Regional Sales Channel form, click the Workflow tab. Notice that user2 is the Approver. Click Approve, then click Close to close the form.
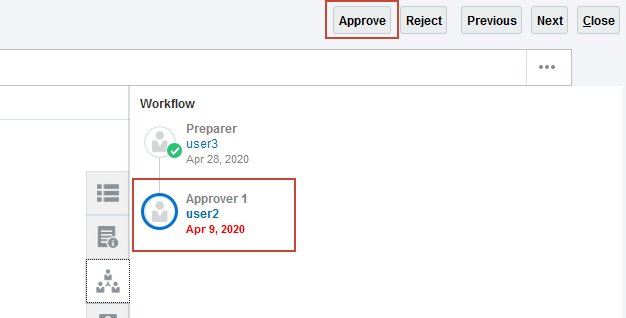
- Notice that Regional Sales Channel has been removed from the incomplete tasks list. Click Close to close the Tasks dialog box.
- On the Task Overview page, click Refresh. The number of tasks in the Incomplete box of the Supplemental Data bar is updated.
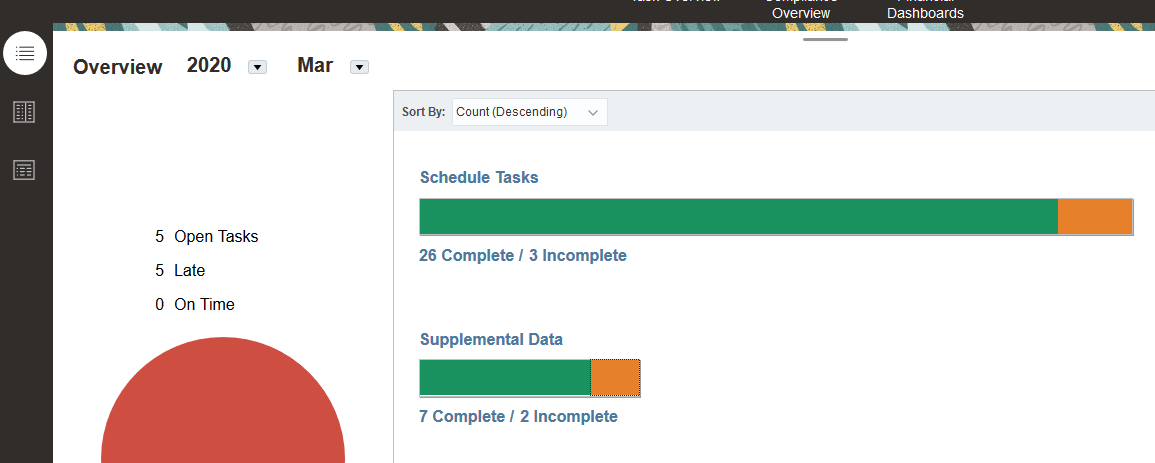
- In the vertical tabs, click Supplemental Data Overview. Set the POV to Default, 2020, Mar, Forecast, All. The number of open tasks for each entity is displayed.

- In the View By list, select Form. The number of complete and incomplete form instances for each form template is displayed.
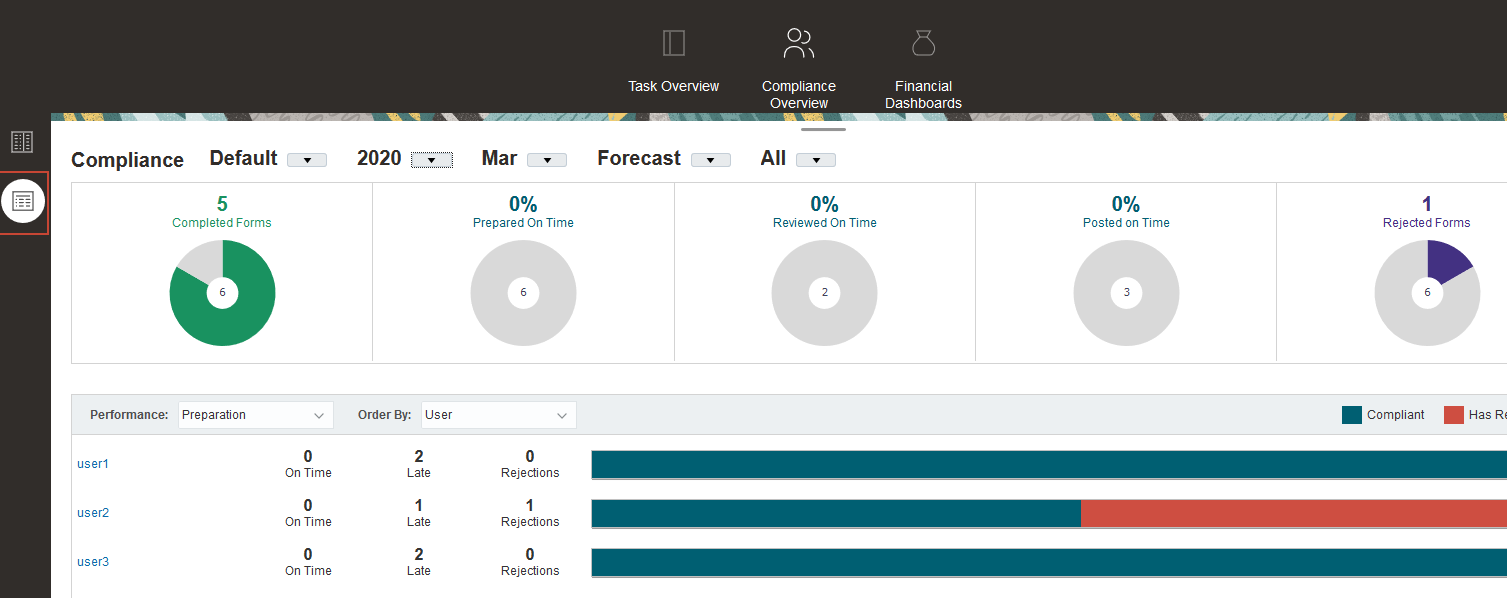
- Click Compliance Overview, and then the Supplemental Data Compliance vertical tab. Set the POV to Default. 2020, Mar, Forecast, All. The Compliance dashboard provides statistics about on-time performance for preparation, review, and posting of supplemental data.
- Click (Home) to return to the Home page.
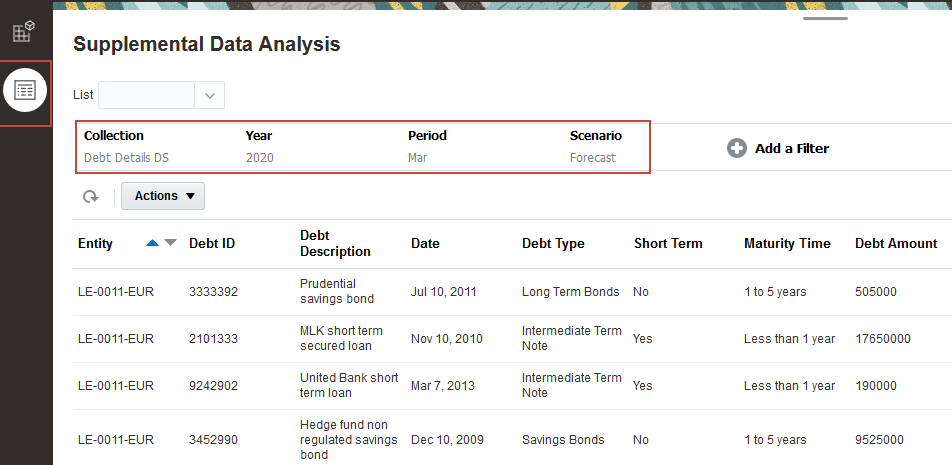
Viewing data collections
In this section, you use the Supplemental Data Analysis page to analyze the Debt Detail DS data collection. You create a list of debts greater than 1 million, sorted by debt amount from low to high..
- On the Home page, click Data.

- Click the Supplemental Data Analysis vertical tab. For Collection, select Debt Details DS, and make these additional POV selections: 2020, Mar, Forecast.
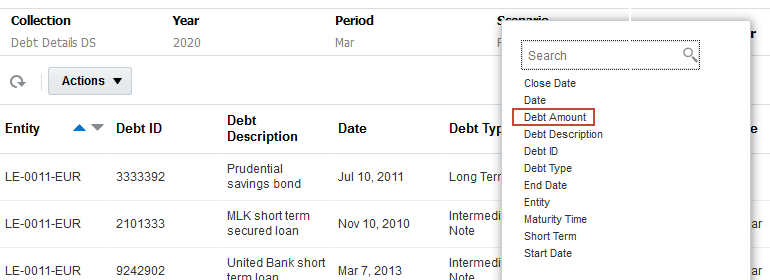
- Click Add Filter, then click Debt Amount..
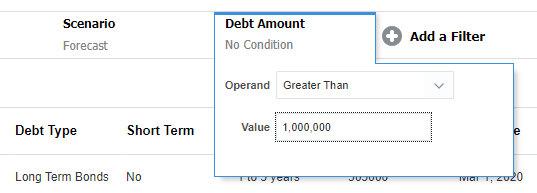
- In the list of operators, select Greater Than, and in the Value box enter 1000000.
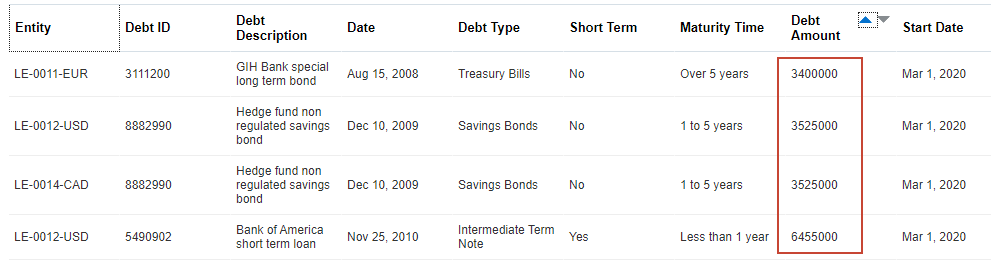
- The list is filtered to include records that have a debt amout of greater than 1,000,000. To sort by the debt amount, click the heading in the Debt Amount ccolumn. The list is sorted by the Debt Amount column. You can use the Actions menu to export the list to an Excel file or CSV file for additional analysis, or to save your filter for future use.
Learn More
Reviewing, Updating, and Analyzing Supplemental Data in Financial Consolidation and Close
F48971-01
October 2021
Copyright © 2021, Oracle and/or its affiliates.
This 30-minute hands-on tutorial shows you how to review and update supplemental data.
This software and related documentation are provided under a license agreement containing restrictions on use and disclosure and are protected by intellectual property laws. Except as expressly permitted in your license agreement or allowed by law, you may not use, copy, reproduce, translate, broadcast, modify, license, transmit, distribute, exhibit, perform, publish, or display any part, in any form, or by any means. Reverse engineering, disassembly, or decompilation of this software, unless required by law for interoperability, is prohibited.
If this is software or related documentation that is delivered to the U.S. Government or anyone licensing it on behalf of the U.S. Government, then the following notice is applicable:
U.S. GOVERNMENT END USERS: Oracle programs (including any operating system, integrated software, any programs embedded, installed or activated on delivered hardware, and modifications of such programs) and Oracle computer documentation or other Oracle data delivered to or accessed by U.S. Government end users are "commercial computer software" or "commercial computer software documentation" pursuant to the applicable Federal Acquisition Regulation and agency-specific supplemental regulations. As such, the use, reproduction, duplication, release, display, disclosure, modification, preparation of derivative works, and/or adaptation of i) Oracle programs (including any operating system, integrated software, any programs embedded, installed or activated on delivered hardware, and modifications of such programs), ii) Oracle computer documentation and/or iii) other Oracle data, is subject to the rights and limitations specified in the license contained in the applicable contract. The terms governing the U.S. Government's use of Oracle cloud services are defined by the applicable contract for such services. No other rights are granted to the U.S. Government.
This software or hardware is developed for general use in a variety of information management applications. It is not developed or intended for use in any inherently dangerous applications, including applications that may create a risk of personal injury. If you use this software or hardware in dangerous applications, then you shall be responsible to take all appropriate fail-safe, backup, redundancy, and other measures to ensure its safe use. Oracle Corporation and its affiliates disclaim any liability for any damages caused by use of this software or hardware in dangerous applications.
Oracle and Java are registered trademarks of Oracle and/or its affiliates. Other names may be trademarks of their respective owners.
Intel and Intel Inside are trademarks or registered trademarks of Intel Corporation. All SPARC trademarks are used under license and are trademarks or registered trademarks of SPARC International, Inc. AMD, Epyc, and the AMD logo are trademarks or registered trademarks of Advanced Micro Devices. UNIX is a registered trademark of The Open Group.
This software or hardware and documentation may provide access to or information about content, products, and services from third parties. Oracle Corporation and its affiliates are not responsible for and expressly disclaim all warranties of any kind with respect to third-party content, products, and services unless otherwise set forth in an applicable agreement between you and Oracle. Oracle Corporation and its affiliates will not be responsible for any loss, costs, or damages incurred due to your access to or use of third-party content, products, or services, except as set forth in an applicable agreement between you and Oracle.