Modify Journal Approval Notifications with Analytics Publisher
This example shows how to modify notifications for the journal approval workflow using Oracle Analytics Publisher reports.
The following table summarizes the key decisions for this scenario.
|
Decisions to Consider |
In This Example |
|---|---|
|
What text changes are needed in the notification header? |
Append the fiscal year. |
|
What additional field should the notification header include? |
The name of the user who created the journal batch. |
|
What changes are needed in the details section of the notification? |
Replace the values of the cost center and account segments with the descriptions for those segments. The chart of accounts has the following segments: Company, Cost Center, Account, Product. |
Modify the journal approval notification by:
-
Downloading the report layout template.
-
Copying and modifying the data model. This step is only needed if the attributes to be added to the notification aren't already present in the data model.
-
Exporting the data model. You must perform this step even if you didn't make changes to the data model. This step is needed for previewing.
-
Editing the report layout template.
-
Previewing the modified notification.
-
Uploading the modified report layout template.
For more information about configuring Analytics Publisher notifications, see the Reports chapter in the Creating Analytics and Reports for Financials Cloud guide.
Prerequisites
-
To edit the report layout template, download and install Template Builder for Word, which is an extension to Microsoft Word.
-
Sign in to the application with the application consultant job role.
-
In the Reports and Analytics work area, click the Browse Catalog button.
-
Click the Home link.
-
In the Get Started section, click the Download BI Desktop Tools link.
-
Select Template Builder for Word from the list.
-
Save the file and run the installer.
-
-
To preview the notification output for your modified report layout template, you must first download a copy of the Workflow Notification Subtemplate.
-
Click the Catalog link on the Oracle Business Intelligence home page and expand the folder.
-
Click the Edit link for the Workflow Notification Subtemplate. The subtemplate page opens.
-
In the Templates section, click the language name link in the Locale column.
-
Save the subtemplate .rtf file to your computer.
-
-
The predefined data model displays the account combination, which is based on segment values, on the journal approval notification. To display a combination of segment values and descriptions on the notification, identify the segment codes for all of the chart of account segments. The segment codes are used in the task Copying and Modifying the Data Model.
-
In the Setup and Maintenance work area, go to the following:
-
Offering: Financials
-
Functional Area: Financial Reporting Structures
-
Task: Manage Chart of Accounts Structure
-
-
Search for the Accounting Flexfield and click Manage Structures to open the Manage Key Flexfield Structures page.
-
Search for your chart of accounts and click Edit in the Search Results section.
-
Find the segment code values for all of the segments in the Segment Code column. In this example, the segment codes are VF_Company, VF_Cost_Center, VF_Account, and VF_Product.
-
-
Find an existing journal approval notification and note the values for the following attributes: accounting period, journal batch name, and ledger name. This information is used to produce sample report data for the task Exporting the Data Model.
Note: The exact steps can vary depending on your version of Microsoft Word.
Downloading the Report Layout Template
The report layout template contains the structure of the notification. To download a copy of the journal approval report layout template to your local drive for modification:-
Sign in to the BI server (for example,
http://hostname.com:7001/xmlpserver) with the application consultant job role. -
Click the Catalog link to open the Catalog page.
-
In the Folders pane, expand the folder.
-
Click the Journals folder to display the Data Models subfolder and the Journal Approval Report.
-
Click the More link for the Journal Approval Report, and then select Customize from the menu. The Journal Approval Report folder, containing the predefined report layout template, is automatically copied to the Custom folder and the Journal Approval Report page opens from within that folder.
Note: If the Customize option isn't available from the menu, check that you signed in to the BI server as mentioned in step 1. -
Click the Edit link on the copy of the Journal Approval Notification report layout template.
-
Save the copy of the .rtf file to your local drive and change the file name to distinguish it from the predefined report layout template. For example, save the file as UpdatedJournalApprovalNotificationReport.rtf.
Caution: Be sure to change the name of the .rtf file, otherwise you could overwrite the predefined report layout template.
Copying and Modifying the Data Model
Always make a copy of the data model to preserve the predefined data model from errors and to have a data model to which you can revert. Modify the copy to add or remove attributes from the data model. In this example, you modify the data model to include either a segment value or a segment description for each segment in the chart of accounts.-
To copy the data model:
-
Click the Catalog link on the Oracle Business Intelligence home page to open the Catalog page.
-
In the Folders pane, expand the folder.
-
Click the Journals folder to display the Data Models subfolder and the Journal Approval Report.
-
In the Folders pane, click the Data Models subfolder to select it.
-
In the toolbar, click the Copy Resource button.
-
In the Folders pane, expand the folder.
-
Click the Journals folder to select it.
-
In the toolbar click the Paste Resource button to create a copy of the Data Models folder.
Note: The Journal Approval Report is automatically redirected to use the copy of the data model in the Custom folder.
-
-
Use a text editor to construct the SQL statement for each segment in the chart of accounts to display either a value or a description.
-
Use this statement as a template for displaying a segment value:
FUN_BIP_UTIL_PKG.get_seg_value_from_code(lines.CODE_COMBINATION_ID,'Segment_code') as Segment_Val.Use this statement as a template for displaying a segment description:
FUN_BIP_UTIL_PKG.get_seg_description_from_code(lines.CODE_COMBINATION_ID,'Segment_Code') as Segment_Desc -
Replace the
Segment_codevalue in each statement with the segment codes from your chart of accounts. -
Replace the
Segment_ValorSegment_Descvalues at the end of each statement with a user-defined term for that segment.Note: The user-defined terms are added to the report layout template as part of the task Editing the Report Layout Template.
The following table shows the segment names, segment codes, and prepared SQL statements for each segment in the chart of accounts. Each SQL statement includes the segment code and ends with the user-defined term representing the segment and indicating whether it's a value or a description. For example, the SQL statement for the cost center ends with
CostC_Desc. Each statement ends with a comma.Segment Name
Segment Code
SQL Statement
Company
VF_Company
FUN_BIP_UTIL_PKG.get_seg_value_from_code(lines.CODE_COMBINATION_ID,'VF_Company')
as Company_Value,
Cost Center
VF_Cost_Center
FUN_BIP_UTIL_PKG.get_seg_description_from_code(lines.CODE_COMBINATION_ID,'VF_Cost_Center')
as CostC_Desc,
Account
VF_Account
FUN_BIP_UTIL_PKG.get_seg_description_from_code(lines.CODE_COMBINATION_ID,'VF_Account')
as Account_Desc,
Product
VF_Product
FUN_BIP_UTIL_PKG.get_seg_value_from_code(lines.CODE_COMBINATION_ID,'VF_Product') as Product_Value, -
-
To edit the copy of the data model:
-
Find your copy of the data model by expanding the folder.
-
Click the Edit button for the Journal Approval Data Model copy. The Journal Approval Data Model page opens.
-
In the Data Model pane, in the Data Sets folder, click the Journal Lines data set.
-
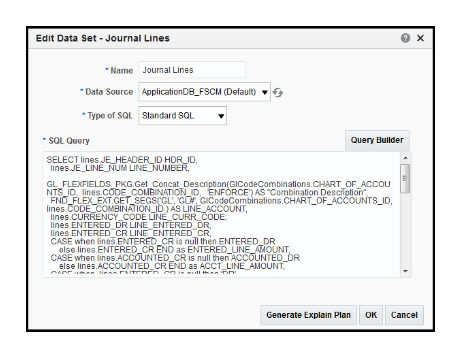
On the Diagram tab, click the Edit Selected Data Set button. The Edit Data Set - Journal Lines dialog box opens with the SQL query for the Journal Lines data set.
The following figure shows the Edit Data Set - Journal Lines dialog box with the predefined SQL query.
-
In the SQL Query field, place your cursor after
SELECTand insert rows for the new SQL statements. -
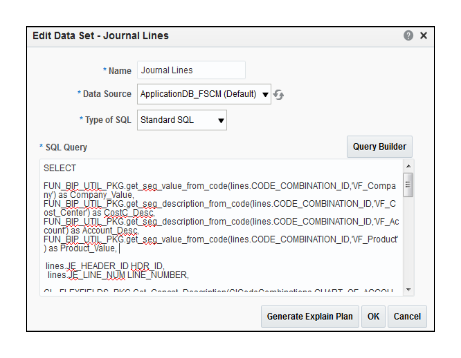
Copy the SQL statements that you prepared in step 2 into the SQL query field after the word
SELECTand before the lines.JE_HEADER_ID HDR_ID.The following figure shows the Edit Data Set - Journal Lines dialog box with the new SQL statements.
-
Click OK to close the Edit Data Set - Journal Lines dialog box.
-
Click the Save button to save the modified copy of the data model.
-
Exporting the Data Model
To add fields from the data model to your copy of the report layout template, you must first export the modified data model .xml file.-
Click the Catalog link on the Oracle Business Intelligence page to open the Catalog page.
-
In the Folders pane, expand the folder.
-
Click the Data Models folder to display the modified Journal Approval Data Model.
-
Click the Edit link for the data model. The data model page opens on the Diagram tab.
-
Click the Data tab.
-
To export the full data model .xml file, click in each of these fields and enter values from an existing journal approval notification: Accounting Period, Journal Batch Name and Ledger Name.
-
To include empty fields in the data model export, click the Properties link in the Data Model pane.
-
On the Properties page, select the Include Empty Tags for Null Elements option.
-
Click Save.
-
In the Data Model pane, click the Data Sets link to return to the Data tab.
-
Click the View button to view the sample data.
-
Click the Export button and save the Journal Approval Data Model .xml file to a local drive.
-
Repeat step 7 to return to the Properties page and deselect the Include Empty Tags for Null Elements option.
Note: If you leave this option selected, performance issues could result. -
Click Save.
Editing the Report Layout Template
Edit the copy of the report layout that you downloaded earlier in the task Downloading the Report Layout Template.-
To append the fiscal year to the notification header:
-
Open your local copy of the report layout template using Microsoft Word.
-
Place your cursor at the end of the default header text, which is Journal Batch Approval.
-
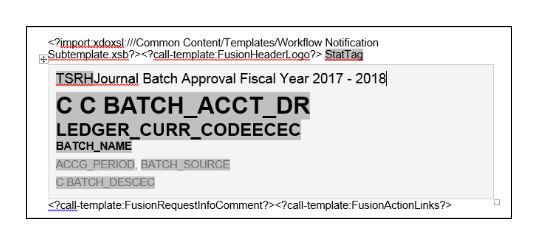
Add a space and enter the text Fiscal Year 2017 - 2018. The header now says Journal Batch Approval Fiscal Year 2017 - 2018.
The following figure shows the modified notification header.
-
-
To add the name of the user who created the journal batch to the notification:
-
Select the Publisher tab to open the Publisher ribbon.
-
In the Load Data group on the ribbon, click Sample XML.
-
On the XML data selection dialog box, select the .xml file that you saved in step 11 of the task Exporting the Data Model. Click Open.
-
Click OK on the message that appears indicating that the data was successfully loaded.
-
In the header section of the report layout template, place your cursor at the end of the BATCH_SOURCE field, and insert a new line.
-
Enter the text label for the new field, such as Batch Created By, and then add a space.
-
In the Insert group on the Publisher ribbon, click the Field button. The Field dialog box opens with a list of the data model fields.
-
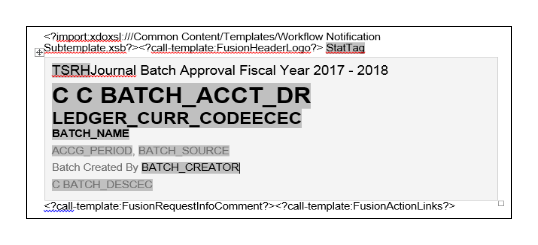
In the JOURNAL_BATCH folder, select the BATCH_CREATOR field and click Insert. The field is automatically added to the header section after the new text label.
-
On the Field dialog box, click Close.
The following figure shows the modified notification header.
-
-
To replace the account combination ID fields on the report layout template with the segment values and descriptions that were added to the data model:
-
Place your cursor after the label called
StrtLineLINE_ACCOUNTECand insert a new line. -
In the Insert group on the Publisher ribbon, click the Field button. The Field dialog box opens with a list of the data model fields.
-
In the Journal Lines folder, select the COMPANY_VALUE field. The name for this field is the user-defined name for the company segment from the task Copying and Modifying Data Model.
-
Click Insert to add the field to the report layout template.
-
In the report layout template, add a character such as a hyphen, to separate the segments.
-
Select the rest of the segments from the Field dialog box and insert them into the report layout template with a separator between each segment.
The following figure shows the modified notification with the account segments.
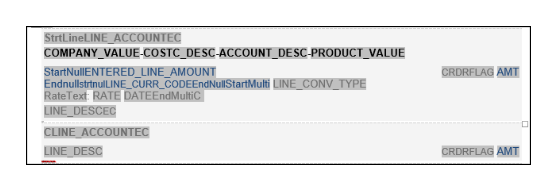
-
Format the segments that were added by copying the format from the CLINE_ACCOUNTEC field in the report layout template. Click the CLINE_ACCOUNTEC field.
-
Click the Home ribbon, select the Format Painter button, and select the segments that were added. For example, select
COMPANY_VALUE-COSTC_DESC-ACCOUNT_DESC-PRODUCT_VALUE. -
Place your cursor after the
CLINE_ACCOUNTECfield and insert a new line. -
Copy the account line that you created in the previous steps of this section and paste it into the new line.
The following figure shows the modified notification with the account segments appearing after both the
StrtLineLINE_ACCOUNTECand theCLINE_ACCOUNTECfields.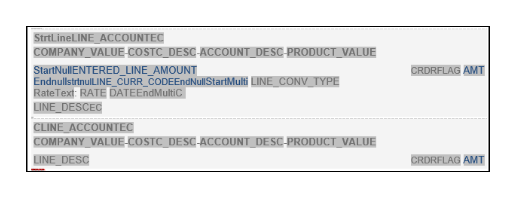
-
Delete the fields
StrtLineLINE_ACCOUNTECandCLINE_ACCOUNTECfrom the report layout template. -
Click Close on the Field dialog box.
-
-
Save your local copy of the report layout template.
Previewing the Modified Notification
Before uploading your modified report layout template to the BI catalog, you should preview the output with the changes that you made. You can avoid uploading a broken report that displays an error to users.-
Replace the path at the beginning of the modified .rtf template with the location of the subtemplate that you downloaded as a prerequisite. For example, change
<?import:xdoxsl:///Common Content/Templates/Workflow Notification Subtemplate.xsb?>to<?import:file:///C:/Template_Directory/FinFunWorkflowNotificationSub.rtf?>.Note: Save the original path information so you can copy it back after previewing. -
In the Preview group on the Publisher ribbon, click HTML.
The following figure shows an example of how the account combination appears in the preview. The value for the company segment is 31111. The segment description for cost center is R&D US. The description for the account segment is White Wine Revenue, and the value for the product segment is 0000.

-
If the preview reflects your changes as expected, then change the subtemplate path in the .rtf file back to the original location.
-
In the Tools group on the Publisher ribbon, click Validate Template.
-
Save the modified report layout template.
Uploading the Modified Report Layout Template
To use the modified report layout template for future journal approval notifications:-
Click the Catalog link on the Oracle Business Intelligence home page to open the Catalog page.
-
In the Folders pane, expand the folder.
-
Select the Journals folder to display the Data Models folder and the Journal Approval Report.
-
Click the Edit link for the Journal Approval Report to open the Journal Approval Report page.
-
Click the View a list link to open the Layout page.
Tip: The Layout page displays the copy of the predefined report layout template that was automatically created in step 5 of the task Downloading the Report Layout Template. If you're not satisfied with your changes, you can revert back to this copy by making it the default layout. (Refer to step 11.) Alternatively, you can revert back to the predefined report layout template by deleting the Journal Approval Report folder from the directory . -
Click the Create button. A page opens with a Create Layout section and an Upload or Generate Layout section.
-
In the Upload or Generate Layout section, click the Upload button. The Upload Template File dialog box opens.
-
Complete the fields, as shown in this table.
Field
Value
Layout Name
Enter a name for the modified report layout template. For example, enter Modified Journal Approval Template.
Template File
Click Browse. Locate and select the modified report layout template that's on your local drive. Click Open to return to the Upload Template File dialog box.
Type
RTF Template
Locale
English
-
Click Upload. The Journal Approval Report page returns to the thumbnail view and displays the report layout template that you just uploaded, along with the original copy.
Note: Configurable workflow notifications are refreshed every 24 hours so that they perform better for your users. But when you're making changes to reports, subtemplates, or data models, you can apply your changes immediately so they're available for testing. For more information, see the Apply Changes to Workflow Notifications Immediately After Upload topic. -
Click the View a list link to return to the Layout page with the list of the report layout templates.
-
In the row for the report layout template that you just uploaded, click the Default Layout option. This step enables the modified report layout template for future journal approval notifications.
-
Click the Save button to save the change to the default layout.
- Overview of Financials Configurable Workflow Notifications
- Overview of Oracle Analytics Publisher Best Practices for SaaS Environments
- Set Up for RTF and Excel Report Layout Templates
- Add a Branding Logo and Change Other Shared Components in Workflow Notifications
- Best Practices for Content and Layout in Workflow Notifications