Example of Setting Up TAD Using Receivables Transaction Type for Creation of Credit Memo or Invoice for Intercompany
This example describes how Transaction Account Definition (TAD) rules can be defined to automatically generate distribution accounts for an intercompany transaction using Receivables transaction type for creation of credit memo or invoice.
Transaction Account Definition (TAD) rules are called to default provider or receiver distribution accounts or both for each transaction.
In this example, we will generate distribution accounts based on specific account combinations for the provider and receiver. These accounts will act as the default accounts but we will also override the intercompany segment value (the last segment) of each account with the trading partner company value.
- Creating a Mapping Set of Provider Organizations: Create a mapping set that maps intercompany Receivables transaction type to specific company segment values for provider organizations. When you enter a transaction, the transaction distribution for the provider is selected based on the selected Receivables transaction type. This mapping set is used in the account rule which is then assigned to Transaction Account Definition.
- Creating a Mapping Set of Receiver Organizations: Create a mapping set that maps intercompany Receivables transaction type to specific company segment values for receiver organizations. When you enter a transaction, the transaction distribution for the receiver is selected based on the selected Receivables transaction type. This mapping set is used in the account rule which is then assigned to Transaction Account Definition.
- Assign Mapping set rule to Provider Organizations: Mapping set created for provider organization in step 1 can be assigned to account rule created for provider organization.
- Assign Mapping set rule to Receiver Organizations: Mapping set created for receiver organization in step 2 can be assigned to account rule created for receiver organization.
- Creating the Transaction Account Definition: Create the transaction account definition to map the account rules previously created in step 3 and 4.
- Assigning the Transaction Account Definition to a Ledger: Assign the transaction account definition to your ledger.
- Creating Transaction Account Definition Enabled Transactions: Create transaction in intercompany module for Transaction Account Definition enabled ledger.
Creating Mapping Sets
Follow these steps to create mapping sets:
- Navigate to Setup and Maintenance.
- Manage Implementation projects.
- Search for Financials IP.
- Navigate to Financials > Define and Maintain Intercompany Processing Rule > Manage mapping set.
- Select the scope, under Subledger Application Setup > select and add > Apply and
Go to Task > Select Financials Common Module.1. Creating a Mapping Set of Provider Organizations
- Navigate to Setup: Financials > Intercompany > Manage Mapping Sets.
- Enter the name and short name for the mapping set.
- In the Output Type field, select Account Combination.
- In the Input Sources section, click Select and Add.
- In the Source field, select Intercompany Receivables Transaction type.
- In the Chart of Accounts section, click the Add icon.
- Select the chart of accounts.
- In the Mappings section, click the Add icon.
- In the Input > Intercompany Receivables Transaction Type, select the transaction type for either creation of credit memo or Invoice.
- In the output > selected COA, provide the chart of account segments to be used while selecting input Receivables Transaction Type.
- Add additional Input and Output combinations according to your requirements.
- Save and Close.
2. Creating a Mapping Set of Receiver Organizations- Navigate to Setup: Financials > Intercompany > Manage Mapping Sets.
- Enter the name and short name for the mapping set.
- In the Output Type field, select Account Combination.
- In the Input Sources section, click Select and Add.
- In the Source field, select Intercompany Receivables Transaction type.
- In the Chart of Accounts section, click the Add icon.
- Select the chart of accounts.
- In the Mappings section, click the Add icon.
- In the Input > Intercompany Receivables Transaction Type, select the transaction type for either creation of credit memo or Invoice.
- In the output > selected COA, provide the chart of account segments to be used while selecting input Receivables Transaction Type.
- Add additional Input and Output combinations according to your requirements.
- Save and Close.
Assign Mapping Sets to Rules
-
3. Assign Mapping set rule to Provider organizations
- Navigate to Setup: Financials > Intercompany > Manage Account Rules.
- Click the Add icon.
- Enter the name and short name for the rule.
- Select the chart of accounts.
- In the Rules section, click the Add icon.
- Add a rule by selecting the value type as Mapping set.
- Select the value defined in point 1 while creating mapping set for provider organization.
- Save the rule.
4. Assign Mapping set rule to Receiver Organizations- Navigate to Setup: Financials > Intercompany > Manage Account Rules.
- Click the Add icon.
- Enter the name and short name for the rule.
- Select the chart of accounts.
- In the Rules section, click the Add icon.
- Add a rule by selecting the value type as Mapping set.
- Select the value defined in point 2 while creating mapping set for receiver organization.
- Save the rule.
5. Creating the Transaction Account Definition
For the distributions to be automatically created for the intercompany transactions, we have to create a transaction account definition that uses the account combination rules
- Navigate to Setup: Financials > Intercompany > Manage Transaction Account Definitions.
- Click the Add icon.
- Enter the name and short name of the Transaction Account Definition (TAD).
- Select the chart of accounts.
- In the Account Combination Rule for the provider distribution account, select the provider account rule. Similarly, select the account combination rule for the receiver distribution account.
- Click Activate to activate the transaction account definition.
6. Assigning the Transaction Account Definition to a Ledger
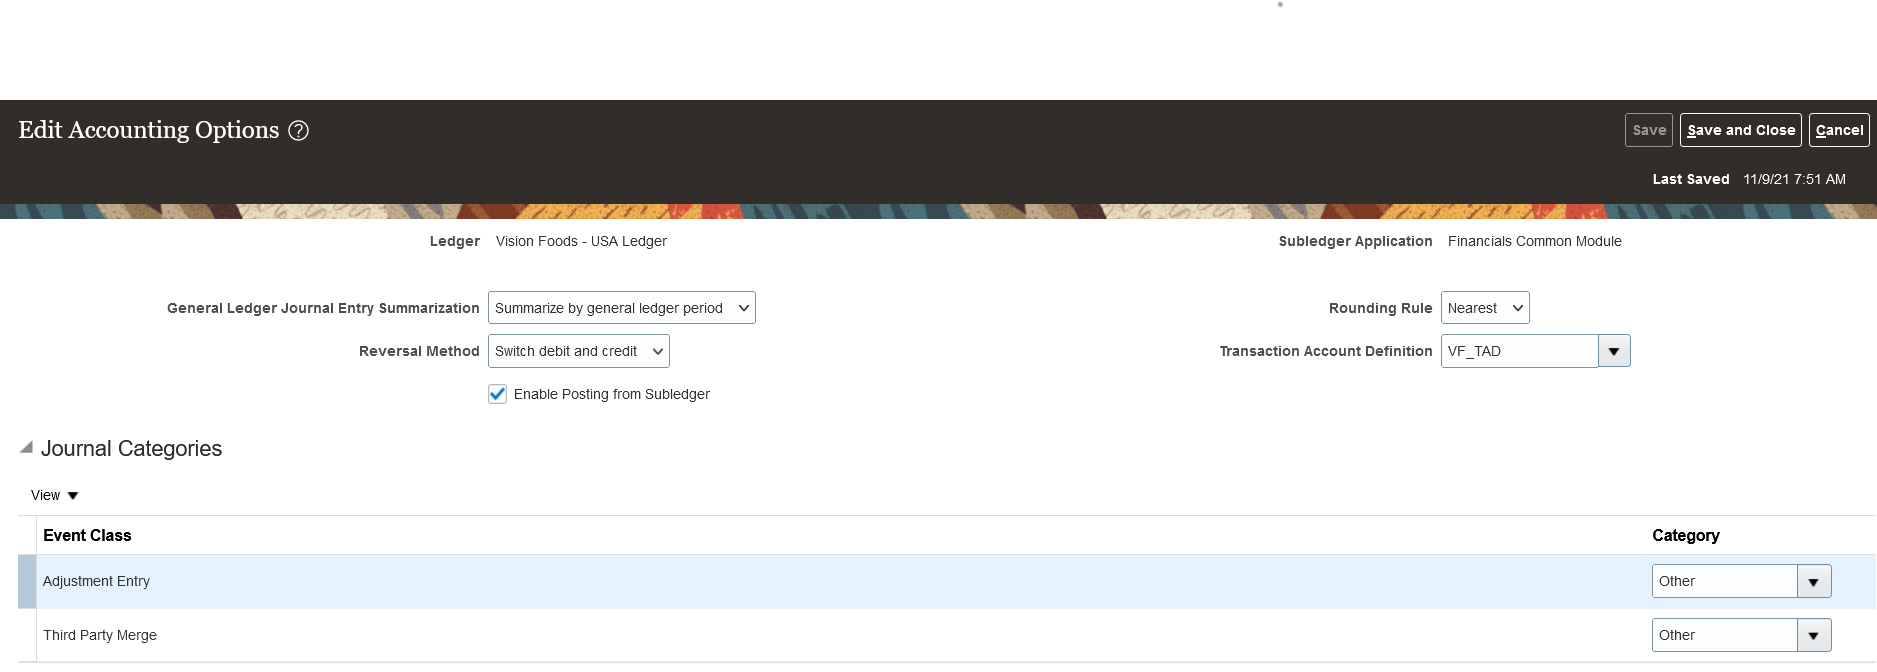
For the transaction account definition rule to work, you must assign the transaction account definition to a ledger as shown in the following image.- Navigate to the Setup: Financials > Intercompany>Manage Subledger Accounting Options page.
- Search for the ledger.
- Expand the ledger.
- Select Financials Common Module and click the Edit Accounting Options icon.
- Select the Transaction Account Definition you defined.
- Select the Transaction Account Definition that you created earlier.
- Save the updated accounting options.
- Now the Transaction Account Definition is assigned to the ledger.
7. Creating Transaction Account Definition Enabled Transactions
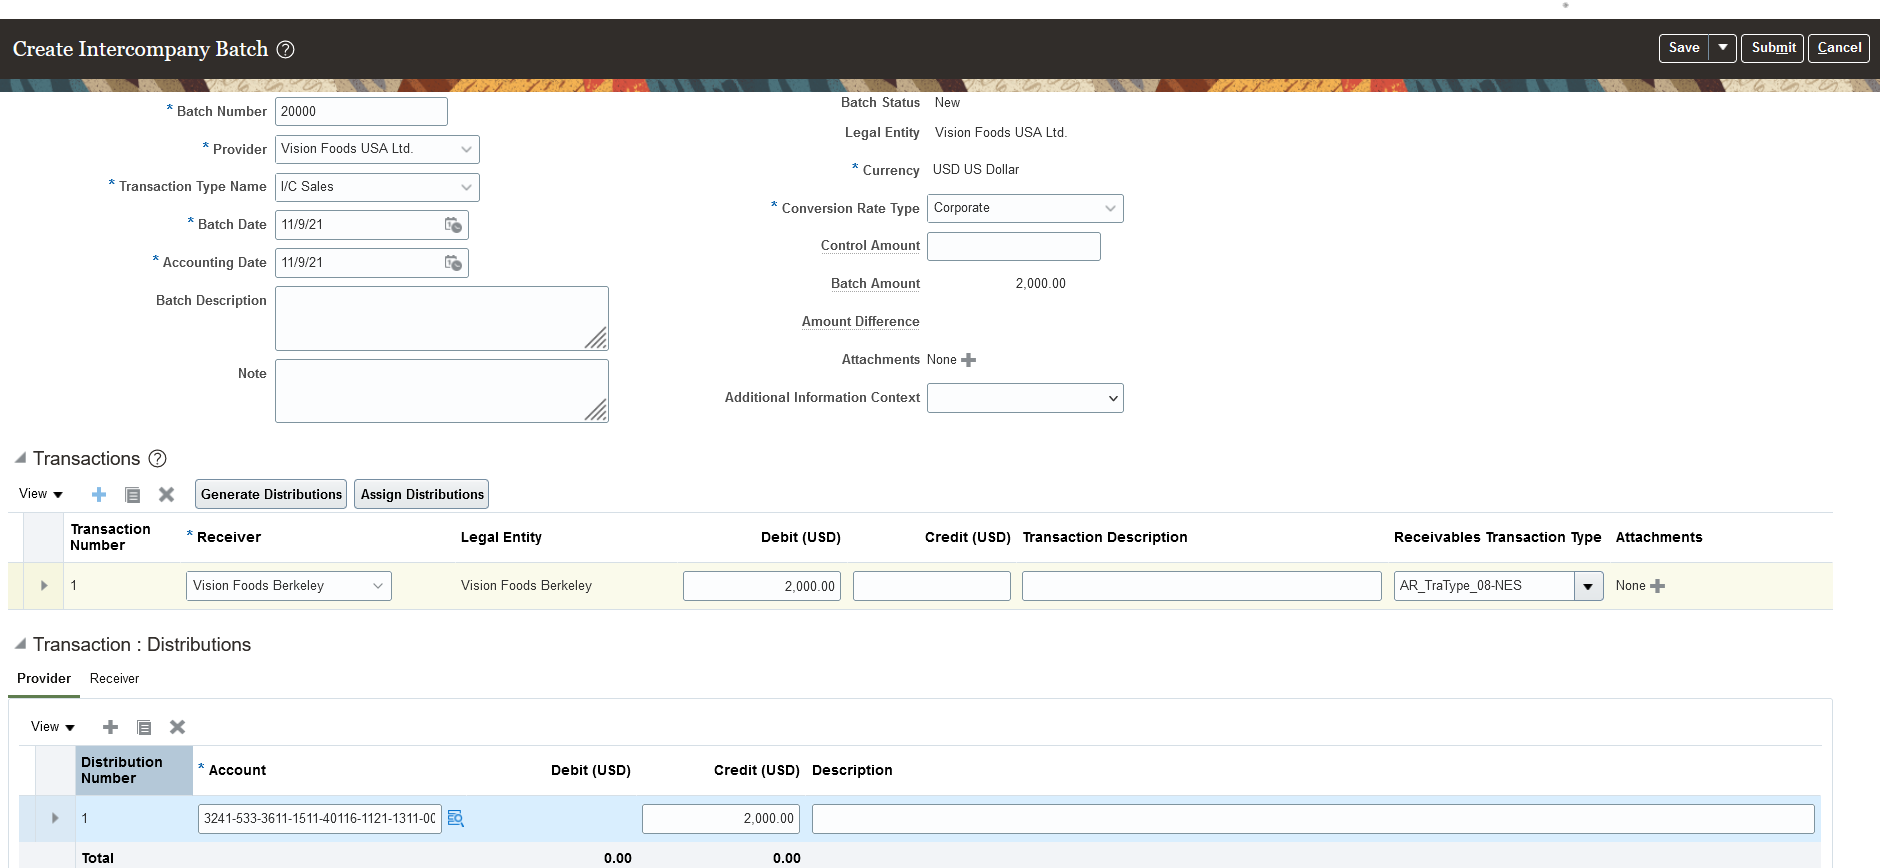
Now, when we create transactions, the distributions are automatically created as illustrated in the following image.- Navigate to Intercompany Accounting > Transactions.
- Click the Tasks Panel tab > Create Transactions.
- Enter a batch number.
- Select a provider, for example, Vision Foods USA Ltd.
- In the Transactions section, click the Add Row icon.
- Select the receiver organization and enter a debit amount. For example, $2000.
- Select Receivables transaction type, for example, AR_TraType_08-NES for provider distribution to get assigned automatically.
- Click Assign Distributions. This will automatically assign the provider distribution accounts.
- Similarly, in order to assign distribution for receiver automatically select receivable transaction type, AR_TraType_22-NES and click assign distributions. This will automatically assign the receiver distribution accounts.
- In the Transactions 1: Distributions region, click the Provider tab to check the provider distribution. Since the provider legal entity is associated with the ledger that has the transaction account definition assigned to it, the distribution is automatically generated.
- Similarly, since the receiver legal entity is associated with the ledger that has the transaction account definition assigned to it, the distribution will be automatically generated.