How Supplier Bank Account Import Data is Processed
Use the Import Supplier Bank Accounts process to import supplier bank accounts and associated data into Oracle Payments.
You can download a spreadsheet template to enter your supplier bank account data. The template contains an instruction sheet to guide you through the process of entering your data. The template also provides field-level bubble help.
Before you can import supplier bank accounts and associated data, you must create suppliers.
If the suppliers bank account is used for international payments, you must also create the following entities:
-
Banks
-
Bank Branches
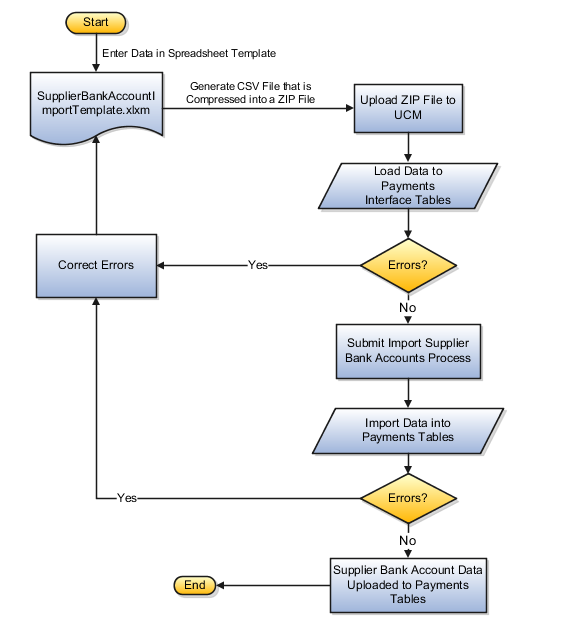
This figure illustrates the flow of importing supplier bank accounts into the application, as well as correcting errors.
To access the SupplierBankAccountImportTemplate.xlsm spreadsheet template, complete these steps:
-
Go to the File-Based Data Import for Oracle Financials Cloud guide.
-
In the Table of Contents, click the File-Based Data Imports link.
-
Click the Supplier Bank Account Import link.
-
In the File Links section, click the link to the Excel template.
Follow these guidelines when preparing your data in the worksheet:
-
Enter the required information for each column. See the tool tips on each column header for detailed instructions.
-
Don't change the order of the columns in the template.
-
You can hide or skip the columns you don't use, but don't delete them.
Tabs That Affect the Import Supplier Bank Accounts Process
The Supplier Bank Account Import spreadsheet template contains an Instruction tab, plus more tabs that represent the interface tables where the data is loaded.
The following table contains the names of the tabs in the Supplier Bank Account Import spreadsheet template and a description of their contents.
|
Spreadsheet Tab |
Description |
|---|---|
|
Instructions and CSV Generation |
Contains instructions and information about:
Other information includes the following:
|
|
IBY_TEMP_EXT_PAYEES |
Enter information about the supplier payees. |
|
IBY_TEMP_EXT_BANK_ACCTS |
Enter information about the supplier bank accounts. |
|
IBY_TEMP_PMT_INSTR_USES |
Enter information about the supplier bank account assignments. |
How Import Supplier Bank Accounts Data Is Processed
This table describes the flow of data when you import supplier bank accounts into Payments:
|
Sequence |
Action |
Result |
|---|---|---|
|
1. |
From the File-Based Data Import for Oracle Financials Cloud guide, download the SupplierBankAccountImportTemplate.xlsm spreadsheet template. It's found in the File-Based Data Imports chapter, Supplier Bank Account Import section. |
The File-Based Data Import spreadsheet is downloaded. |
|
2. |
Enter data in the spreadsheet template. Follow the instructions on the Instructions and CSV Generation tab under the section titled Preparing the Table Data. |
Follow the instructions on the Instructions and CSV Generation tab under the section titled Preparing the Table Data. |
|
3. |
Click Generate CSV File. Follow the instructions on the Instructions and CSV Generation tab under the section titled Loading the Data in the Instructions and CSV Generation tab. |
A CSV file is generated that's compressed into a ZIP file. |
|
4. |
To upload the ZIP file:
|
The ZIP file is uploaded. Data is loaded into Payments interface tables successfully or with errors. |
|
5. |
To submit the Load Interface File for Import process:
|
Data is loaded into Payments interface tables. |
|
6. |
Follow the instructions on the Instructions and CSV Generation tab under the section titled Importing the Loaded Data |
Load process purges Payments interface tables. |
|
7. |
To submit the Import Supplier Bank Accounts Process:
|
The Import Supplier Bank Accounts process first validates the supplier bank accounts and associated data and then imports the data from the Payments interface tables into the following Payments tables:
After you submit the Import Supplier Bank Accounts process, the following data appears in Payments:
The log output of the Import Supplier Bank Accounts process reports the number of successful and rejected records. |
|
8. |
To correct import errors:
|
Failed records remain in the Payments interface table and aren't purged automatically. |
|
9. |
Import supplier bank account data at one of the following levels if you've their associated identifiers:
|
If only the Supplier Number is provided, the supplier bank account is created at the supplier level. If the Supplier Number and the Supplier Site Code are provided, the supplier bank account is created at the supplier site level. |
|
10. |
Set the Primary indicator in the SQL loader file for only one bank account per supplier per level. |
If the Primary indicator is set for multiple bank accounts, then Payments accepts only the first bank account with the indicator set to be the primary account at that level. If the Primary indicator isn't set for any bank account, Payments accepts the first bank account as the primary. |
|
11. |
Manage intermediary account details and create factor accounts manually using the Manage Suppliers page. |
The Import Supplier Bank Accounts process doesn't allow you to import the following data:
|