- Using Financials for the Americas
- Generate Auxiliary Document Security Form
Generate Auxiliary Document Security Form
You can generate a contingency fiscal document using the Auxiliary document security form contingency type.
This image shows the contingency fiscal document generation using Auxiliary Document Security form:
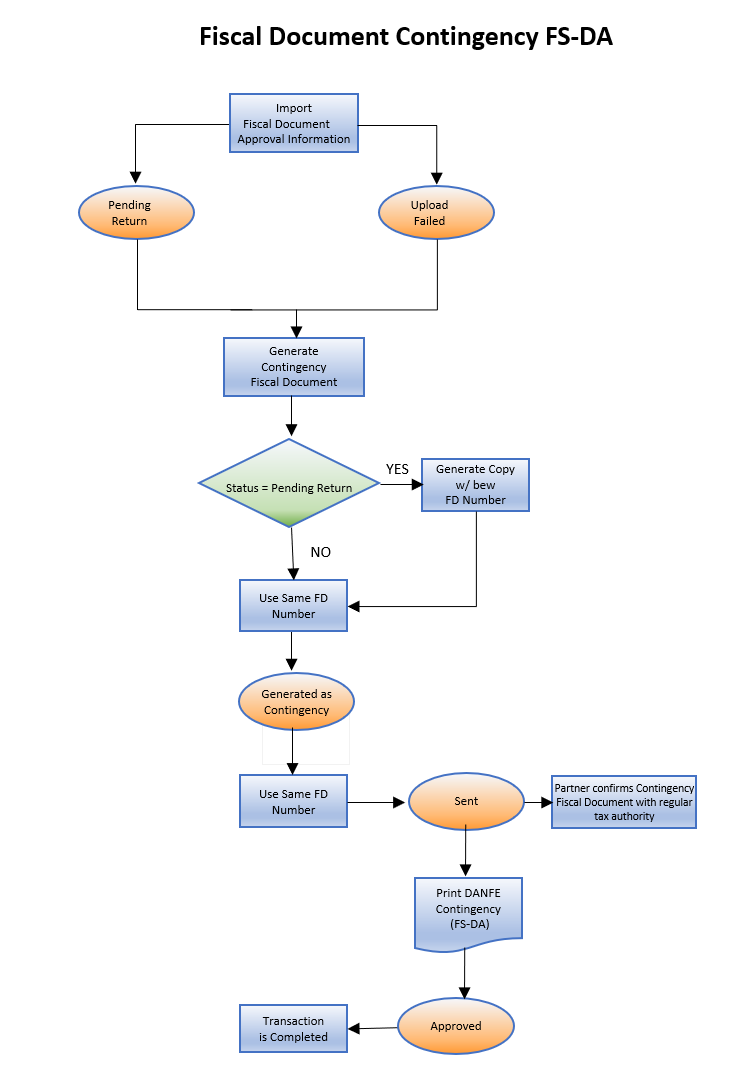
Follow these steps:
-
From the Shipments Work area, navigate to the Manage Fiscal Document Generation task.
Note: You can also navigate to the Manage Fiscal Document Generation task from the Billing work area.
- In the Search region, enter the selection criteria.
- Click Search.
- Select the transaction.
-
In the Actions menu, select Generate Contingency Fiscal
Document to open the Enter Contingency Information page.
Note: This action is allowed only if the fiscal document status is Upload Failed or Pending Return.
- In the Contingency Type field, select Auxiliary document security form.
- In the Contingency Series field, select the series of contingency fiscal document. The Contingency Series value is displayed based on the Manage Fiscal Document Generation Controls configuration.
- In the Contingency Justification field, enter the justification text. This is required by the tax authority.
-
Click Generate Fiscal Document. This action submits the
Generate Fiscal Document Number process that generates a new fiscal document
key.
Note: If the fiscal document status is Pending Return, a copy of the original fiscal document is generated with a new fiscal document number. However, if the fiscal document status is Upload Failed, the same fiscal document number is used for the contingency fiscal document. The fiscal document status is changed to Generated as contingency.
-
In the Actions menu, select Send Fiscal Documents to Tax
Authority. This process creates an extract file containing the
contingency fiscal document information and changes the fiscal document status
to Sent.
Note: In this case, the partner does not generate a contingency request. However, after the network connection with the regular tax authority is restored, the partner must transmit the contingency fiscal document to the regular tax authority as a confirmation that a contingency fiscal document was issued.
- In the Send Fiscal Documents to Tax Authority page, enter the selection criteria to select the fiscal document records that you want to extract.
- Click Submit Request.
- In the Actions menu, select Print Fiscal Document to print the DANFE for Auxiliary document security form (FS-DA).
- Select the transaction.
- In the Actions menu, select Capture Tax Authority Return Status to manually approve the fiscal document. The Capture Tax Authority Return Status page opens.
- In the Status field, select Approved.
- In the Processed Date and Time field, enter the current date and time.
- In the Protocol Number field, enter the numeric value of the bar code of the Auxiliary document security form (FS-DA).
-
Click Apply. The fiscal document status changes to
Approved.
If the fiscal document was generated in Receivables, the transaction is automatically completed. If fiscal document was generated based on the shipment, the Ship Confirm action is enabled and you can proceed with your shipment flow.