Configure Smart View Client for Users
Smart View is a multidimensional pivot analysis tool combined with full Excel functionality. Smart View enables you to interactively analyze your balances and define report using a familiar spreadsheet environment.
Install Smart View, an add-in to Excel, to each client computer. To download the installation files:
-
Navigate to the Financial Reporting Center and select the Open Workspace for Financial Reports task.
-
In the Enterprise Performance Management System Workspace, select Tools > Install > Smart View.
Once Smart View is installed, you must configure the connection using the Smart View Shared Connections URL. To derive the Shared Connections URL follow these steps:
-
From the Financial Reporting Center task panel, select Open Workspace for Financial Reporting.
-
Edit the workspace URL by removing index.jsp and adding SmartViewProviders at the end.
Note: This URL is an example for a Cloud-based environment. If the workspace URL is https://efops-rel5st4-cdrm-external-bi.visioncorporation.com:10622/workspace/index.jsp, the Shared Connections URL is https://efops-rel5st4-cdrm-external-bi.visioncorporation.com:10622/workspace/SmartViewProviders. -
Copy the URL.
-
Open Excel.
-
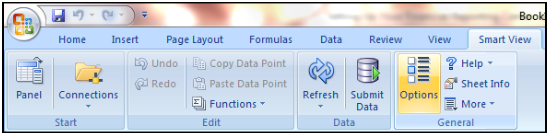
Navigate to the Smart View menu > Options
This image shows the Smart View ribbon on the Excel spreadsheet. The task lists include Panel, Connections, and Options.
-
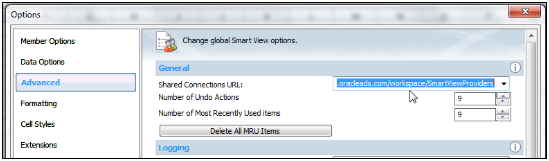
Click the Options button and select the Advanced option.
The following figure shows the Options window with the Advanced option selected. The shared connections URL appears in the General section.
-
Paste the URL in the Shared Connections URL field.
-
Click OK.
For more information about configuring the Smart View client for users, see the Oracle Smart View for Office User's Guide.
To connect to Oracle Fusion General Ledger Balances cubes in Smart View:
-
Start Smart View.
-
Click the Smart View tab and select the Panel icon. The Smart View pane opens.
-
Click the Shared Connections button on the task pane.
-
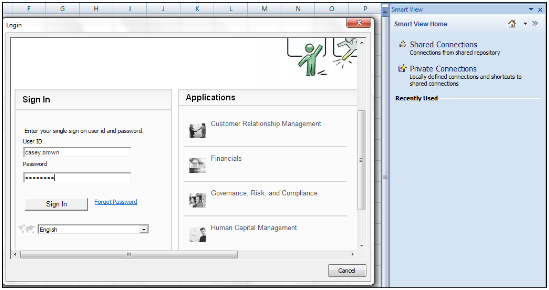
Sign in with your user name and password.
The following image shows the Sign In window for connecting to the database.
-
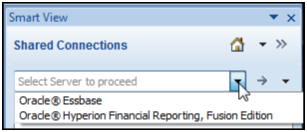
Click the Select Server list icon to proceed.
The following figure shows the Shared Connections section on the Smart View panel. The Select Server to proceed field is selected and two values appear in the drop-down list: Oracle Essbase, Oracle Hyperion Financial Reporting.
 Note: If the Essbase Server isn't there, then it has to be added. Use the following steps:
-
Click the Add Essbase Server link.
-
Specify the Essbase Server login and password.
-
Expand the Essbase server and locate its cube.
-
-
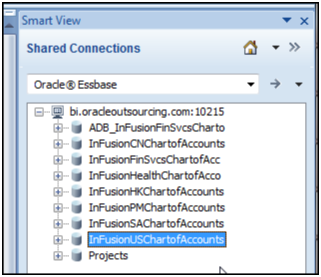
Select Oracle Essbase from the list of shared connections.
-
Click the Expand to expand the list of cubes.
-
Expand your cube that has the name of your chart of accounts.
The following figure shows the Shared Connections section on the Smart View panel. The Oracle Essbase server is expanded, showing several cubes.
-
Click db. A list of functions appears.
-
Click the analysis link.
To set how the name and alias of the Essbase database appears:
-
On the Smart View ribbon, click the Options button.
-
Select Member Options from the list and select the Member Name Display list.
-
You can select from among the following options:
-
Distinct Member Name: Only shows the full Essbase distinct path.
-
Member Name and Alias: Shows both the member name and the alias.
-
Member Name Only: Shows only the member name.