Modify the Printable Expense Report Template
The Printable Expense Report template is a RTF file. You can change the information that displays on the Printable Expense Report template. First you download the RTF file, FinExmExpenseTemplate, to your local drive from Oracle Analytics Publisher.
Then you can modify attribute names or attribute display text with their corresponding predefined attributes. Finally, you upload the modified template to Oracle Analytics Publisher.
On the FinExmExpenseTemplate RTF file, you can modify the following:
-
Attribute names: Displayed as UI text on the RTF file.
-
Attribute display text: Displayed as bold text on the RTF file.
-
Attributes: Code that corresponds to the attribute display text on the RTF file.
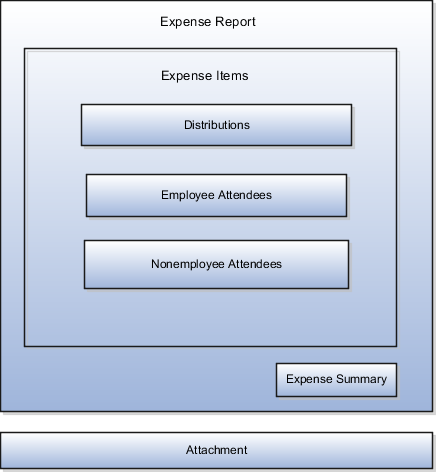
The following table contains regions on the Printable Expense Report template that correspond to predefined view objects.
|
Regions on the RTF Template |
Predefined View Objects |
|---|---|
|
Expense Report Header |
PrintableReportVO |
|
Expense Items |
PrintableExpenseVO |
|
Distributions |
PrintableExpenseDistVO |
|
Employee Attendees |
EmployeeExpenseAttendeeVO |
|
Nonemployee Attendees |
NonemployeeExpenseAttendeeVO |
|
Expense Summary |
ExpenseSummaryVO |
|
Attachment |
AttachmentVO |
Given the region on the Printable Expense Report template in which your intended change is located, you can then identify which view object table to consult. The view object tables list the attribute names and their corresponding predefined attributes. The predefined attributes are available for you to add to the Printable Expense Report template. To access the view object tables, click the Printable Expense Report Template Attributes related link in this topic.
The following diagram illustrates the layout of the regions on the Printable Expense Report template.
Prerequisites
Before you can modify the FinExmExpenseTemplate RTF file, you must download and install the Template Builder for Word, which is a BI Publisher add-on for Microsoft Word. To download and install the Template Builder for Word, follow these steps:
-
Sign into the Oracle Analytics Publisher server with the BI Administrator Role.
-
On the Oracle Analytics home page by the Get Started section, click the Download BI Publisher Desktop Tools link.
-
Select and install Template Builder for Word.
Downloading the Printable Expense Report Template
To download a copy of the FinExmExpenseTemplate RTF file from Oracle BI Publisher, complete these steps:
-
Sign into the Oracle BI Publisher server with the BI Administrator Role.
-
Navigate: Navigator > Tools > Reports and Analytics.
-
On the Oracle BI Publisher home page, click the Catalog menu.
-
On the Catalog page in the Folders pane, expand Shared Folders > Financials > Expenses.
-
Click the Expenses folder to display the Printable Expense Report template.
-
By the Printable Expense Report template, click the Edit link.
The Printable Expense Report Template page appears.
-
By the FinExmExpenseTemplate icon, click the Edit link.
-
Click Save as to save the Printable Expense Report template RTF file to your local drive.
Tip: Save the downloaded template with the name UpdatedPrintableExpenseReport to distinguish it from the predefined template.
Adding a Predefined Attribute
To add a predefined attribute to a location on the Printable Expense Report template, complete these steps:
-
Select existing attribute display text, such as ExpenseReportDate.
-
Copy the attribute display text by pressing Ctrl + C on your keyboard.
-
Move your cursor to the location where you want to add the predefined attribute and press Ctrl + V on your keyboard.
-
Select the new field you pasted, right-click, and navigate: BI Publisher > Properties.
The BI Publisher Properties dialog box appears.
-
In the Text to display field, change the attribute display text.
-
Select the Advanced tab.
-
Click the Printable Expense Report Template Attributes related link in this topic.
-
In the Printable Expense Report Template Attributes topic, determine which view object table to consult based on the location on which you want to add the predefined attribute.
For example, if you want to add a predefined attribute to the header region of the Printable Expense Report template, you would consult the PrintableReportVO - Expense Report Header Region table. Then, in the In the PrintableReportVO - Expense Report Header Region table, locate the UI label and associated predefined attribute that you want to add.
-
In the Advanced tab, enter the predefined attribute between the question marks.
-
Click OK.
Uploading the Printable Expense Report Template
To upload the FinExmExpenseTemplate RTF file to Oracle BI Publisher, complete these steps:
-
Sign into the Oracle BI Publisher server with the BI Administrator Role.
-
Navigate: Navigator > Tools > Reports and Analytics.
-
On the Oracle BI Publisher home page, click the Catalog menu.
-
Click the New icon.
-
From the New menu, select Report.
-
On the Create Report page, select the Use Data Model icon.
-
In the Select Data Model dialog box, click Cancel to bypass the data model. which is not applicable.
-
Click OK to confirm cancellation.
-
On the Data Model page, click the Upload icon.
-
In Upload Template File dialog box, enter the following:
-
In the Layout Name field, enter FinExmExpenseTemplate.
-
In the Template File field, browse for your modified Printable Expense Report template RTF file on your local drive, select the template, and click Open.
-
From the Type choice list, select RTF Template.
-
From the Locale choice list, select English (United States).
-
Click Upload.
The modified RTF file appears with the layout name FinExmExpenseTemplate.
-
-
Click the Save Report icon.
The Save As dialog box appears.
-
In the Save In field, navigate to the folder where you want to save the modified Printable Expense Report template.
Tip: A copy of your modified Printable Expense Report template is automatically saved in the Expenses folder at: Shared Folders > Custom > Financials > Expenses. -
In the Name field, enter a name for the modified Printable Expense Report Template, such as UpddatedFinExmReport.
Caution: When you name the report in the Name field, don't include spaces. -
Click OK.
Now you can navigate to the Expenses System Option page through Setup and Maintenance. After you click a specific business unit link in the Specific Business Units section, select the Corporate Options for Expense Report tab. Then you can select your modified expense report template from the Printable Expense Report Format choice list.
Adding an Attachment Region to the Printable Expense Report Template
If your Printable Expense Report Template is missing the Attachment region, you can add the missing components as follows:
-
<?for-each:Attachment?>
-
Placeholder image with alt-text = url:{DOCUMENT}
-
<?TITLE?>
-
<?end for each?>
To add the missing components, follow these steps:
-
In the RTF Printable Expense Report template, scroll to end of the file.
-
Select and copy any For field and paste on a separate line outside the last table at the end of the template.
-
Select For and navigate: Add-ins > BI Publisher > Field Browser.
-
In the Field Browser dialog box, click Show All.
-
Scroll to the end of the list.
-
Select the last For in the Text and Code fields in the Field Browser dialog box. The last For is the For you just copied in Step 2 and it's what you must update.
-
In the Edit field, change the code to <?for-each:Attachment?>
-
Click Update.
-
Click Close.
-
After For in your work area of the RTF Printable Expense Report template, press the Enter key on the keyboard twice.
-
Navigate: Insert > Pictures.
-
Browse to the image.
-
Select the image and click Insert.
-
Click the image.
-
On the image, right-click the mouse and select Picture.
-
In the Format Picture dialog box, select the Alt Text tab.
-
In the Alternative text field, enter url:{DOCUMENT}.
-
Click OK.
-
After the image in your work area, press the Enter key on the keyboard twice.
-
Copy and paste any field in your work area.
-
Select the field you pasted and navigate: Add-ins > BI Publisher > Field Browser.
-
In the Field Browser dialog box, click Show All.
-
Scroll to the end of the list.
-
Select the final entry.
-
In the Edit field, change the code to <?TITLE?>.
-
Click Update.
-
Click Close.
-
Double-click the field you pasted. The Text Form Field Options dialog box appears.
-
In the Default text field, enter Title.
-
Click OK.
-
After Title in your work area, press the Enter key on the keyboard twice.
-
Select and copy any End For field and paste on a separate line after Title.
-
Select End For and navigate: Add-ins > BI Publisher > Field Browser.
-
In the Field Browser dialog box, the Text and Code fields show exactly what you need, so you don't have to change the code.
-
Click Close.
-
Click the Save icon in the RTF Printable Expense Report template.