Overview of Managing Fiscal Documents for Imported Receivables Invoices
Oracle Fusion Cloud ERP now enables you to import fiscal attributes to generate fiscal documents based on imported Receivables transactions.
You can import the transaction data to create transactions in Receivables using AutoInvoice.
-
Oracle Cloud Projects
-
Oracle Cloud Distributed Order Orchestration
-
non-Oracle financial systems
You can also create and transfer order lines from Oracle CPQ Cloud to AutoInvoice using the Receivables Invoice Service.
Use these steps to create transactions in Receivables using AutoInvoice:
-
Import Fiscal Attributes to Interface Tables.
-
Import AutoInvoice with Fiscal Attributes.
-
Use the Spreadsheet for Fiscal Attribute Corrections.
- Import Fiscal Attributes using Oracle ERP Integration.
Fiscal Document Flow for Imported Receivables Invoices
This image shows the general fiscal document flow for Receivables transactions imported from a feeder system:
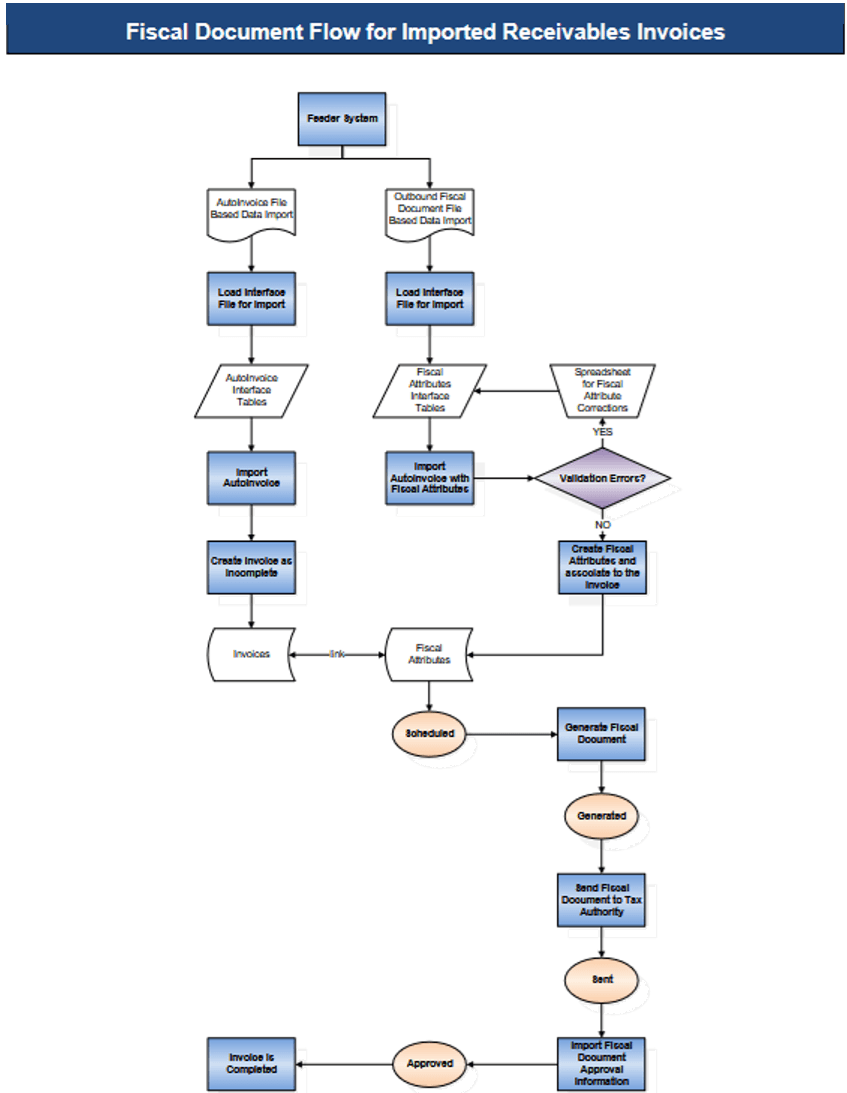
Here's the description of the fiscal document flow for imported Receivables invoices:
- Use AutoInvoice to import the transaction data from Oracle or non-Oracle feeder systems and
create Receivables invoices.
Invoices are created as incomplete and are completed only after the fiscal document approval process. AutoInvoice checks if the fiscal document feature is enabled for the business unit in the Manage Localization System Options configuration. The fiscal document status is Transaction Entered.
- Similar to the AutoInvoice process, use the File-Based Data Import spreadsheet and the Load Interface File for Import process to import fiscal attributes to the respective interface tables.
- Run the Import AutoInvoice with Fiscal Attributes process to validate the imported data. You can correct the invalid records in the interface using the Spreadsheet for Fiscal Attribute Corrections.
- Valid records are imported as fiscal attributes and associated with corresponding invoices. The fiscal document status changes to Scheduled.
- Run the Generate Fiscal Document process to validate the fiscal document information, and generate the fiscal document key and the fiscal document number. The fiscal document status changes to Generated.
- The fiscal document can now be extracted and consumed by a third party who submits the request for approval by the tax authority. The Send Fiscal Document to Tax Authority process creates an extract file containing the fiscal document information and changes the fiscal document status to Sent.
- Partners generate the fiscal document XML file based on the extract file and send this information to the tax authority.
- The tax authority can approve, reject, or raise validation errors for the fiscal documents. Partners communicate the tax authority response through the Import Fiscal Document Approval Information process.
- If the fiscal document is approved, the status changes to Approved and the Receivables invoice is automatically completed.