Year-End Closing Rules
You must define closing rules to configure the General Ledger (GL) accounts that will be closed (source account) and the corresponding GL account (target account) to which the closed balance will be moved as part of the year-end close process.
You define closing rules in Calculation Manager in Oracle General Ledger to generate closing journal entries.
According to OMB requirements and USSGL rules, it’s recommended that GL closing rules are created to close year-end journal entries for USSGL accounts. The following table shows an example of some commonly used USSGL accounts for which year-end closing rules need to be created:
| Source USSGL Account | Target USSGL Account |
|---|---|
| 310700 (Expended Appropriation subsidiary account) | 310000 (Primary Unexpended Appropriations) |
| 490200 (Expenditures Paid) | 420100 (Total Actual Resources Collected) |
| 570000 (Expended Appropriation) | 331000 (Net Operations) |
| 610000 (Expenses) | 331000 (Net Operations) |
| 510000 (Revenue) | 331000 (Net Operations) |
| 488100, 487100 (Obligation Upward/Downward Accounts) | 480100 (Undelivered Orders - Obligations, Unpaid) |
| 498100, 497100 (Expenditure Upward/Downward Accounts) | 480100 (Delivered Orders - Obligations, Unpaid) |
- Create a balances cube for your ledger
- Create allocation rules in Calculation Manager
Create a Balances Cube
A balances cube stores financial balances in a multidimensional database for interactive reporting and analysis.
In this topic, you’ll see an example of how to create a General Ledger balances cube for your ledger, for example USFed1 US.
Before you start
Before you create a balances cube, you must ensure that your ledger is set up. You must also verify the account combinations set up for your chart of accounts. To view the account combinations, go to the Manage Account Combinations task in the Financial Reporting Structures functional area in the Functional Setup Manager.
- In the Setup and Maintenance work area, go to the following:
- Offering: Financials
- Functional Area: General Ledger
- Task: Review and Submit Accounting Configuration
- Click the Scope link.
- On Select Scope, from the Primary Ledger drop-down list, select Select and Add and click Apply and Go to Task.
- On Manage Primary Ledgers, search for and select the USFed1 US ledger and then click Save and Close.
- On Review and Submit Accounting Configuration, review the accounting details and
then click Submit.
A confirmation message appears, indicating that the Create Accounting Configuration process has been submitted.
- Click OK in the Confirmation dialog box.
- Access the Scheduled Processes work area from the Tools menu in the Navigator to verify that the Create Accounting Configuration process and its subprocesses completed successfully.
- Restart your browser to review your newly generated balance cubes for your ledger in the Calculation Manager.
Create Allocation Rules
Use the Create Allocation Rules task in the Journals work area to access the Calculation Manager to create, validate, deploy, and administer multidimensional allocation rules for the U.S. Federal Financials year-end close process.
Use allocation rules to configure year-end closing rules that define the source GL accounts that will be closed and the target GL accounts to which the closed balance will be moved before generating year-end closing journal entries periodically.
In this topic, you’ll see an example of how to create a new rule that will be used to close the USSGL source account 310700 (Expended Appropriation subsidiary account) and move the closed balance to the USSGL target account 310000 (Primary Unexpended Appropriations). To close the USSGL account (for example, 310700), you’ll close the natural account (for example, 31070001).
Use the steps in this example to create allocation rules for all the other closing rules as required.
For more information on frequently asked questions when creating allocation rules, see the Allocations and Periodic Entries chapter in Oracle Fusion Cloud Financials: Implementing Enterprise Structures and General Ledger guide.
- Go to Calculation Manager:
- From the Journals work area, click Create Allocation Rules task from the Tasks pane. This opens the Enterprise Performance Management workspace.
- From the Navigate menu, select Administer and then Calculation Manager.
- Find the balances cube for the chart of accounts that’s associated with the ledger and then expand the db node. Right-click Rules and select New.
- In Rule Name, enter a name for the rule, for example, Close Expenses.
- Accept the default values for the remaining fields and click
OK.
The Rule Designer opens in a new tab with the name of the rule you just entered.
-
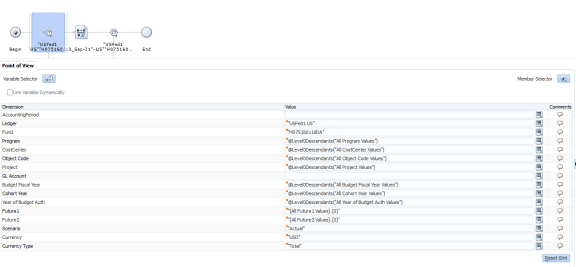
From the New Objects list, select the Point of View object and then drag and drop it between the Begin and End components in the flow chart in the Designer area.
The dimensions appear based on your ledger and the balances cube.
Set the Point of View (POV) to default values that are fixed throughout the allocation rule. A POV defines the context for calculations, specifying which members of dimensions will be used in the calculations. For example, if you want to run the closing rule for only one ledger but you want to include all funds, you can assign a specific value to the dimension, Ledger and assign the Level0Descendants value to the dimension, Fund. Level0Descendants acts as a wildcard and if you select it, the rule will process all available funds in the ledger.
- Set up the dimensions for the point of view. To set a dimension value:
- Click the Select icon next to the Value field and then select Member, or select Variable to select a runtime prompt variable.
- On Member Selector, select a member and move it to the Selections panel. If you selected Variable in the previous step, select the variable.
- Click OK.
The following table describes example values for the dimensions:
Dimensions for POV with Example Values
Dimension Value AccountingPeriod It’s recommended that you create a runtime prompt variable component for the rule so that the user is prompted to specify the period to use in the allocation calculation when the rule is run. This will also ensure that the rule doesn't have to be changed at the end of each fiscal year. This example uses a runtime prompt variable, AccountingPeriod. Ledger The ledger to be closed, for example, USFed1 US. Fund If you’re using this rule only for one fund, set this to the fund value. If you’re using this rule to close the account for all funds in the ledger, right-click All Fund Values, click Add Special, and then select Level0Descendants.Note: Level0Descendants acts as a wildcard and if you select it, all the available values are selected and processed.Program @Level0Descendants("All Program Values") CostCenter @Level0Descendants("All CostCenter Values") Object Code @Level0Descendants("All Object Code Values") Project @Level0Descendants("All Project Values") GL Account The account that will be used for the rule. Leave this field blank. Budget Fiscal Year @Level0Descendants("All Budget Fiscal Year Values") Cohort Year @Level0Descendants("All Cohort Year Values") Year of Budget Authority @Level0Descendants("All Year of Budget Auth Values") Future1 Select 0 to be used as the default, for example, "[All Future1 Values].[0]" Future2 Select 0 to be used as the default, for example, "[All Future2 Values].[0]" Scenario Select "Actual." This ensures that the rule is run with the actual balances in context. Currency "USD" Currency Type "Total" Here’s how the Point of View object looks like after you define the dimensions:
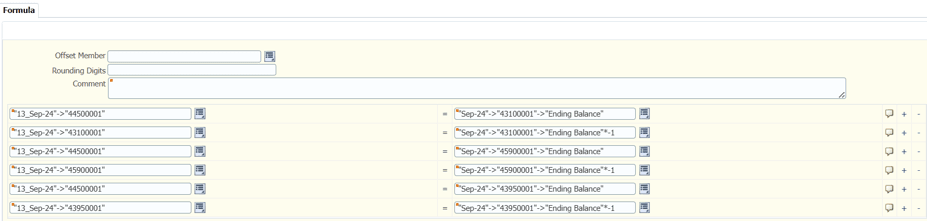
- Next, select the Formula object from the New Objects list, and then drag and drop it after the Point of View object in the flow chart in the Designer area.
- Set up the Formula object to define the source account
and target account for the closing journal. To define the source and target
values, click Select next to the field and then set up
the dimension values.
The following table describes example values for the formula fields:
Example Formula Values
Field Description Value Offset Member This is optional. Leave this blank. Source This is the source amount that will be allocated. Set the values for these dimensions: - Accounting Period: Set this to the last period of the fiscal year, for example, Sep-21.
- GL Account: This is the GL account you're closing. In this example, it’s 61000001.
- Balance Type: Set this to Ending Balance to close the balance of the account to $0.
Target This is the GL account to which the funds will be moved from the source account. Set the values for these dimensions: - AccountingPeriod: Set this to the closing adjustment period of the fiscal year.
- GL Account: This is the GL account you're moving the funds to. In this example, it’s 33100001.
You must define 2 formulas for each closing rule for a source and target combination:- Formula 1 will be used to copy the total amount from the source GL account to the target GL account.
- Formula 2 will be used to nullify or zero out the source GL account.
Here’s an example of how the formulas are defined for a closing rule:Target Source Comment "13_Sep-24"->"33100001" "Sep-24"->"61000001"->"Ending Balance" This formula moves the September 2024 ending balance of GL Account 61000001 to GL Account 33100001 in the closing period 13_Sep-24. "13_Sep-24"->"61000001" "Sep-24"->"61000001"->"Ending Balance"*-1 This formula reduces the amount of GL Account 61000001 to $0 in the closing period 13_Sep-24. Each closing rule can have many rows of source and target combinations. However, only one journal entry will be created for each rule.
Here’s an example that shows a closing rule with many rows of source and target combinations:
- Do one of these tasks:
- Click Save to save your changes.
- Click Validate to validate your rule.
- Click Validate and Save to validate your rule and then save it.
- Click Validate and Deploy to validate and deploy your rule.
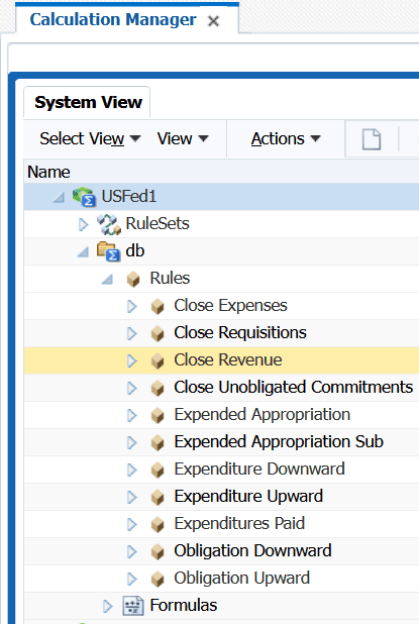
Note: Validating and deploying your rule is a required step. While validation checks for consistency against the outline of the balances cube that it references, you must deploy the rule for it to be available for generation in Oracle General Ledger. - Repeat steps 2-9 to create all the other closing rules as required.
Here’s an example of how the Rules node looks like after all the rules are created:
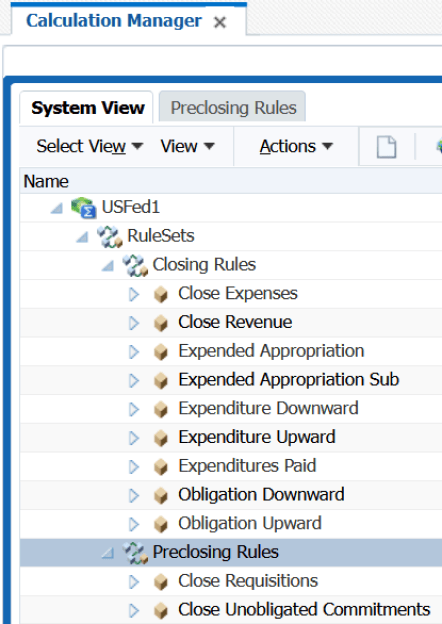
Create Allocation Rule Sets
You create an allocation rule set by combining allocation rules that can be generated sequentially. You add rules to a rule set by dragging and dropping them into it.
After you create and save the rule set, you can validate and deploy the rules. Then you can either generate the rules individually or the rule set to generate the allocations in Oracle General Ledger. Each rule will create one journal and each rule set will create one journal batch containing all the journals corresponding to the rules in the rule set.
When you run the scheduled process, Generate General Ledger Allocations, you can generate the allocations by the rule set to run all the rules sequentially as a group. It’s recommended that federal agencies create a rule set for each of the following rules:
- Federal preclosing rules that are used to generate accruals and other preclosing entries as needed.
- Federal closing rules that are used to generate closing entries in General Ledger and carry forward obligated balances to the next fiscal year.
- Go to Calculation Manager:
- From the Journals work area, click Create Allocation Rules task from the Tasks pane. This opens the Enterprise Performance Management workspace.
- From the Navigate menu, select Administer and then Calculation Manager.
- Find the balances cube for the chart of accounts that’s associated with the ledger. Right-click RuleSets and select New.
- In Name, enter a name for the rule set, for example, Closing Rules.
- Accept the default values for the remaining fields and click OK.
-
Next, move the rules that you created using the example in the above topic to the rule set.
To move a rule to a rule set, open the rule set and then drag and drop the rule to the rule set.
Here's an example of how the RuleSets node looks like: