Customizing the Column Layout

Each column in the grid represents a member property (Member Name, Parent Member, Default Data Storage, and so on). The columns that initially display on the grid can be different based on which dimension type you're editing.

You can customize the layout of columns in the Edit Member Properties grid by hiding, unhiding, resizing, or reordering columns. You can also display the complete set of properties (all columns) by selecting Select All in the Select Columns dialog box.

The properties listed in the column selector are not a flat list of properties. Instead, properties are grouped in the column selector according to their functionality. For example, Account-specific properties such as Account Type, Variance Reporting, and Time Balance, are grouped under Account in the column selector. When you select Account in the column selector, all properties in the group are selected for inclusion in the grid. Then you can clear the checkboxes for any properties that you don't want added to the grid.

To customize the column layout in the Edit Member Properties grid:
  1. View Edit Member Properties.
  2. On the grid, right-click any column heading.

    Tip:

    Alternatively, you can display this dialog box by clicking Select Columns icon (Select Columns) or by clicking Actions, and then Select Columns.

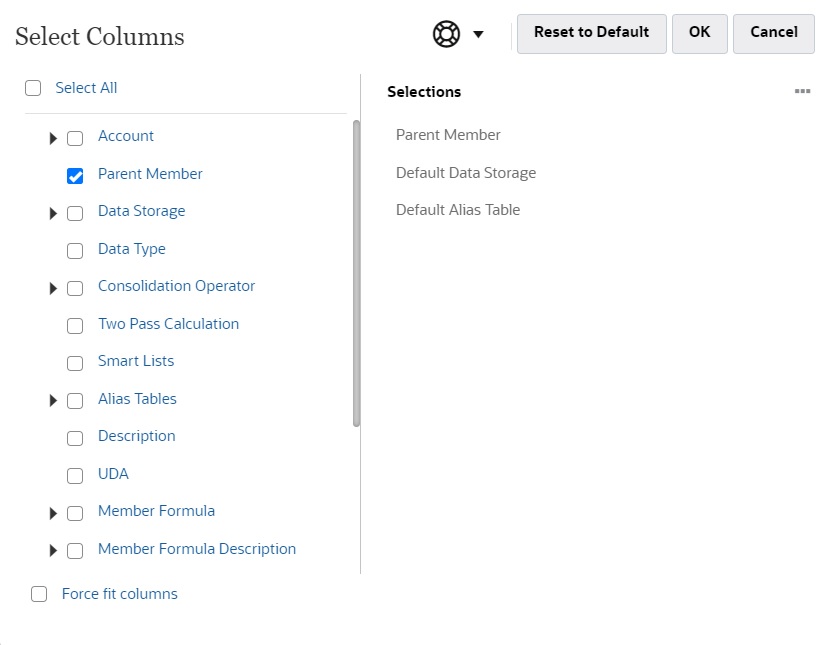
    The Select Columns dialog box displays.

    Image of Select Columns dialog box
  3. Select or clear the check boxes for the columns (properties) you want to add to or remove from the grid. Select a top-level group such as Account or Data Storage to select all of the properties grouped under those categories.
    • To display all property columns on the grid, click Select All.

    • In the Selections pane of the Select Columns dialog box, columns appear in the order they are selected, and this is the order in which they will be displayed on the grid. To reorder the columns on the grid, hover over a column in the Selections pane, then select the up or down arrows to move the column up or down in the order.

      Note:

      You can also reorder columns by dragging and dropping them directly on the grid.

    • To remove a column from the Selections pane, hover over a column and click Delete Selection icon (Delete).

    • To remove all columns from the Selections pane, click Selections Actions icon (Selections Actions), and then select Remove All.

    • To view the columns that initially displayed on the grid, click Reset to Default.

    Note:

    After making your selections, the columns you select will be saved for the next session.

  4. To change the size of the grid or the columns that are displayed on the grid, select or clear the Force fit columns option. Selecting the Force fit columns option resizes the columns so that all columns are visible on the grid without scrolling.