Create Custom AI Agents of Type Workflow
Agent teams of type Workflow consist of a sequence of nodes used for deterministic, rule-based orchestration of tasks in which every step is preconfigured. Workflows are ideal for scenarios where compliance, repeatability, and governance are essential. The workflow tasks are represented as a connected sequence of nodes. Each node within the workflow performs a defined function, such as extracting data, calling a business object function, running an LLM, or sending an email. The output from each node is seamlessly passed to the subsequent step, ensuring a controlled and efficient process flow.
When designing your workflow, keep these process breakdown steps in mind:
- Model the manual workflow. Start from a high-level process and break it down into smaller, automatable steps.
- Identify task dependencies and group nodes by type. For example, distinguish between backend logic tasks and those driven by LLMs. Doing so helps to streamline execution and minimize unnecessary LLM usage.
- For each task, define the node type, required inputs, expected outputs, and any transformation logic needed.
-
For recommendations about improving your agent's efficiency, see How do I make agents respond faster?
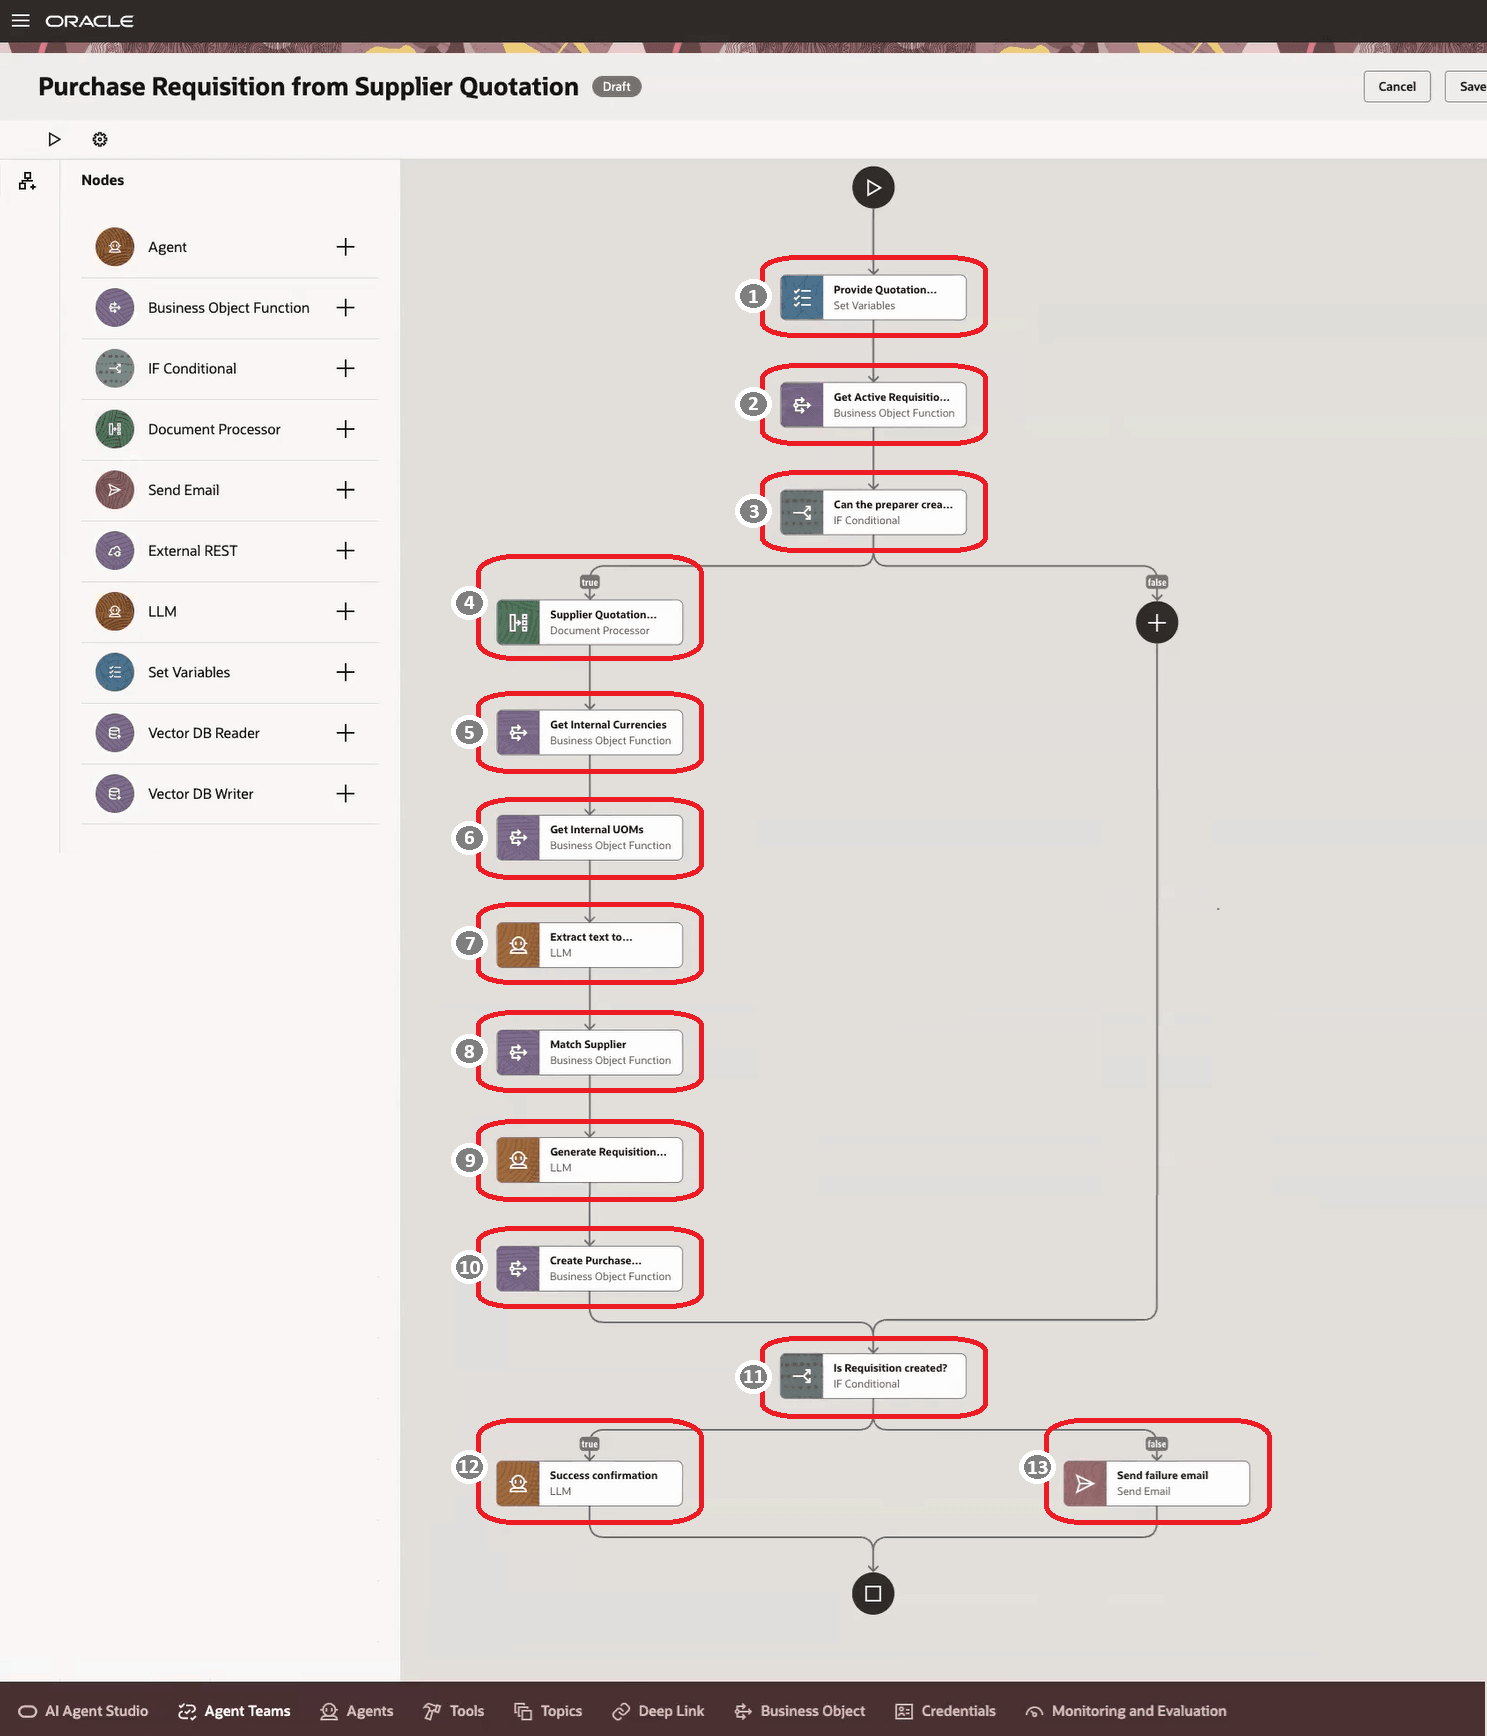
Let’s look at an example to illustrate how a workflow operates in practice. Suppose an employee needs to purchase a product or service and contacts a supplier to request a quotation. The supplier responds with a quotation, which might vary in format and content, but typically includes key information such as the seller’s details, a list of items, and the total quoted price. The quotation is processed internally, and a requisition order is created.
Here's an example workflow for this scenario, created in AI Agent Studio.

| Callout Number | Node Name | Node Type | Description |
|---|---|---|---|
| 1 | Provide Quotation | Set variables | Sets the values for the input variables. |
| 2 | Get Active Requisition | Business Object Function | Retrieves the default preferences of the requester. |
| 3 | Can the preparer create a requisition? | IF conditional |
Validates whether the user has permission to create a requisition.
|
| 4 | Supplier Quotation | Document processor | Downloads the document from the WebCenter Content server and parses the content for further processing. |
| 5 | Get Internal Currencies | Business Object Function | Pulls the valid internal currency value. |
| 6 | Get Internal UOM | Business Object Function | Pulls the valid internal units of measure value. |
| 7 | Extract text to LLM | LLM | Uses LLM to convert the unstructured text from upstream nodes to a structured JSON format. |
| 8 | Match supplier | Business Object Function | Checks and validates the supplier information extracted earlier. |
| 9 | Generate requisition payload | LLM | Maps all gathered data from the document and database to generate a valid post request for creating a purchase requisition payload. |
| 10 | Create purchase requisition | Business Object Function | Invokes the API to create the draft requisition. After this call, the requisition is saved to the database. |
| 11 | Is requisition created? | IF conditional |
Checks if the requisition is successfully created.
|
| 12 | Success confirmation | LLM | Displays a message indicating the successful creation of the requisition. |
| 13 | Send failure email | Send email | Sends an email to the user with failure details. |
Here are the steps to create your own workflow.
- Go to AI Agent Studio.
- From the Agent Teams tab, add an agent team and provide
details for the new agent team.
Details Tab
Field Description Family Select the family to which this agent team belongs. Product Select the product within the family to which this agent team belongs. Type Select Workflow. LLM Tab
Field Description Provider Select the LLM for your agent team. Security Tab
Field Description Add Select the roles which will have access to this agent team. Triggers Tab
Create triggers to initiate the workflow. Triggers define the conditions or events that start the workflow and determine when and why it begins.Field Description Type Select the data type of the trigger. Variables Tab
Define workflow-level variables, making them accessible to all nodes within the workflow. Variables are ideal for storing IDs, constants, or any values you need to share and use across different parts of the workflow.Field Description Type Select the data type of the variable. Chat Experience Tab
You can allow users to upload attachments while interacting with agents. Users can upload up to five files, with a total combined size limit of 50 MB. These file types are supported: PDF (tagged or scanned), TXT, DOCX, XLSX, PNG, and JPEG.Field Description Enable file upload Select this option to allow users to upload files from local storage. Enable third party file upload Select this option to allow users to upload files from connected cloud storage accounts. To enable this functionality, add credentials for at least one provider by navigating to the Credentials tab in AI Agent Studio and completing the Chat Experience setup. Note: To process attachments, make sure you add the runtime processing tool, Runtime File Processor, to the relevant node.Output Tab
Define the overall structure of the workflow’s output using JSON schema, to specify exactly what you will receive when the workflow is completed. If no schema is specified, the output type defaults to that of the individual node. When a schema is provided, the system validates the outputs against the schema and enables auto-complete for those fields.Field Description Specification Mode Select this mode to directly modify the JSON schema for the output. Simple Mode Use this mode to define output values and types. The corresponding JSON schema will be generated automatically and displayed in the specification mode for you to edit. Error Handling Tab
Specify where to send an email when a workflow instance encounters a permanent error. You can also use context expressions in these fields for additional clarity. - Click Create.
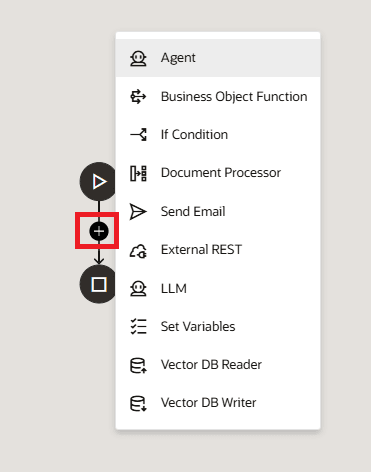
- Add nodes to the workflow by hovering over the line between the start and end of
the workflow. Click
 to choose the type of node you want to add.
  Tips
Tips- Connect nodes in sequence to control how inputs are received, processed, and forwarded throughout the workflow.
- You can insert new nodes before, after, or between existing nodes as needed.
- For more information about Vector nodes, see Vector Write and Read Nodes.
- Once created, you can’t rearrange the nodes. To change a node’s position, delete it and create it again in the desired spot.
- If needed, use
 to test the agent team. For any required
fine-tuning, you can edit the agent team using
  .
. Publish the agent team.
Users can view the published agentic workflows from the AI Agents page. To open this page, add agent-explore to the end of the URL for AI Agent Studio. For example,https://example.com/myApp/redwood/human-resources/ai-studio/agent-explore.