Export and Import Benefits Plan Configuration
You can use the export and import functionality to export programs, plans, and eligibility profiles in XML format from one environment and import it into another environment, such as development, test, or production, as well as into the same environment.
Also, you can migrate updated configurations across environments including date effective updates, error handling, and validations and use the log files to troubleshoot any import issues. You can compare each row from source and target after the import.
Here's an overview of how the export and import process works:

You access these the export and import tasks from both the Plan Configuration work area and the Setup and Maintenance work area.
How You Export Benefits Plan Configuration
Depending on the benefit object that you're exporting, here are the details of each related benefit object that the application includes in the export:
|
Benefit Object |
Related Objects |
|---|---|
|
Program |
|
|
Plan not in program |
|
|
Eligibility Profile |
|
Here are the steps to export and download the plan configuration data as a ZIP file:
-
Click Navigator > Benefits Administration > Plan Configuration.
-
In the Actions panel, click Export Benefits Plan Configuration.
-
Click Create.
-
Enter the required fields, and click Submit.
-
Back in the Search Results section, wait for the task to complete. Click Refresh to see the latest status.
-
When the task is complete, click the Download link. You can download a ZIP file and a log file. You need the ZIP file to import the configuration into your destination environment. The log file contains the results of each benefit object that was exported.
How You Import Benefits Plan Configuration
You use the ZIP that you downloaded as part of the export process to import the plan configuration into your destination environment.
Here's a list of eligibility profile criteria that you can't import:
|
Eligibility Profile Category |
Criteria that the Import Doesn't Support |
|---|---|
|
Personal |
|
|
Employment |
|
|
Other |
|
|
Related Coverage |
|
When the import creates a new plan or program in the destination environment, they're in the Pending status. When the import updates an existing plan, the status is updated on the basis of the export file.
Here's a list of aspects related to how the import works with programs and plans:
|
Aspect |
How the Import Works |
|---|---|
|
User Values and Reporting Groups |
The import doesn't add prefixes and suffixes to user values. If the name of the user value is the same in both the export ZIP file and the destination environment, it will be reused in the destination environment. If the user value name is changed at source, and you export the configuration subsequently, the import creates an object in the destination environment. Likewise, if you change the name of a reporting group at source, the import creates a new object in the destination environment. |
|
Standard Rates and Payroll Elements |
Proration details aren't included in the import. All payroll elements and input values that are exported from the source should exist in the destination. |
|
Flex Shell Plans |
The import doesn't add prefixes and suffixes to the flex shell plan and the plan type associated with it. |
Here are the steps to import the plan configuration ZIP file that you exported:
-
In the Plan Configuration work area, click Import Benefits Plan Configuration.
-
Click Create.
-
In the Import Type list, select the type of benefit object to import.
-
Click Browse to locate the ZIP file that you exported.
-
Click Submit.
-
In the Task List section, wait for the process to complete. Click Refresh to see the latest status.
-
When the process finishes, click the Go to Task link in the Import Plan Configuration Data task row. Depending on the benefit object that you're importing, you can see the related mapping section on the Import Benefits Plan Configuration page. Review the mappings and make changes, if any.
-
Click Submit when you're done. In the Task List section, wait for the task to complete. You can click Refresh to see the latest status.
-
When the task is complete, click Back.
-
In the Search Results section, click the Download link for the import that you created to download the log file. The log file contains the results of each benefit object that was imported. See the How You Can Use the Log File to Review Imported Objects section for more information.
-
Check the configuration page of the benefits object. For example, open the Manage Rate and Coverage User Values page to see if the data appears as expected.
How You Can Use the Log File to Review Imported Objects
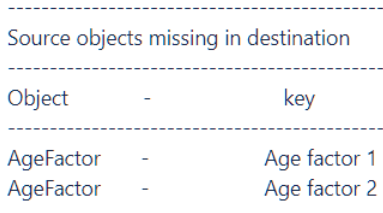
The import process generates a log file that provides a list of benefit objects that were imported. The log file also tells you any differences between the source and destination objects. For example, if both the source and destination objects have the same configuration, the log file says so.
If there are source objects missing in the destination, the log file will list those objects in the Source objects missing in destination section. This typically happens when you use prefixes and suffixes to distinguish the imported objects. The application creates these objects.
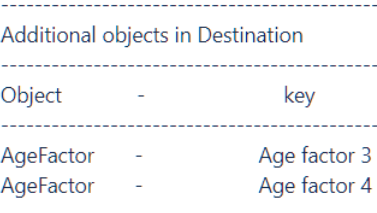
If additional objects were found in the destination, but don't exist in the source, the Additional objects in Destination section contains a list of such objects. This happens if you made any updates to these objects in the destination after an import, and you subsequently import another file.
You can update imported eligibility profiles in the target environment. If the data is already present in the target environment, then the update will take place if there is any change in non-key attributes. If a key attribute is changed in the source, then a new object will be created in the target environment.