Steps to Adjust Balances
You can use HCM Data Loader to load balance adjustments in the batch mode.
Before You Begin
Before you adjust balances, do these tasks:
-
Create the appropriate eligibility links for the elements that you're adjusting. For example, to adjust base elements, it must contain an eligibility link.
-
Populate the Balance Date column if the balance dimension requires an entry.
This image shows the steps involved in adjusting balances.
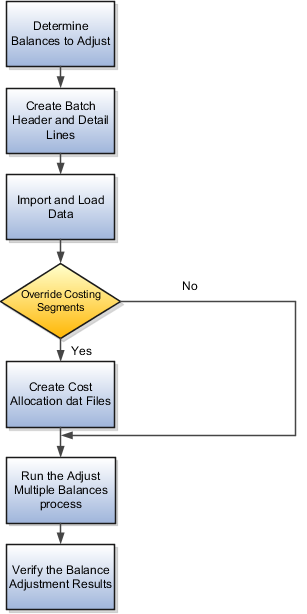
Perform these steps to adjust your balances.
-
Determine the balances that require an adjustment.
-
Create the batch header and detail lines in the dat files. Use the balance adjustment header to adjust balances in bulk. The balance adjustment lines contain the individual adjustment lines for the balance adjustment group.
-
Import and load the data using the HCM Data Load process. This process creates a run result by adjusting one or more balances. And this adjustment depends upon the balance fed by the element input value.
-
Decide whether the balance adjustment results must be costed or not. If you want to cost your balance adjustments, you can create the cost allocation dat files.
Note: Not all costed adjustments need the cost allocation files. Only those costed adjustments that need one or more costing segments to be overridden for the adjustment element entry need the allocation file -
From Payroll Calculation work area, run the Adjust Multiple Balances process to create balance adjustment element entries for each line within the data set. In this process, you provide the batch name that you used in the HCM Data Loader file.
-
Verify the balance results of adjustments.