- Implementing Benefits
- Create Extract Definition Using Benefits User Entities
Create Extract Definition Using Benefits User Entities
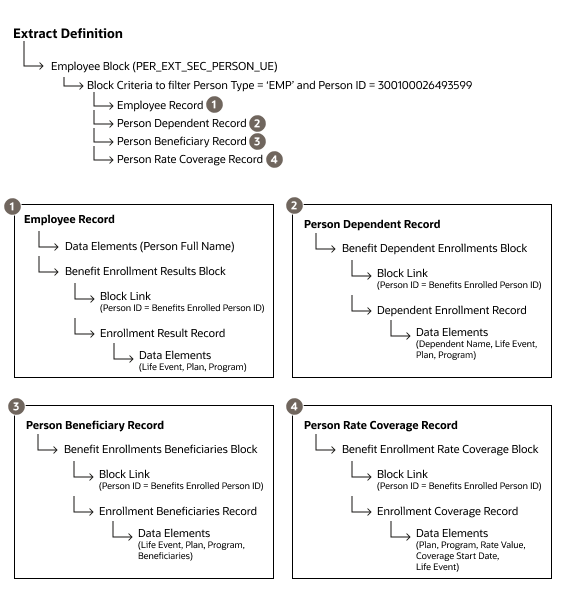
You create an extract definition using these benefits user entities - BEN_EXT_ENRT_RSLT_UE, BEN_EXT_ENRT_DPNT_UE, BEN_EXT_ENRT_BNF_UE, and BEN_EXT_ENRT_RTCVG_UE.
Here's how you create the extract definition.
- Click Navigator > My Client Groups > Data Exchange.
- In the HCM Extracts section, click Extract Definitions.
- In the Extract Definitions page, click Create.
-
In the Create Extract Definition window, complete these details. Leave the rest
of the fields as is.
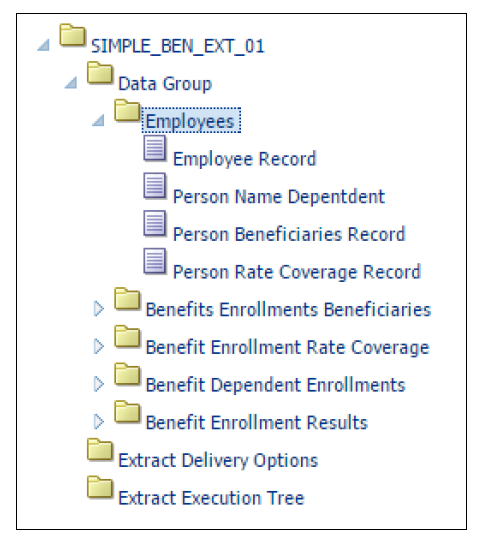
Field Value Name A meaningful name for the extract definition, such as SIMPLE_BEN_EXTRACT_01 Type HR Archive Consumer Report - Click Save and Close.
- On the Extract Definitions page, in the row of the extract definition that you just created, click the Advanced Edit icon.
- On the Edit Extract Definition page, in the Hierarchy pane, click Data Group. You create a data group to associate benefits user entities with the extract definition.
-
Create a root data group to represent the company employees; in the Data Groups
section, click Create, and complete these fields:
Field Value Name Employees Tag Name Employees User Entity PER_EXT_SEC_PERSON_UE. This is the user entity that represents employees. Root Data Group Select Threading Database Item Extract Person ID Threading Action Type Object actions - Click Save.
- In the Data Group Filter Criteria section, click Add.
-
Click Edit. Use the conditions and operators to create
this filter criteria:
Extract Person System Person Type = 'EMP' And Extract Person ID = 300100026493599Note: Use the Advanced option to enter the filter criteria directly. Include the quotation marks for EMP as it's a string data type. Don't include quotation marks for the person ID as it's a number type. The person ID is just an example in this procedure. - Use the same steps as above to create another data group (not a root data group) called Benefits Enrollment Results. Associate this data group with the BEN_EXT_ENRT_BNF_UE user entity.
- Click Save and Close.
- On the Edit Extract Definition page, you need to connect the Benefits Enrollment Results data group to the Employees parent data group. In the Data Groups section, click Benefits Enrollment Results.
- In the Connect Data Groups section, click Add, then select Employees as the parent data group.
- In the Parent Data Group Database Item list, select Extract Person ID.
- In the Database Item list, select Person ID.
- Click Save.
- Select the Employees parent data group. You need to create a record for this group.
-
In the Records section, click Create.
Field Value Next Data Group Benefits Enrollment Results Sequence 10 Name Employee Record Tag Name Employee_Record Type Header Record Process Type Fast Formula - Click Save.
-
Use the steps in this procedure to create these additional data groups and link
them to relevant user entities, as shown in this table.
Data Group User Entity Benefits Enrollments Beneficiaries BEN_EXT_ENRT_BNF_UE Benefit Enrollment Rate Coverage BEN_EXT_ENRT_RTCVG_UE Benefit Dependent Enrollments EN_EXT_ENRT_DPNT_UE - Use the steps in this procedure to connect the data groups you created in the previous step, with the Employees parent data group.
-
Create these additional records in the Employee data group. Ensure that you set
each record's next data group to the corresponding Benefit Extract child data
group.
- Person Name Dependent Record
- Person Beneficiaries Record
- Person Rate Coverage Record
- For the employee data group record, you need to configure the Person Full Name extract attribute. In the Hierarchy pane, expand the Employees data group, and select Employee Record.
-
In the Extract Attributes section, click Create.
Complete these fields.
Field Value Name Person Full Name Short code fullname Data Type Text Type Database Item Group Database Item Group Person Full Name Output Label Person Full Name Output Column 1 -
Create a record for the Benefits Enrollment Results data group. Use this table
to provide values to key fields.
Likewise, create records for the other data groups you created.Field Value Next Data Group Leave empty. Type Detail Record Process Type Fast Formula - Use the steps in this procedure to create relevant extract attributes for each record.
- In the Hierarchy pane, click Extract Execution Tree.
- Click Compile All Formula. You need to click Refresh to see the current status. If the compile succeeds, you can see a green check mark beside the Status column.
- Click Validate to check the completeness of the extract definition you created.
- Click OK. You can also download the validation report to your device if necessary.
- Click Export XML Schema to download the extract definition as an XSD file that you will use later to create an RTF report template.
Related Topics