Define the Due Date and Expiration Policies for Workflow Tasks
If you want workflow to finish within a general time frame, you can set a due date, expiration policies, or both.
-
Before the due date, the current assignee will be reminded to take action. Even after the due date passes, the task doesn't expire. The assignee, and any approvers after them, can still act on the task.
-
But if you set expiration policies, the task can expire based on your settings. Expired tasks are in a final state and no one can make any more updates to them.
Overall Process
Here's how you set the due date, expiration policies, or both for a specific workflow task:
-
In the Setup and Maintenance work area, go to Manage Task Configurations or another approval setup task in Application Extensions or another functional area.
-
In BPM Worklist, on the Task Configuration tab, search for the workflow task in the Tasks to be configured pane.
-
Select the task from the search results and click the Edit task icon in the toolbar.
-
Open the Deadlines subtab and make your changes.
-
Click the Commit task icon in the Tasks to be configured toolbar when you're ready to roll out your changes.
Let's take a look at the Deadlines subtab and what you can set up there.
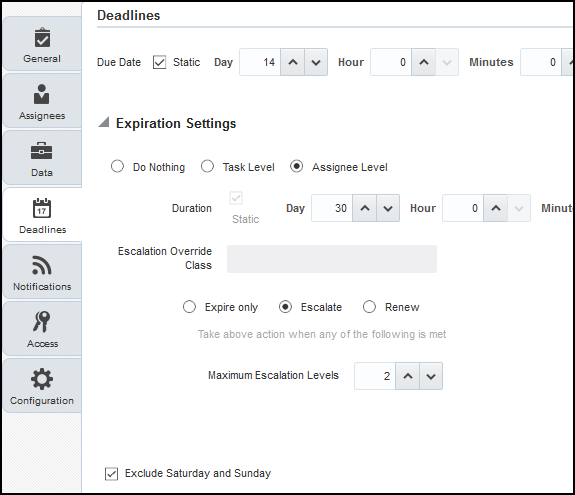
Specify a Due Date
On the Deadlines subtab, specify how much time you want to give to approvers. For example, if you enter 14 days for the Due Date fields, that means the task is due 14 days after it's created. All approvals should be done by then.
Indicate How Tasks Would Expire
If you want to set expiration policies, do this first:
-
On the Deadlines subtab, expand the Expiration Settings section.
-
Indicate how the task would expire:
-
Task Level: If all approvals aren't done within a certain time frame
-
Assignee Level: If the assignee doesn't act on the task within a certain time frame
-
-
Now let's move on with the rest of the setup, which depends on the level you selected.
There's no expiration policy if you leave it at Do Nothing. The task is automatically withdrawn if it's still open after the number of days (180) you see in the Open Tasks Withdrawn After Number of Days field. That field is on the Application Preferences page, which you can get to by opening the Administration tab in BPM Worklist.
Define Expiration Policies at the Assignee Level
If you selected Assignee Level, here's how you set expiration policies, including any escalations or renewals:
-
In the Expiration Settings section of the Deadlines subtab, enter a duration and optionally select the Exclude Saturday and Sunday check box. Let's say you enter 30 days and select the check box:
-
With sequential routing, the task expires if the last assignee doesn't act on the task within 30 weekdays after the task is routed to them. If the first assignee doesn't act within 30 weekdays, the task is passed to the next assignee, who gets another 30 weekdays. This goes on until the last assignee.
-
With parallel routing, the task expires if the current assignees don't act on the task within 30 weekdays after the task is assigned.
-
-
If you want to escalate or renew tasks after they expire, select the Escalate or Renew option. If not, leave the Expire only option selected.
-
To escalate, indicate how many times to go up the management chain. Suppose you enter 2 in the Maximum Escalation Levels field. Here's what happens when the task expires:
-
With sequential routing, the task goes to the manager (User 2) of the last assignee (User 1).
-
With parallel routing, the task goes to the managers (User 2) of all current assignees (User 1).
When User 2 doesn't act within 30 weekdays, the task is escalated to the manager of User 2, who has another 30 weekdays before the task goes to a final Expired status.
-
-
To renew, indicate how many times the task can get renewed. For example, you enter 2 in the Maximum Renewals field. Here's what happens when the task expires:
-
With sequential routing, the last assignee gets another 30 weekdays.
-
With parallel routing, the current assignees get another 30 weekdays.
If they still don't act within those 30 weekdays, they get another 30 weekdays before the task goes to a final Expired status.
-
Define Expiration Policies at the Task Level
If you selected Task Level, here's how you set expiration policies, including any escalations or renewals:
-
In the Expiration Settings section of the Deadlines subtab, enter a duration and optionally select the Exclude Saturday and Sunday check box. Let's say you enter 30 days and select the check box:
-
The task expires if all approvals aren't done 30 weekdays after the task is routed to the first assignee.
-
If there are three assignees and the first two take 25 weekdays to act, then the last assignee gets only five weekdays.
-
-
If you want to escalate or renew tasks after they expire, select the Escalate or Renew option. If not, leave the Expire only option selected.
-
To escalate, indicate how many times to go up the management chain. Suppose you enter 2 in the Maximum Escalation Levels field:
-
When the task expires, it's routed to the manager (User 2) of the current assignee (User 1).
-
When User 2 doesn't act within 30 weekdays, the task is escalated to the manager of User 2, who has another 30 weekdays before the task goes to a final Expired status.
Don't select anything for the Highest Approver Title list. This setting won't apply to your expiration policy.
-
-
To renew, indicate how many times the task can get renewed. For example, you enter 2 in the Maximum Renewals field:
-
When the task expires, all pending assignees get another collective 30 weekdays to act.
-
If they all don't act within that period, they get another 30 weekdays before the task goes to a final Expired status.
-