How Retroactive Pay Is Calculated
Retroactive pay is the recalculation of prior payroll results due to changes that occurred after you ran the original calculation.
To process retroactive pay, run the Recalculate Payroll for Retroactive Changes process. This process creates retroactive element entries based on retroactive events. This process automatically creates some retroactive events, but some you can create manually.
For further info, see Recalculate Payroll for Retroactive Changes for the US in the Help Center.
Only elements that are set up to include a retroactive event group can have retroactive element entries.
Examples of prior period adjustments that could trigger a retroactive event are:
-
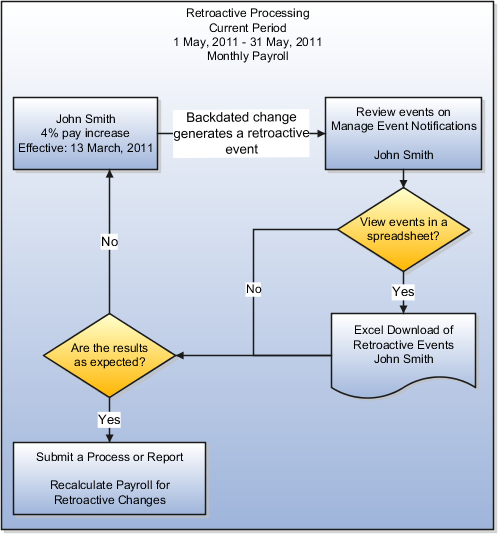
An employee receives a pay award that's backdated to a previous pay period.
-
The Payroll Department makes a backdated correction for an error that occurred in a previous pay period.
Settings That Affect Retroactive Pay
To enable retroactive processing of an element:
-
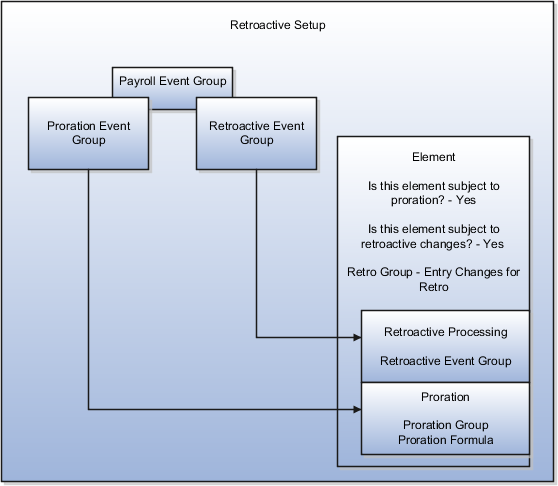
On the Event Groups task, review the types of changes that automatically trigger a retroactive notification for the predefined Entry Changes for Retro event group. You can edit this group or create one for the element, if required.
-
During base element definition, on the Create Element: Additional Details page, select Yes for the following questions.
-
Is this element subject to proration?
-
Is this element subject to retroactive changes?
The element template creates nonrecurring retroactive elements with the same attribution of the base element with a couple exceptions.
-
If you selected Process Separately or Pay Separately, the template creates input values on the retroactive element. However, the input value default is set to N on the retroactive element. You can override these values at these levels.
-
Element
-
Element entry
-
Element eligibility
-
-
All retroactive elements are set with a latest entry date of Final Close, regardless of what you select for the base element.
-
-
Select the predefined event group or a group you have created.
This figure illustrates retroactive configuration.

How Retroactive Pay Is Calculated
To process retroactive pay:
-
Use the Event Notifications task to review or create retroactive events. You can download results to a Microsoft Excel spreadsheet to view retroactive events in a report format.
-
Submit the Recalculate Payroll for Retroactive Changes process.
You can use the Submit a Flow task, or the process can run automatically as part of your payroll flow.
This process never overwrites historical payroll data. Instead, it creates one or more retroactive entries to receive the process results.
Note:Always run the Recalculate Payroll for Retroactive Changes process immediately before you run a payroll. If you run it after the Calculate Payroll process, retroactive adjustments are held over until the next payroll period.
-
Run the Calculate Payroll process.
If you don't get the expected retroactive notification, check these:
-
The originating transaction causing the event
-
Your element setup
-
The element eligibility for the person
-
The retroactive event group entities and attributes that are set up to trigger retroactive events
-
The proration event group entities and attributes setup that triggers proration
This figure illustrates retroactive processing for a person getting a pay increase retroactively.
