- How do I implement time cards in Time and Labor?
- Create a Unified Multiple-Attribute Time Card Field
Create a Unified Multiple-Attribute Time Card Field
You can create a time card field and the drop-down list of values. A listed value can store values for multiple attributes, such as the payroll time type and the project expenditure type.
- Make sure that the payroll time attributes and all applicable custom time attributes exist in the data dictionary.
- Go to Setup and Maintenance > Workforce Deployment > Time and Labor > Time Entry Layout Components.
- Create the multiple-attribute time card field.
-
On the Field Definition page, enter the general properties.
Field Best Practice Name Enter a unique short name, possibly using agreed on abbreviations, such as PTT for payroll time type. This name appears in the Name drop-down list on the Edit Layout dialog box, Time Card Matrix page. That drop-down list shows only the first 15 characters.
Description Provide a concise but complete description of the purpose of the time card field or web clock buttons. It really helps people who are configuring time layouts to know which components to add or delete.
-
Add and configure the time attributes and data sources by completing these
steps for each time attribute that needs to be part of the field
structure.
- Set the attribute display sequence to specify where the column appears in the table.
- Select the independent or dependent time attribute, such as Payroll Time Type or State.
- Select the unfiltered data source and filtered data source for the specified time attribute. Typically, the appropriate source is the first value in the drop-down list.
- Specify whether the structure definition requires the time attribute.
- Click OK.
-
Add up to five of the filters provided by the filtered data sources, for the
time attributes in the attribute definition table. For example, these are the
filter variables and input attributes provided by the Expenditure Type and
Payroll Time Type attribute data sources.
Filter Variable Filter Input Attribute pAssignmentID Assignment pEffectiveDate Start Time pProjectUnitID Project Unit pStartTime Start Time pStopTime Stop Time -
Configure the settings in each value row, including whether the value is
enabled; worker, line manager, and time and labor actions; and HCM groups who
are eligible to use the value. The display value in each row is the value people
see in the drop-down list.
Here's an example using the delivered Time Type field, which you need to finish configuring so that the delivered layouts for combined absence, payroll, and project costing time can work correctly.
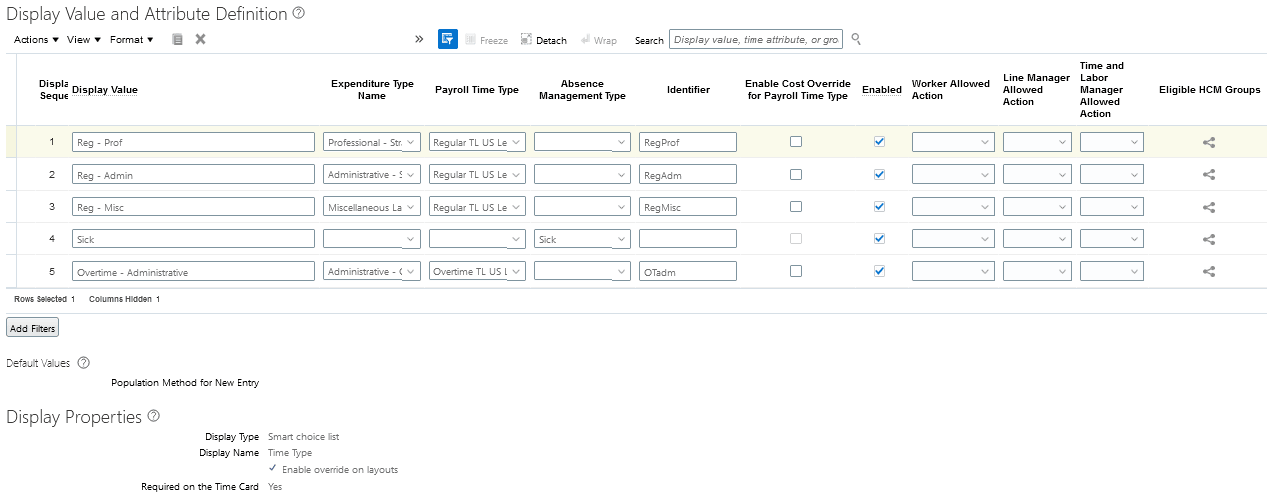
Note that the absence row has a value for only an absence management attribute. This way payroll and project time data routes to the appropriate approvers and transfers to the appropriate time consumers. If you extract time data to use with external applications, you can combine absence data with payroll or project data, or both.
After time processing, Absence Management retrieves the attribute values from the row with display sequence 4. And, Project Costing and Global Payroll transfer their respective attribute values from all the other rows.
-
Optionally, configure a default value for the field when it's added to time
cards. People add fields to a time card when they open the time card, add an
attribute row, or add an entry.
Select the population method for new field entries from these options:
- No default value: Don't automatically populate the new field with an entry.
- Specific value: Automatically populate the new field with the specified value. The unfiltered data source selected in step 3 populates the Specific Display Value drop-down list.
- Function: Automatically populate the new field with the value derived by the selected function, such as Based on primary assignment. The function uses the filtered data source. This option is available only if the time attribute has delivered functions.
Note: Any default value that you specify is ignored by My Client Groups > Show More > Time > Team Time Cards > Generate Time Cards. The team time cards generate process uses the attribute values specified on that Generate Time Cards page instead. -
Configure the field-level display properties.
- Select the display type.
- Edit the display name, as appropriate. This name is the default column header in tables on the time card pages. To fully render the display name on time card, calendar, and web clock pages and dialog boxes, limit the name to 70 characters or less.
- Optionally enable override on layouts. Enabling the override lets people set different, meaningful display names in various layout sets that use the same layout component.
-
Specify whether the time card field is required. Required fields
always appear on the page and people need to provide a value.
Tip:
To keep people from submitting time cards with no entries, make sure that at least one time card field on the time layout is required.
The validation that checks for values in the required fields runs when people save or submit time cards.