Connect an Intelligent Advisor Site to an OCI IAM Identity Domain
To connect an Intelligent Advisor site to an OCI IAM identity domain, you need to:
-
Add a new locally managed API client in Intelligent Advisor Hub. This will be used to enable provisioning for Intelligent Advisor in OCI IAM service.
-
Configure the Intelligent Advisor application in your identity domain
-
Configure Intelligent Advisor Hub to use identity domain-managed user accounts
Configure the Intelligent Advisor application in your identity domain
To configure the Intelligent Advisor application in your identity domain, you need to:
Add the Intelligent Advisor application from the Application Catalog
A partially configured Intelligent Advisor application template is available in the Application Catalog in the Oracle Cloud Console. To add the Intelligent Advisor application in your identity domain:
-
In the tenancy where you activated Intelligent Advisor, open the navigation menu and select Identity & Security.
-
Under Identity, select Domains.
-
Select the Default identity domain.
-
Select the Integrated applications tab.
-
Click Add application.
-
In the Add application window, select Application Catalog, and then select Launch workflow.
-
Search for Intelligent Advisor, and then click on the Intelligent Advisor tile.
-
On the Add Intelligent Advisor page, enter:
-
Name - a name for the Intelligent Advisor application. For applications with lengthy names, the application name appears truncated in the My Applications page. Consider keeping application names as short as possible.
-
Intelligent Advisor Server Name - the Intelligent Advisor Hub server (hereafter referred to as IAServerName)
-
-
Click Submit. The application has been added in a deactivated state.
Set up provisioning for the Intelligent Advisor application
User provisioning and synchronization are an important aspect of Intelligent Advisor application management. Provisioning allows you to manage the lifecycle of user accounts in applications, such as creating and deleting accounts, using IAM. For example, when you grant the user access to the Intelligent Advisor application, then this user account is automatically created in Intelligent Advisor Hub. To set up provisioning for the Intelligent Advisor application:
-
Select the Provisioning tab.
-
In the Provisioning menu, select Edit provisioning.
-
On the Enable provisioning page, enable Enable provisioning.
-
Click Confirm to confirm the enablement of provisioning.
-
Under Configure connectivity, enter values for the following fields to establish a connection with Intelligent Advisor through OCI IAM service:
-
Host Name - the host name of the server hosting the Intelligent Advisor Hub
-
Port Number - the port number where Intelligent Advisor is listening
-
Client ID - the client ID value that you obtained when you added the locally managed API client in Intelligent Advisor Hub
-
Client Secret - the client secret value that you obtained when you added the locally managed API client in Intelligent Advisor Hub
-
Authentication Server URL - the URL of the Intelligent Advisor Hub authorization server. For example,
https://<IAServerName>/opa-hub/api/auth/
-
-
Click Test connectivity to verify the connection with Intelligent Advisor.
-
Under Configure attribute mapping, click Attribute mapping. This will allow you to view predefined attribute mappings between the user account fields defined in Intelligent Advisor and the corresponding fields defined in your identity domain. In most cases the default mapping is fine as is and should not be changed. Click Save changes.
-
Under Select provisioning operations, specify the provisioning operations that you want to enable for Intelligent Advisor:
-
Create an account - Automatically creates an account in Intelligent Advisor Hub when Intelligent Advisor access is granted to the corresponding user in the OCI IAM identity domain. This is selected by default.
-
Delete the account - Automatically deletes an account from Intelligent Advisor Hub when Intelligent Advisor access is revoked from the corresponding user in the OCI IAM identity domain. This is selected by default.
-
-
Click Submit. You can now manage Intelligent Advisor accounts through your OCI IAM identity domain.
Finish setting up the Intelligent Advisor application
To finish setting up the Intelligent Advisor application:
-
Select the OAuth configuration tab.
-
Under General Information, write down the Client ID.
-
Under Client Secret, select Show in the Show secret menu, and then write down the client secret.
-
Click Edit OAuth configuration, and then on the Edit OAuth configuration page:
-
Under Resource server configuration, update the value for the Primary audience field to
https://<IAServerName>/ -
Under Client configuration:
-
Update the value for the Redirect URL field to
https://<IAServerName>/opa-hub/authenticate/idcs -
Update the value for the Post-logout redirect URL to
https://<IAServerName>/opa-hub/manager/logout
-
-
-
Click Submit.
-
In the Actions menu at the top of the page, select Activate.
-
Confirm the activation.
Configure Intelligent Advisor Hub to use identity domain-managed user accounts
Before you can configure Intelligent Advisor Hub to use identity domain-managed user accounts, you need to ensure that the Intelligent Advisor application is assigned to a user account. You use this account for verifying the integration. After the integration is successful, this account is assigned the default Permissions administrator role in Intelligent Advisor. Note: Ensure that you do not revoke access for the user account with the Permissions administrator role otherwise the user cannot access the Intelligent Advisor Hub as administrator.
To configure Intelligent Advisor Hub to use identity domain-managed user accounts:
- Access Intelligent Advisor Hub at
https://<IAServerName>/opa-hub/, and then log in as an administrator. - Navigate to the Permissions Page.
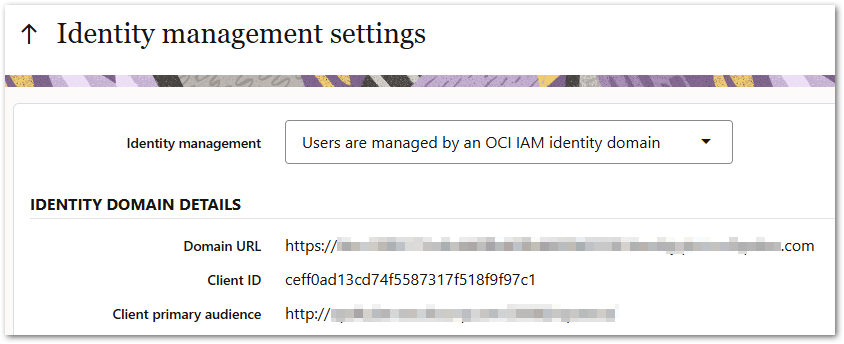
- In the Actions menu, select Identity management settings.
- On the Identity management settings page, in the Identity management drop-down, select Update to manage users with an OCI IAM identity domain.
- In the IDENTITY DOMAIN DETAILS section, enter the:
- Domain URL - the Identity Domain URL. For example,
https://<IDCS-Service-Instance>.identity.oraclecloud.com. Tip: The Domain URL is shown on the Details page for your identity domain in Oracle Cloud Console. - Client ID - the client identifier for the Intelligent Advisor application (obtained in step 4 in Finish setting up the Intelligent Advisor application)
- Client secret - the client secret for the Intelligent Advisor application in Identity Cloud Service (obtained in step 4 in Finish setting up the Intelligent Advisor application)
- Client primary audience - by default, this field displays the Intelligent Advisor server URL. For example,
https://<IAServerName>/. Ensure that the URL does not include a suffix after <IAServerName>. For example, if the field displays the URL as https://<IAServerName>/opa-hub/idcs/, remove the opa-hub/idcs/ suffix.
- Domain URL - the Identity Domain URL. For example,
- Click Apply. The settings will be tested and if successful, the Oracle Cloud login page is displayed.
- Log in using the credentials for a user that is assigned to the Intelligent Advisor application. On successful login to Oracle Cloud, a corresponding User account on the Hub will be generated with Permissions administrator role. The Identity Management Settings page is redisplayed and the Intelligent Advisor site has been switched to using OCI IAM for identity management. Note that the OCI IAM identity domain settings are not editable.
Verify the integration
To verify that the authentication works correctly when initiated either from Intelligent Advisor (Relying Party) or OCI IAM service (IdP), you need to:
-
Confirm that the login that is initiated from OCI IAM service works
-
Confirm that the login that is initiated from Intelligent Advisor works
In addition, you should:
-
Confirm that logout works and that the user is no longer logged in to Intelligent Advisor and OCI IAM service