 Connect a Thermal Camera with Oracle IoT Asset Monitoring Cloud Service
 Before You Begin
This 15-minute tutorial shows you how to configure an FLIR : E95, a thermal camera to connect with Oracle IoT Asset Monitoring Cloud Service and send temperature values. FLIR : E95 is an advanced hand-held thermal camera that can help diagnose electrical faults, detect hidden deficiencies, and monitor temperature differences in assets managed by the Oracle IoT Asset Monitoring Cloud Service application.
Background
The FLIR E95 has the sensitivity and resolution to diagnose and detect faults to keep your enterprise running smoothly. This thermal imaging camera offers high-performance features, such as laser-assisted auto-focus, on-screen area measurement, 161,472 (464 x 348) points of temperature measurement, and wide temperature range, up to 1500°C. The E95 has a superior spot-size ratio and is sensitive enough to detect minute temperature differences.
Oracle IoT Asset Monitoring Cloud Service manages enterprise assets, track their real-time location, health and utilization. You can view your asset metrics on the dashboard and automate actions based on predictive insights.
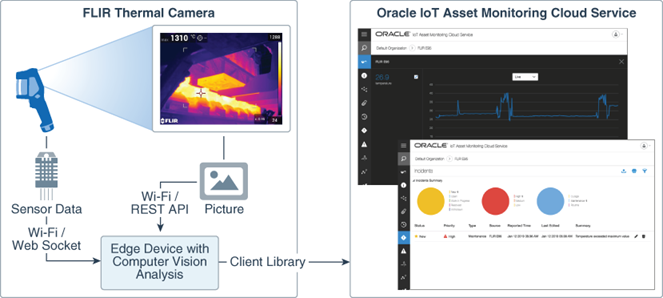
The following image displays the integration of a FLIR Thermal Camera with Oracle IoT Asset Monitoring Cloud Service. The edge device displayed in the imagecan be your laptop in this scenario.
What Do You Need?
- A FLIR E95 camera
- Searched for T810190 and downloaded the FLIR EXX series Manual
- Completed the initial setup, calibration, and Wi-Fi configuration of the camera by referring the manual
- A computer running on any platform that supports Java and has the Gradle build tool installed
- A REST client plug-in enabled in your computer's web browser
- Downloaded JDK 8 for your platform
- Downloaded and extracted the sample application
- Access to an Oracle IoT Asset Monitoring application instance version 19.1.x or above
 Review the Integration Capabilities of the Thermal Camera
Over Wi-Fi, the FLIR E95 camera can provide live thermal video stream and thermal photo snapshot that can be used for computer vision (CV) analysis. It also provides the live temperature readings of a defined spot.
- To access the live thermal video stream of the camera over the real time streaming protocol (RTSP), open the following URL in a video player that supports the RSTP protocol. VLC is an example of such a video player.
rtsp://<camera-ip-address>/<video-format>
camera-ip-address = 192.168.x.1, where "x" is dynamically  allocated
by the camera.
video-formats supported by FLIR E95 are avc (AVC H.264), mpeg4(MPEG 4), and
mjpg(motion JPEG)
Note: This IP address is valid only if the camera is configured as an WiFi Access Point. If the camera is connected to an existing WiFi network then the IP address will be different and defined by your network configuration such as a DHCP server on your WiFi network may alloctae an IP address. For this tutorial, it is assumed that the camera is configured as an WiFi Access Point
- To obtain notifications about changes in the camera sensors, open a WebSocket session at the following address:
ws://<camera-ip-address>/x
The JSON format of the sensor values are:
{
	"<Sensor 1 ID>": sensor value,
	...
	"<Sensor N ID>": sensor value
}
The format of the spot temperature sensor ID is:
.image.sysimg.measureFuncs.spot.1.valueT
You obtain a double value that represents the measured temperature in Kelvin. - To obtain the thermal photo snapshots from the camera, you use a REST API POST method to login to the thermal camera and the a REST API GET method to retrieve the thermal photo snapshots. The steps are described in the following section.
 Obtain the Camera Thermal Photo Snapshot
You invoke REST operations from your computer to login to the thermal camera and retrieve snapshots of the photos.
- To login to your thermal camera, open a REST client plug-in in your web browser, invoke a REST API with the following details:
- Method: HTTP POST
- URL:
http://<camera-ip-address>/check_login - Request Headers:
Content-Type: application/x-www-form-urlencodedandAccept: application/json, text/plain - Request Body:
_username=<user name>&_password=<password>
The default value isviewerfor user name and password.When the login succeeds, you revive a response value of 302. From the Response Headers, note down the values of
Set-Cookie,Cache-Control, andPragmaas you'll need them in the following step.
-
To retrieve a thermal photo snapshot, invoke a REST API with the following details:
- Method: HTTP GET
- URL:
http://<camera-ip-address>/snapshot.jpg - Request Headers:
Content-Type: image/jpeg,Accept: */*,Cookie: <value of Set-Cookie>, Cache: <value of Cache-Control>, and Pragma: <value of Pragma>
Substitute the values that you noted from the Response Headers obtained after login, in the previous step.When the operation succeeds, you revive a response value of 200. The Response Body contains the binary representation of a thermal photo snapshot in JPEG format.
 Install and Run the Java Application
Run the sample Java application that uses the Java Client library to connect the thermal camera device to Oracle IoT Asset Monitoring Cloud Service and sends spot temperature readings to the instance. The Java application also registers the required device model and the thermal camera device in Oracle IoT Cloud Service.
- To build the sample application, go to the folder where you extracted the Java application archive, and enter the following command:
./gradlew build
The output is stored in
./dist - Open and edit the
./dist/config.jsonfile to provide information about the Oracle IoT Cloud Service instance , temperature units (Celsius, Fahrenheit or Kelvin), camera location, and maximum temperature parameter to trigger an incident in Oracle IoT Asset Monitoring Cloud Service when the measured spot temperature exceeds this value. - Run the sample Java application
java-jar flir.jar
 Verify the Connectivity
- Navigate to your Oracle IoT Cloud Service instance. Click Menu
 , Applications and then click Oracle IoT Asset Monitoring Cloud Service.
 - Click Data and Explorations.
- On the Data tab, for the Filter field, select Device, and then click Select Device.
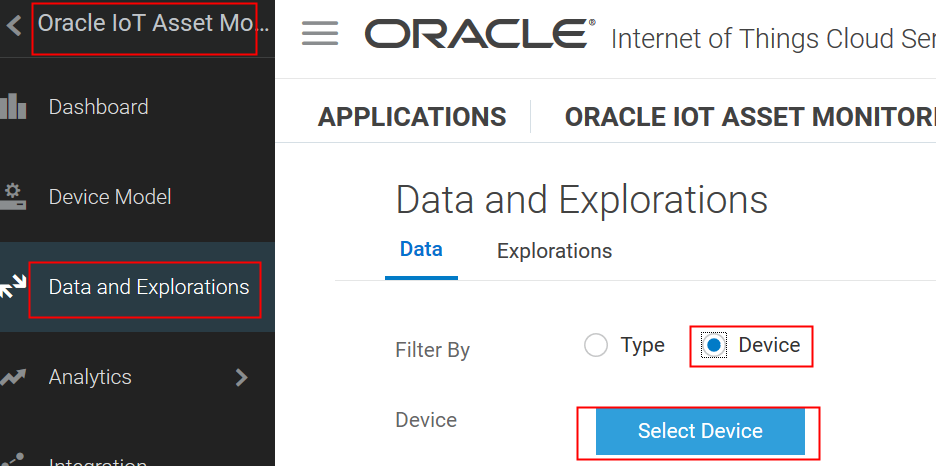
Description of the illustration select_device.png - From the list, select the FLIR E95 device that your sample Java application registered and activated. Click Done.
- Verify that the spot temperature measured by the thermal camera is displayed.