 Connect a Freematics ONE Vehicle Data Logger to a Mobile Device
 Before You Begin
This tutorial shows you how to configure and install a Freematics ONE vehicle data logger that can transmit vehicle data to a mobile device connected to Oracle IoT Fleet Monitoring Cloud Service
Background
Oracle IoT Fleet Monitoring Cloud Service is a cloud-based service that lets you gain real-time visibility into vehicle location, operational costs, vehicle use, and driving behavior.
To view and manage real-time information about a vehicle, you connect a data logger to the on-board diagnostics II (OBD-II) port of the vehicle. The data logger transmits vehicle data, such as engine temperature, speed, and location, to an Android device and then to Oracle IoT Fleet Monitoring Cloud Service. You can use this data to monitor vehicle and driver performance.
What Do You Need?
- Access to an instance of Oracle Internet of Things Cloud Service
- Oracle IoT Cloud Service Client Software Library for Android downloaded (The files are
iotcs-csl-android-bin-release.zip,iotcs-csl-android-samples-release.zip, andiotcs-csl-android-src-release.zip. Release is the release and version number.) - Java SE Development Kit (JDK) 8.0 or later installed
- Android Studio installed
- The latest Arduino Software (IDE) installed
- Git CMD or git bash installed
- The ora_obd2_device_model.json device model file downloaded to a directory on your computer
- Proxy settings for your corporate network
- An Android mobile device running Android 7.1.2 (Nougat) or later
- A Freematics ONE vehicle data logger
- A computer running Microsoft Windows 7 or later, Apple macOS 10.9 or later, or Linux with a web browser
 Install the Oracle IoT Cloud Service Android Client Software Library
To create the sample OBD application that receives data from the Freematics ONE data logger, you need to install the Oracle IoT Cloud Service Android Client Software Library.
- Extract the the Client Software Library for Android binary, sample, and source code files. If the Confirm File Replace dialog box is displayed, select Yes to All.
When you extract
iotcs-csl-android-bin-release.zip, a folder namediotcsis created and the contents of the samples and source code files are automatically added to it. - To verify that the zip files were extracted, make sure these files appear in the
iotcs\csl\android\subdirectory: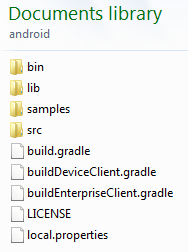
Description of the illustration android_subdirectory.png
 Upload the Device Model
To successfully complete this tutorial, you must have a device model named ora_obd2_device_model. The device model identifies the data to be collected from the Freematics ONE vehicle data logger and lets any device communicate with Oracle IoT Cloud Service regardless of its manufacturer or operating system.
- In a web browser, find your Oracle IoT Cloud Service instance. Typically, the URL format is
https://server host name\ui\login\login.html. - Enter your user name and password, and click Sign In.
- Click Menu
 , click Devices, and then click Model.
 - In the Device Model section, click Import
 , and click Choose File.
 - Select
ora_obd2_device_model.json, click Open, and then click Import.A success message is displayed to let you know that the
ora_obd2_device_modelfile was imported successfully.
 Register Your Android Mobile Device
You must register and activate every device that communicates with Oracle IoT Cloud Service.
- In a web browser, find your Oracle IoT Cloud Service instance. Typically, the URL format is
https://server host name\ui\login\login.html. - Enter your user name and password, and click Sign In.
- Click Menu , click Devices, and then click Registration.
- In the Single Registration section, then click Register Single Device.
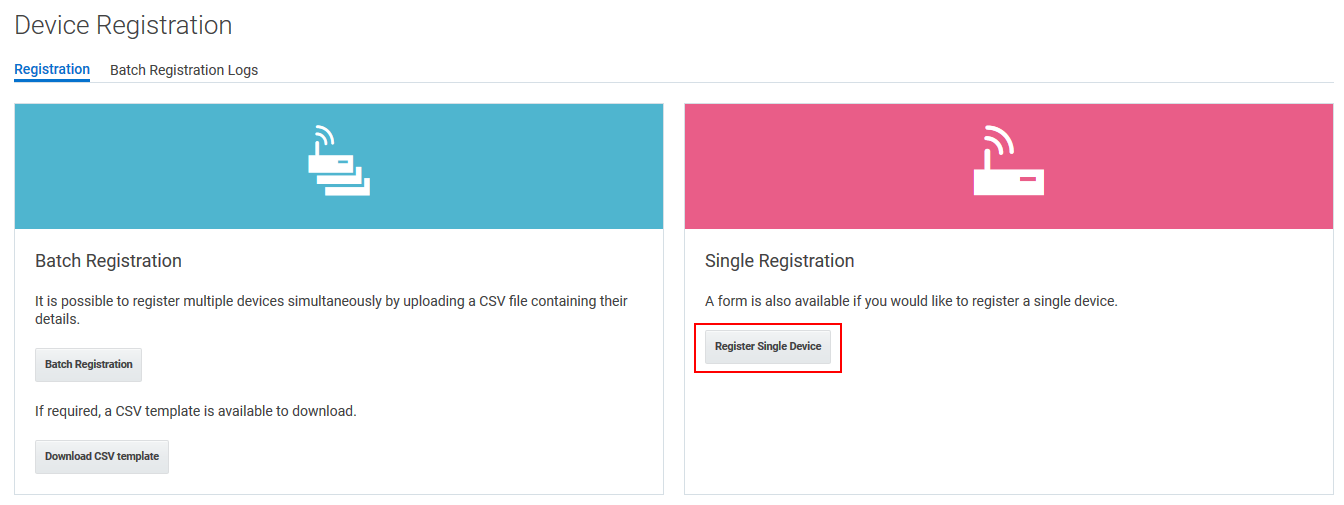
Description of the illustration register_single_device.png - In the Activation Secret field, enter a value, record the value, and then click Register.
You need the value to open the sample OBD application later on.
- In the File Protection Password field, enter a password, and enter it again in the Confirm Password field.
- Click Download Provisioning File, and click Finish.
- To confirm that your Android mobile device was registered successfully, click Menu , click Management, and then locate your device in the Name list.
Your registered device is listed with a Registered state value and an Unknown type value.
- Connect a USB cable between your mobile device and the computer where you stored the provisioning file.
- Select the provisioning file and drag it to your Android mobile device.
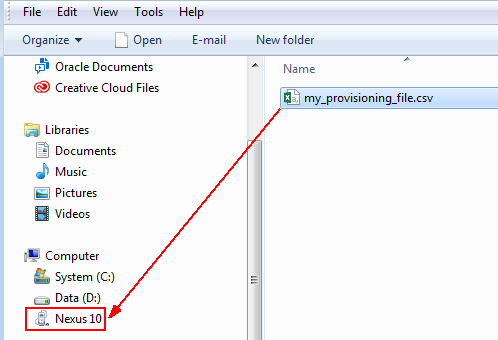
Description of the illustration move_provisioning_file.png
 Configure Your Communication Settings
If you're on a corporate network, complete this section to avoid communication errors when you create and deploy the sample OBD application. Otherwise, proceed to Section 5.
- In a text editor, paste the following text, and replace
your valuewith the values for your corporate network. If you don't know the values, contact your IT (information technology) department.systemProp.https.proxyPort=your value systemProp.http.proxyHost=your value systemProp.https.proxyHost=your value systemProp.http.proxyPort=your value - In the
iotcs\csl\android\samples\obddirectory, save the text file asgradle.propertieswithout the.txtfile extension, and close the file. - In Android Studio, select File, select Settings, and then expand Appearance and Behavior.
- Under System Settings, select HTTP Proxy, select Manual proxy configuration, enter your corporate network host name (
www-your corporate hostname) and port number, and click OK. - Under System Settings, select Android SDK.
- In the right pane, select Android 7.0 (Nougat), select Apply, and then click OK.
- Click Finish, and close Android Studio.
The SDK Quickfix Installation dialog box is displayed, and the Android SDK Platform 24 (revision: 2) is installed.
 Update the Freematics ONE Vehicle Data Logger Firmware
You must update the Freematics ONE vehicle data logger firmware so that Oracle IoT Fleet Monitoring Cloud Service recognizes the data sent by the data logger.
- In Git CMD or git bash, download the Freematics.git repository to your computer.
- Change to the Freematics directory and checkout the specified file.
cd Freematicsgit checkout 98eccfba5ae3101e1a96b8d3d446c0a6a0b17b1e - Browse to the location of the Freematics
datalogger.inofile. For example:C:\Users\username\Downloads\FreematicsNew\Freematics\firmware_v4\datalogger. - In a text editor, open the
datalogger.inofile, peform the following actoions, and then save and close the file: - On line 326 remove the pids[2] array and all references to it.
- Enter these values for the byte pids[] array:
PID_SPEED,PID_RPM,PID_THROTTLE,PID_MAF_FLOW,PID_FUEL_LEVEL,PID_RUNTIME,PID_DISTANCE, andPID_COOLANT_TEMP. - Copy the Freematics
librariesfolder into the Arduinolibrariesfolder. Typically, the Arduinolibrariesfolder is located in this path:C:\Users\usernname\MyDocuments\Arduino\libraries. - Connect a data cable between the Freematics ONE vehicle data logger and a computer.
- In a web browser, go to the Silicon Labs website, and download and install the USB to UART Bridge Virtual COM Port drivers.
- In Windows Device Manager, expand Ports (COM & UPI), and record the port number for Silicon Labs CP210x USB to UART Bridge (COM30).
- In Arduino Software (IDE), click File, click Open, and then find the modified
datalogger.inofile. - Click Tools, click Port, and then confirm that the port number which you recorded in step 7 is displayed.
- Click Tools, click Serial Monitor, and then confirm that data is scrolling in the window.
- Click Sketch, and click Verify/Compile.
- Click Sketch, and click Upload.
git clone https://github.com/stanleyhuangyc/Freematics.git Create and Deploy the Sample OBD Application
You need an application on your Android device to receive data from the Freematics ONE vehicle data logger. You create an application by using the files provided in the Oracle IoT Cloud Service Android Client Software Library. After you create the application, you build an Android Package (APK) file that you deploy on your Android device.
- Connect a USB cable between your mobile device and the computer where Android Studio is installed.
- In Android Studio, click Open an existing Android Studio project, find
iotcs\csl\android\samples, click obd, and then click OK.The obd project build starts, and a progress indicator is displayed.

Description of the illustration progress_indicator.png - When the
Gradle build finishedmessage appears in the Android Studio output window, click Build, and click Build APK(s). - When the
Build APK: APK(s) generated successfullymessage appears in the Android Studio output window, click Show in Explorer.
Description of the illustration apk_build_success_message.png The APK file is typically saved to this location:
iotcs\csl\android\samples\obd\app\build\outputs\apk. - Turn on and unlock your Android mobile device.
- Select the
app-debug.apkfile, and drag it from your computer to your Android mobile device.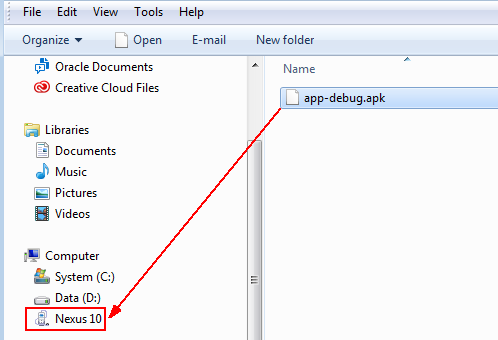
Description of the illustration move_apk.png - On your Android mobile device, find the
app-debug.apk, tap it, and then follow the installation instructions. - In the
OBD Sampleapplication, tap File, select the provisioning file, enter the password, and then click OK.
 Transmit Vehicle Data to Your Mobile Device
- Insert the Freematics ONE vehicle data logger into a vehicle OBD-II port.
- Activate Bluetooth functionality on your Android mobile device.
- Start the vehicle where you installed the Freematics ONE vehicle data logger.
- Move the Android device to the interior of the vehicle and connect to the Freematics ONE vehicle data logger.
- Open the OBD Sample application on your Android device.
- Confirm that vehicle data is added to the Vehicle OBD Data table.
You have successfully completed the setup necessary to transmit vehicle data from a Freematics ONE datalogger to the
OBD Sampleapplication.