Import Historical Sensor and Metric Data for Machines

If you have your pre-deployment device data in an external system, you can choose to import historical sensor and metric data into Oracle IoT Production Monitoring Cloud Service and use the data to train your analytics artifacts, such as anomalies and predictions.

Importing historical data is useful for cold start scenarios where you don't have training data already available in Oracle IoT Production Monitoring Cloud Service. You can also import data for proof-of-concept demonstrations, so that you can use the imported data to train your anomalies, predictions, and trends.

Note:

Pattern anomalies do not support imported historical data. To create pattern anomalies, you must generate training data in Oracle IoT Production Monitoring Cloud Service.

Use the following steps to import historical sensor and metric data into Oracle IoT Production Monitoring Cloud Service:

  1. In Oracle IoT Production Monitoring Cloud Service, create and export a machine data template for your machine's data.
  2. Populate the machine data template with sensor and metric data from the external system.
  3. Import the machine data into Oracle IoT Production Monitoring Cloud Service. The data is available for training after validation and processing.

Export the Machine Data Template

The machine data template defines the schema for your machine data import. It includes fields for machine names and IDs, timestamps, sensor attributes, and metrics.
You should have your machine type, sensor attributes, metrics, and machines created in Oracle IoT Production Monitoring Cloud Service before creating the machine data template.
  1. Log in to Oracle IoT Production Monitoring Cloud Service as an administrator.
    Only administrators have the privilege to export machine data templates from Oracle IoT Production Monitoring Cloud Service.
  2. Click Menu (Menu icon), and then click Design Center.
  3. Select Machines from the Design Center sub-menu.
  4. Click the Machine Inventory Menu Machine Inventory Menu Icon and select Export Machine Data Template.
  5. Select the Entity Type (Machine Type) for the machine data template.
    For example, you may want to create a machine data template for a combustion engine.
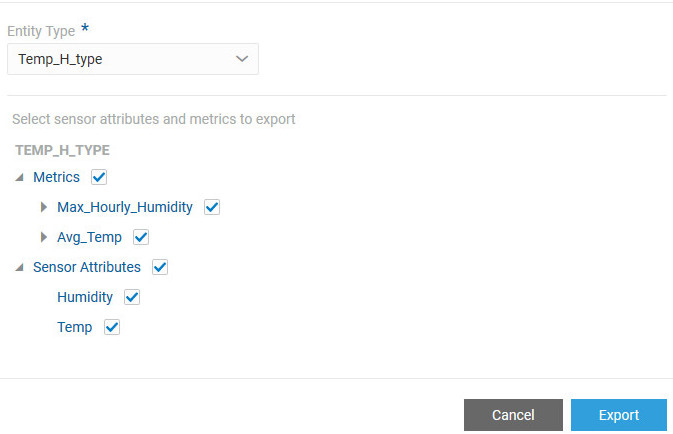
    The existing sensor attributes and metrics for the machine type appear in a tree-like structure under the machine type.
  6. Deselect the sensor attributes and metrics that you do not wish to include in your machine data template.
    For example, if you do not have historical data for a particular attribute in your external system, you can exclude it from the machine data template.

    Export Machine Data Template Dialog

    You can click on the Sensor Attributes and Metrics nodes to expand or collapse them.
  7. Click Export.
    Save the exported csv (comma separated value) file to your local storage.
    The exported csv file contains the following fields:
    • ora_entity_type_name: The entity type (machine type) for which you created the template.
    • ora_entity_name: Name of the entity (machine). You must specify at least one of ora_entity_name, ora_entity_id, and ora_external_entity_id for each row of data that you populate in the machine data template.
    • ora_entity_id: Identifier (ID) of the entity (machine). You must specify at least one of ora_entity_name, ora_entity_id, and ora_external_entity_id for each row of data that you populate in the machine data template.
    • ora_external_entity_id: External Identifier of the entity (machine). An external identified would be the identifier of an imported machine in the external system from which it was imported. For example, the resource instance ID of a machine in Oracle Fusion Cloud Manufacturing.

      You must specify at least one of ora_entity_name, ora_entity_id, and ora_external_entity_id for each row of data that you populate in the machine data template.

    • ora_event_time: The event time against which the telemetry data is being reported. The epoch long time format and ISO 8061 format are supported.
    • ora_sensor.name fields: The sensor attribute values for the attributes that you included in your template.
    • ora_metric.name fields: The metric values for the attributes that you included in your template.

Import Machine Data for Sensors and Metrics

Once you have populated your machine data template with machine data, you can import the csv file, or a zip file containing one or more csv files, into Oracle IoT Production Monitoring Cloud Service.

  1. Log in to Oracle IoT Production Monitoring Cloud Service as an administrator.
    Only administrators have the privilege to import historical machine data into Oracle IoT Production Monitoring Cloud Service.
  2. Click Menu (Menu icon), and then click Design Center.
  3. Select Machines from the Design Center sub-menu.
  4. Click the Machine Inventory Menu Machine Inventory Menu Icon and select Import Machine Data.
  5. Enter an Import Task Description to help you identify the import task later.
  6. Select the Entity Type (Machine Type) for the machine data that you are importing.
  7. Optionally change the number of data lines under Rejection Threshold.
    The Rejection Threshold specifies the threshold number of erroneous data lines in the imported file before the import is rejected. Typically, users populate the machine data template using an automated process, so if a certain number of data lines are erroneous, it is very likely that the rest of the lines are erroneous too. Oracle IoT Production Monitoring Cloud Service halts the import once the specified threshold is reached.
    A data line may be rejected for various reasons. For example, the data line might have missing or incorrect entity information.
  8. (Optional) Deselect Review errors before processing if you wish the file to be auto processed or rejected without prompting you to review the errors, if any.
    Review errors before processing lets you review the error details in case there are validation errors in the imported file. If the number of erroneous rows are below the threshold, you can choose to process or reject the remaining rows.
    If you deselect Review Errors Before Processing, then if the number of errors is below the rejection threshold, the import is auto-processed. Else the import is rejected.
  9. Click Choose File and select the csv file or zip file to be imported.
    The maximum file size cannot exceed 150 MB. You can choose to compress multiple csv files in a single zip file.
  10. Click Continue.
    A notification appears confirming that the upload request was sent.
    The imported file is next validated and processed after which the imported data is available for training. If you are working in other areas of the application, you get periodic notifications about the status of the import. You are also notified if data errors are found in the import file.
  11. (Optional) Click the Data Import Log tab to monitor the status of the import.
    The Initiated column reflects the time when the import request was initiated.
    The Status column reflects the current status of the import. The status column may reflect one of the following:
    • Pending Validation: This is the status just after you have initiated the import.
    • Validating Data: The data validation is in progress for the imported file.
    • Processing Trained Data: The data processing stage follows the validation stage.
    • Historical Data Available: The training data is available in the system.
    • Some Data Errors Found: Indicates that there were data errors while processing. You can click the Show Details icon Show Details icon to view the error details. Click Action Required Action Required icon to accept or reject the remaining rows.
    • Request Rejected: The reason for request rejection is enumerated. For example, the machine data template had a bad schema, or the number of erroneous rows exceeded the rejection threshold. You can click the Show Details icon Show Details icon to view the rejection details.
    1. Click the Show Details icon Show Details icon to view details about the import, such as any error or rejection details.
    2. Click OK.
    3. Click Action Required Action Required icon to complete any user-pending tasks, such as the following:
      • Process historical data ignoring errors
      • Reject Request
      If you have chosen to review errors before processing, and if the number of erroneous rows are below the rejection threshold, then you can choose to process the historical data in the remaining rows. You can also choose to reject the import request.
    4. Click OK.