 Configure Oracle IoT OPC UA Gateway Software to Integrate with OPC UA Server
  Before You Begin
This 15-minute tutorial shows you how to install, configure, and run the Oracle IoT OPC UA Gateway software to integrate an on-premise Open Platform Communications (OPC) Unified Architecture (UA) server with the Oracle Internet of Things (IoT) Production Monitoring Cloud Service application.
Background
OPC UA is a platform-independent, open-communication protocol for industrial automation. It's used in many industries, such as building automation, manufacturing, pharmaceuticals, process control, oil and gas, and industrial robotics. Many types of devices, sensors, and aggregating servers provide an OPC UA server interface and access to data through this interface.
Oracle IoT OPC UA Gateway software communicates with an on-premise OPC UA server by using Eclipse Milo Library, retrieves data from sensors and other sources, and then synchronizes this data with an instance of Oracle IoT Production Monitoring Cloud Service by using Oracle IoT Java Client Library..
Note that for integrating with an OPC UA server in the cloud, you use the Oracle IoT OPC UA Connector that is covered in another tutorial.
The following diagram illustrates the Oracle IoT OPC UA Gateway software, the OPC UA server, and the Oracle IoT Production Monitoring Cloud Service application. Oracle IoT OPC UA Gateway software uses Eclipse Milo Library to communicate with the OPC UA Server and Oracle IoT Java Client Library to communicate with Oracle IoT Production Monitoring Cloud Service.
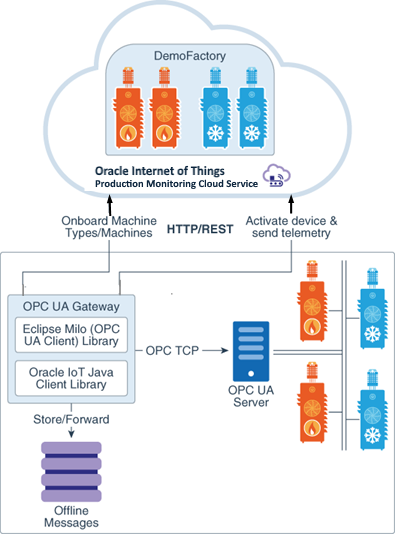
In this tutorial, you use a demo OPC UA server, air-conditioner controller sensor data, and Oracle IoT Production Monitoring Cloud Service application for the integration.
What Do You Need?
- Access to any OPC UA server that has real-time sensor data. (
opc.tcp://opcuaserver.com:48010from Unified Automation andopc.tcp://milo.digitalpetri.com:62541/milofrom Eclipse Milo are public demo OPC UA servers) - Access to an instance of Oracle Internet of Things Production Monitoring Cloud Service with administrator privileges
- A Windows, Mac, or Linux laptop or a desktop with Java SE Runtime (JRE) 8
- Downloaded the Oracle IoT Cloud Service OPC UA Gateway zip
 Create a Factory
Before you integrate, a factory should exist in your Oracle IoT Production Monitoring Cloud Service instance.
- Sign in to your instance of Oracle IoT Production Monitoring Cloud Service. You should have administrator privileges that allow you to create device modules, machine types, and machines.
- The Map view of the Operation Center is displayed. Click Menu
 .
. - On the left navigation bar, click Design Center and then Factories.
- On the Factories page, click Add
 .
.
- On the Factory page, enter the following mandatory details:
- ID:
DemoFactory - Name:
Demo factory
- ID:
- Note the Factory ID for later use. Click Save and then click Close X.
 Install and Configure the Oracle IoT Cloud Gateway Software for OPC UA
- Extract the
iotcs-opcua-gateway-<version>.zipfile. - To configure the software for the Oracle IoT Production Monitoring Cloud instance, in the
/config/opcua-gateway.propertiesfile, enter values for the following fields as described in the file:iotcs.hostiotcs.usernameiotcs.password(not mandatory. If left empty, you will be prompted for a password on the console when the script runs. If you are in a production instance, make sure that you do not store the password.)opcua.hostopcua.username(not mandatory if the OPC UA server supports anonymous access. Make sure that you do not use anonymous access in a production instance.)factory.id(more information in Section 1)
mapping.files(more information in Section 3)
 Create a Mapping File
For each machine type to be configured in the Oracle IoT Production Monitoring Cloud Service instance, you need to create a separate mapping/CSV file. In this section, you review a sample AirConditioner.csv that is used when the machine types do not exist in your Oracle IoT Production Monitoring Cloud Service instance.
- Click
AirConditioner.csvandFurnace.csv,save them in theiotcs-opcua-gateway-<version>/configfolder. - Notice the following format used in
AirConditioner.csv:- The comma separated values shouldn't have spaces before or after a comma. If present, then the spaces become part of the values.
- First column heading is the ID of the machine type, and second column heading is the name of the machine type, which is
AirConditionerin the example. ForAirConditioner.csv, the first column heading is left blank. If machine types already exist in your Oracle IoT Production Monitoring Cloud Service instance or imported from Oracle Manufacturing Cloud, then add the machine type ID field name in the first row first column of the mapping file. - Remaining column headings are the sensor attribute names attached to the machine type.
HumidityandTemperatureare examples. - First column from second row are the machine IDs that should be unique in the Oracle IoT Production Monitoring Cloud Service instance.
AirConditioner1is an example. - Second column from second row are the machine names.
AirConditioner1is an example. - Remaining columns from second row have Node IDs of the sensor attributes, which are as follows, in the example:
"ns=3;s=AirConditioner_1.Humidity","ns=3;s=AirConditioner_1.Temperature" - Node IDs are specially formatted strings of text that identify a unique OPC UA node.
Each Node ID contains a namespace index and an identifier separated by a semicolon. In the example,
ns=3is the namespace of the Node ID3ands=AirConditioner_1.Humidityis an identifier of type String and valueAirConditioner_1.Humidity. - If a value of a Node ID contains quotes, then enclose the value with another pair of quotes as an escape character. Here's an example:
# For the node ID: ns=3;s="Temperature", enter the following in the CSV file:"
"ns=3;s=""Temperature""
Note: If you use the demo OPC UA server at
opc.tcp://opcuaserver.com:48010, then the CSV file maps the incoming sensor data from the air-conditioners to machinesAirConditioner1,AirConditioner2, etc. in the Oracle IoT Production Monitoring Cloud Service instance. - If you do not use the demo OPC UA server, refer to the sample CSV files and create a new mapping file for each machine type.
- Ensure that your new, updated, or modified CSV files are referenced in the
opcua-gateway.propertiesfile accurately. Since each machine type has a CSV file, you can provide their names in themapping.filesfield, separated by a comma.#example mapping.files= config/
AirConditioner.csv, config/Furnace.csv
 Integrate the OPC UA Server with the Oracle IoT Production Monitoring Cloud Service Application
- Ensure that you have completed Section 2 of this tutorial before you run the commands provided in this section. If your system is behind a firewall, ensure that you have set or exported the value for
HTTP_PROXY and HTTPS_PROXYin your system settings.#example export HTTP_PROXY="some.proxy.com:port"
For Windows environment, you can alternatively create
export HTTPS_PROXY="some.proxy.com:port"HTTP_PROXYandHTTPS_PROXYas environment variables, and set their values on your system from the Advanced system settings option in the System > About window. - Use the command line to set the
OPCUA_GATEWAY_HOMEvariable to the location where you've extracted theiotcs-opc-ua-gateway-<version>.zipfile, which contains thebin,config, andlibdirectories.# example for Windows
For Windows environment, you can alternatively create the
set OPCUA_GATEWAY_HOME="C:\software\opcua"
# or # example for Linux export OPCUA_GATEWAY_HOME="/home/user/software/opcua"OPCUA_GATEWAY_HOMEenvironment variable, and set its value on your system from the Advanced system settings option in the System > About window. -
From the command line, go to the directory where you extracted
iotcs-opc-ua-gateway-<version>.zipand change to the./bindirectory. With theopcua-gateway.propertiesproperly configured, run the IoT OPC UA Gateway to start data ingestion from the OPC UA server.# for Windows
opcua-gateway.bat
# or # for Linux ./opcua-gateway.sh - If you have used a security policy for connecting to the OPC UA server, go to the OPC UA server, open the OPC UA server administration or configuration tool, on the Certificates tab, right click the security policy entry
and, select Trust.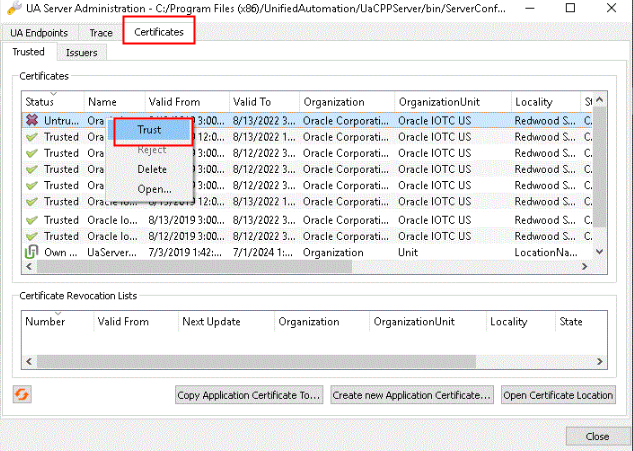
Description of the illustration trust_certificate.png
 Verify the Integration
Verify that the device messages are received by your Oracle IoT Production Monitoring Cloud Service instance from the machines managed by the OPC UA server.
- Click Menu and then click Operation Center. The Map view appears.
- On the map, locate and zoom in to the area where DemoFactory is located.
- Click the Factory
 icon. On the floor plan of the factory, click an air-conditioner machine icon.
 - The dashboard of the air-conditioner machine appears. On the navigation bar, click Machine Sensors
 .
. - On the sensor data graph, select Time Period as Live. Notice that the live values of the Humidity and Temperature attributes are displayed on the graph.
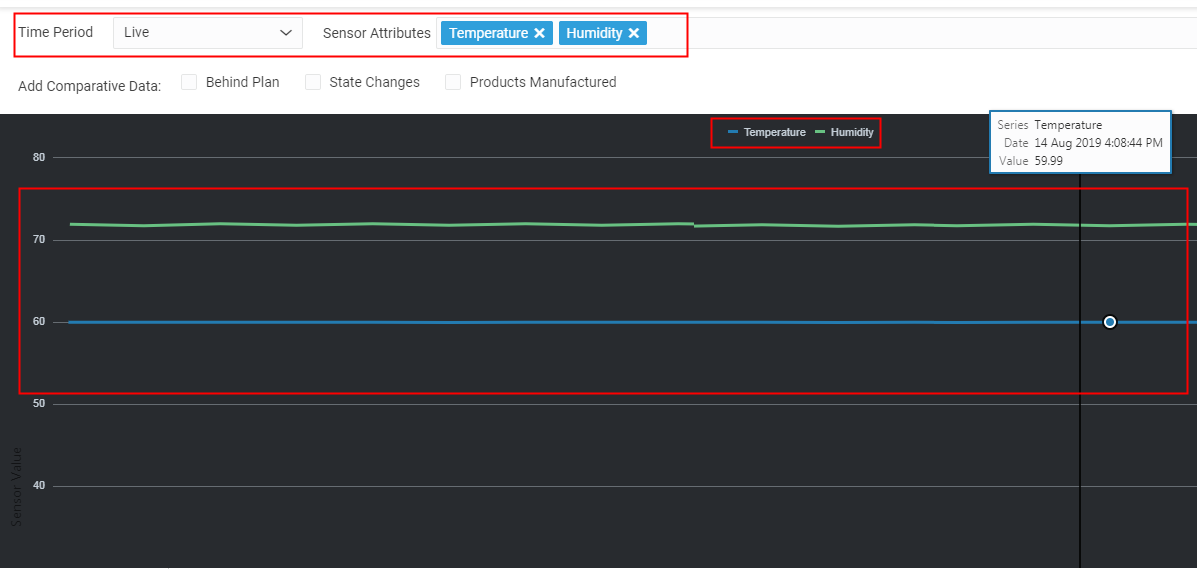
Description of the illustration device_messages.png