 Configure Oracle IoT PI System Gateway Software to Integrate with PI System
 Before You Begin
This 15-minute tutorial shows you how to install, configure, and run the Oracle IoT PI System Gateway software that integrates a PI System server with the Oracle Internet of Things (IoT) Production Monitoring Cloud Service application.
Background
Oracle IoT PI System Gateway software integrates with the OSIsoft PI Server to retrieve factory, floor, machine, and product data, and then sends and synchronizes this data to an instance of Oracle IoT Production Monitoring Cloud Service.
The following diagram illustrates the Oracle IoT PI System Gateway software, the PI System server, and the Oracle IoT Production Monitoring Cloud Service application.
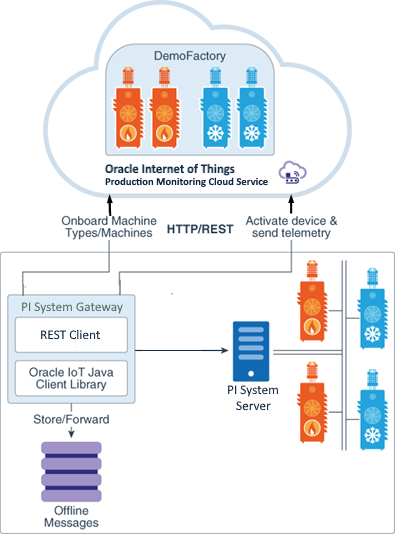
In this tutorial, you use a demo PI System server, fuel controller sensor data, and Oracle IoT Production Monitoring Cloud Service application for the integration.
What Do You Need?
- A Windows, Mac, or Linux laptop or a desktop with Java SE Runtime (JRE) 8
- Access to any PI System server that has real-time sensor data
- Access to an instance of Oracle Internet of Things Production Monitoring Cloud Service
- Downloaded the Oracle IoT Gateway Software for PI System from the Oracle IoT Cloud Service Gateway Software Downloads page
 Create a Factory
Before you integrate, a factory should exist in your Oracle IoT Production Monitoring Cloud Service instance.
- Sign in to your instance of Oracle IoT Production Monitoring Cloud Service.
- The Map view of the Operation Center is displayed. Click Menu
 .
. - On the left navigation bar, click Design Center and then Factories.
- On the Factories page, click Add
 .
. - On the Factory page, enter the following mandatory details:
- ID:
DemoFactory - Name:
Demo factory
- ID:
- Note the Factory ID for later use. Click Save and then click Close X.
 Install and Configure the Oracle IoT Cloud Gateway Software for PI System
- Extract the
iotcs-pi-system-gateway-<version>.zipfile. - To configure the gateway software for your Oracle IoT Production Monitoring Cloud Service instance, in the
/config/pi-gateway.propertiesfile, enter values for the following fields as described in the file:iotcs.hostiotcs.usernameiotcs.password(not mandatory. If left empty, you will be prompted for a password on the console when the script runs. On a production instance, make sure that you do not save the password.)pisystem.hostpisystem.portpisystem.usernamepisystem password(not mandatory. If left empty, you will be prompted for a password on the console when the script runs. On a production instance, make sure that you do not save the password. )factory.id(more information in Section 1. The gateway software will create a factory if it does not exist.)
mapping.files(more information in Section 3)
 Create a Mapping File
For each machine type to be configured in the Oracle IoT Production Monitoring Cloud Service instance, you need to create a separate mapping/CSV file. In this section, you review a sample Fuel.csv that is used when the machine types do not exist in your Oracle IoT Production Monitoring Cloud Service instance.
- Click
fuel.csv, save them in theiotcs-pi-system-gateway-<version>/configfolder. - Notice the following format used in
Fuel.csv:- First column heading is the ID of the machine type, and second column heading is the name of the machine type, which is
Fuelin the example. ForFuel.csv, the first column heading is left blank. If machine types already exist in your Oracle IoT Production Monitoring Cloud Service instance or imported from Oracle Manufacturing Cloud, then add the machine type ID field name in the first row first column of the mapping file. - Remaining column headings are the sensor attribute names attached to the machine type.
SinusoidandFuelGasFloware examples. - First column from second row are the machine IDs that should be unique in the Oracle IoT Production Monitoring Cloud Service instance.
Fuel1is an example. - Second column from second row are the machine names.
Fuel1is an example. - Remaining columns from second row have tags of the sensor attributes, which are as follows, in the example:
  F1DPW6Wlk0_Utku9vWTvxg45oAAQAAAAUElTUlYxXFNJTlVTT0lE,
F1AbEIRAQC7zjPUOfBqai218IAwF86n73045hGAxAANOhDHzg1C1SPoJqCFg8zXXXV
kovvgUElTUlYxXE5VR1JFRU5cTlVHUkVFTlxUVUNTT05cRElTVElMTElORyBQUk9DRVNTXEVRVU
QTUVOVFxCLTExN3xGVUVMIEdBUyBGTE9X - Tags are specially formatted strings of text that identify a unique PI System point or attribute.
Note: If you use the OSIsoft demo PI System server at
https://devdata.osisoft.com:443, then the CSV file maps the incoming sensor data to the Fuel1 machine in the Oracle IoT Production Monitoring Cloud Service instance. - First column heading is the ID of the machine type, and second column heading is the name of the machine type, which is
- If you do not use the demo PI System server, refer to the sample CSV file and create a new mapping file for each machine type.
- Ensure that your new or updated CSV files are referenced in the
pi-system-gateway.propertiesfile accurately. Since each machine type has a CSV file, you can provide their names in themapping.filesfield, separated by a comma.#example mapping.files= config/
Fuel.csv, config/Fuel2.csv
 Integrate the PI System Server with the Oracle IoT Production Monitoring Cloud Service Application
- Ensure that you've completed Section 2 of this tutorial before you run the commands provided in this section. If your system is behind a firewall, ensure that you've set the values for
HTTP_PROXYandHTTPS_PROXYin your system settings.#example export HTTP_PROXY="some.proxy.com:port"
For Windows environment, create
export HTTPS_PROXY="some.proxy.com:port"HTTP_PROXYandHTTPS_PROXYas environment variables, and set their values on your system. - From the command line, go to the directory where you extracted
iotcs-pi-system-gateway-<version>.zipand change to the./bindirectory. With thepi-system-gateway.propertiesconfigured accurately, run the IoT PI System Gateway to start data ingestion from the PI System server.# for Windows
pi-system-gateway.bat
# or # for Linux ./pi-system-gateway.sh
 Verify the Integration
Verify that the device messages are received by your Oracle IoT Production Monitoring Cloud Service instance from the machines managed by the PI System server.
- Click Menu and then click Operation Center. The Map view appears.
- On the map, locate and zoom in to the area where DemoFactory is located.
- Click the Factory
 icon. On the floor plan of the factory, click the Fuel1 machine icon.
 - The dashboard of the Fuel1 machine appears. On the navigation bar, click Machine Sensors
 .
. - On the sensor data graph, select Time Period as Last 1 Hour. Notice that the values of the Sinusoid and FuelGasFlow attributes are displayed on the graph.

Description of the illustration device_messages.png