Authenticate with Live Experience for the Web

Set up User Authentication and Live Experience Authentication, which are two necessary steps for adding Live Experience to your website.

User Authentication refers to confirming that a user who's accessing your application is who they say they are. Your greater organization will determine how that authentication is handled. For instance, you may need to use OAuth authentication through a third party provider such as Google, Facebook, or Yahoo. In other cases, you may use your own organization's single sign-on facilities, some sort of LDAP system, or, during development, you may use a simple username/shared password challenge. In any case, you'll need to design an appropriate workflow along with the supporting back end code.

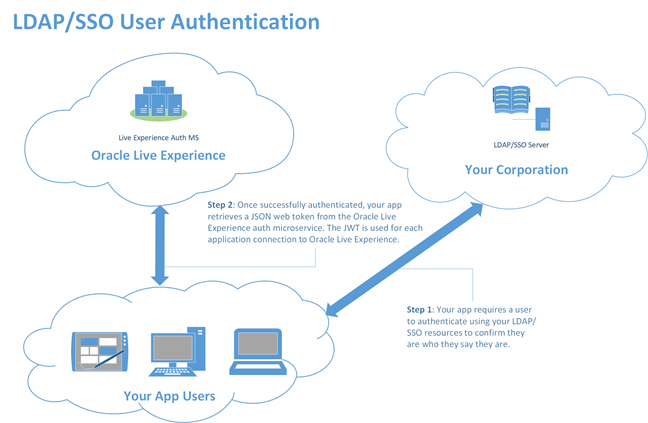
The following graphic shows the flow if you're using your own SSO/LDAP workflow.Shows the authentication workflow if you are using your own corporate directory for single sign on. Your app requires your users to authenticate using your LDAP and SSO resources to confirm they are who they say they are. Once complete, your app retrieves a JSON web token (JWT) from Live Experience. The JWT is used for each application connection to Live Experience.
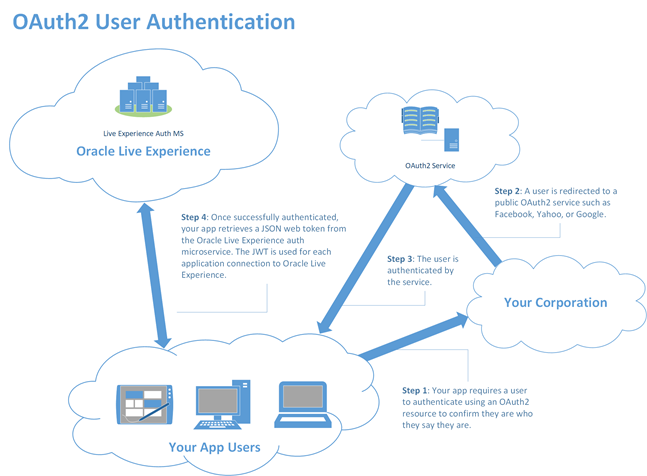
And the following graphic shows the flow if you're using a third party OAuth platform such as Facebook, Google, or Yahoo.Shows the authentication workflow if you're using a third-party authentication platform. The platform needs to use the OAuth2 authentication protocol. First, your app requires a user to authenticate using an OAuth2 resource to confirm they are who they say they are. Next, the user is redirected to a public OAuth2 service (such as Google or Facebook). Once the authentication is complete, the your application receives a JSON web token (JWT) from Live Experience. The JWT is used for each application connection to Live Experience.
After you authenticate a user (assuming it's required for your application), you then need to handle Live Experience Authentication. Fortunately, Live Experience authentication is much more prescribed and quite a bit simpler than User Identity Authentication. To authenticate with Live Experience, you obtain a JSON Web Token (JWT) from Live Experience which you use when opening any connection or REST interface requests. You use JavaScript XMLHttpRequests to communicate with a simple script that you'll deploy on a web server in your own domain. See Deploy the Sample JWT Script. While the supplied script is sufficient for development, you'll want to create something more secure for a production environment using the REST call described in Retrieve a JWT Access Token Using the Auth REST Call.

To retrieve a JWT token from the script, you use an XMLHttpRequest, and store the JWT in the browser's sessionStorage so you can recall it when you actually connect to Live Experience.

  1. Deploy the script as described in Deploy the Sample JWT Script.
  2. Use an XMLHttpRequest to retrieve the JWT and store it in the browser's sessionStorage for easy retrieval:
    var xhr = new XMLHttpRequest();
    xhr.open("GET", "https://your-server/cgi-bin/auth.sh", true);
    xhr.setRequestHeader("Accept","application/json");
    xhr.onload = function () {
     // Extract the access_token field from the response
     var response = JSON.parse(xhr.responseText);
     console.log(response.access_token);
     // Save the JWT in session storage...
     sessionStorage.setItem(jwtKey, response.access_token);
    };
    xhr.send();

Results:

After you obtain and store the JWT access_token, you can use it to authenticate with Live Experience.

What to do next

Next, Add and Configure the Live Experience Widget for your Website.