Create and manage publish templates
Use the Manage Publish Templates page to create and manage publish templates. In CX Audience, publish templates enable you to pre-define a list of attributes to use in audience publishing. Publish templates can include up to 10 fields from a customer data list, its associated profile extension tables (PETs), or both.
When a user selects a publish template to be used when publishing an audience to Responsys, its attributes are included in the export, along with the RIID.
To open the Manage Publish Templates page:
- Click
 .
. - Select Manage Publish Templates from the Audiences menu.

The Manage Publish Templates page is displayed.
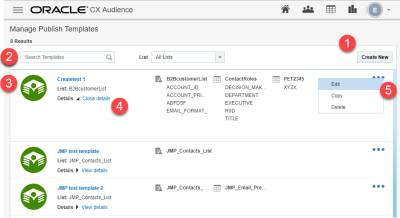
About the Manage Publish Templates page:
- Click the Create New button to create a new publish template. See Creating and editing publish templates for more details.
- Use the Search Templates field to search for templates, or you can use the List drop-down list to show templates associated with a particular customer data list (choose All Lists to remove this filter).
- Each row in the page shows a publish template, its associated list, and the lists or PET(s) from which attributes are selected.
- Click View details to show the selected attributes from each list or its PET(s) or both.
- Click
 to show more actions. You can edit, copy, or delete a publish template.
- Edit opens the Edit Publish Template dialog, where you can modify the fields selected or change the template's name. See Creating and editing publish templates for more details.
- Copy enables you to save a copy of your publish template using a different name. If you want to make changes to the copy, you must edit it.
- Delete displays a confirmation dialog; click Delete again to complete the action. Note that deleting publish template cannot be reverted.
Creating and editing publish templates
When you create or edit a publish template, you can name the publish template, choose a customer data list to associate with the template, and then select up to 10 fields from a customer data list or its associated PET(s), or both.
Important: For compliance and security reasons, CX Audience does not include email address and mobile number when an audience is published to an SFTP location.
To create a publish template:
- Click the Create New button.
- On the Create New Publish Template dialog, enter the Name and choose a customer data list from the Profile List drop-down list.
- Click Next. The Create New Publish Template dialog expands to show the columns (also known as fields) in the list and profile extension tables associated with the list.
- Select up to 10 fields. After selecting a field, it will display in the Selected Columns section. The system will stop selecting fields if you choose more than 10.
- Click the List or Profile Extensions tab and use the Search Columns field to search for fields.
- On the List tab, select fields from the customer data list.
- Click the Profile Extensions tab to show all PETs associated with the list. Click the arrow next to a PET to show its fields.
- Modify your field selections as needed.
- Click field names under the List and Profile Extensions tabs to add and remove them.
- Click X in the Selected Columns section to remove a field.
- Click Save to save your edits, or Cancel to close the dialog without saving the publish template.
To edit a publish template:
- Locate the template you want to edit, click
 and then select Edit. The publish template opens in the Edit Publish Template dialog.
 - Optionally, you can rename your publish template. Type a new name in the Name field.
- Modify your field selections as needed. You can have up to 10 fields in your publish template.
- Click the List or Profile Extensions tab and use the Search Columns field to search for fields.
- Click field names under the List and Profile Extensions tabs to add and remove them.
- Click X in the Selected Columns section to remove a field.
- Click Save to save your edits, or Cancel to close the dialog without saving your changes.
