Creating multi-step campaigns
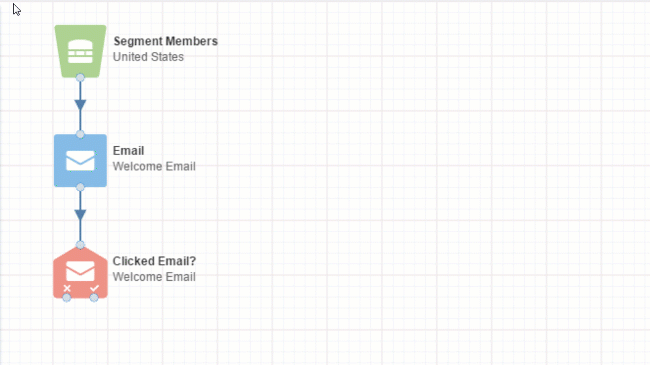
A multi-step campaign is a highly customizable marketing tool. Simply add the elements of your campaign to the campaign canvas and then connect them to create your campaign flow.
Learn more by watching the video
Tip: Looking to create a one-time batch email? Consider using a simple email campaign instead. This is an ideal way to send a single email to a group of contacts or conduct A/B testing on emails.
Before you begin:
- Plan out your campaign. Document your campaign goals, target audience, key messages, and identify the appropriate channels to reach your audience. If you're not sure where to start, have a look at
- Create all the assets (emails, forms, landing pages) required for your campaign. If you need to add something after activating the campaign, that is OK. Just deactivate the campaign and make the changes you need. Keep in mind this information about leaving a campaign deactivated for more than 3 months.
- If you want to be able to report on all of the form and landing page activity resulting from your campaign, be sure to add them to the campaign canvas. This allows you to attribute form submits and page visits back to the campaign. Find out more about campaign reporting.
- Before activating your campaign, plan to test it first. This will catch typos, broken links, and ensure you're sending the right emails in your campaign flow.
To create a multi-step campaign:
- Navigate to Orchestration
 , then click Campaigns.
 - Click Create a Multi-Step Campaign.
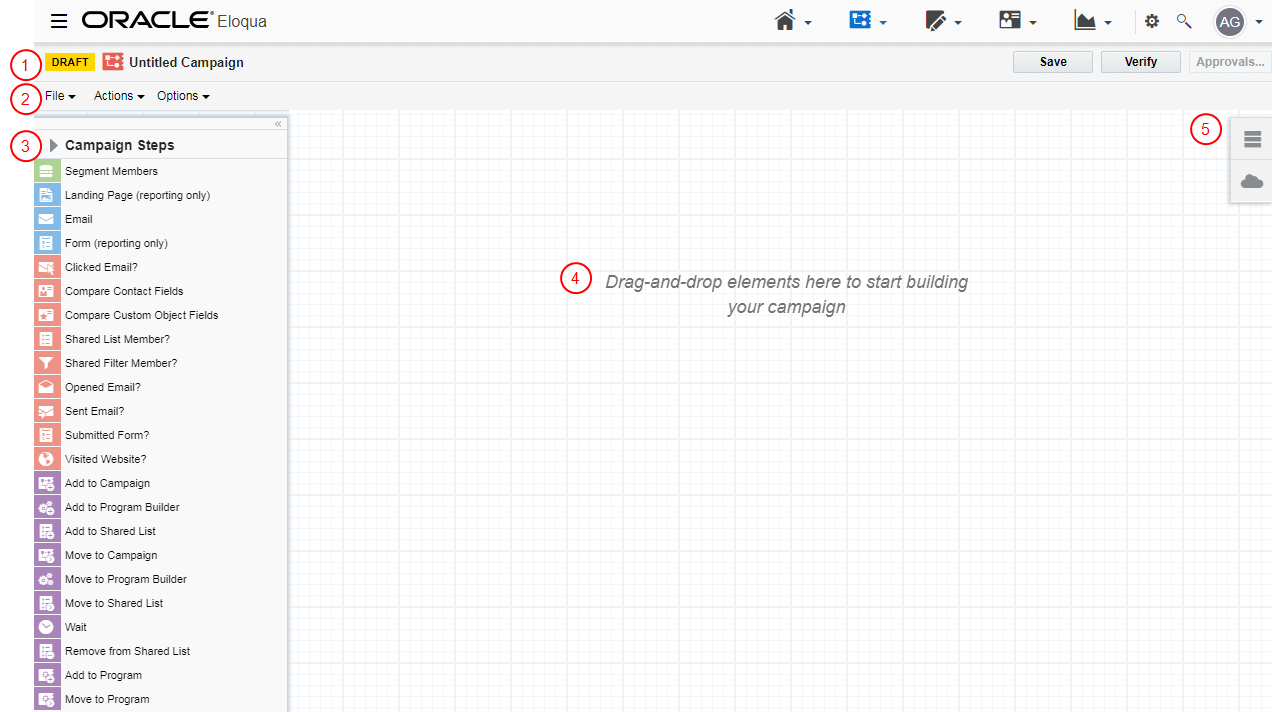
- Select a template or use the blank campaign. The campaign canvas opens.
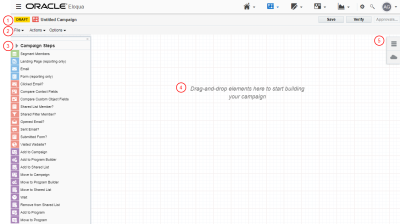
 Campaign name and state
 Menu bar
  Campaign elements
 Campaign canvas
 Campaign settings
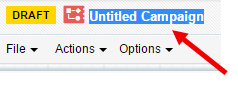
 - At the top of the canvas, double-click Untitled Campaign and type in a name for your campaign.

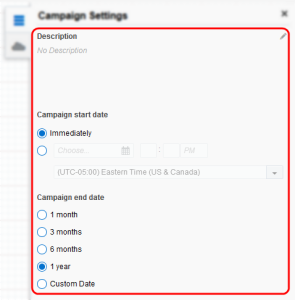
- Configure the settings for your campaign.
- Click Options, then click Campaign Settings.
- Add a description of the campaign and set when the campaign will start and end.
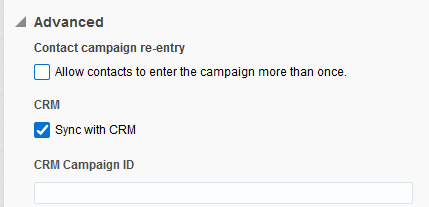
Click Advanced and configure additional details:
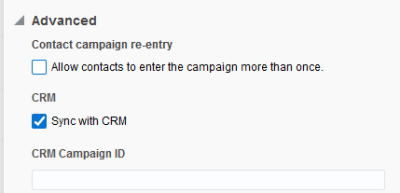
- To allow a contact to enter the campaign more than once, click the Allow contacts to enter the campaign more than once option. If you select this option, after a contact enters the campaign, the contact can enter the campaign again. For example, if you want to allow contacts to flow through a different path of your campaign and receive a different email. Or if you have an ongoing campaign where assets regularly change each time the contact flows through the campaign.
- To sync the campaign with your CRM, click the Sync with CRM option. Leave the CRM Campaign ID field blank. It will populate after Oracle Eloqua syncs with your CRM.
- Click X to close the settings.
- Configure any additional campaign information used by your organization by clicking Options > Campaign Fields. Use the Campaign Fields dialog to provide further information about the campaign that can also be used for reporting purposes. For example, budget information, any custom campaign fields required by your organization, and so on. You can also add an end date notification on the Notifications tab.
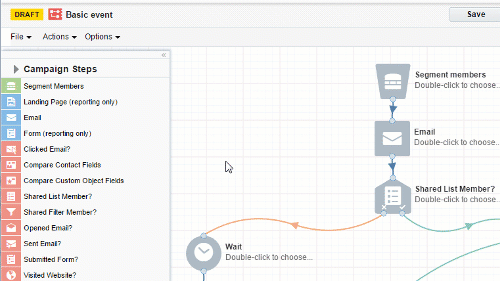
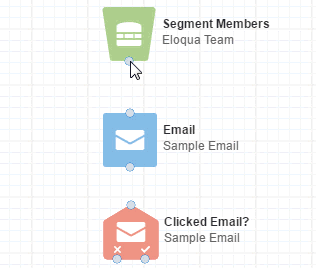
- Add elements to the campaign canvas by double-clicking the element in the Campaign Steps pane. By default, popular elements are shown. To view all the available elements, click the Campaign Steps heading. You can mark your own favorite elements by clicking the star icon.
Tip: You can copy and paste groups of steps by highlighting them with your cursor and using your default keyboard shortcuts (for example, Ctrl+C to copy and Ctrl+V to paste).
- Configure each element by double-clicking the element. See the following topics for more information on campaign canvas elements:
- Configuring audience elements
- Configuring asset elements
- Configuring decision elements
- Configuring action elements
- Connect the steps on the canvas to form the campaign flow.
Tip: Add notes to your campaign to help you remember where you left off while working and alert colleagues as to the purpose of your campaign. Learn about adding notes.
- Click Save.
Note: Draft errors appear
 until you have completely configured the campaign. Click the error indicator to view a list of all validation errors. You must resolve all draft errors before you can activate the campaign.

After you finish configuring the campaign and resolve all draft errors, you can activate the campaign.
Activating multi-step campaigns
Adding notes to campaigns and programs
Creating simple email campaigns
Setting up campaign notifications