Step 4: Configuring campaign settings
Before saving the campaign, let's configure the campaign settings. Campaign settings determine when a campaign starts and ends, allow you to configure any custom campaign fields set up by your organization, and specify information needed for your CRM.
In this step of the tutorial, we are going to name the campaign, configure the campaign length, and also make sure that the campaign doesn't sync with the CRM.
To configure campaign settings:
- With your draft campaign open, double-click the Untitled Campaign text so that you can give your campaign a name. Type in a new name of the campaign.
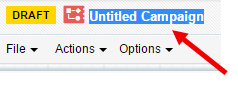
Your organization might have naming guidelines in place and you should always follow those. For this tutorial, we're going to call it DO NOT LAUNCH - My first welcome campaign. We're trying to be clear that we do not want to launch this campaign and that it is for demo purposes only.
- To access the campaign settings, click Options > Campaign Settings.
The Campaign Settings appear.
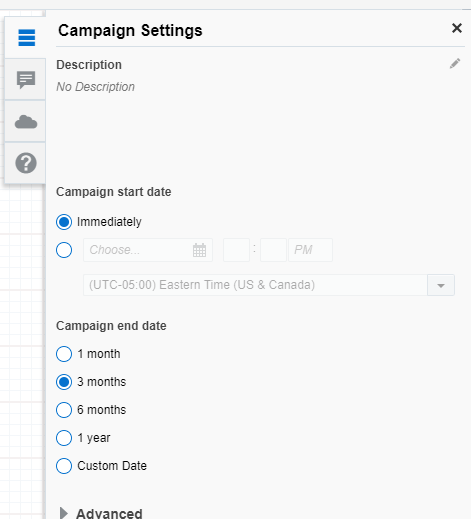
- Add a description of the campaign.
The description can provide further details about the campaign purpose or other information people on your team may need to know. Keep in mind though that this information is not visible to others until they open the settings.
- Choose when the campaign should start and end.
- Starting the campaign immediately means that the campaign starts as soon as it is activated and contacts will start flowing through the campaign. In most cases you are probably setting up campaigns to start at a later date and time, based on your own information of when contacts are most responsive to emails.
- The end date determines when contacts will stop flowing through the campaign. The end time will always be at midnight EST on the date selected. The default end date is for 3 months. Only set durations up to what is necessary and not far beyond. This is to prevent the canvas from continually triggering the segments to run unnecessarily. After the end date, the campaign becomes read-only and Oracle Eloqua continues to track all campaign activity for an additional 12 months. For longer running campaigns, you can later choose to be notified when the campaign is coming to an end so that you can choose to take action on it if necessary.
- Click Advanced so you can see the additional campaign settings.
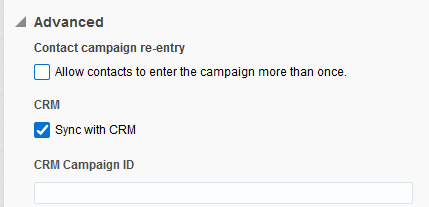
- Although not covered in this tutorial, it's possible to select Allow a contact to enter the campaign more than once. If you select this option, after a contact enters the campaign, the contact can enter the campaign again. For example, if you want to allow contacts to flow through a different path of your campaign and receive a different email, or if you have an ongoing campaign where assets regularly change each time the contact flows through the campaign.
- To sync the campaign with your CRM, you would select the check box. However, since this is a test campaign, be sure to clear the check box so that this campaign doesn't risk ending up in your CRM. If you are syncing the campaign, Oracle Eloqua populates the CRM Campaign ID field after synching with your CRM.
- Click X to close the settings.
- To configure your organization's custom campaign fields, click Options > Campaign Fields.
-
The Campaign Fields window appears.

The configuration of the campaign fields really depends on your organization. But lets take a look at the tabs on this window.
Tab
Description
General Reporting settings and default campaign field settings: - Product
- Region
- Campaign type
Financials Financial information about the campaign such as budget and actual cost. These can be used for ROI reporting. 
Custom Fields Any custom campaign fields set up by your organization. These fields can then be used for campaign reporting purposes. 
Notifications Set up notifications for when a campaign is ending. 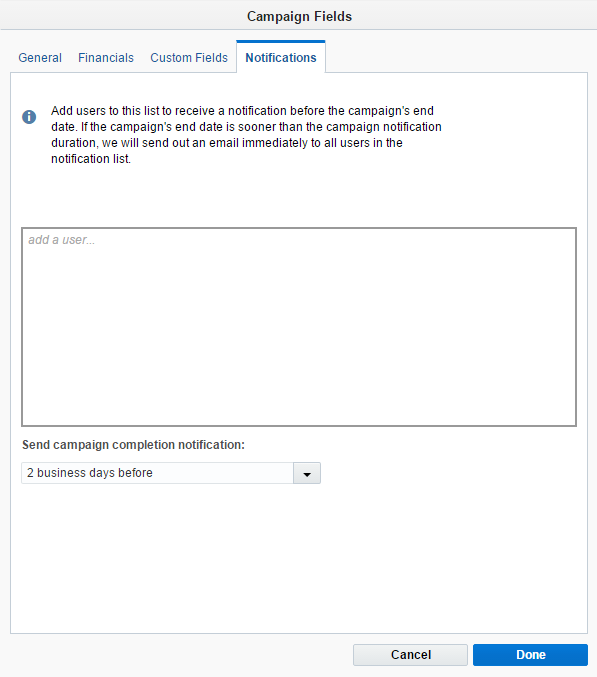
We left all of our settings with the default settings except for Sync with CRM. Here is the final settings screen:

Now the settings are done. In the final part of this tutorial, we'll save the campaign.