Configuring sales prioritization views in Salesforce
This guide describes how you can create a lead or contact calling list for your sales team in Salesforce, allowing them to prioritize by lead score and other criteria. Optionally, you can include links to Oracle Eloqua Engage and Profiler.
 Download the Sales Prioritization Views Configuration Guide.
Configuration prerequisites
- Salesforce administrator privileges
- CRM integration is set up in your Salesforce instance
- The Lead Score property from Eloqua has been synchronized to a property in Salesforce
Configuration
The configuration requires the completion of the following high level steps:
Creating the properties
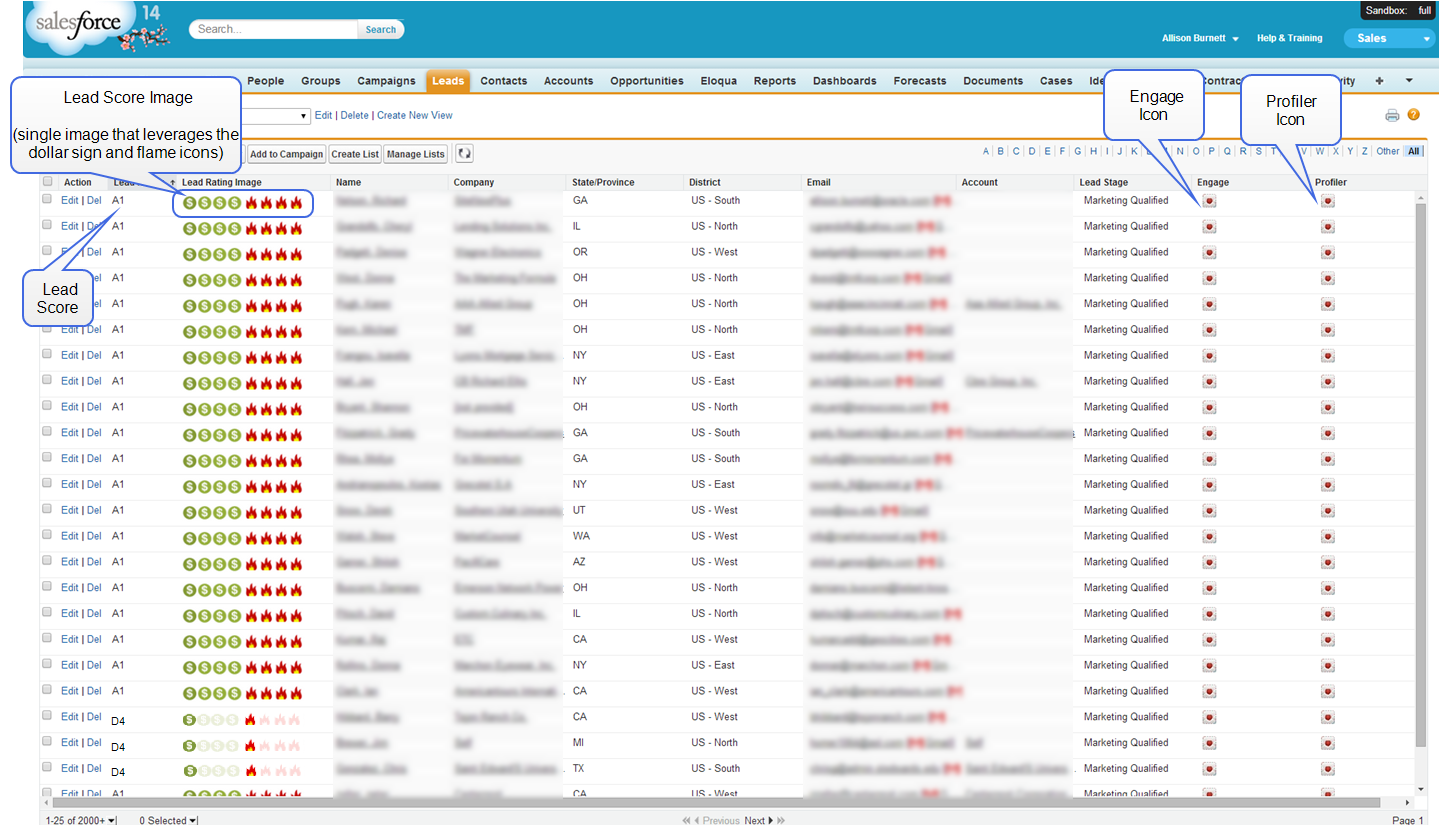
This configuration involves creating new properties in Salesforce to show the Lead Score Images. These images (typically composed of dollar sign and flame icons) appear inside the Salesforce View and link users to Profiler and Engage. There will be a total of 16 images (A1, A2, A3, A4, B1, B2, B3, B4, C1, C2, C3, C4, D1, D2, D3, D4).
Note: The only required property is the Lead Score property, which is a prerequisite for this configuration. The properties below are optional, but provide visual cues and a better user experience.
To create the optional properties:
- (Optional) Create the Lead Score Image property:
- Create the 16 different lead score images or download the example images. For example:

- Upload the 16 images to Salesforce.
- Inside Salesforce, navigate to Documents.
- Click New to create a new document.
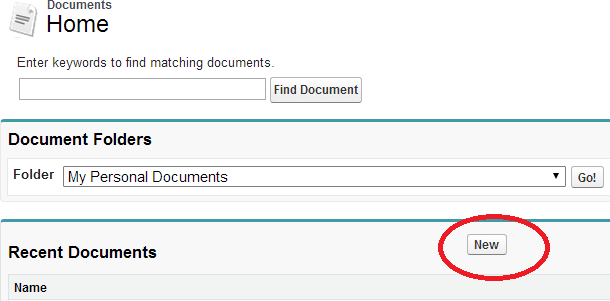
- Upload the image and then Save.
- Open the document and click View File. The image opens in a new tab.
- Copy the URL from your browser address bar into a document or spreadsheet so you can reference it later. Note: This is the URL to the image. You will need these image URLs later.
- Repeat for each flame and dollar sign image.
- Create a new field to lookup the appropriate image based off the lead score rating value. In other words, if the lead score is A1, then we want Salesforce to display the A1 image.
- Inside Salesforce, navigate to Setup > Leads > Fields.
- Create a New Custom Field.
- Step 1: Choose the Field Type. Select Formula.
- Step 2: Choose output type. Select Text
- Step 3: Custom Field Definition Edit. Insert the following code, with your own data substituted for the information highlighted below:
IMAGE(
CASE( <API Name for Lead Scoring Field> ,
"A1", "<A1ImageURL>",
"A2", "<A2ImageURL>",
"A3", "<A3ImageURL>",
"A4", "<A4ImageURL>",
"B1", "<B1ImageURL>",
"B2", "<B2ImageURL>",
"B3", "<B3ImageURL>",
"B4", "<B4ImageURL>",
"C1", "<C1ImageURL>",
"C2", "<C2ImageURL>",
"C3", "<C3ImageURL>",
"C4", "<C4ImageURL>",
"D1", "<D1ImageURL>",
"D2", "<D2ImageURL>",
"D3", "<D3ImageURL>",
"D4", "<D4ImageURL>",
"/s.gif"),
"Lead Rating") - Step 4: Establish field-level Security. Select which profilers get access to this field.
- Step 5: Add to page layouts. Select the page layouts that this field will show up in
- Save
Here is an example:
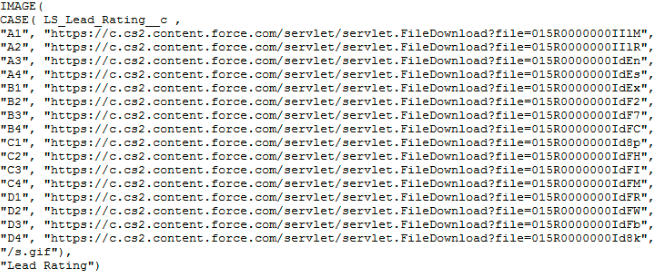
Note: Your image URLs and Lead Scoring API name will differ from the example shown above.
- (Optional) Create a property to link to Engage:
- Create and store the Engage icon inside Salesforce.
- Inside Salesforce, navigate to Documents.
- Create a New document.
- Upload the Engage icon and then Save.
- Open the document and click View File. The image opens in a new tab.
- Copy the URL in the address bar. Note: This is the URL to the image. You will need the image URLs later.
- Copy the URL from your browser address bar into a document or spreadsheet so you can reference it later. Note: This is the URL to the image. You will need this image URL later.
- Create a new field that displays the Engage icon, by performing the following steps:
Note: The icon will contain a hyperlink to Engage, with the lead's email address populated in the To field. Alternatively, the URL could take the sales rep to a specific engage template.
- Inside Salesforce, navigate to Setup > Leads > Fields.
- Create a New Custom Field.
- Step 1: Choose the Field Type. Select Formula.
- Step 2: Choose output type. Select Text
- Step 3: Custom Field Definition Edit. Insert the following code, with your own data substituted for the information highlighted below:
HYPERLINK("<Login URL>&Url=/apps/engage?sendTemplateEmailToContacts/" & Email, IMAGE("<EngageIconURL>", " "))
Note: Specify the URL that you typically use to access (i.e. login to) Engage.
- Step 4: Establish field-level Security. Select which profilers get access to this field.
- Step 5: Add to page layouts. Select the page layouts that this field will show up in.
- Save.
- (Optional) Create a property to link to Profiler:
- Create and store the Profiler icon inside Salesforce:
- Inside Salesforce, navigate to Documents.
- Create a New Document.
- Upload the profiler image and then Save.
- Open the document and click View File.
The image opens in a new tab. - Copy the URL from your browser address bar into a document or spreadsheet so you can reference it later. Note: This is the URL to the image. You will this image URL later.
- Create a new field which will show the Profiler icon with a hyperlink to the specific profiler for that contact:
- Inside Salesforce, navigate to Setup > Leads > Fields.
- Create a New Custom Field.
- Step 1: Choose the Field Type. Select Formula.
- Step 2: Choose output type. Select Text
- Step 3: Custom Field Definition Edit. Insert the following code, with your own data substituted for the information highlighted below:
HYPERLINK("<LoginURL>/apps/salesTools/profiler/contacts?emailAddress=" & Email , IMAGE("<ProfilerImageURL>", " "))
Note: Specify the URL that you typically use to access (i.e. login to) Profiler.
- Step 4: Establish field-level Security. Select which profilers have access to this field.
- Step 5: Add to page layouts. Select the page layouts that this field will show up in.
- Save.
Creating the View
This section is about creating a View on the Lead tab which will show a list of all the leads sorted by the lead score.
- Inside Salesforce, navigate to the Leads tab.
- Click Create New View.

- Specify a meaningful name for your new view.
- Specify Filter Criteria - Filter the view.
Filter By Owner
The view can show all leads, my leads or leads in a specific queue. “My Converted Leads” will show all the leads that are assigned to the user that is currently logged in. Only one view is needed instead of creating a view for each user.
Filter by Additional Fields
The lead score value occasionally can be empty or invalid. Therefore, by default, filter out the following:
- Lead Score not equal to “”
- Lead Score not equal to “A”
In addition, filter out any custom property. For example: Region, Territory, State, and so on
- Select Fields to Display – Add fields that will appear in the view.
Add the fields that will appear in the field, at a minimum add in Lead Score, and Name of the contact. Make sure you add all of the optional fields that you created in the Creating Properties section.

- Save the view.
- Sort on Lead Score by clicking the heading of the column inside the view.
Note: You can configure the same view on the contacts tab by adding the same properties to the Contact object and then creating the same view on the Contacts tab.