How to Create a User and Assign Job Roles for Fusion Marketing
This section outlines how you create users and assign job roles for your Fusion Marketing team.
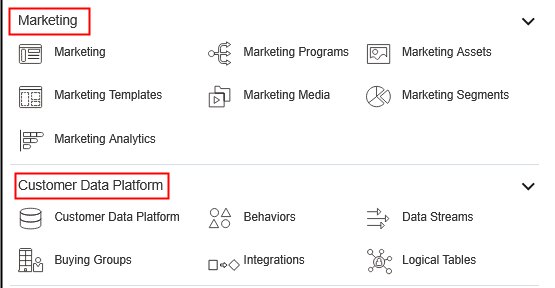
To get started with getting access to the Customer Data Platform (CDP) and Marketing Orchestration areas of your Fusion Marketing application, you can follow these steps:
- Create a user for your Fusion Marketing team
- Add Instance Admin as an example job role for your Fusion Marketing user using the Security Console
- Assign specialist job roles to Fusion Marketing users
- Edit role memberships from existing roles
Create a User for Your Fusion Marketing Team
From the Navigator, go to the task to create a user for your Fusion Marketing team. When the Search Person page appears, select the Create (+) icon and the Create User page appears for you to fill in and save.
If you use the HCM pages to upload workers, hire employees, or add contingent workers, you also automatically create application users and identities.
When you create a new user, it automatically triggers role provisioning requests based on role provisioning rules.
- Navigate to .
- Select Create (the + icon).
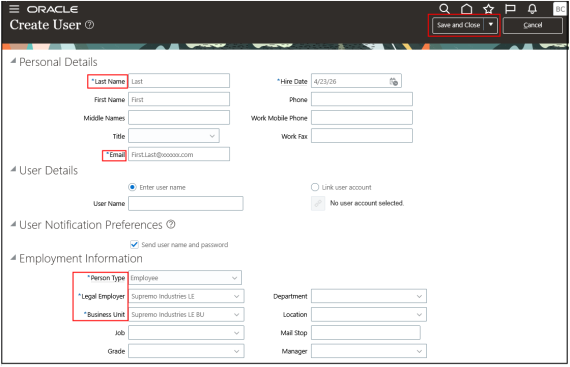
- Enter Last Name and Email address.
- Select Employee as the Person Type and select
Legal Employer and Business
Unit values as per this sample image.
- From the Resource Information section, you can
assign a Resource Role as follows:
- Select
Sales Administrator(temporary baseline).
- Select
- Click Save and Close.
See the Create Users topic of the Securing Applications guide for more information.
Example of Adding Instance Admin Role for Your Fusion Marketing User Using the Security Console
You can create a duty role, job role, or an abstract role using the Security Console. Often, an efficient method of creating a role is to copy an existing role, then edit the copy to meet your requirements. Typically, you'd create a role from scratch if no existing role is similar to the role you want to create.
To create a role from scratch, select the Roles tab in the Security Console, then select Create Role and enter values in a series of role-creation pages, selecting Next or Back to navigate among them.
- Navigate to .
- From the Search fields enter these details as
shown:
- Roles and Permission Groups
- Job roles, Duty roles
- Instance Admin
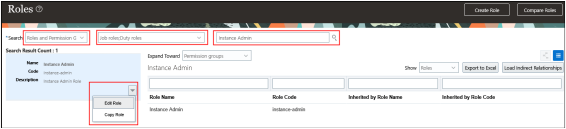
- Select Edit Role to add the Instance Admin role for the newly created Fusion Marketing user you created.
- Click Next until you click-through to step
7 Users in the guided process as
shown:
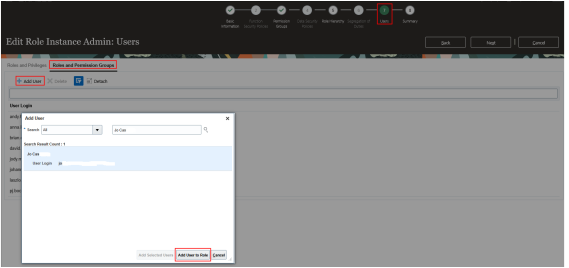
- Select + Add User, then find and select the user you created.
- Select Add User to Role to add the Instance Admin role.
- Confirm that the user has been added.
- Select Next and then Save and Close.
See the Create Roles in the Security Console topic of the Securing Applications guide for more information.
Assign Specialist Job Roles to Fusion Marketing Users
The following lists the required specialist job roles to enable users access and use features of the Customer Data Platform, Marketing Orchestration, and Sales Integration areas.
Customer Data Platform
| Job Role Name | Job Role Code |
|---|---|
| Customer Data Platform Specialist | ORA_FMK_CUSTOMER_DATA_PLATFORM_SPECIALIST_JOB |
| Customer Data Platform Administrator | ORA_FMK_CUSTOMER_DATA_PLATFORM_ADMINISTRATOR_JOB
(Optional) |
| Job Role Name | Job Role Code |
|---|---|
| Marketing Specialist | ORA_FMK_MARKETING_SPECIALIST_JOB |
| Job Role Name | Job Role Code |
|---|---|
| Sales System Integrator | ORA_ZCA_SALES_SYSTEM_INTEGRATOR_JOB |
Caution: Do not assignORA_MKTroles. These are not aligned with Customer Data Platform functionality.
Edit Role Memberships for Existing Roles
You can individually add role memberships (roles belonging to other roles within a category) from existing roles as follows:
- Navigate to .
- Search for the user you want and from the User Account Details screen, select Edit.
- Select Add Role and the Add Role Membership
from Role dialog, similar to the following, is
displayed:
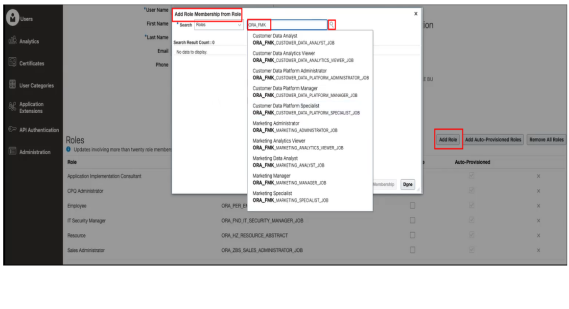
- In the Search fields, look for roles you want to add, select them, and select
Add Role Membership. For example, enter
ORA_FMKto display a list of all the predefined Fusion Marketing roles. - Select the required specialist job role that you want and select Add
Role Membership and then select Done. For
example, to enable access to the Customer Data Platform, Fusion Marketing and
Sales Integration users, individually select and add role membership for:
- Customer Data Platform Specialist -
(
ORA_FMK_CUSTOMER_DATA_PLATFORM_SPECIALIST_JOB) - Marketing Specialist -
(
ORA_FMK_MARKETING_SPECIALIST_JOB) - Sales System Integrator -
(
ORA_ZCA_SALES_SYSTEM_INTEGRATOR_JOB)
You can also delete roles. Click the x icon in the row for the role, and then respond to the confirmation message.
- Customer Data Platform Specialist -
(
- Select Save and Close and then Done.
These roles should now give you access to the Marketing and Customer Data Platform areas of the Fusion Marketing application.
See the Add User Accounts topic of the Securing Applications guide for more information.