Basic Installation Guide Document
The Oracle CX Core is a framework for iOS that enables easy integration with other Oracle CX products. This guide will walk you through the initial setup process, from integrating the SDK with your project to sending events to server.
Installation
Import Oracle CX Mobile SDK
First download the latest Oracle CX Mobile SDK. To import the Oracle CX Mobile SDK into the Xcode project follow the below steps. These steps are relevant as of Xcode version 11:
- Open your app or module under Xcode
- Tap on the project in the Project Navigator
- Select Target
- Select General Tab
- Navigate to Frameworks > Libraries > Embedded Content section
- Add new framework by selecting + icon and then click Add Other > Add Files
- Select OracleCXMobileSDK.framework from your local system
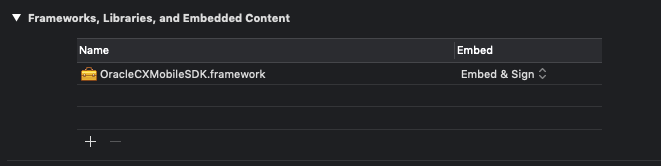
After the above steps, we can see the framework under Embedded Content section like below:
Setup the SDK
There are two ways one can setup the Oracle CX Core Mobile framework.
1. Without Configurations
In this case, without manually enabling Oracle CX Core configurations, one can use all the features of the SDK except sending events to server. This case will be helpful in case we don't want to send the events to the data collection server. In case if you want to send events to the server, then please follow the next step. Below are the few features we can use without configuration
- HTTP layer
- Namespace storage
- Relational data store
2. With Configurations
Using this case, the Oracle CX Core Mobile framework will send all the event tracking data to the server. To enable the configurations, please follow the below documentation.
If you are using the older version (1.0.5 and below) of SDK, to set the configurations, skip the below step and follow Set the configurations without json file. Please note, this method has been deprecated.
Setting The Configurations Using oracle.json
Once you have integrated CX Core framework, if you would like to send the events to data collection server, it is required to pass the configurations such as url and account_guid etc. This can be done with the help of oracle.json file. The sample oracle.json file can be found here. Place the oracle.json file in the main project folder and update the keys ora_dc_collection_url & ora_dc_account_guid with your own values given. This configuration will help sending data to the server. As a next step, we need to load these configurations from the code. This can be done either in application:didFinishLaunchingWithOptions method or in viewDidLoad method of the root view controller.
ORACoreDataContainer *coreContainer = [[ORACoreDataContainer alloc] init];
[coreContainer loadFromConfigFile];
let coreContainer = ORACoreDataContainer()
coreContainer.loadFromConfigFile()
If you would like to add any other Core configs in the above json, you can add as shown below.
{
  "config_version": "1.0",
  "ORACORE": {
    "ora_dc_end_point_config": [
      {
        "ora_dc_collection_url": "https://dc.oracleinfinity.io/v3/",
        "ora_dc_account_guid": "your_account_guid",
        "ora_dc_retry_count": "2"
      }
    ],
    "ora_dc_send_interval_millis": "10000",
    "ora_dc_app_start_auto_enabled": "true"
  }
}
oracle.json file for loading config, you need to put config_version as higher than the version mentioned in loadConfig:versionNumber: method.
From the above, the key ora_dc_end_point_config expects an array of endpoints. Right now, it is configured with one endpoint. If you wants to send data to multiple endpoints, please follow Multiple Endpoint Guide
Below is the oracle.json format if you would like to remove ora_dc_end_point_config
{
  "config_version": "1.0",
  "ORACORE": {
    "ora_dc_end_point_config": [
    ],
    "ora_dc_send_interval_millis": "10000",
    "ora_dc_app_start_auto_enabled": "true"
  }
}
Important Note:
The first entry in the oracle.json should be config_version. The JSON must contain this key. Without this, core SDK will not send events to Infinity Data Collection server. The value for this is a decimal number in x.y format. The config_version value plays an important role while updating/modifying the oracle.json key/values. When you want to update any configuration value, the config_version key to be incremented. Otherwise, SDK can't load the updated configurations.
For example current value for config_version is 1.0, and the value for ora_dc_send_interval_millis is "10000". If you want to change the ora_dc_send_interval_millis value to "20000", you also need to change the config_version to 1.1. If the config_version is not incremented, the new config value will not be stored.
Set The Configurations Without Json File (Deprecated)
In this method, setting the configurations can be done either in application:didFinishLaunchingWithOptions method or in viewDidLoad method of the root view controller. To setup the basic configurations like url & account_guid we need to use ORAEndPointConfig class. This configuration will help sending data to the server. Below is the sample code using ORACoreDataContainer:
Note: If you wants to send data to multiple infinity endpoints, please follow Multiple Endpoint Guide
ORACoreDataContainer *coreContainer = [[ORACoreDataContainer alloc] init];
NSMutableDictionary *urlConfigDictionary = [NSMutableDictionary dictionary];
[urlConfigDictionary setObject: @"[{\"ora_dc_collection_url\": \"http://dc.oracleinfinity.io/v3/\", \
                                      \"ora_dc_account_guid\": \"your_account_guid\", \
                                       \"ora_dc_retry_count\":\"2\"}]"
                         forKey: @"ORAEndPointConfig"];
[coreContainer loadConfig: urlConfigDictionary versionNumber:1];
let coreContainer = ORACoreDataContainer()
var urlConfigDictionary: [AnyHashable : Any] = [:]
urlConfigDictionary["ORAEndPointConfig"] = """
              [{\"ora_dc_collection_url\": \"http://dc.oracleinfinity.io/v3/\",
                  \"ora_dc_account_guid\": \"your_account_guid\",
                   \"ora_dc_retry_count\":\"2\"}]"""
coreContainer.loadConfig(urlConfigDictionary, versionNumber: 1)
From the above code, the JSON @"[{\"ora_dc_collection_url\": \"http://dc.oracleinfinity.io/v3/\",
\"ora_dc_account_guid\": \"your_account_guid\", \"ora_dc_retry_count\":\"2\"}]" is necessary to send events to Infinity server. You can replace your own ora_dc_collection_url and ora_dc_account_guid. Please make sure the JSON is an array of endpoints and it should be in the above format.
Logging - Enable/Disable logs
The OracleCXMobileSDK contains lot of log statements across the code. These logs can be used to analyze the flow when you come across any issue.
Using ORAConfigDebug is deprecated and will be removed in future releases. Instead use new ORALogger api which is explained below for logging. The logs are categorized into different levels for ease of filtering. The class ORALogger provides the method to enable or disable the logs.
Below are the different log levels used in the SDK:
- Verbose
- Debug
- Info
- Warn
- Error
- None
The default option from the above list is Debug. ORALogger setLogLevel: method is used to set the log level. If you set any log level, it will show log messages of that level and as well as the message levels lower in the list. For example if you set log level Info, it will show all Info, Warn, and Error messages.
If you want to disable all the log messages, set the log level as None.
Below is the sample code to set the log level:
[ORALogger setLogLevel:Debug];
ORALogger.setLogLevel(ORALogLevel.Debug)
Common Actions
This guide provides sample code for a couple of common actions you might take with the SDK, such as triggering events and pausing/resuming event sending.
Triggering Event
There are several convenience methods in CX Infinity SDK to trigger a particular event(i.e. button click etc). Here's an example of how to send an event associated with a button press:
Important Note: The event sending will be possible only if you set the configurations via Adding The Optional Configurations Using oracle.json OR Set the configurations without json file
// Once we've set up our basic information, pass it to the data collector
NSDictionary *event = [ORACoreEventBuilder createBaseEventWithCustomParams:@{ORA_DCSURI: EVENT_PATH_BUTTON}];
[[ORACoreDataCollector sharedCollector] triggerEvent:event];
// Once we've set up our basic information, pass it to the data collector
let event = ORACoreEventBuilder.createBaseEvent(withCustomParams: [
    ORA_DCSURI: EVENT_PATH_BUTTON
])
ORACoreDataCollector.shared().triggerEvent(event)
Triggering Event Immediately
The above triggerEvent: method will create and stores an event in the local database. Based on the config ORAConfigSendIntervalMilliseconds value, it will fetch the events from the database and send them to collection servers. This process takes a couple of seconds(based on the config) to reach event info to the server. But there are cases, we need to send event info immediately to the server without storing in the database. To serve this case, we can use triggerEventImmediately:. In the case of internet non-availability during the call, we can use the config ORAConfigImmediateEventStoringEnabled to save the event data into the database. Here's an example of how to send an event associated with a button press:
// Once we've set up our basic information, pass it to the data collector
NSDictionary *event = [ORACoreEventBuilder createBaseEventWithCustomParams:@{ORA_DCSURI: EVENT_PATH_BUTTON}];
[[ORACoreDataCollector sharedCollector] triggerEventImmediately:event];
// Once we've set up our basic information, pass it to the data collector
let event = ORACoreEventBuilder.createBaseEvent(withCustomParams: [
    ORA_DCSURI: EVENT_PATH_BUTTON
])
ORACoreDataCollector.shared(). triggerEventImmediately(event)
There are a wide variety of events you can trigger, all of which are documented in ORACoreDataCollector and the Manual Events Guide.
Triggering Event Automatically
In above sections we have explained how to send an event to the server manually. But it is possible to send an event automatically based on system behavior like when application started, application went to background or foreground. In its default configuration, Oracle CX Mobile SDK logs nothing. Automatic events can be logged by setting the respective config settings to true. Below are some of the configurations:
-
ORAConfigViewControllerAutoEnabled -
ORAConfigForegroundAutoEnabled -
ORAConfigAppStartAutoEnabled -
ORAConfigErrorAutoEnabled -
ORAConfigSendScreenViewWithActivityViewEnabled
See the Automatic Events Guide for more information.
Disabling Data Collection & Pausing/Resuming Event Sending
Oracle CX Mobile SDK data collection can be disabled at any time with the help of below code:
ORAConfigEnabled *configEnabled = [[ORAConfigEnabled alloc] init];
[coreContainer putValue:@"false" forKey:configEnabled];//coreContainer is an object of ORACoreDataContainer class we created above
let configEnabled = ORAConfigEnabled()
coreContainer.putValue("false", forKey: configEnabled) //coreContainer is an object of ORACoreDataContainer class we created above
Here's an example of how to pause then resume event sending:
[[ORACoreDataCollector sharedCollector] pauseEventTransmission];
[[ORACoreDataCollector sharedCollector] resumeEventTransmission];
ORACoreDataCollector.shared().pauseEventTransmission()
ORACoreDataCollector.shared().resumeEventTransmission()