Configuring a connection to Movable Ink
Important: This integration is only available under controlled availability with Movable Ink. Please reach out to Movable Ink to check eligibility.
Tip: Need support? An engagement with the Oracle Consulting Services can support you with completing the Movable Ink configuration. Please reach out to your Oracle representative for more details.
The following topic will provide you with step-by-step instructions on how to configure Oracle Infinity to pass key behavioral events to Movable Ink.
- Movable Ink Stories Product: You must have access to the Movable Ink Stories product. Please reach out to Movable Ink, and they can guide you through the process of ensuring you have access to this.
- Movable Ink API Credentials: Your Movable Ink representative will provide you with your endpoint URL and basic authentication API credentials, which you will need to enable this integration. Movable Ink needs to review sample event payloads in order to share these credentials – please work with your Oracle Infinity team to provide these. Here is the sample payload for Product Viewed.
- Choose your Customer ID: Discuss with Movable Ink what Customer ID you'd like to use for the integration (see How do I declare my customers).
- Website/App Tagging per Event: For each Movable Ink event you wish to support (for example, Product Viewed, Add to Cart, and so on), you must have Oracle Infinity tagging in place collecting this data with a minimum set of parameters (for example, product URL, product price, and so on). In the Step-by-Step integration topic, part of the process will be checking your tagging for each desired event.
- (Mobile Apps only) Ensure minimum Mobile Parameters Tracked: If using mobile apps for the integration, you must ensure that either:
You are using the Oracle CX Mobile SDK (or legacy equivalent) .
If you're not using the SDK (for example, you are using the Data Collection API), then you will need to ensure you are collecting the mobile App Name (as
wt.a_nm==MYAPPNAME) and App Version (aswt.av=MYAPPVERSION) for all mobile app events.
Setting up the Movable Ink integration requires 7 steps:
- Step 1: Choosing your desired events
- Step 2: Audit tagging
- Step 3: Creating your query
- Step 4: Building connections and destinations
- Step 5: Building actions
- Step 6: Validating data in Movable Ink
- Step 7: Running your first campaign
Step 1: Choosing your desired events
To begin, you'll need to choose which Movable Ink standard events you would like to support. Below is a list of the Movable Ink events along with the minimum required data points you need to be capturing in Infinity per event. Movable Ink also supports custom events.
Tip: Unsure what events you wish to support? Your Movable Ink representative will be able to explain what each given event would enable you to do in Movable Ink.
|
Event name |
Description |
Required parameters |
Notes |
|---|---|---|---|
|
Product Viewed |
Upon view of a product within your website/mobile app. |
|
|
|
Cart Add |
Adding a product to your cart within your website/mobile app. |
|
|
|
Conversion |
Completing an order within your website/mobile app. |
|
|
|
Identify |
Declaring their customer ID at any point during a session (for example, login or order complete). |
||
|
Search |
Performing a search on your website. |
|
|
|
Category View |
Viewing a page listing products for a given category. |
|
|
|
Custom Event |
Any events on your website/mobile app. |
|
Step 2: Audit tagging
In order to support your chosen Movable Ink events, you must have minimum data collection in place. To validate whether you are collecting this, you must perform a tag audit to see whether the minimum parameters required per event are available as per Required Parameters Per Event below.
Tip: Not confident with auditing your tagging? An engagement with the Oracle Consulting Services can support you with completing all of the auditing of your data and full Movable Ink configuration. Please reach out to your Oracle representative for more details.
For example, the Product Viewed event requires the following parameters:
|
Movable Ink Parameter |
Required |
Recommended Infinity parameter |
Description |
Sample value |
Notes |
|---|---|---|---|---|---|
|
timestamp |
Yes |
datetime_utc |
The time when the event occurred (Unix Time) |
2023-10-05T10:02:35.738Z |
|
|
user_id or anonymous_id |
Yes |
wt.dcsvid |
The unique identifier of the profile / anonymous profile that triggered this event. |
wt.dcsvid=customerid14323 |
Please speak to Movable Ink for suggestions on what identifier to use per customer. |
|
properties.id |
Yes |
wt.pn_sku or wt.pn_id |
The unique identifier of the product. |
wt.pn_sku=56544-abc wt.pn_id=56544 |
Only one is required. |
|
timezone |
No |
ext.geo.tzname |
the time zone of where the event took place (TZ database name in the IANA Time Zone Database) |
ext.geo.tzname = 'asia/kolkata' |
|
|
properties.title |
No |
wt.product_name |
The title or name of the product. |
wt.product_name=All-Purpose Cleaning Wipes |
|
|
properties.price |
No |
wt.product_price |
The product price |
wt.product_price=14.99 |
Must be in decimal form (that is, no currency symbol). |
|
properties.url |
No |
wt.es |
The URL of the product. |
wt.es=https://mysite.com/product/56544 |
If tracking mobile app, the URL must point to your product page on your website (so that Movable Ink can visit the page to grab information about the page). |
|
properties.categories |
No |
wt.cg_n |
An array of Categories with which this product is associated |
wt.cg_n=bathroom |
If using Category View event, then this value must match |
|
properties.category[i].id |
No |
data.wt.cg_n |
For each Category, the unique identifier of the Category. |
wt.cg_n = 'collections' |
|
|
properties.category[i].url |
No |
|
For each Category, the URL of the Category. |
|
|
|
properties.meta |
No |
|
A map of meta data to provide additional context about the event. |
|
Note: Movable Ink does not require that event data sent use the exact same parameter names outlined here. For example, if the parameters in the event payload is originally “wt.product_price”, it can be sent to Movable Ink with the label “wt.product_price” and does not have to be updated to use the label ‘Price’.
Similarly, a custom event, requires the following parameters:
|
Movable Ink Parameter |
Required |
Recommended Infinity parameter |
Description |
Sample value |
Notes |
|---|---|---|---|---|---|
|
timestamp |
Yes |
datetime_utc |
The time when the event occurred (Unix Time) |
2023-10-05T10:02:35.738Z |
|
|
user_id or anonymous_id |
Yes |
wt.dcsvid |
The unique identifier of the profile / anonymous profile that triggered this event. |
wt.dcsvid=customerid14323 |
Please speak to Movable Ink for suggestions on what identifier to use per customer. |
|
timezone |
No |
ext.geo.tzname |
The time zone of where the event took place (TZ database name in the IANA Time Zone Database) |
ext.geo.tzname = 'asia/kolkata' |
|
|
properties.meta |
No |
|
A map of meta data to provide additional context about the event. |
|
|
This means that you must be collecting all of the required parameters in your Infinity tag when someone views a product on your website. You can use different parameter names other than the Recommended Infinity Parameter supplied, but if you do you will need to know how to Customize your query to account for the different parameter names or logic.
Tip: How do I check my available parameters? Please see How do I Audit my Data.
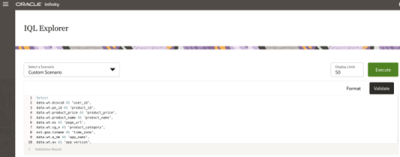
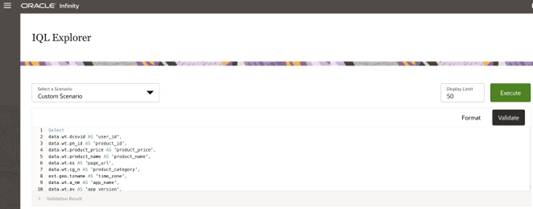
Step 3: Creating your query
Entering query template
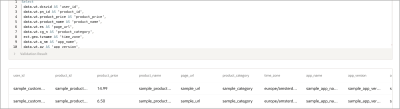
Once you are confident you have the required parameters for your given events, you can begin building out your queries using the supplied query templates. For example, here is the query template for the Product Viewed event:
Here is the query template for a custom event:
Note: Make sure you have customized your query template if required. The parameter display names need not match exactly as per the event schema (for example, Timestamp vs time vs time_stamp can be used for time stamp). However, the parameter’s original name as per Required Parameters Per Event, should be used to ensure it is capturing the correct information (datetime_utc for Time stamp). See Customizing your query in the FAQ for instructions
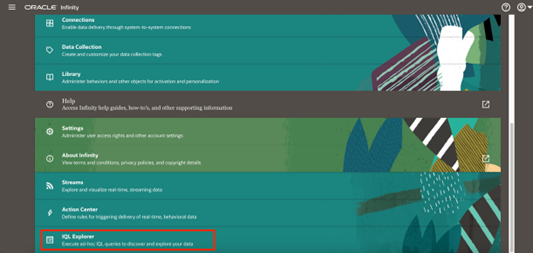
You'll need to copy your query (which you may have customized) and then paste into the IQL Explorer user interface (which is available in navigation menu).
To create the query for the Product Viewed event:
- Navigate to IQL Explorer in the Infinity user interface.
- Copy your query (which may have been customized), then paste it in the query box.
-
Click Validate to check for errors.
-
Click Execute to capture the parameters with the values.
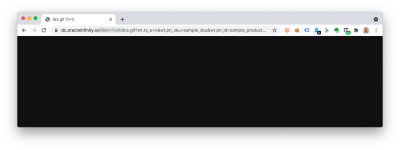
Fire sample requests
For users to select their required parameters, they need them to show in the IQL Explorer interface. To do this, users can fire a sample request to ensure the parameters show in the IQL Explorer interface so that they can ensure the parameters are going to be made available to the integration. You can find the sample requests per Events in the query templates section.
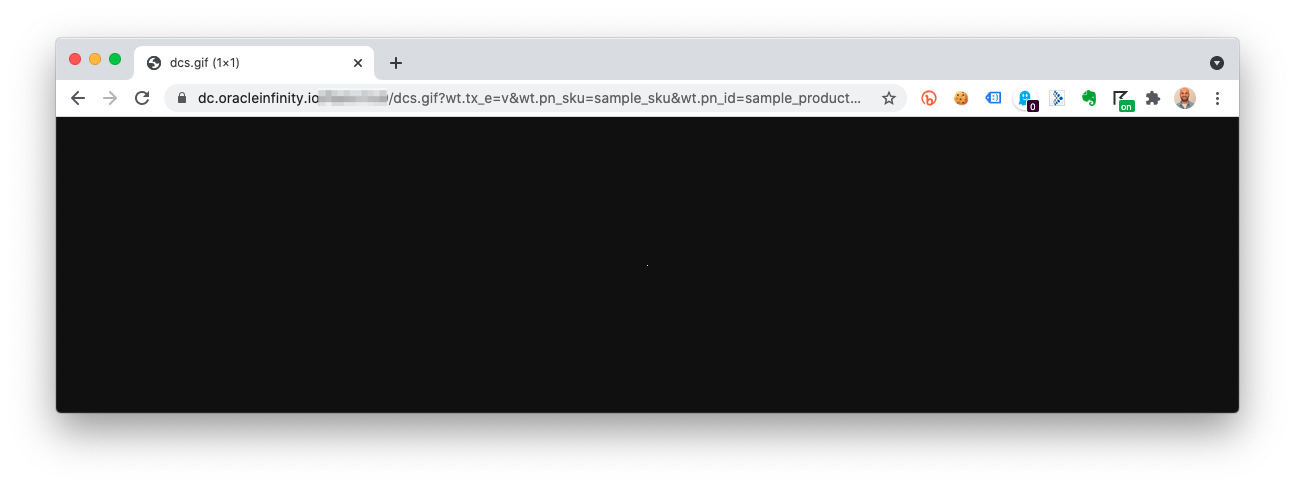
To fire your sample request:
- Take the sample request for your desired parameter from the query templates section. For example:
https://dc.oracleinfinity.io/{ENTERACCOUNTGUID}/dcs.gif?wt.tx_e=v &wt.pn_id=sample_product_id&wt.es=sample_url&wt.product_price=14.99&wt.dcsvid=sample_customer_id&wt.cg_n=sample_category&wt.product_name=sample_product_name&wt.a_nm=sample_app_name&wt.av=sample_app_version&mi_ecmp=sample_campaign_name&mi_u=sample_mi_id&wt.co_f=sample_anonymous_id
Tip: How do I fire the correct request for my event? Please see How do I Fire the Correct Sample Request in the FAQs to ensure you are firing the correct sample request.
- Once you are sure your sample request is correct, open the request in a window in your browser and press Enter.
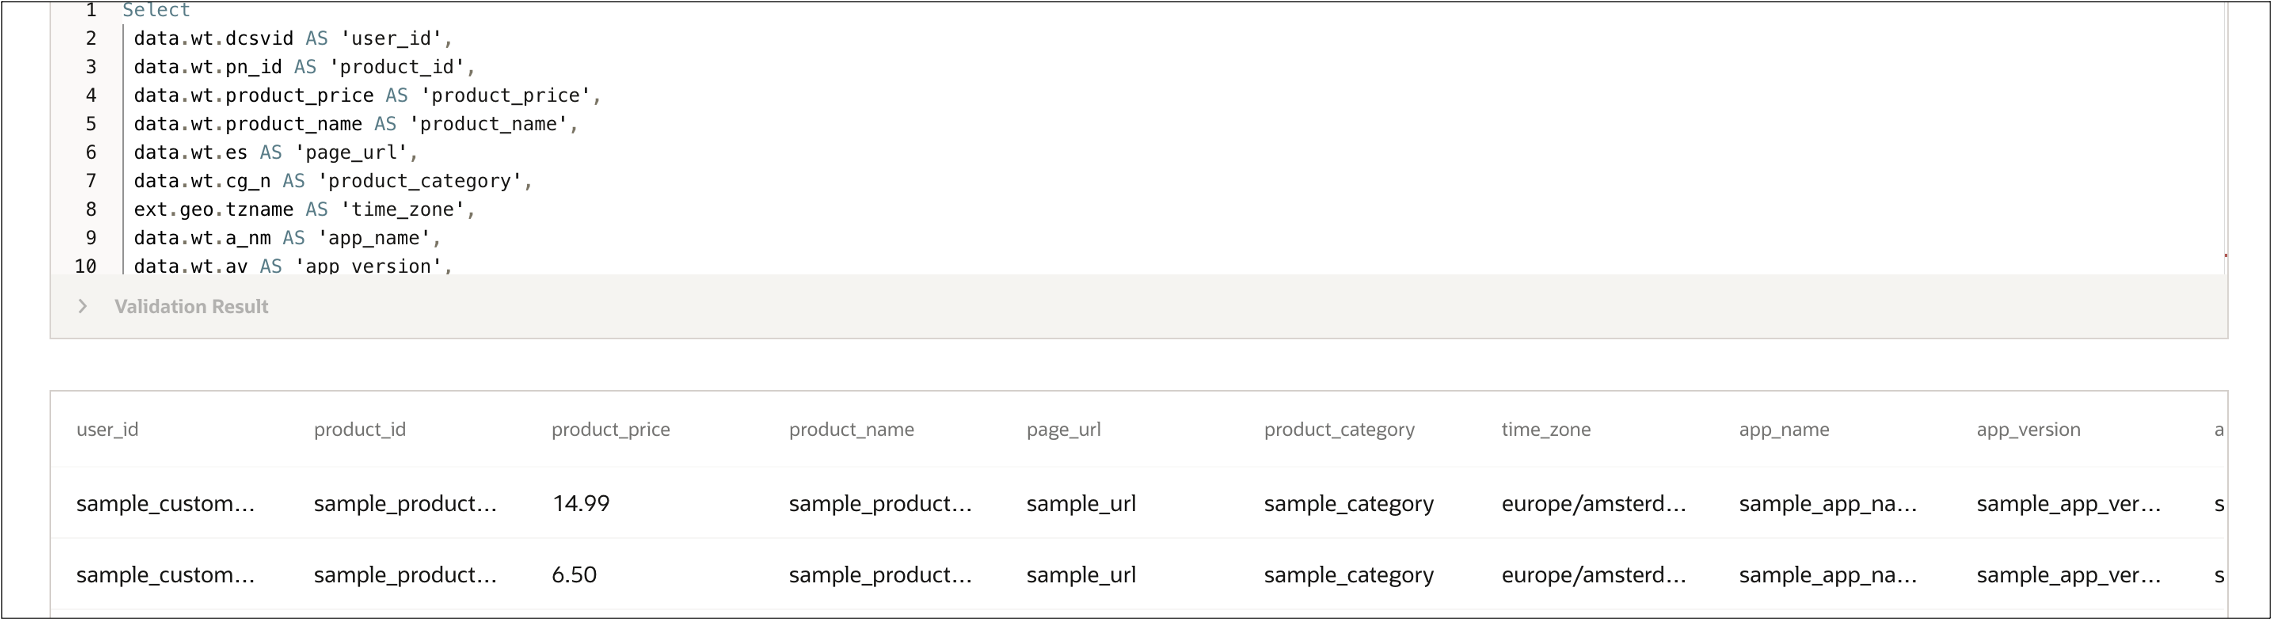
-
In the IQL Explorer page (if Execute is already clicked), you should now see the parameters with the values from the sample request.
Important: If you can't see any data showing, then check the following items:
Have you clicked Execute in IQL Explorer? Are you sure you have updated your query correctly? See Customizing your query.
Is your sample request correctly formed? See How do I Fire the Correct Sample Request? - Repeat steps 1-3 for each event.
Step 4: Building connections and destinations
Building your connection
To build out your connection to Movable Ink:
- Open the navigation menu from the upper-left corner of your Infinity screen, and click Connections.
-
From the Connections page, click
 to create a new connection.
- Click the Webhook Connection Type card.
- Enter the following details for the connection:
- Connection Name: Movable Ink (or another user-friendly name)
- Description: Description for how this connection may be used
- Base URL: Movable Ink endpoint URL
- Port: Optional and can be left blank
- Authentication Type: Basic Auth
- User Name: Your API Key (provided by Movable Ink – see Prerequisites)
- Password: Your API Secret (provided by Movable Ink – see Prerequisites)
- Confirm the details and click Save and Continue.
Your connection is now ready for you to add destinations per event.
Building your destinations
For each of the events you would like to use, you will need to build a destination.
To build a destination:
- Within your new connection that you've just made, click on the connection to expand it, then click to create a new destination.

- Add the following details:
Destination Name: Insert a user-friendly event name (for example, "Product Viewed")
Description: Enter a description to identify the destination
Select a request method: POST
Content Type: application/json
Endpoint Path: /oracle-infinity (if necessary)
Template: Enter the events javascript template that will format the data before it is sent. For example:
{{! Return JSON.stringify(it.data[0]); }}Status: Set the status as Enabled.
-
Click Save.
-
Repeat steps 1-3 for each event you have chosen.
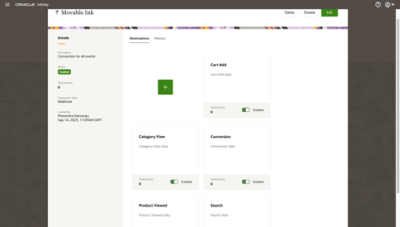
Note: If you use all of the Movable Ink supported, then you will see multiple destinations against your Connection. For example:

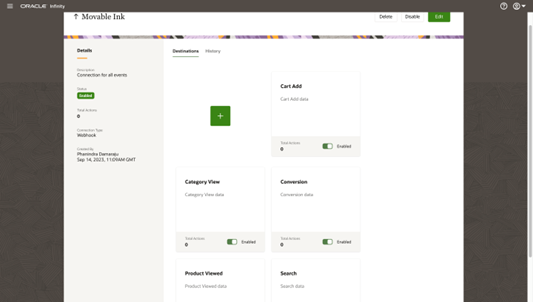
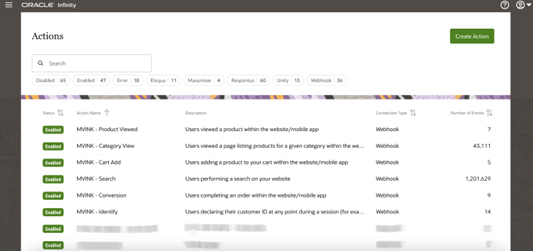
Step 5: Building actions
The final configuration step is to create actions and connect your destinations per event. This can be achieved by using actions. Please follow the following steps per event.
To create a new action per event:
-
Open the navigation menu from the upper-left corner of your Infinity screen, and click Actions.
-
From the Actions page, click Create Action,
-
On the Basic Details screen, enter the following details:
-
Name: Enter a user-friendly name for your action (for example, "Movable Ink : Product Viewed").
-
Description: Optional description for your action.
-
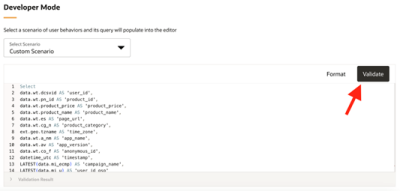
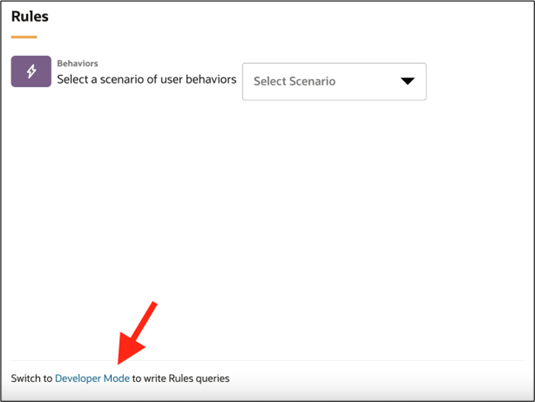
- Click Continue to Rules screen where you can define the required scenario using the query and click Switch the Developer Mode.

-
Click Use Developer Mode to proceed and select Custom Scenario from the Select Scenario to view the text are to enter your query.
-
Paste the query that you’ve already created and click Validate.
-
After validating the query, click Continue to go to Sources step (optional) and proceed to Destinations step.
-
Select your Webhook connection, its destination type and the destination for the desired event.
-
Click Save and you are redirected to the View Actions screen. When an action is saved, by default it is disabled.
-
From the View Actions screen, locate and click into the action you want to enable.
-
The action's current status should appear as Disabled. In the upper-right corner of the screen, click Enable and confirm the status change to ensure your action is enabled and that your event is now being passed through from your website or app to Movable Ink.

Step 6: Validating data in Movable Ink
Validating that the integration is working should be tested on three levels:
- Validating with sample requests
- Checking that your actions are still running
- Asking Movable Ink to validate incoming data
Validating with sample requests
To validate the integration can send data to Movable Ink, you can send sample requests to Infinity, which should result in data being sent to Movable Ink. This first test isolates any issues with tagging or data collection on your site from the integration pipeline you have just built.
To test this, perform the following test per event:
- Fire at least one sample request as you fired previously when building your Action. (see How do I Fire the Correct Sample Request?. For example (Sample Request Template - Product Viewed):https://dc.oracleinfinity.io/{ENTERACCOUNTGUID}/dcs.gif?wt.tx_e=v&wt.pn_id=sample_product_id&wt.es=sample_url&wt.product_price=14.99&wt.dcsvid=sample_customer_id&wt.cg_n=sample_category&wt.product_name=sample_product_name&wt.a_nm=sample_app_name&wt.av=sample_app_version&mi_ecmp=sample_campaign_name&mi_u=sample_mi_id&wt.co_f=sample_anonymous_id
Tip: See How do I Fire the Correct Sample Request? and Query Templates for how to ensure you fire the correct sample requests.
Checking that your actions are still running
Note: Additionally, you should check to see whether the number of executions (the number on the right-hand side) has incremented. If it is a common action, you should see high numbers within a few hours.
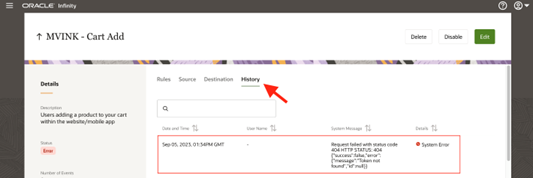
If there are major problems with your Actions, then they are disabled and marked as “Error” and you will see this in the Infinity user interface. You can open the error ones to check for the error messages to resolve any issues.
If you spot any that are marked as “Error”, click on the action and click on “History” tab and then review the red error message (see Why are my Actions showing Error? for common failures).
Asking Movable Ink to validate incoming data
Movable Ink should be receiving both your sample requests so you can begin using the integration.
Note: Movable Ink's Solutions team will need to map event data based on a sample payload. You may see an error if this mapping has not been completed yet or if the event payload does not match the schema of the payload that was initially provided. Please reach out to your Movable Ink Client Experience team with the sample payload and user ID value that you are testing with if you are seeing mapping errors when configuring the integration.
Step 7: Running your first campaign
Data will now be flowing to Movable Ink from Infinity so that the integration is now ready for you to use. Please reach out to Movable Ink if you need support on how to leverage the integration.