Pointing a form to Responsys Express
You can add fields from Responsys Express to a form on your website to automate the creation of contacts Responsys Express as well as contact updates and updates to their subscription status.
Set up your form's fields with Responsys Express using the visual form designer tabs:
- Design and Field Properties: Using the drag-and-drop visual form editor, add form elements and data attributes to your form. Select each form element and attribute on your form, and then set its properties and mappings to data attributes.
- Rules: With form rules:
- Indicate what happens when there's a match or none.
- Manage the subscription rules your form follows.
Add a submission confirmation page in case the form redirects.
- Settings:
- Indicate the unique identifier for matching contacts who fill out forms with the contacts in your Responsys Express database.
- Include a URL that contacts are redirected to when form validation fails.
To create a new form:
- Click
 from any page in Responsys Express.
 - Click Forms.
You're redirected to the Forms list page.
- Click Create.
- Give your form a name and description.
- Click Continue.
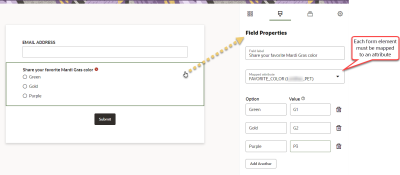
The form opens in the visual form designer. Drag and drop form elements and attributes to the form, and then set Field Properties as follows:
Form elements: Click the form element to set its properties. You must map the field to an attribute, and then set its other properties. For example, for a radio button, you must map to a data attribute, and then configure the options (labels people will see on the form) and values (value that gets stored in the mapped contact attribute).
Attributes: When you add an attribute to a form, a field is created on the form and it is automatically mapped to the attribute.
Tip: Where possible, use form elements such as check boxes, radio buttons, and drop-down menus to map options to valid field values. This helps people fill out your forms correctly.
- In the Update Contact section:
- Indicate what Responsys Express should do if a form submit contact matches an existing contact:
- Always update: if there's a match, the chosen attributes are updated for the matched contact.
- Do not update if it's a match: if there is a match, the chosen attributes are not updated for the matched contact.
- Indicate what Responsys Express should do if a form submission is not matched to an existing contact:
- Create a new contact: if there is no match, the form submission creates a new contact
- Do not create a new contact: if there is no match, the form submission does not create a new contact
- Indicate what Responsys Express should do if a form submit contact matches an existing contact:
- In the Manage Subscriptions section, indicate how the subscription status should be managed once the form is submitted:
- Unsubscribe: If it's a new contact who submits the form, they are brought in as unsubscribed. If it's an existing subscribed contact, they'll be switched to unsubscribed. If it's an existing unsubscribed contact, their subscription status does not change.
- Subscribe, without confirmation: If it's a new contact who submitted the form, they are brought in as subscribed. If it's an existing contact who's unsubscribed, they are now subscribed. If they're an existing contact who's subscribed, their subscription status does not change.
- Subscribe, with confirmation: If it's a new contact who submitted the form, they are brought in as unsubscribed until they click the confirmation link, which they receive by email. Existing unsubscribed contacts also remain unsubscribed until they click that link. If they're an existing contact who's subscribed, their subscription status does not change. If you select this option, you must choose a confirmation message that is with the confirmation link.
Note: To send a confirmation message, your instance must be enabled for transactional messaging. Please contact your account rep, CSM, or Oracle Sales to have this feature enabled.
- In the Redirect section, enter a URL for a submission confirmation page in case the form redirects.
- Click the Settings tab.
- In the Match submission to contact section, select the field that Responsys Express should use to match the submission to a contact record. You can select one field as this unique identifier, or optionally you can select two.
The attribute for the match key is automatically included and cannot be removed.
- In the Validation failure page section, include a URL that contacts are redirected to when form validation fails.
- Click Save.
