STO programs
Basic Design
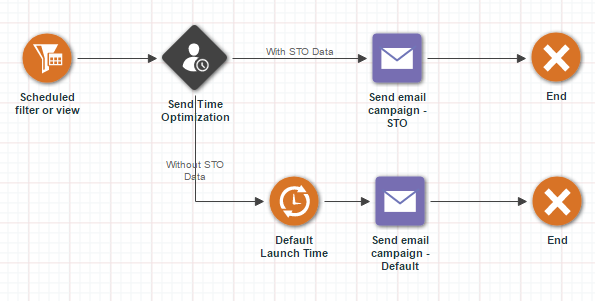
Creating a basic STO Program is easy. Simply add the Send time optimization stage after the Start Event stage. In the example above, it’s a Scheduled filter or view stage. From the Send time optimization stage, you are required to create a “With STO Data” path to a Send email campaign stage. A second “Without STO Data” path will also need to be created. This path can be routed to any stage. In the example, the path routes to a Target Timer stage that is set to a default launch time. From the Target Timer stage, a path is created to another Send email campaign stage and then an End stage.
Note: Both Send email campaign stages can reference the same email campaign. For reporting purposes, we recommend that the names of the two stages be unique.
Send Period Delay Prevention
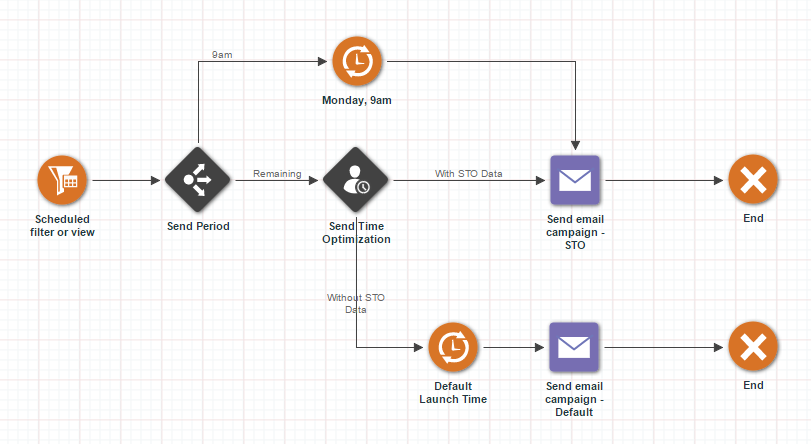
As previously mentioned, a large audience size may cause the send period to be delayed causing the desired start time (of the send period) to be pushed back by an hour. You can reduce the possibility of that happening by entering the audience members into the Send time optimization stage before the desired start time.
As an alternative solution, you can enter the audience members at the desired start time. However, instead of routing them directly to the Send time optimization stage, you would route them to a Data Switch first. The Data Switch will have a condition with a filter that looks for audience members with the optimal send time that matches the desired start time. So, for example, if the send period is Monday, 9am through Tuesday, 8am, then the desired start time is 9am (9) on Monday. You will create a filter to looks for the value of 9 in the MONDAY field. Audience members that matches this condition should be routed to a Target Timer that is set to the move them to the Send email campaign stage on Monday at 9am. The remaining audience members who don’t match the condition will be routed directly to the Send time optimization stage.
Blackout Period
Some companies may choose not to send emails during certain hours of the day. We refer to these hours of the day as the “blackout period”.
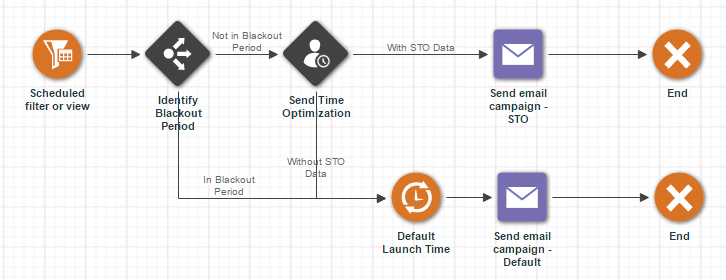
Let’s say a company wants to send an email to their audience at the most optimal time using a STO Program starting on Monday at 9am. The marketer designs a basic STO Program that enters the audience on Monday, 9am. This means the send period is from Monday, 9am through Tuesday, 8am. The company has a blackout period everyday between 8pm to 8am. Taking that into consideration, this means the send period is really from Monday, 9am through 7pm and Tuesday at 8am. The marketer wants audience members with optimal send times that fall within the blackout period to be sent the email campaign at the default launch time.
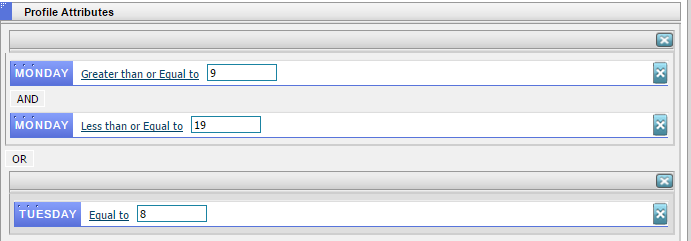
To achieve this, the marketer simply needs to add a Data Switch between the Start Event stage and the Send time optimization stage in a basic STO Program. From the Data Switch, they should create a “Not in Blackout Period” path that routes to the Send time optimization stage. This path will have the following filter condition that looks for audience members with optimal send times that is greater than or equal to 9 (9am) and less than or equal to 19 (7pm) on MONDAY or equal to 8 (8am) on TUESDAY:
Audience members who don’t meet this filter condition will be directed to the default “In Blackout Period” path that leads them to the Target Timer with the default launch time.
A/B Split Test
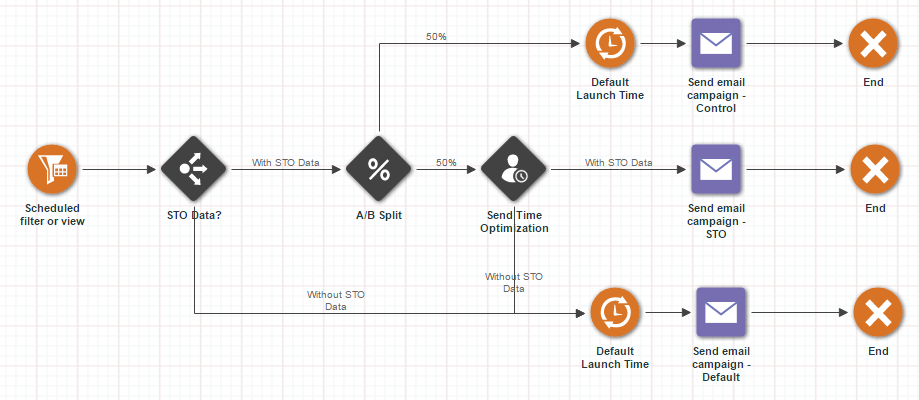
Marketers may want to conduct an A/B split test to compare the results of sending an email campaign to audience members with STO data at their optimal send times versus at a default launch time.
To achieve this, the marketer should create a basic STO Program and incorporate a Data Switch and Allocation Switch into the design. The Data Switch will follow the Start Event stage and direct audience members with optimal send times within the send period along a “With STO Data” path to the Allocation Switch. Those who don’t have optimal send times in the send period will be directed to the original Target Timer in the basic STO Program along the “Without STO Data” path and be sent the email campaign at the default launch time.
At the Allocation Switch, the audience will be split up into two groups. One group will be directed along the existing path to the Send time optimization stage and will be sent the email campaign at their optimal send times. The 2nd group will be directed along a new path to a Target Timer that will move the audience to another Send email campaign stage and then an End stage.
Note: The new Send email campaign stage can reference the same email campaign, but has a different stage name to allow it to be distinguish from the other Send email campaign stages for reporting purposes.
Best Day and Time
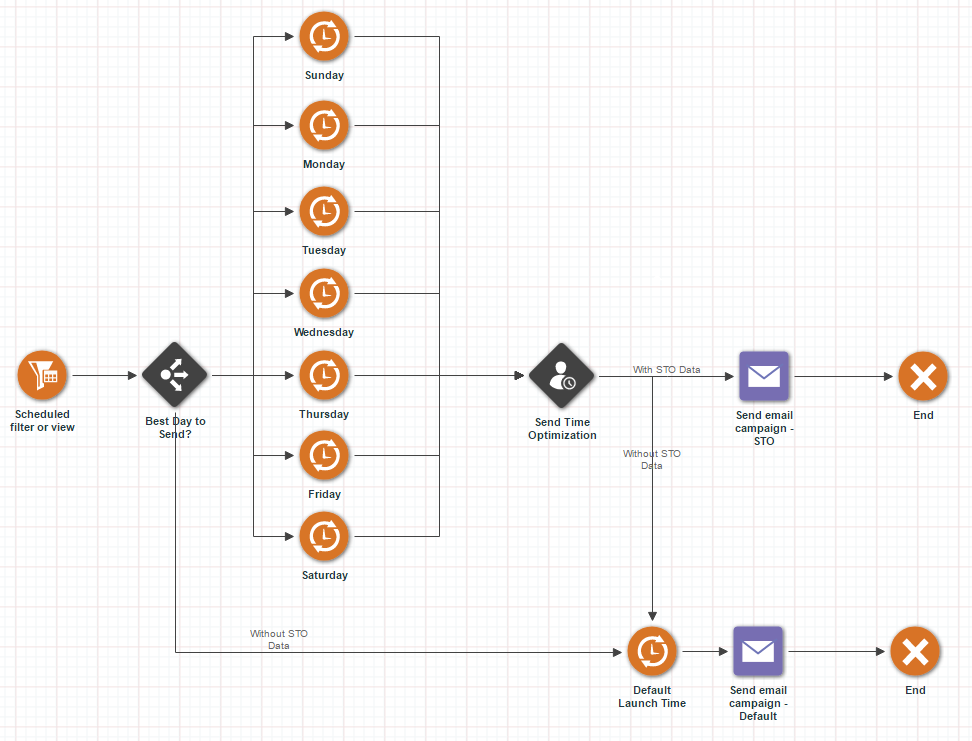
For some marketers, they may want to take advantage of the BESTDAY and BESTHOURFORBESTDAY data in their Send Time Optimization PET and send the email campaign to audience members at the most optimal day and time of the week.
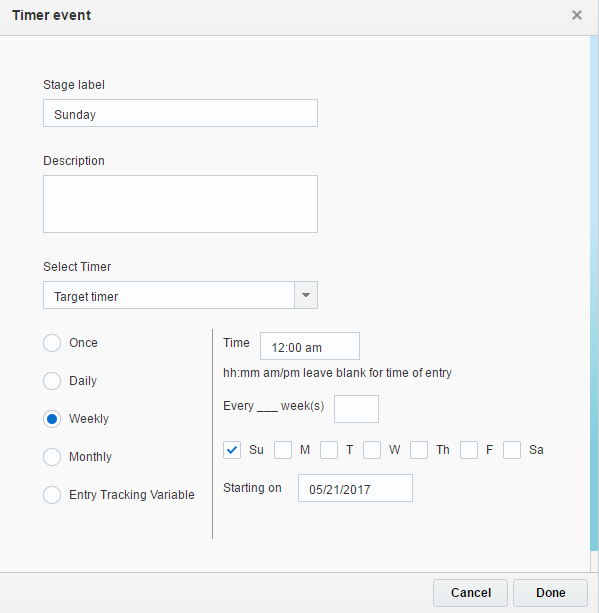
To achieve this, the marketer should create a basic STO Program and incorporate a Data Switch and a series of Target Timers into the design. The Data Switch will follow the Start Event stage and have 8 paths. Seven of the paths will route to Target Timers, each configured to move the audience to the next stage on a specific day of the week. For example, for the Target Timer representing Sunday, the properties should be configured to be “Weekly” on “Su” (Sunday) at 12:00 am.
To direct audience members from the Data Switch to the appropriate Target Timer, a filter condition needs to be created. For example, the filter to retrieve audience members with the optimal send day of Sunday will look something like this:

Those who don’t have an optimal send day will be directed to the original Target Timer in the basic STO Program along the “Without STO Data” path and be sent the email campaign at the default launch time.