Load Data from an SFTP Source into NetSuite Analytics Warehouse (Preview)
As a service administrator, you can use the NetSuite Analytics Warehouse extract service to acquire data from a secure FTP source (SFTP) and use it to create data augmentations.
Ensure that SFTP is enabled on the Enable Features page prior to creating this connection. See Make Preview Features Available.
- In NetSuite Analytics Warehouse, create the SFTP data connection using these instructions:
- In the dialog for the SFTP connection, provide applicable values in Remote Host, User Name, Private Key, Remote Host Extract Files Directory, File Type, CSV Delimiter, CSV Date Format, and CSV Timestamp Format. Ensure that the value in Remote Host Extract Files Directory begins with a leading "/" to avoid issues. In Lock Metadata, specify whether you want to turn off the metadata extracts after first refresh if metadata isn't going to change. This option is useful if the flag to derive metadata from data files using the metadata utility is turned on in your source. In Remote Host, ensure that you specify an SFTP Server that supports FIPS Compliant key exchange algorithms.Ensure the following:
- The table name and file name in your SFTP source needs to be the same.
- The private key you provide is in the valid OpenSSH format and the minimum number of bits in the key should be 2048.
- Date format for the data files must match the date format in your SFTP source; for example, if you've used MM/dd/yyyy (01/23/1998) in your source, then you must specify the same format in CSV Date Format. See About Date and Timestamp Formatting for CSV File-based Extractors.
- Timestamp format for the data files must match the timestamp format in your SFTP source; for example, if you've used MM/dd/yyyy hh:mm:ss (01/23/1998 12:00:20) in your source, then you must specify the same format in CSV Timestamp Format.
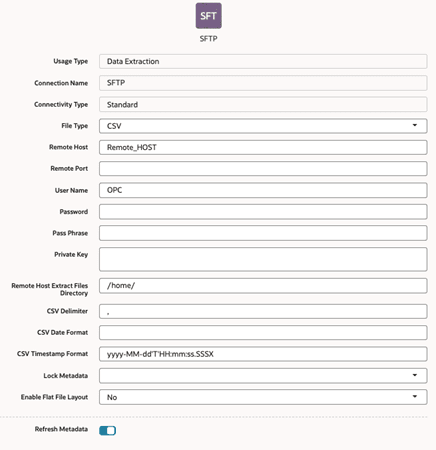
- In the dialog for the SFTP connection, provide applicable values in Remote Host, User Name, Private Key, Remote Host Extract Files Directory, File Type, CSV Delimiter, CSV Date Format, and CSV Timestamp Format. Ensure that the value in Remote Host Extract Files Directory begins with a leading "/" to avoid issues. In Lock Metadata, specify whether you want to turn off the metadata extracts after first refresh if metadata isn't going to change. This option is useful if the flag to derive metadata from data files using the metadata utility is turned on in your source. In Remote Host, ensure that you specify an SFTP Server that supports FIPS Compliant key exchange algorithms.