Configuring Microsoft AD FS 3.0 for the SAML Integration
This section provides the steps to set up Microsoft Active Directory Federation Service (AD FS) 3.0 to provide single sign-on (SSO) access to OpenAir using the OpenAir SAML SSO feature.
The following configuration steps are given for illustration purposes only. OpenAir does not support specific identity provider products or product versions. The following steps may not reflect the latest identity provider product version. Refer to Microsoft product documentation for detailed and updated instructions about Microsoft ADFS. For additional questions about setting up Microsoft ADFS, please contact Microsoft Support.
To Configure Microsoft AD FS 3.0 for the SAML Integration:
-
Make sure that you have installed the following patch on your AD FS server:
-
Windows Server 2012 (R2) — KB3003381
This patch fixes the incorrect MSIS0038 error reported in AD FS 2.0 and AD FS 3.0.
-
-
Install AD FS 3.0 on Windows Server.
-
Download the AD FS metadata XML file from the following location:
https://<your_federation_server_name>/federationmetadata/2007–06/federationmetadata.xml -
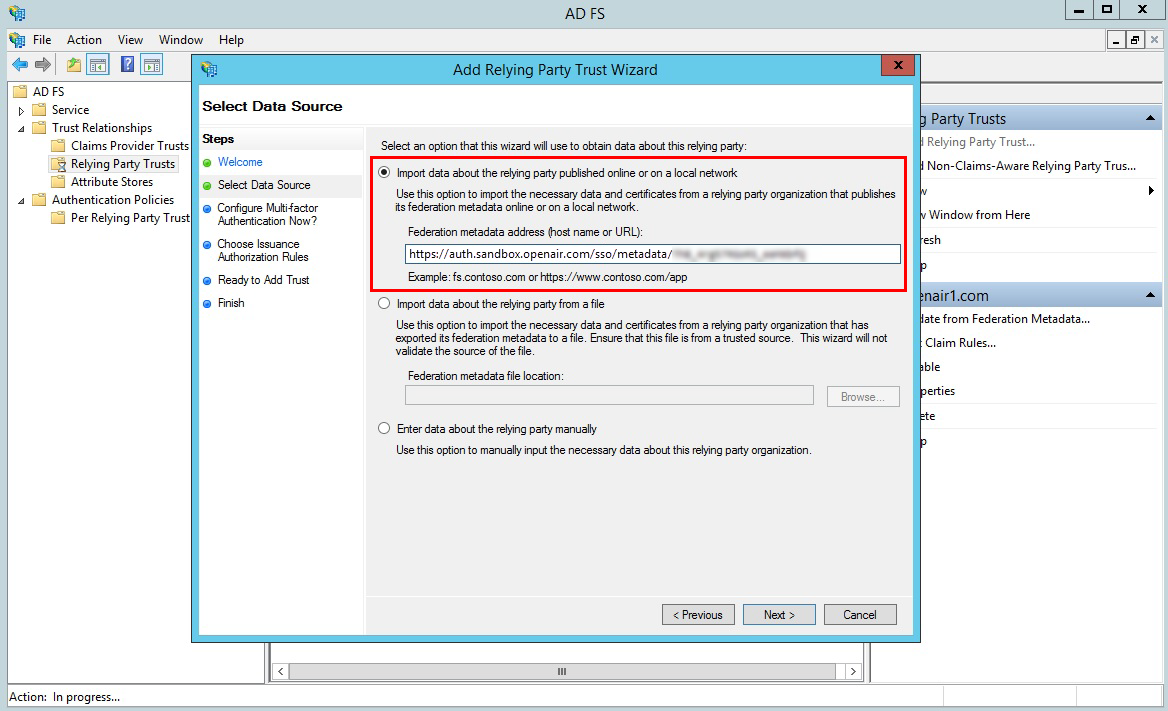
In AD FS 3.0, open the Add Relying Party Trust Wizard. Click Start.
-
On the “Select Data Source” step, select Import data about the relying party published online or on a local network, and enter the Federation metadata address (host name or URL):
-
https://auth.sandbox.openair.com/sso/metadata/<unique_ref_generated_by_OpenAir>, if testing the SAML deployment on a sandbox OpenAir account. -
https://auth.openair.com/sso/metadata/<unique_ref_generated_by_OpenAir>, if deploying SAML SSO on a production OpenAir account.
Note:Examples in this help topic use a sample metadata URL generated for a sandbox account. To set up AD FS SSO with your production or sandbox account, replace the URL with the unique Entity ID generated by OpenAir on the identity provider profile you created for Microsoft AD FS 3.0 on your OpenAir account. See OpenAir SAML Metadata.
Click Next.
The following warning appears: “AD FS Management: Some of the content in the federation metadata was skipped because it is not supported by AD FS. Review the properties of the trust carefully before you save the trust to the AD FS configuration database.”
Click OK
-
-
On the “Specify Display Name” step, enter a Display name for the Relying Party Trust, and click Next.
-
On the “Configure Multi-factor Authentication Now?” step, select I do not want to configure multi-factor authentication settings for this relying party trust at this time, and click Next.
-
On the “Choose Issuance Authorization Rules” step, select the option permitted by your company’s policies or preferences then click Next.
-
On the “Ready to Add Trust” step, click Next.
-
On the “Finish” step, clear the Open the Edit Claim Rules dialog... box, and click Close.
-
In AD FS, go to Relying Party Trusts, right-click the display name you entered for the OpenAir SAML endpoint, and click Properties.
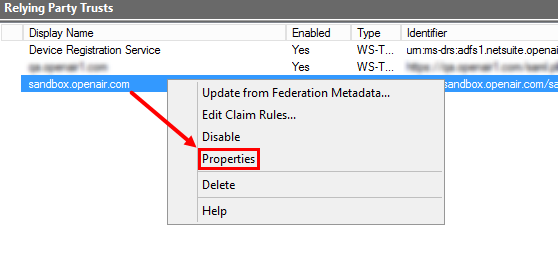
-
On the Monitoring tab, clear the Monitor relying party box, and click Apply.
-
On the Encryption tab, click Remove, then click Yes to confirm.
-
On the Signature tab, verify that a certificate still appears in the list.
-
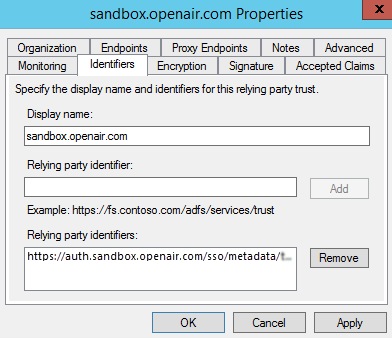
On the Identifiers tab, verify that Relying party identifiers includes the relevant OpenAir metadata URL:
-
https://auth.sandbox.openair.com/sso/metadata/<unique_ref_generated_by_OpenAir>, if testing the SAML deployment on a sandbox OpenAir account. -
https://auth.openair.com/sso/metadata/<unique_ref_generated_by_OpenAir>, if deploying SAML SSO on a production OpenAir account.
Note:Examples in this help topic use a sample metadata URL generated for a sandbox account. To set up AD FS SSO with your production or sandbox account, replace the URL with the unique Entity ID generated by OpenAir on the identity provider profile you created for Microsoft AD FS 3.0 on your OpenAir account. See OpenAir SAML Metadata.
-
-
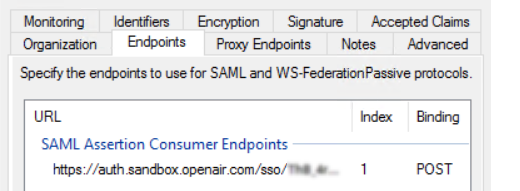
On the Endpoints tab, verify that the list of SAML Assertion Consumer Endpoints includes the relevant OpenAir SAML endpoint:
-
URL:
https://auth.sandbox.openair.com/sso/acs/<unique_ref_generated_by_OpenAir>— Index:1— Binding:POST, if testing the SAML deployment on a sandbox OpenAir account. -
URL:
https://auth.openair.com/sso/acs/<unique_ref_generated_by_OpenAir>— Index:1— Binding:POST, if deploying SAML SSO on a production OpenAir account.
Note:Examples in this help topic use a sample Assertion Consumer Service URL generated for a sandbox account. To set up AD FS SSO with your production or sandbox account, replace the URLs with the unique Assertion Consumer Service URL generated by OpenAir on the identity provider profile you created for Microsoft AD FS 3.0 on your OpenAir account. See OpenAir SAML Metadata.
-
-
Click OK.
-
Set up claim rules to ensure that SAML assertions contain the required attributes with the appropriate OpenAir sign-in identifiers. See Creating Claim Rules to Send OpenAir Sign-In Identifiers as SAML Assertion Attributes.
-
To test your connection, open a web browser and go to the following web address:
https://<your_federation_server_name>/adfs/ls/IdpInitiatedSignOn.aspx
Creating Claim Rules to Send OpenAir Sign-In Identifiers as SAML Assertion Attributes
The type and configuration of claim rules you use depend on the values used to populate the SAML assertion attributes (or outgoing claim type), as well as any convention used for the OpenAir User ID in your company. This guide provides steps for the following examples:
-
NameID— If the OpenAir User ID is the same as the user’s Active Directory email address, create two rules and map it to theNameIDassertion attribute. See Mapping the Active Directory Email Address to the NameID Assertion Attribute. -
The attribute
account_nicknameis no longer required. The OpenAir SAML endpoint is unique to your OpenAir account and to each identity provider profile.
For general guidelines about SAML assertion attributes expected by OpenAir, see SAML Assertion Attributes.
To create a claim rule:
-
In AD FS, go to Relying Party Trusts, right-click the display name you entered for the OpenAir SAML endpoint, and click Edit Claim Rules....
-
Click Add rule.... The Add transform claim rule wizard appears.
-
Choose Rule Type page — Select the appropriate Claim rule template, and click Next.

-
To use values from attributes in Lightweight Directory Access Protocol (LDAP) attribute store and associate a claim type with each of the LDAP attributes, use Send LDAP Attributes as Claims.
-
To use a value from an incoming claim type and map it to a different claim type or map its claim value to a new claim value in the outgoing assertion, use Transform an Incoming Claim. For example, you can use this template to use the value from the E-mail Address from an incoming claim type and map it to the Name ID outgoing claim type, if this is what you use as OpenAir User ID.
-
To use more advanced options and write a custom rule in AD FS claim rule language, use Send Claims Using a Custom Rule.
-
-
Configure Claim Rule page — Enter a Claim rule name, and other claim rule configuration settings. These settings depend on the chosen claim rule template.
-
Click Finish.
Mapping the Active Directory Email Address to the NameID Assertion Attribute
If the OpenAir User ID is the same as the user’s Active Directory email address, you can create two rules to get the email address and map it to the NameID assertion attribute.
To map the AD email address to the NameID assertion attribute:
-
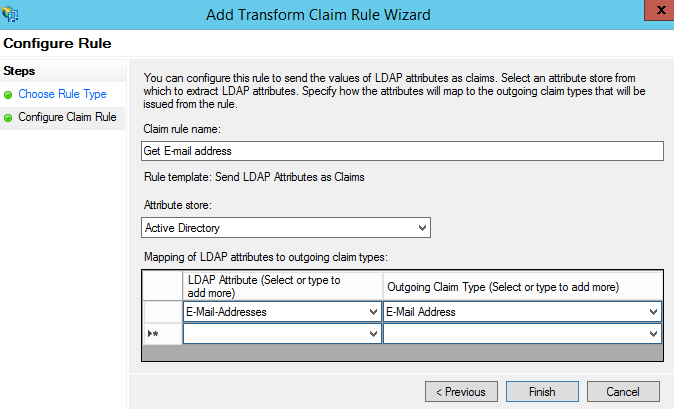
Create a claim rule using the Send LDAP Attributes as Claims template and use the following steps on the Configure Claim Rule page. See Creating Claim Rules to Send OpenAir Sign-In Identifiers as SAML Assertion Attributes.
-
Click the Attribute store dropdown, and select Active Directory.
-
Click the cell under LDAP Attribute, and select E-Mail-Addresses.
-
Click the cell under Outgoing Claim Type, and select Name ID.
-
-
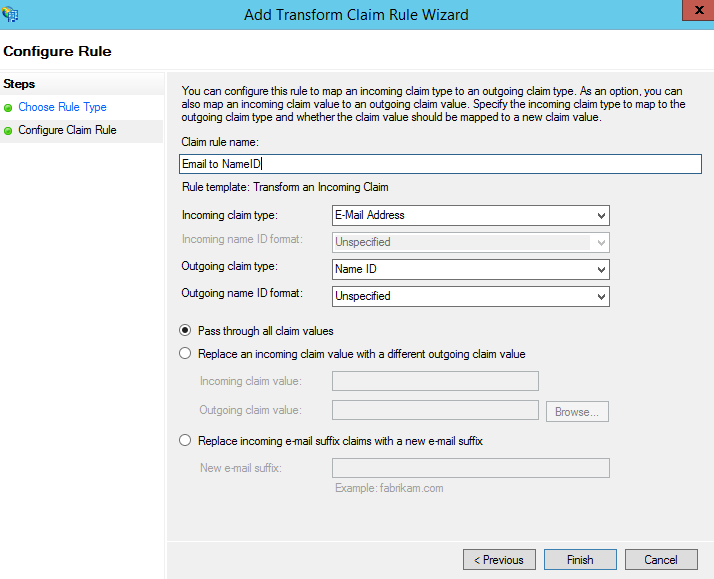
Create a claim rule using the Transform an Incoming Claim template and use the following steps on the Configure Claim Rule page. See Creating Claim Rules to Send OpenAir Sign-In Identifiers as SAML Assertion Attributes.
-
Click the Incoming claim type dropdown, and select E-Mail Address.
-
Click the Outgoing claim type dropdown, and select Name ID.
-
Click the Outgoing name ID format dropdown, and select Unspecified.
-
Select Pass through all claim values.
-