Switching to SuiteScript 2 Versions of Integration Bundle Scripts
After you update the bundles, you can switch to the SuiteScript 2 versions of scripts in each bundle, or continue to use the updated SuiteScript 1.0 versions. All SuiteScript 1.0 versions that were deployed before the update are deployed by default after the update. When updating the SuiteProjects Pro Real-time Add-on from version 2.0, 2.01, or 2.02, SuiteScript 1.0 or SuiteScript 2.0 versions that were deployed before the update are deployed by default after the update.
When updating SuiteProjects Pro Single Sign-on (Bundle ID 369619) to version 7.0 or later, the switch to SuiteScript 2 versions of scripts in this bundle is done automatically.
To switch to SuiteScript 2 versions of integration bundle scripts:
-
In NetSuite, go to Customization > Scripting > Scripts.
-
For each deployed SuiteScript 1.0 version script in any of the NetSuite bundles for the SuiteProjects Pro integration:
-
Locate the script in the list and click Deployments.
The Script Deployments list appears.
-
Make a note of the script name and all script deployment list entries with a checked box under Deployed. If the script applies to different record types or events, and is deployed only for specific record types or events, you will need to refer to this list later to deploy the SuiteScript 2 equivalent.
-
For each list entry, clear the Deployed box.
Note:Currently, there are no SuiteScript 2 equivalent for the following RESTlet scripts in the SuiteProjects Pro SRP Integration (Bundle ID 369637) bundle:
-
oa_get_field_info- This script deployment is required only for Purchase Requisitions field synchronization. Unless you use Purchase Requisitions in NetSuite, you can clear the Deployed box. -
oa_ping- This script deployment is not required anywhere in the integration. You can clear the Deployed box.
-
-
Click Submit at the top of the page.
-
Click Scripts in the upper-right corner to return to the Scripts list.
-
-
For each SuiteScript 2 version script in any of the NetSuite bundles for the SuiteProjects Pro integration:
-
Locate the script in the list and click Deployments.
The Script Deployments list appears.
-
Check the Show undeployed box.
-
For each deployment list entry equivalent to the SuiteScript 1.0 versions you undeployed earlier, check the Deployed box.
-
Verify that the script is deployed for all roles and, in the case of portlet, Suitelet, or user event scripts, executed as the
SuiteProjects Pro Integration Administratoror the custom role you created for the integration. See Verifying Integration Script Deployment Settings. -
Verify that all SuiteScript 2 equivalent to the SuiteScript 1.0 versions you undeployed earlier are deployed to ensure that you retain the same integration functionality.
-
Click Submit.
Important:Review the Switch to SuiteScript 2 Versions Additional Guidelines.
-
-
Skip this step when updating SuiteProjects Pro Single Sign-on (Bundle ID 369619) to version 7.0 or later. Otherwise, after you switch to SuiteScript 2 versions of the SuiteProjects Pro Single Sign-on (Bundle ID 369619), update the category links for the SuiteProjects Pro (PSA) center tab. To do so:
-
Go to Customization > Centers and Tabs > Center Tabs.
-
Locate the row for the SuiteProjects Pro (PSA) center tab and click the center tab name.
-
On the Content > Categories subtab, click Edit on the
Modulesrow. -
For each line on the category link sublist, update the link to point to the SuiteScript 2.1 Suitelet script deployment.
-
Click the name of SuiteScript 1.0 Suitelet script deployment under Link -
SuiteProjects Pro: <Module> module deployment, where<Module>is the name of the SuiteProjects Pro module. -
Search and select the name of the SuiteScript 2.1 Suitelet script deployment -
SuiteProjects Pro: <Module> module deployment 2.1.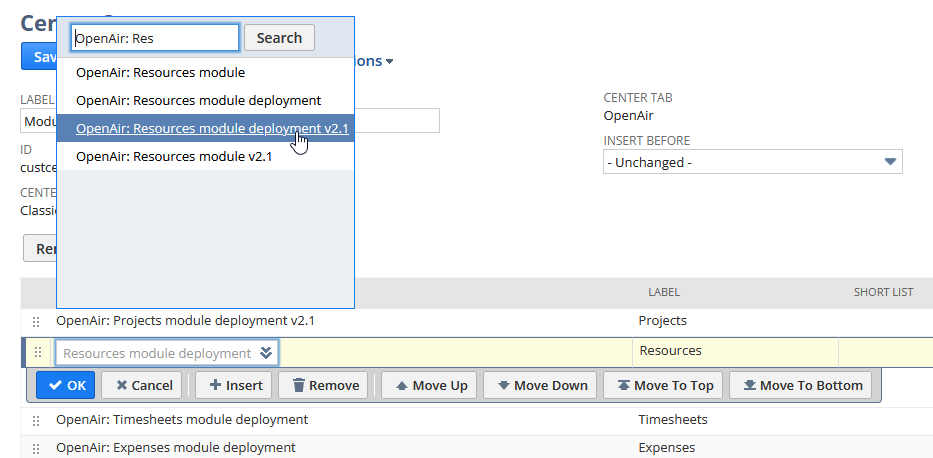
-
Click OK.
-
-
Click Save.
-
On the Content > Categories subtab, click Edit on the
Help & Supportrow. -
For each line on the category link sublist, update the link to point to the SuiteScript 2.1 Suitelet script deployment (Use the same steps as for the Modules center category).
-
Click Save.
-
-
Skip this step when updating SuiteProjects Pro Single Sign-on (Bundle ID 369619) to version 7.0 or later. Otherwise, after you switch to SuiteScript 2 versions of the SuiteProjects Pro Single Sign-on (Bundle ID 369619) or SuiteProjects Pro Real-time Add-on (Bundle ID 369630) scripts, edit existing Portlet, Suitelet and User Event connection points in the SuiteSignOn record for SuiteProjects Pro. To do so:
-
Go to Setup > Integration > SuiteSignOn.
Important:Until the SuiteProjects Pro 2023.2 release, the SuiteProjects Pro Within NetSuite and Real-Time Record Import features relied on the NetSuite Outbound Single Sign-On (SuiteSignOn) feature as outbound single sign-on method. NetSuite plans to end support for SuiteSignOn with the NetSuite 2025.1 for production accounts. Support for SuiteSignOn has already ended on non-production accounts, such as sandbox accounts. If you are using older version of these features relying on SuiteSignOn, upgrade your integration configuration before the NetSuite 2025.1 release to ensure service continuity.
See Upgrading NetSuite Integration Features to Remove the Dependency on SuiteSignOn.
-
Click the name of the SuiteSignOn record for SuiteProjects Pro.
-
Click Edit.
-
On the Connection Points subtab, for each Portlet, Suitelet and User Event connection points, do the following:
-
Click the SuiteScript 1.0 script name under Display Context.
-
Select the SuiteScript 2 equivalent from the dropdown list.
-
Click OK.
-
-
Click Save.
-
-
If you are using real-time record imports from NetSuite into SuiteProjects Pro, verify that the user event script sending the record to SuiteProjects Pro runs after all other user event scripts for that record type. See Verifying User Event Scripts Running Order.
-
Verify the integration configuration settings for SuiteScript 2 versions of the bundle scripts.
Important:When using SuiteScript 2 versions of SuiteProjects Pro SRP Integration (Bundle ID 369637), SuiteProjects Pro Single Sign-on (Bundle ID 369619), or SuiteProjects Pro Real-time Add-on (Bundle ID 369630) bundle scripts, integration configuration settings are sourced from the
SuiteProjects Pro: Integration Settingscustom record.When using SuiteScript 1 versions SuiteProjects Pro SRP Integration (Bundle ID 369637), SuiteProjects Pro Single Sign-on (Bundle ID 369619), or SuiteProjects Pro Real-time Add-on (Bundle ID 369630) bundle scripts, integration configuration settings are sourced from Setup > Company > General Preferences (Custom Preferences tab).
To do so:
-
Go to Customization > Lists, Records and Fields > Record Types.
-
Click List for the custom record type
SuiteProjects Pro: Integration Settings.The
SuiteProjects Pro: Integration Settingsrecord list appears and should include one record only (SuiteProjects Pro Integration Settings Record). -
Click View for the record
SuiteProjects Pro Integration Settings Record. -
Verify the settings and edit the record to change any settings, if required.
-
Switch to SuiteScript 2 Versions Additional Guidelines
In most cases, upgraded versions of the script have the same name as their SuiteScript 1.0 equivalent followed by the version number (v2.1 or 2.1 for example).
Note the following exceptions:
-
There are no SuiteScript 1.0 equivalent for
SuiteProjects Pro: Add Timestamp 2.1. Only the SuiteScript 2.0 version was present in previous versions of the bundle. The script has been upgraded to SuiteScript 2.1 and are deployed by default. There are no actions required for this script. -
The SuiteScript 1.0
SuiteProjects Pro: SFA Integrationhas no SuiteScript 2 equivalent. Support for this feature ended with SuiteProjects Pro 2021.1.
Most of your integration settings and preferences are copied to the SuiteProjects Pro: Integration Settings custom record so they can be maintained after you update the bundles and switch to SuiteScript 2 versions.
Note the following exceptions:
-
SuiteProjects Pro SRP Integration
-
After you deploy the
SuiteProjects Pro: PO/VB/VC Validate 2.1script, you need to change preferences at the user level to let employees view projects and items and check the Billable and Export to SuiteProjects Pro boxes for purchase order (or vendor bill and vendor credit) line items and purchase order (or vendor bill and vendor credit) records. To do so, go to Home > Set Preferences and check the Validate SuiteProjects Pro PO/Vendor Bill 2 box on the Custom Preferences tab. -
After you deploy the
SuiteProjects Pro: JE from Time 2.1script, you need to change the parameters for this script deployment manually to match the settings for the previous SuiteScript 1.0 deployment. To do so, go to Customization > Scripting > Script Deployments, locate the deployment for theSuiteProjects Pro: JE from Time 2.1script and click Edit, go to the Parameters subtab and edit the parameters.
-