Reports
Links are provided to forms for the following settings and configurations. They are located in Administration > Global Settings under Reports. The following lists them in the order in which they display on the Global Settings window.
Custom Calculations Overview
SuiteProjects Pro comes with several standard value fields, but you may find that there are other values you would like to track such as fields related to projects, employees, resources, and expenses to name a few. Or, there may be some standard value fields that you would like to rename for reporting purposes, using your company's terminology. SuiteProjects Pro addresses your needs by allowing you to create custom calculated fields and renamed built-in fields.
To access Calculated Fields:
-
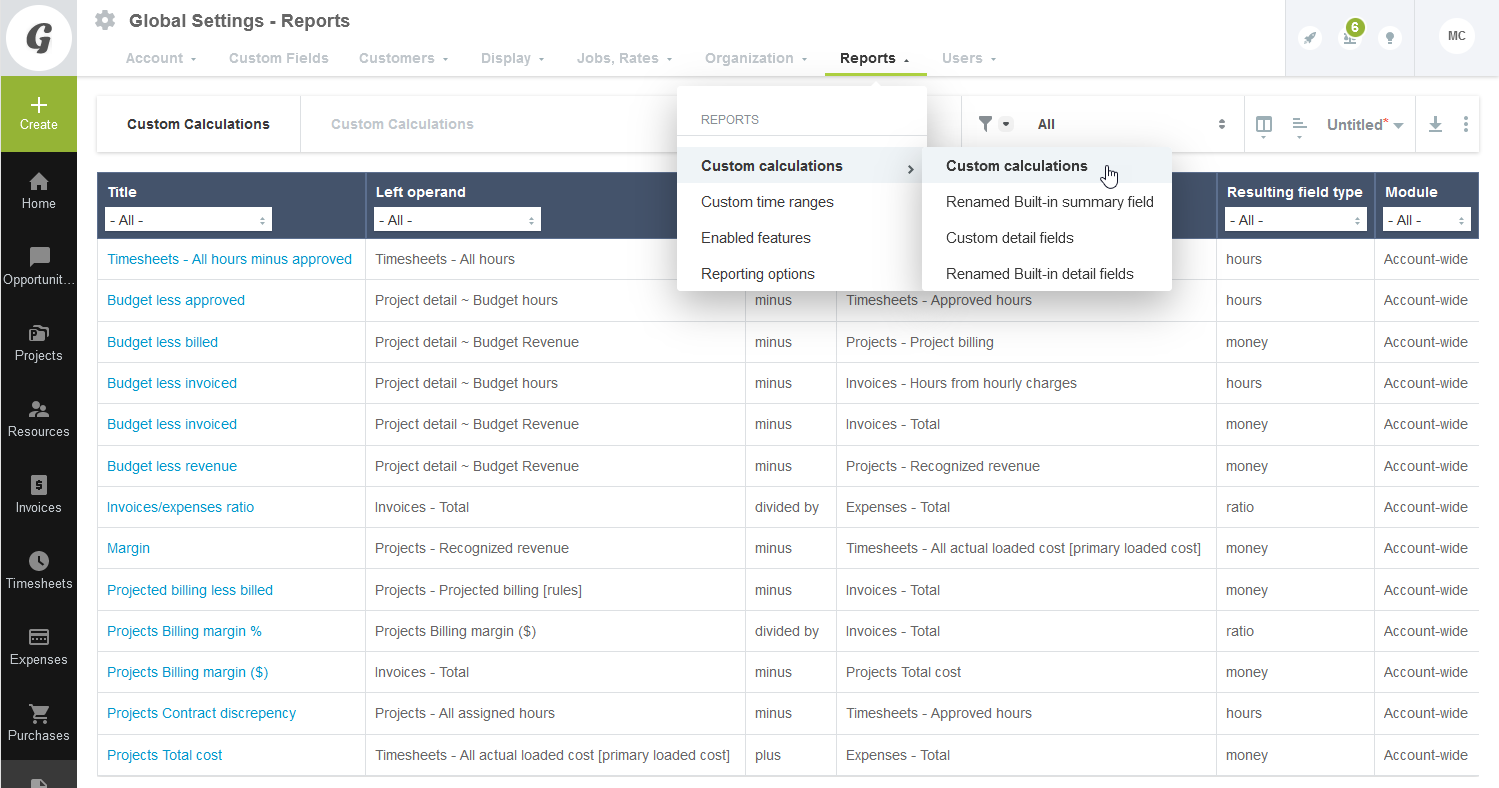
Go to Administration > Global Settings > Reports > Custom Calculations. Select the type of calculated field link you want to use.
-
To view or modify an existing calculated field, select the appropriate field link under the Title column.
-
To add a new calculated field, select New and one of the options available in the drop-down list.
Refer to the following sections for more information.
Custom Calculations
The Custom calculations option lets you define additional value fields for specific objects. Custom calculated field values are only displayed in Summary reports. When selecting what type of custom calculated field to make, the drop-down selection under the New menu corresponds to the type of summary report the calculation will be found in after it is made. For example, if you select an Account-wide project custom calculation, the resulting calculation can be found when you create a report from the account-wide projects section of summary reports. You are also able to use custom detail fields as constants in Custom calculations.
Calculated fields allow you to take two value fields and apply an operation on one from the other such as Expenses Approved minus Expenses Submitted. When a custom calculated field is created and associated with an object, it cannot be changed to another object. See Custom Calculations Overview.
When you create custom calculations, you need to decide on the main value you want to use in the custom calculation. For example, do you want to use money values related to Invoices or hours related to Timesheets, or both? This decision helps you determine whether you are choosing an Account-wide custom calculation or a application-specific custom calculation. The Account-wide selection provides the most flexibility in creating custom calculations. The entity determines where the value is stored in SuiteProjects Pro.
To create a Custom calculation:
-
Go to Administration > Global Settings > Reports > Custom Calculations.
-
Select the custom calculation type from the Create Button.
The New custom calculation form displays.
-
Next, decide on the Left operand, Operation and Right operand. Operation values include: plus, minus, times and divided by.
-
The Title is the name you provide for the custom calculated field. The custom calculated field title is automatically prepended with the entity name (for example, Employee - Invoiced hours).
Note:The Do not automatically prepend module name to title in account-wide report box is only available when selecting Account-wide custom calculations. When checked, the entity name does not appear in the name of the custom field when selecting it as a value in the Summary reports.
-
A description may be added.
-
An Active custom calculation box is available.
-
Click Save.
Custom Detail Fields
The Custom detail fields option lets you define additional value fields for specific objects. You can display Custom detail field values in Detail reports.
Custom detail fields allow you to create a new value field from standard value fields within a particular application. When a custom detail field is created and associated with an object, it cannot be changed to another object. You can bring custom detail fields in as separate columns in summary reports.
You need to select the entity value you want to use from the New drop-down list. For example, are you creating a custom field based on the Project stage or Booking? The entity determines where the value is stored in SuiteProjects Pro.
To create a Custom detail field:
-
Go to Administration > Global Settings > Reports > Custom Calculations.
-
Click the Custom detail fields link.
-
Select the new custom detail field type from the Create Button.
The New custom detail field form displays.
-
Next, choose the Function. Function choices include: AVERAGE, CONCATENATION, CONSTANT, DATE_DIFF, DIFFERENCE and SUM. Not all function types are available for the various application entities. For example, if the entity is a text field, your function choices are limited to CONCATENATION and DATE_DIFF.
-
The Title is the name you provide for the custom detail field.
-
Depending on the application entity chosen and the function, the form varies:
-
If the function is AVERAGE, an Available numeric area displays where you can select the numeric values to be used in the average and move them to the Selected numeric area.
-
If the CONCATENATION function is selected, a Text template area displays. You are able to add straight text and use standard field values. To select standard field values, choose the appropriate value from the Field drop-down list. Then copy and paste the value shown in the text box below the drop-down list into the Text template. It may be something like the following: %%approval_history%%
-
If the CONSTANT function is selected, you need to enter the value of the constant. The other argument for the constant function is the Resulting field type. Choices include: hours, days, quantity, and ratio. The constant custom detail fields can be used in custom calculations and in summary reports. This functionality is currently limited to transaction fields, such as Project billing transactions or Time entries.
-
If the DATE_DIFF function is chosen, the arguments area displays Date 1 minus Date 2. Both date fields are drop-down lists with the date fields available for the entity selected.
-
If the function chosen is DIFFERENCE, the arguments area displays Minuend minus Subtrahend. The minuend and subtrahend fields are drop-down lists that contain the numeric data values for the entity selected.
-
If the function is SUM, an available numeric area displays where you can select the numeric values to be used in the sum and move them to the Selected numeric area.
-
Renamed Built-In Detail Fields
SuiteProjects Pro gives you the capability to Rename built-in detail fields for reporting purposes, using your company's terminology. You can also bring these Renamed built-in detail fields in as columns on summary reports.
To create a Renamed built-in detail fields:
-
Go to Administration > Global Settings > Reports > Custom Calculations.
-
Click the Renamed Built-in detail fields link.
-
Select the standard field that you want to rename from the Create Button.
The Rename built-in detail field form displays.
-
The Built-in title drop-down list provides a list of fields available to be renamed that are associated with the entity chosen.
-
After choosing the Built-in title field, enter the new Customized title. For example, Project owner may now be called Project Manager.
-
Under Summary Reports detailing options, if desired, check the Suppress Optional 'Summary Report' suffix box.
-
Click Save.
Renamed Built-In Summary Fields
SuiteProjects Pro lets you rename built-in summary fields for reporting purposes, using your company's terminology. You can use these Renamed built-in summary fields in Summary reports.
To create a Rename built-in summary fields:
-
Go to Administration > Global Settings > Reports > Custom Calculations.
-
Click Renamed Built-in summary fields.
-
Select the summary field that you want to rename from the Create Button.
-
The Built-in title drop-down provides a list of fields available to be renamed that are associated with the entity chosen. After choosing the Built-in title field, you enter the new Customized title. For example, you can change Project billing hours to Billed Hours.
-
Check the Do not automatically prepend application name to title in account-wide reports box if you don't want the application name prepended to the title. If you do not check this box, the calculated field displays in the value selection in summary reports with the application name before it. For example, it could read Timesheets - [NAME OF CALCULATION].
-
Click Save.
Custom Time Ranges
SuiteProjects Pro lets you create custom time ranges to use in Summary reports and in Advanced resource reports and Invoice-Income received reports. Each report has a period field that sets the time range for the report. SuiteProjects Pro comes with built-in time periods such as Weekly, Monthly, Annual, etc. Custom time ranges allow for custom periods to be created based on specific company needs (such as a 4-4-5 calendar). When created, they are available for use in time period specific reports. A typical use of custom time ranges is if you report upon a fiscal monthly period that does not coincide with calendar months.
To create Custom time ranges:
-
Go to Administration > Global Settings > Reports > Custom Time Ranges.
-
Select New Custom time range from the Create Button.
-
Enter the Custom time range name.
-
Next, add Time period names and Time period start dates. You must have at least two periods and dates, because the last date you enter is only used to calculate the end date of the previous period. The end date of each period is set to one day before the start date of the next period. If you do not name each time period, the name defaults to the start and end dates.
-
If you need to add more periods and dates, click Add Rows and select the number of rows to add.
-
Click Save.
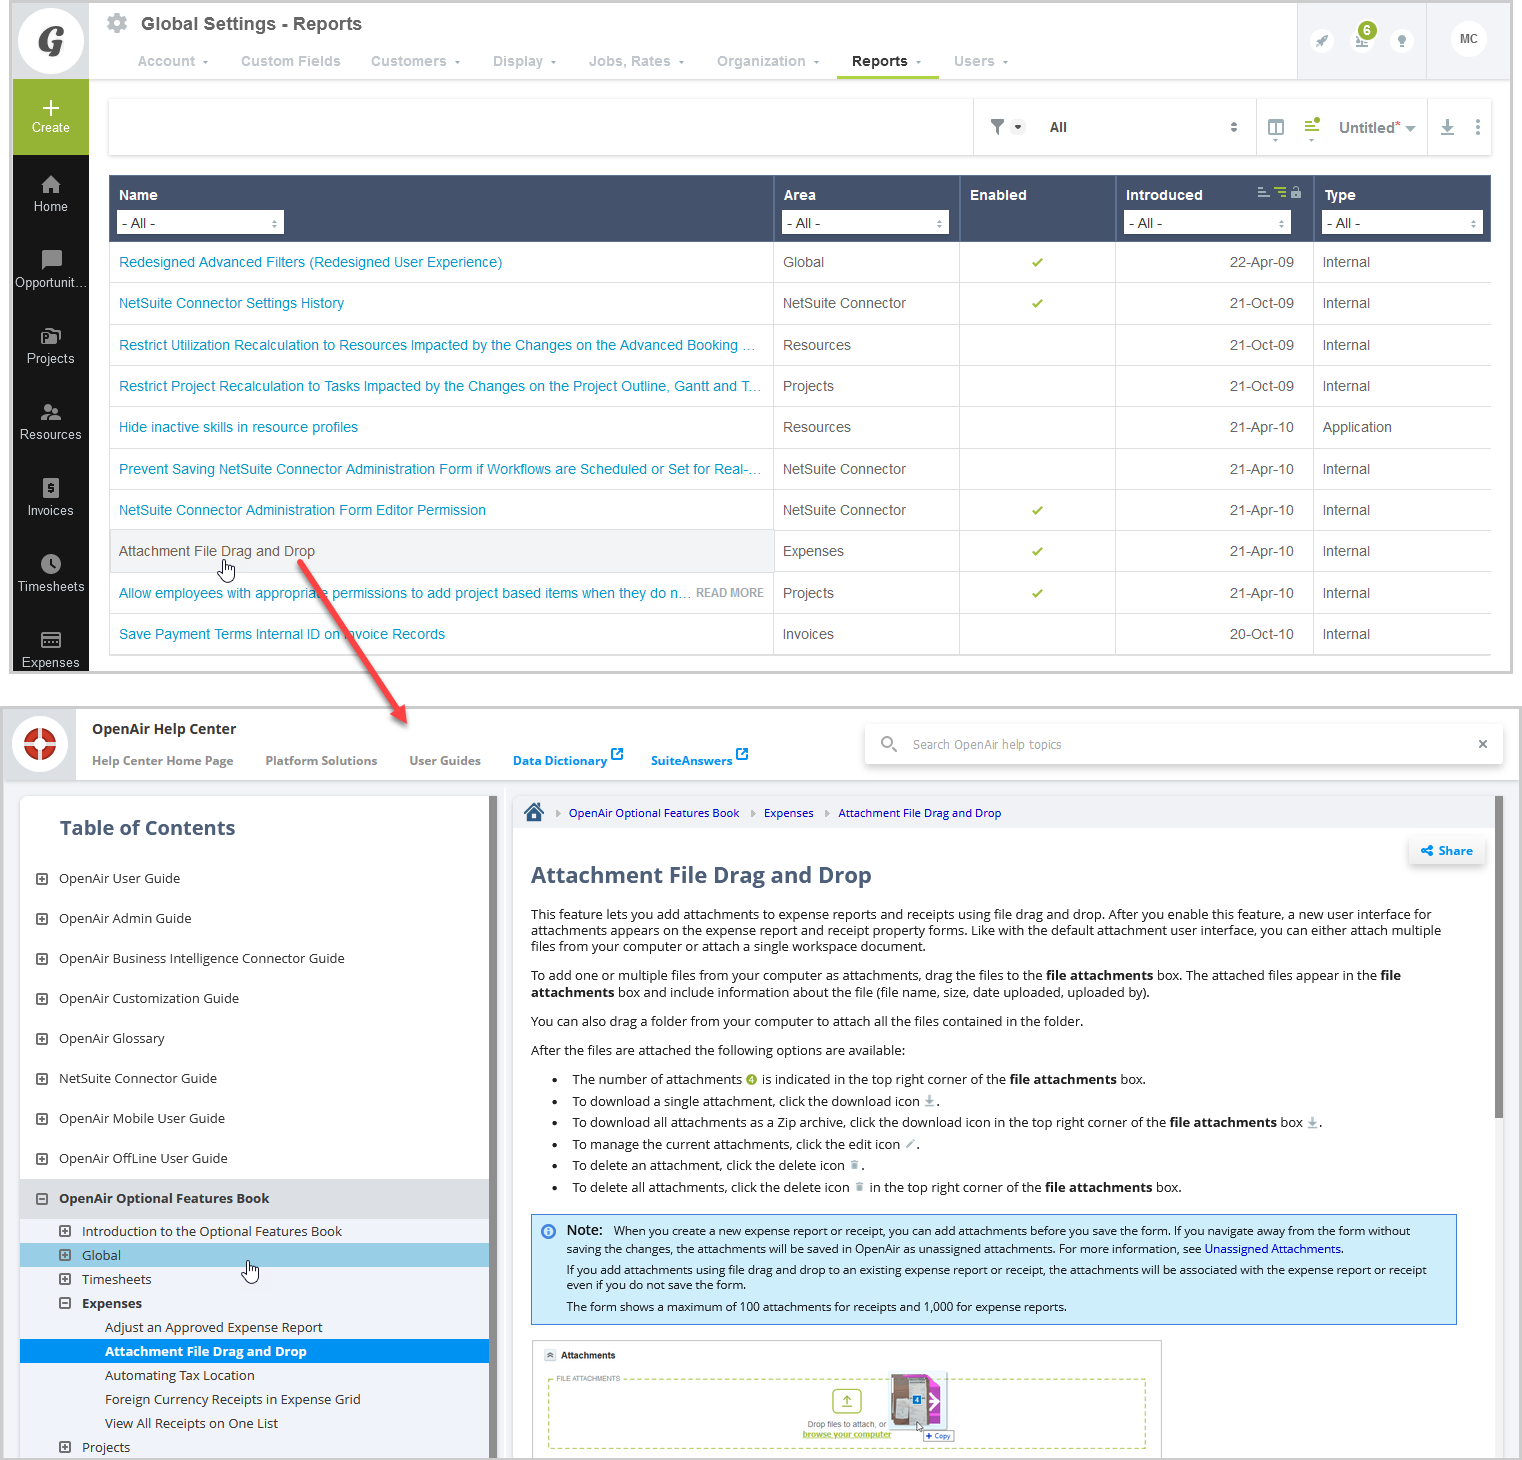
Enabled features
The Enabled features page lists features which can be enabled or disabled by account administrators for each SuiteProjects Pro application or by SuiteProjects Pro Support at the account level.
To view the enabled features list, go to Administration > Global Settings > Reports > Enabled features.
The listed features can be one of the following types:
-
Application - Application settings are controlled by account administrators in the Administration module (Administration > Application Settings > [Select an Application] > Other Settings). These features are described in this guide. See the chapters describing each application.
-
Internal - Internal settings control the optional features which can be enabled for your account by SuiteProjects Pro Support. These features are described in Optional Features.
The view includes the following information for every listed feature:
-
Name of the feature - To learn more about the feature, click the feature name. The SuiteProjects Pro Help Center opens in a new browser window or tab and takes you directly to the relevant help topic.
-
The release date when the feature was Introduced.
-
The Area indicates which application the feature relates to or whether it is global feature.
-
Whether the feature is Enabled in account (green square icon) or Disabled in account (red square icon). To learn more about requesting an optional feature to be enabled for your account, click Disabled in account. For Application settings, this link points to the help topic describing the feature.
Note:Some optional features shown as Enabled in account require additional Administration settings. Click the feature name or refer to Optional Features for more information.
-
The feature Type - Application or Internal.
You must be an administrator or have the View Enabled Features role permission to access the enabled features list.
You must be an administrator or have the View Help Center role permission to click the links and access help topics describing the features.
Reporting Options
Reporting options settings provide system-wide controls on the appearance of reports and functions available in the Reports application. The Reports application also contains an Options tab which has other settings that affect the appearance of reports.
To view and modify the reporting options, go to Administration > Global Settings > Reports > Reporting Options.
The page includes the following settings:
-
Summary report forex conversions (multicurrency) determination observe the 'date to use' value: Check this box to determine the historical foreign currency exchange rate to use in summary reports according to the date to use selected in dropdown list in the report properties.
-
Summary report user loaded cost determination observe the 'date to use' value: Check this box to determine the historical loaded cost values to use in summary reports according to the date to use selected in dropdown list in the report properties.
-
Show projected billing values in summary reports. Calculated as hours times employee's default billing rate: Projects-projected billing fields if multi-currency are available in Summary reports. The hours used in the computation of the field are determined by the charge projection feature activated within the Project Application Options tab. The charge projection feature by default uses the defined hours as virtual timesheets and forecasts financials based on existing billing rules on the project. When you check this box, it overrides the charge projection feature value by using the employee's hourly billing rate value instead of any rate defined on billing rules.
-
Show date and timestamp on reports: Checking this option displays a Generated on date timestamp at the bottom of each report.
-
Show filter set on downloaded reports: If you are using Filter sets to limit or narrow access to various data values, that is, a set of customers or employees, this option displays the filter set on the report to clarify the content presented.
-
Enable date range detailing: Selecting this option enables new date ranges available within custom detail calculations using the Date_Diff function. When enabled, the Date_Diff function can use date ranges such as Today, Last week, and This Month. For example, a custom detail calculation field called Days to Completion would be calculated as Calculated finish date minus Today.
-
Hide the 'Drill down' reports tab: Drill down reports allow reporting with hierarchies and a drill down capability into the various levels of the defined hierarchy. If you are not using hierarchies, you should hide the drill down tab since no additional capabilities are available to report employees.
-
Disable the FTE forecast summary report values which use job code-specific FTE generics: The FTE forecast summary report calculates amounts based on the loaded cost for the Job code. If a generic resource is selected on the job code, costs are calculated on projects that have a generic resource assigned using the work schedule. Choosing this option prevents these costs from being calculated for generic resources and possibly skewing the data presented in the report.
-
In historical utilization calculations, the task type for filtering, subtotaling and detailing is sourced from the project's task instead of the timesheet's task: When calculating historical utilization, by default the Task type value is taken from the timesheet. If this option is selected, the current task type value from the task is used in the calculation instead of that from the timesheet.
-
Enable Purchase date filters on summary reports: Selecting this option provides several date filters to be available for Purchases data in the Summary reports form.
-
Enable Invoices date filters on summary reports: Selecting this option provides several date filters to be available for Invoices data in the Summary reports form.
-
Enable Timesheets date filters on summary reports: Selecting this option provides several date filters to be available for Timesheets data in the Summary reports form.
-
Enable Expense reports date filters on summary reports: Selecting this option provides several date filters to be available for Expense report data in the Summary reports form.
-
Enable custom field date filters on summary reports: Selecting this option provides a date filter for Custom date fields that you have created for your company to be available in the Summary reports form.
-
Enable custom field date filters on detail reports: Selecting this option provides a date filter for Custom date fields that you have created for your company to be available in the Detail reports form.