Introduction
This tutorial covers the details of creating a Format Rule and the Design Time Formatting (DTF) options in web forms. You will format various sections for an Income Statement using multiple Format Rules. You will also duplicate and modify Format Rules. The sections for this tutorial build on each other and should be completed sequentially.
Background
Design Time Formatting (DTF) enables you to combine form design Validation Rules on the web to provide robust formatting capabilities in data forms. You can also combine these with end user formatting capabilities for forms rendered in Oracle Smart View. Both data and metadata can be formatted.
Applies to: Enterprise Profitability and Cost Management, Financial Consolidation and Close, FreeForm, Planning, Tax Reporting
With Design Time Format Rules, forms will now:
- Support most of the formatting capabilities from Smart View client such as borders, colors, font sizes, fonts, numeric formats, and so on
- Allow Rules to be created for pure formatting purposes in addition to today’s Data Validation Rules
- Allow Format Rules to be applied to header and metadata cells in addition to data cells
Prerequisites
Cloud EPM Hands-on Tutorials may require you to import a snapshot into your Cloud EPM Enterprise Service instance. Before you can import a tutorial snapshot, you must request another Cloud EPM Enterprise Service instance or remove your current application and business process. The tutorial snapshot will not import over your existing application or business process, nor will it automatically replace or restore the application or business process you are currently working with.
Before starting this tutorial, you must:
- Have Service Administrator access to a Cloud EPM Enterprise Service instance.
- Import this snapshot into your instance. The examples provided in this tutorial use the snapshot.
Note:
If you run into migration errors importing the snapshot, re-run the migration excluding the HSS-Shared Services component, as well as the Security and User Preferences artifacts in the Core component. For more information on uploading and importing snapshots, refer to the Administering Migration for Oracle Enterprise Performance Management Cloud documentation.Assigning values to User Variables
User Variables were added when the business process was created. User variables act as filters in forms, enabling planners to focus only on certain members. In this section, you set values for user variables.
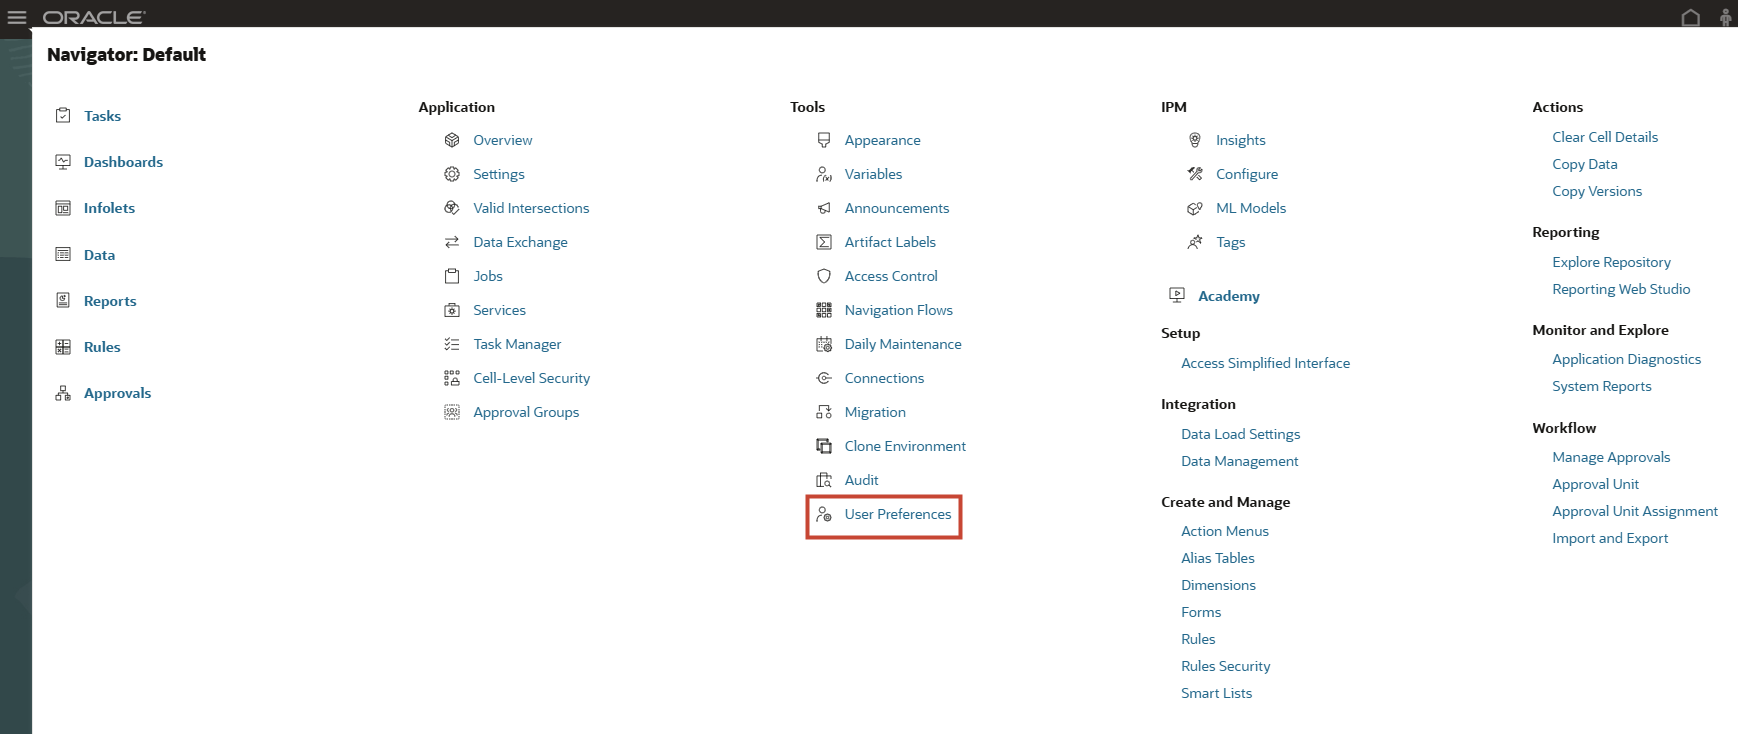
- On the home page, click
 (Navigator), and under Tools, click User Preferences.
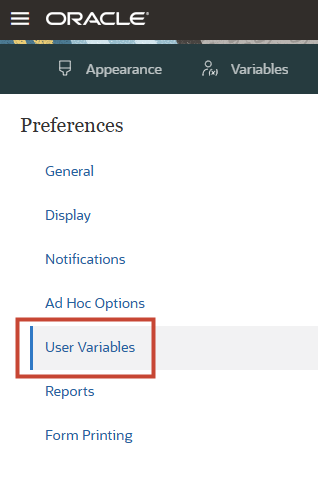
- Under Preferences, click User Variables.
- Click
 (Member Selector) to select each variable's value.
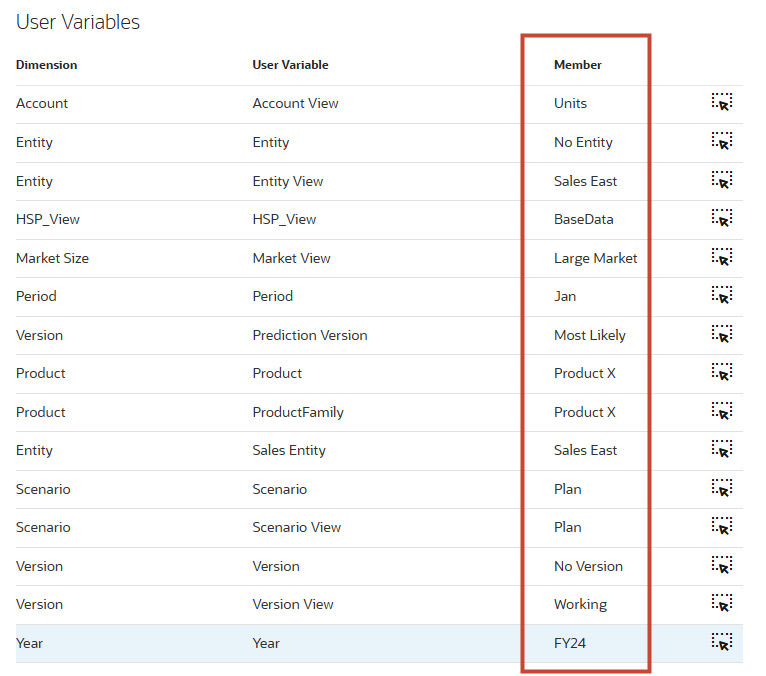
Tip:
You can also type and enter the values under Member for each Dimension. - Verify your selections and click Save.
- At the information message, click OK.
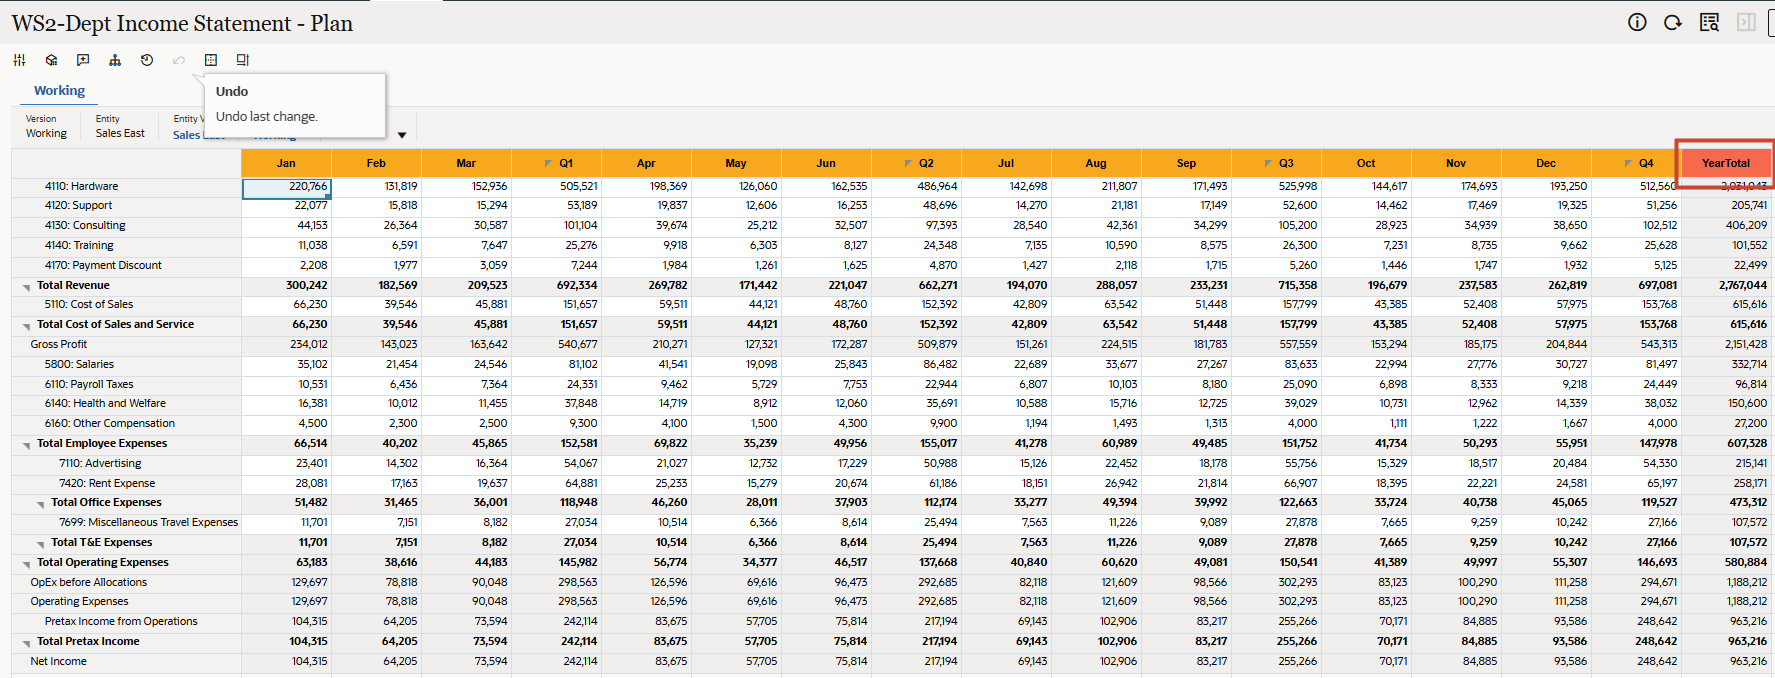
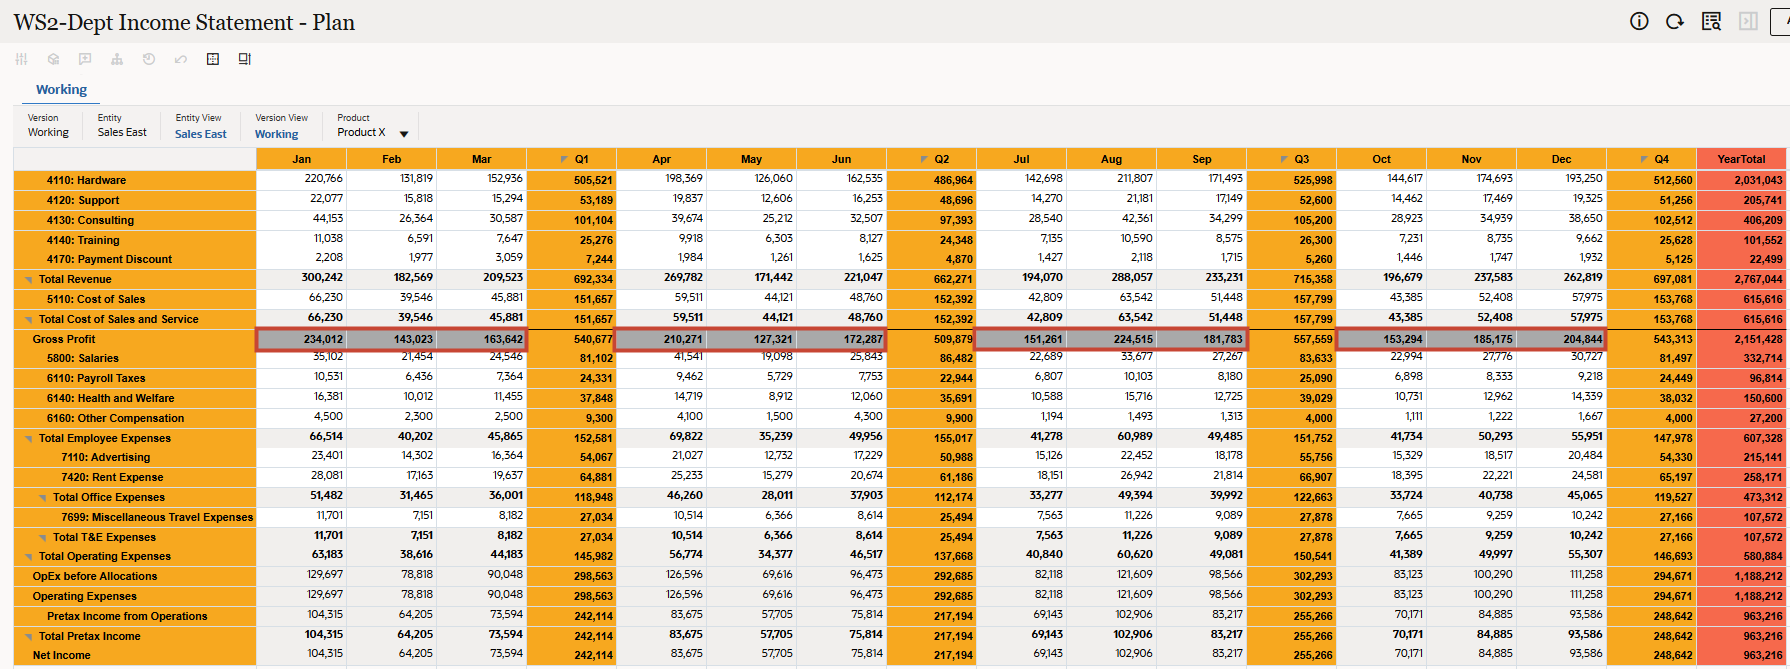
Validating form for no Format Rule
In this section, you will validate a form for no Format Rule applied to it. In the later sections, you will create and apply Format Rule to the same form.
-
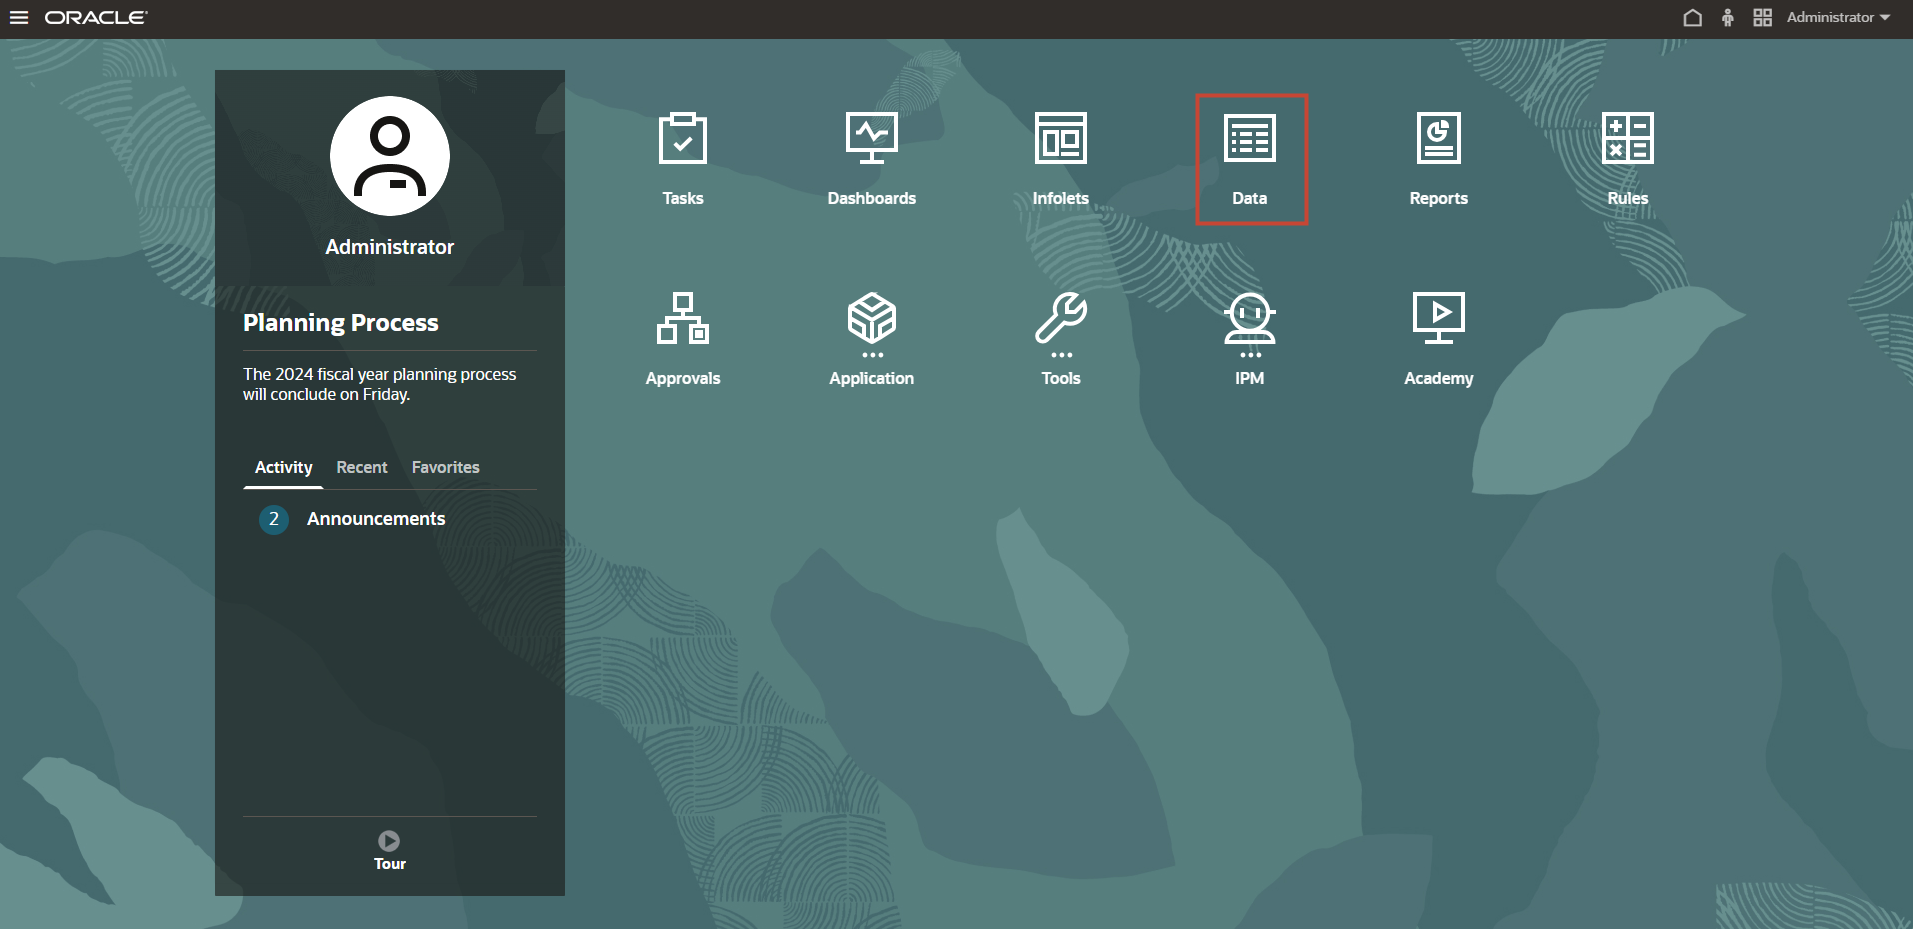
On the home page, click Data.
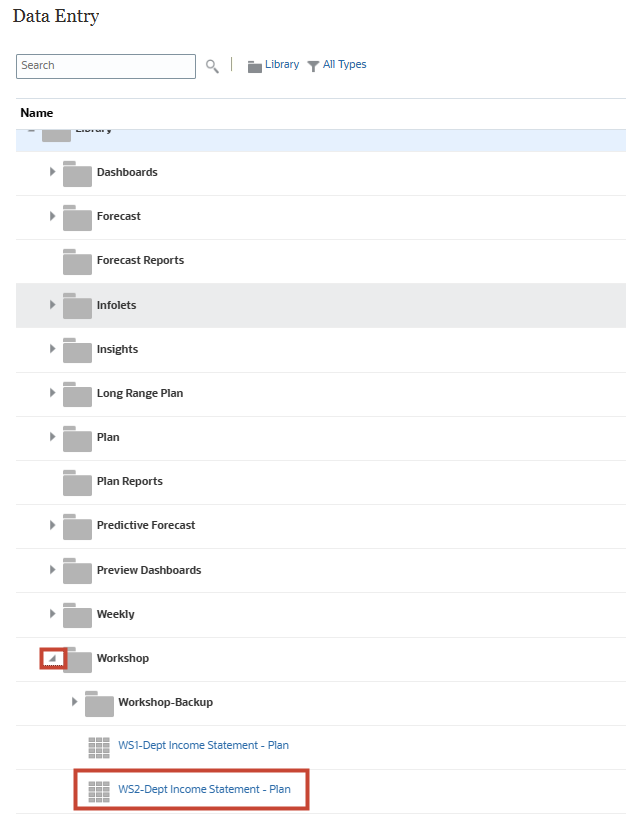
- In Data Entry, under Library, expand Workshop.
In this example, the forms displayed are part of the application provided in the Prerequisites section of this tutorial. When you create your business process, the cubes do not contain data.
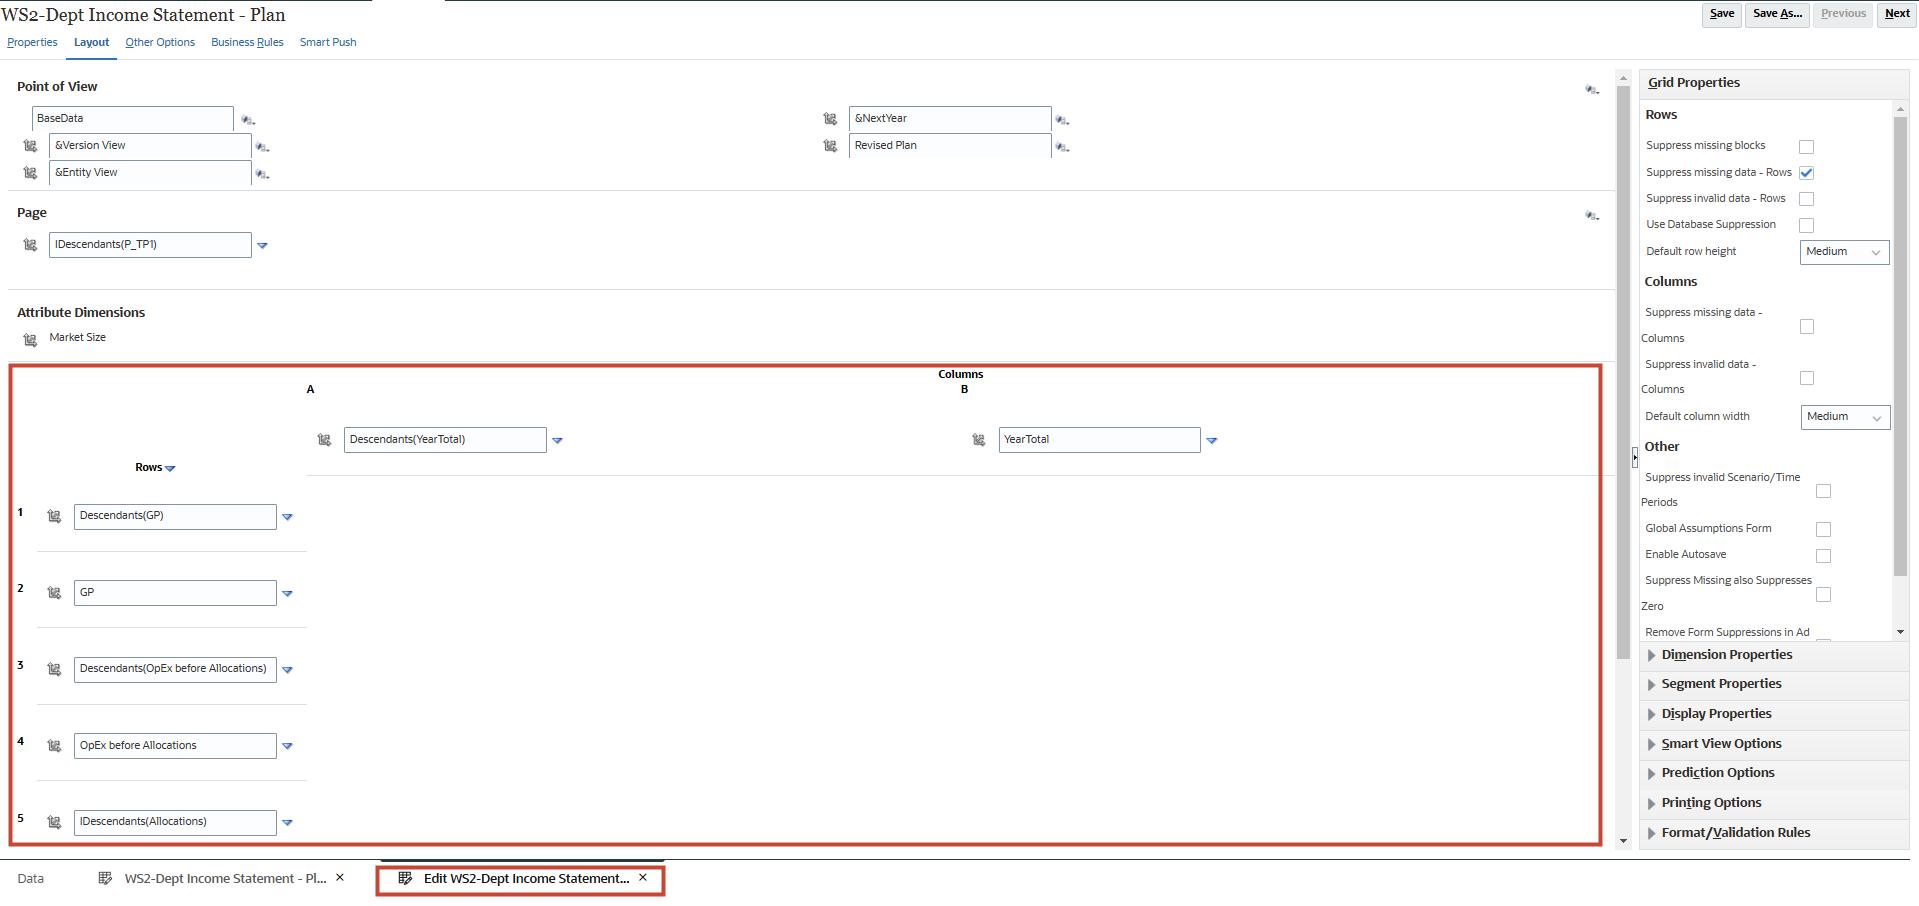
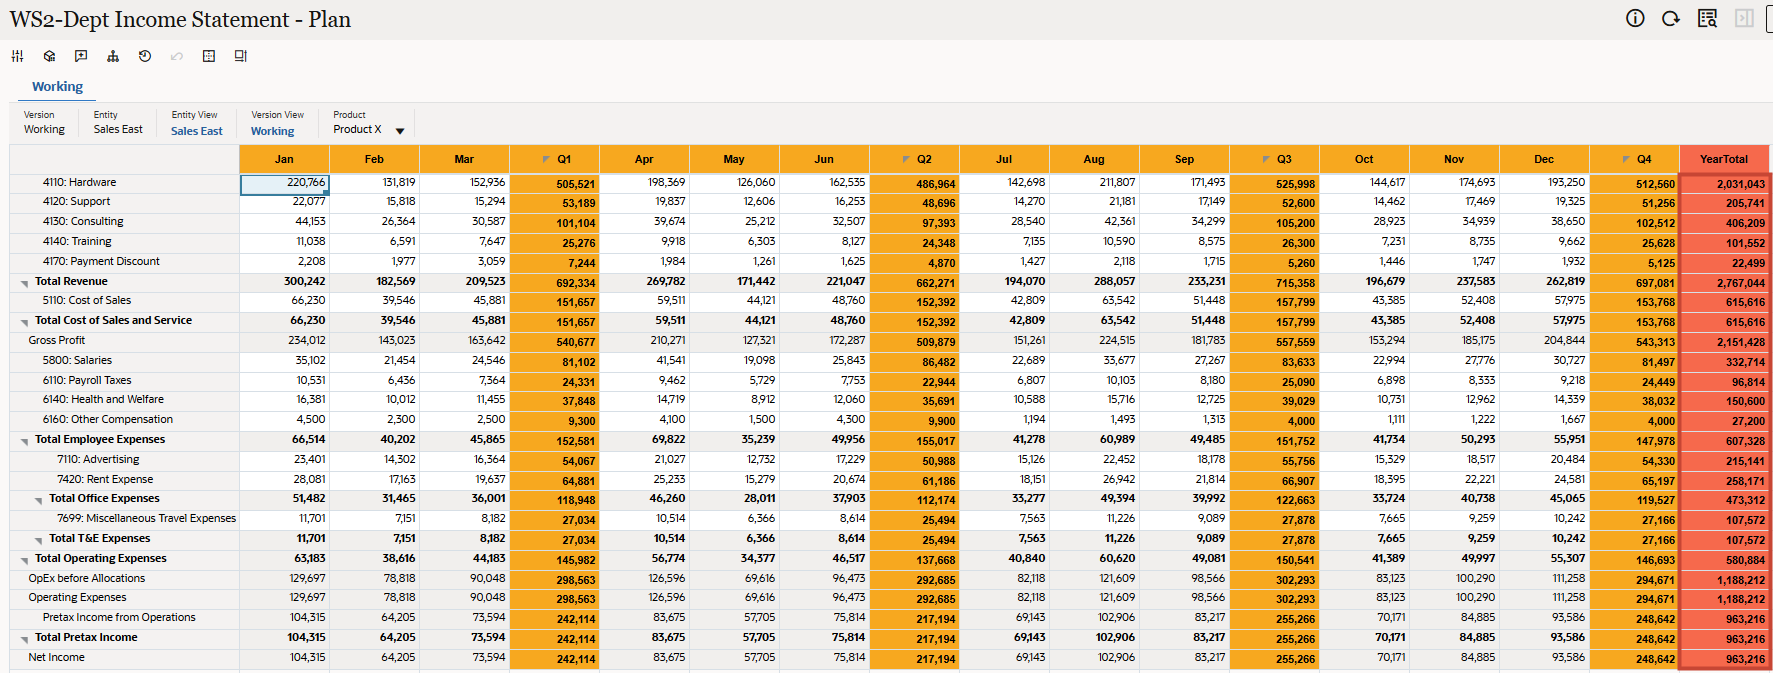
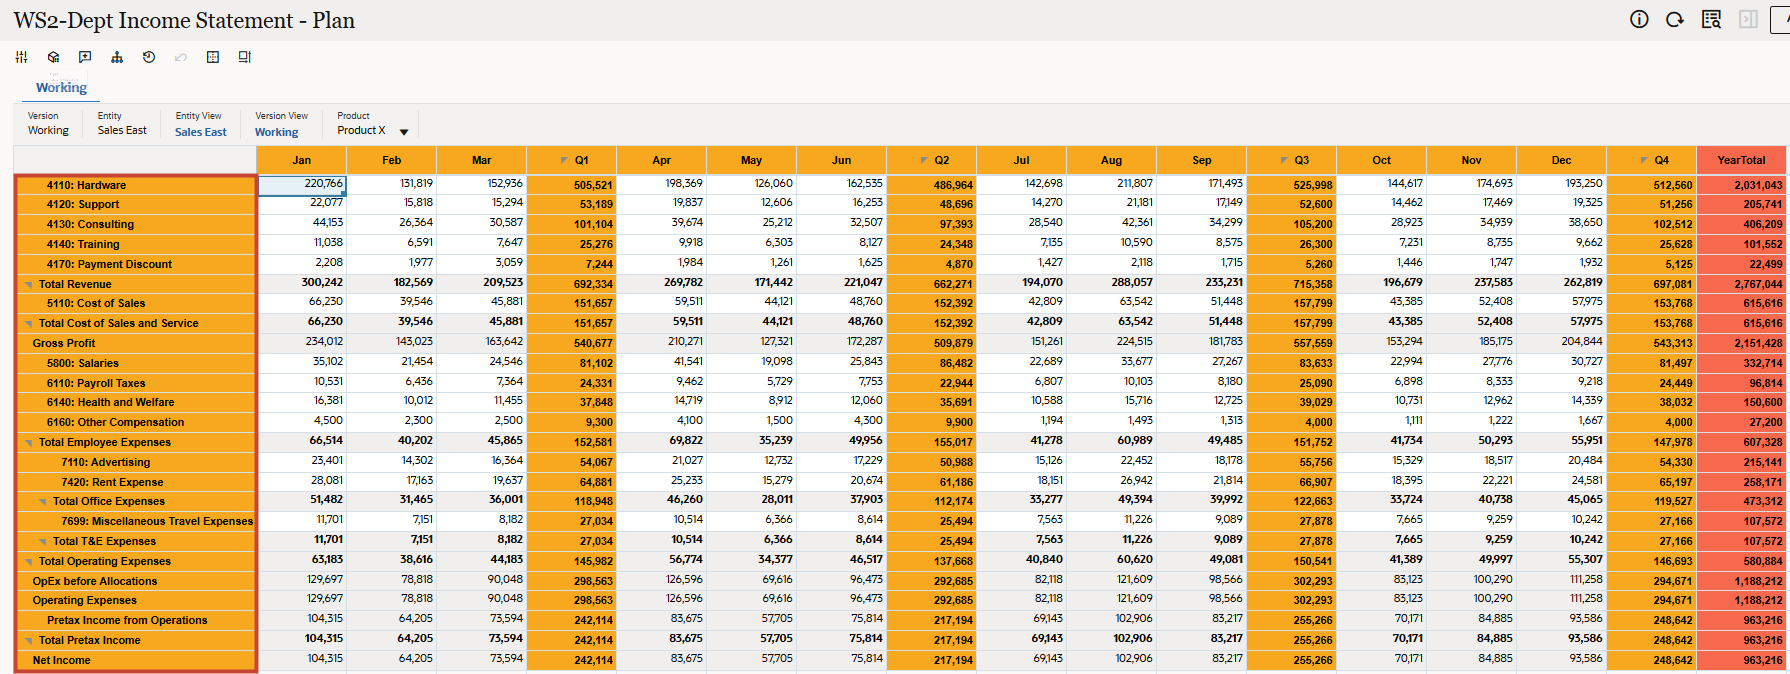
- Click WS2-Dept Income Statement – Plan.
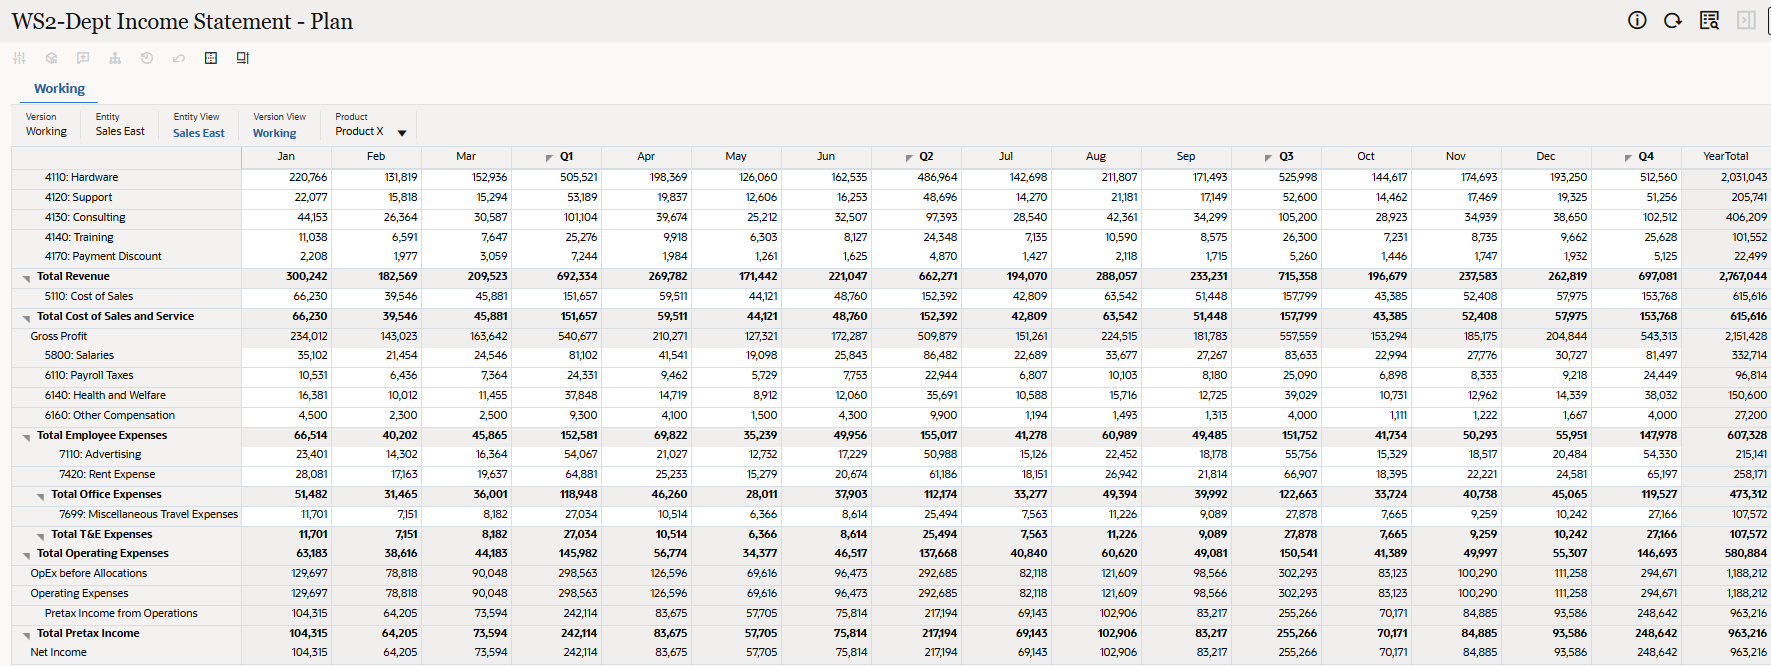
The form with an unformatted Data Grid is displayed.
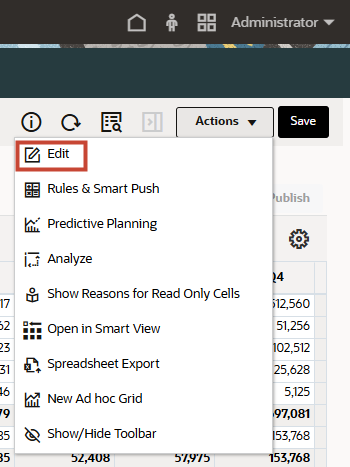
- On the right, click Actions, then click Edit.
A Dynamic Tab (with the prefix Edit) opens with Forms Designer for the selected Data Grid.
Note:
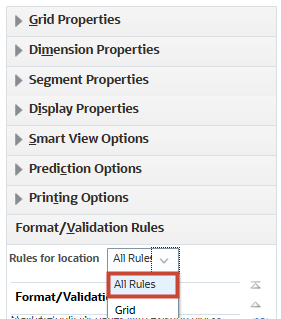
In the layout section, if Column / Row Elements are shown with background (green) color, it indicates that there exists a format rule for the form. However, in this case none of the elements are shown with background (green) color. - In the right panel, click Format/Validation Rules.
- In Format/Validation Rules, for Rules for location select All Rules.
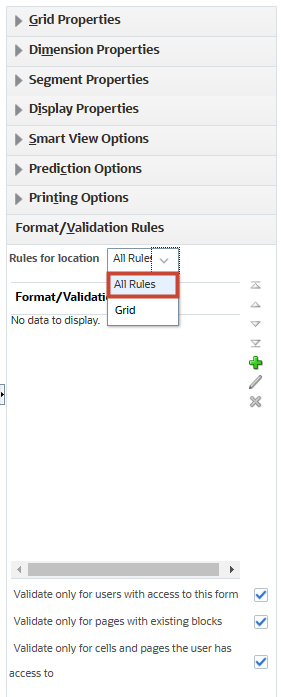
Note:
You can see that there are no Rules available – which denotes that so far, there are no Format or Data Validation Rules defined for this form.
Creating Format Rules in Forms
Format rules are defined by Administrators on the Layout tab of the Form Designer. You can add format rules at the grid, row, row metadata cell, column, column metadata cell, or cell level. Areas on the Layout tab with a green background, indicate locations where rules have been defined. In this section, you will create Format Rules for formatting multiple sections of a form.
Creating Format Rule to format Column Headers
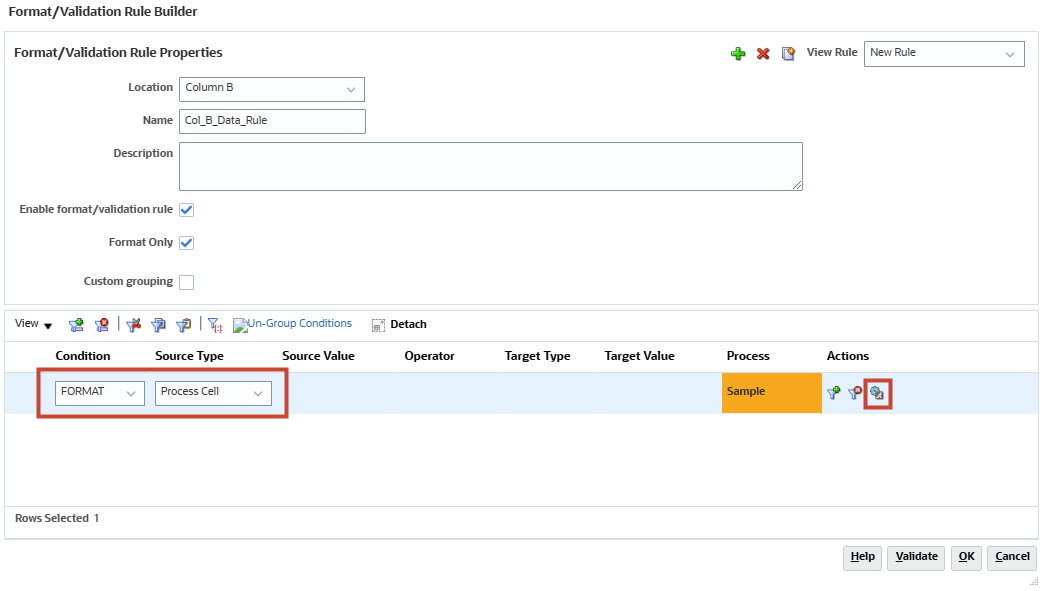
- In Format/Validation Rules, click
 (Create).
 - In Format/Validation Rule Builder, select and enter values:
Location Column A Metadata Name Col_A_Metadata_Rule Enable format/validation rule Enabled Format only Enabled 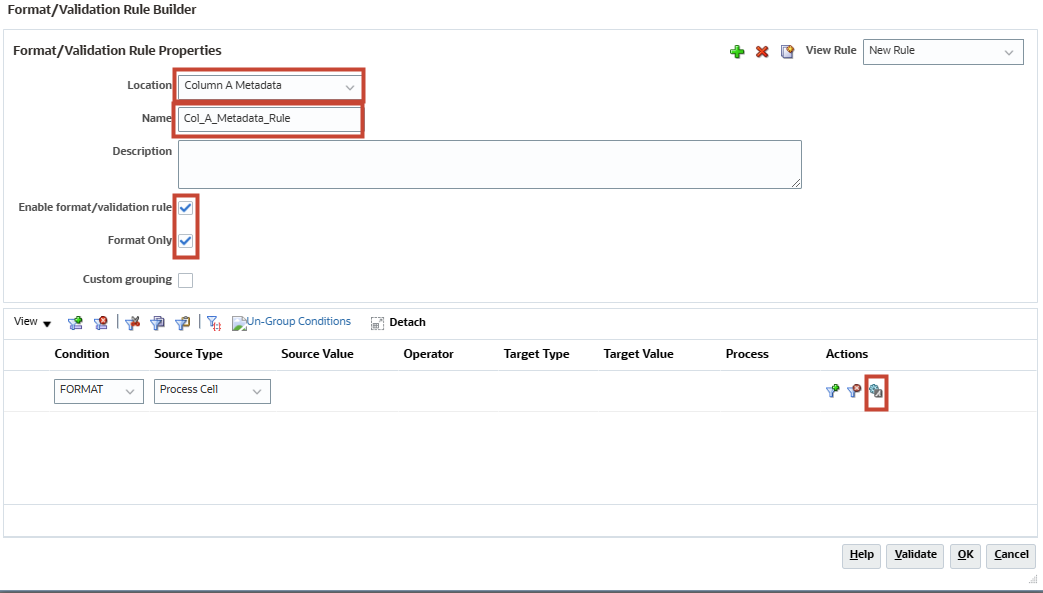
Note:
-
Enable format/validation rule: Select to make the Format/Validation Rule available in forms. You can temporarily disable a Format/Validation Rule by clearing this checkbox.
-
Format Only: Select to mark a Rule as Format only. This option is automatically enabled when a Format only Rule is created.
- Cell formatting for each Rule is displayed in the Process column for that Rule.
-
- In Format/Validation Rule Builder, under Actions click
 (Process Cell).
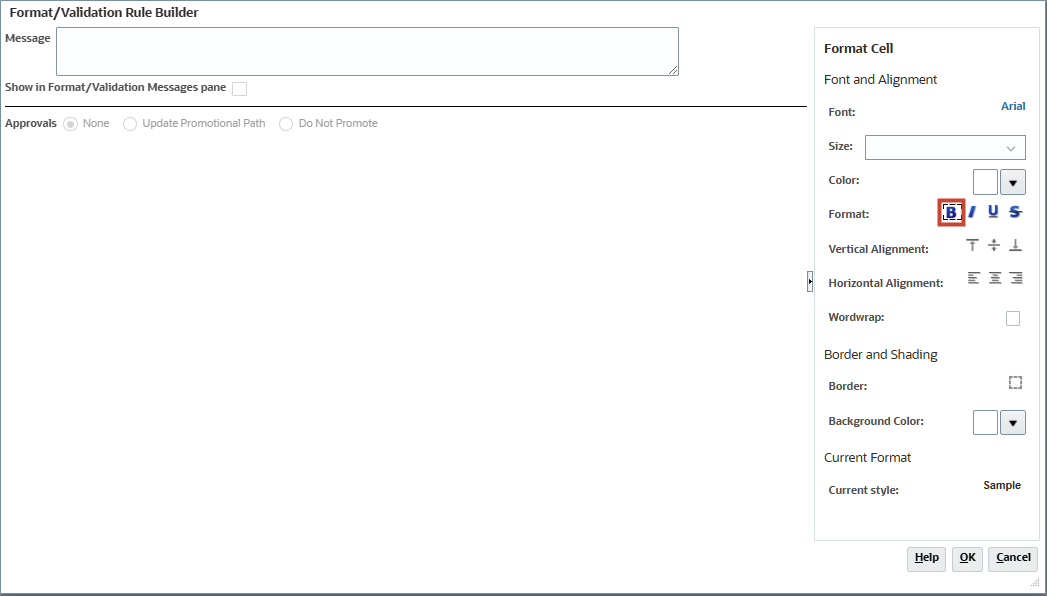
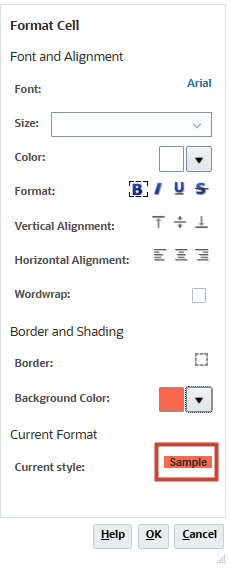
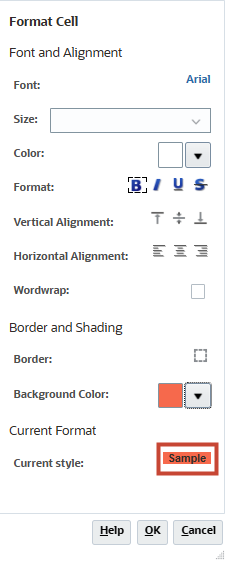
 - On the right under Format Cell, under Font and Alignment, for Format click
 (Bold).
Note:
- You can add tooltip text to the Message field. At runtime, when you hover the mouse over the location on the form that is formatted, you see the tooltip.
- The Show in Format/Validation Messages page checkbox is disabled for Format only Rules and, consequently, messages will not appear in the Data Validation Messages pane in forms.
- The Approvals options are also disabled.
- On the right under Format Cell, for Background Color click
 (Popup selector).

Note:
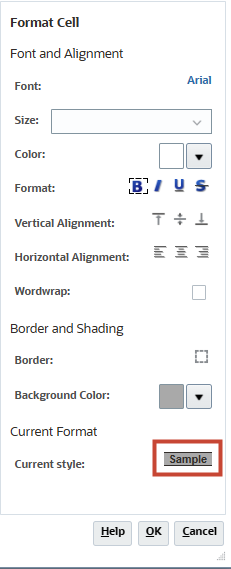
- Options available for Font and Alignment, including Font, Size, Color, Format, Vertical Alignment, Horizontal Alignment, and Wordwrap.
- Options available for Border and Shading, including Border (Left, Top, Right, Bottom, and All) and Background Color.
- As options are selected, the Current Format displays how it would appear when displayed on the form.
- In the Color Picker, select Orange – FFA500.

Tip:
Keep the mouse over a color to see its details as tooltip.As soon as the new background color is picked, the Current Style displays the newly picked color.
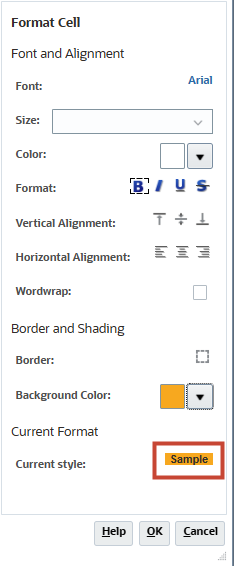
- Click OK.
- In Format/Validation Rule Builder, click OK.
- Click Save.
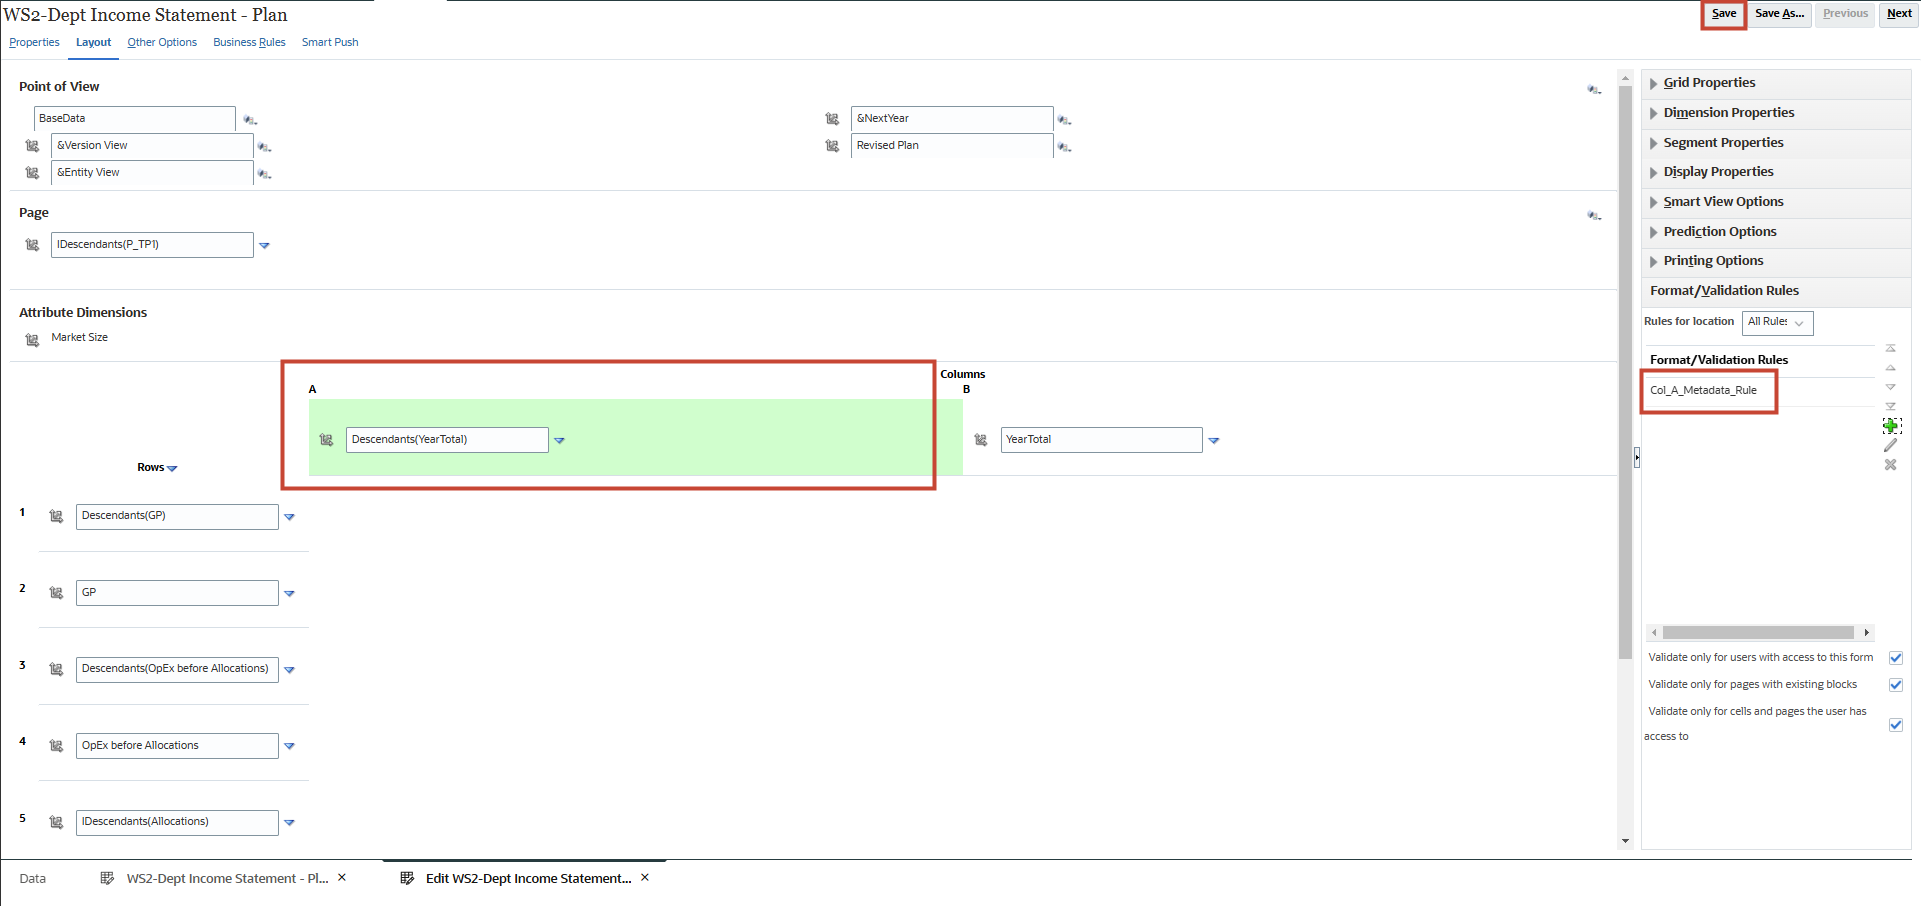
Note:
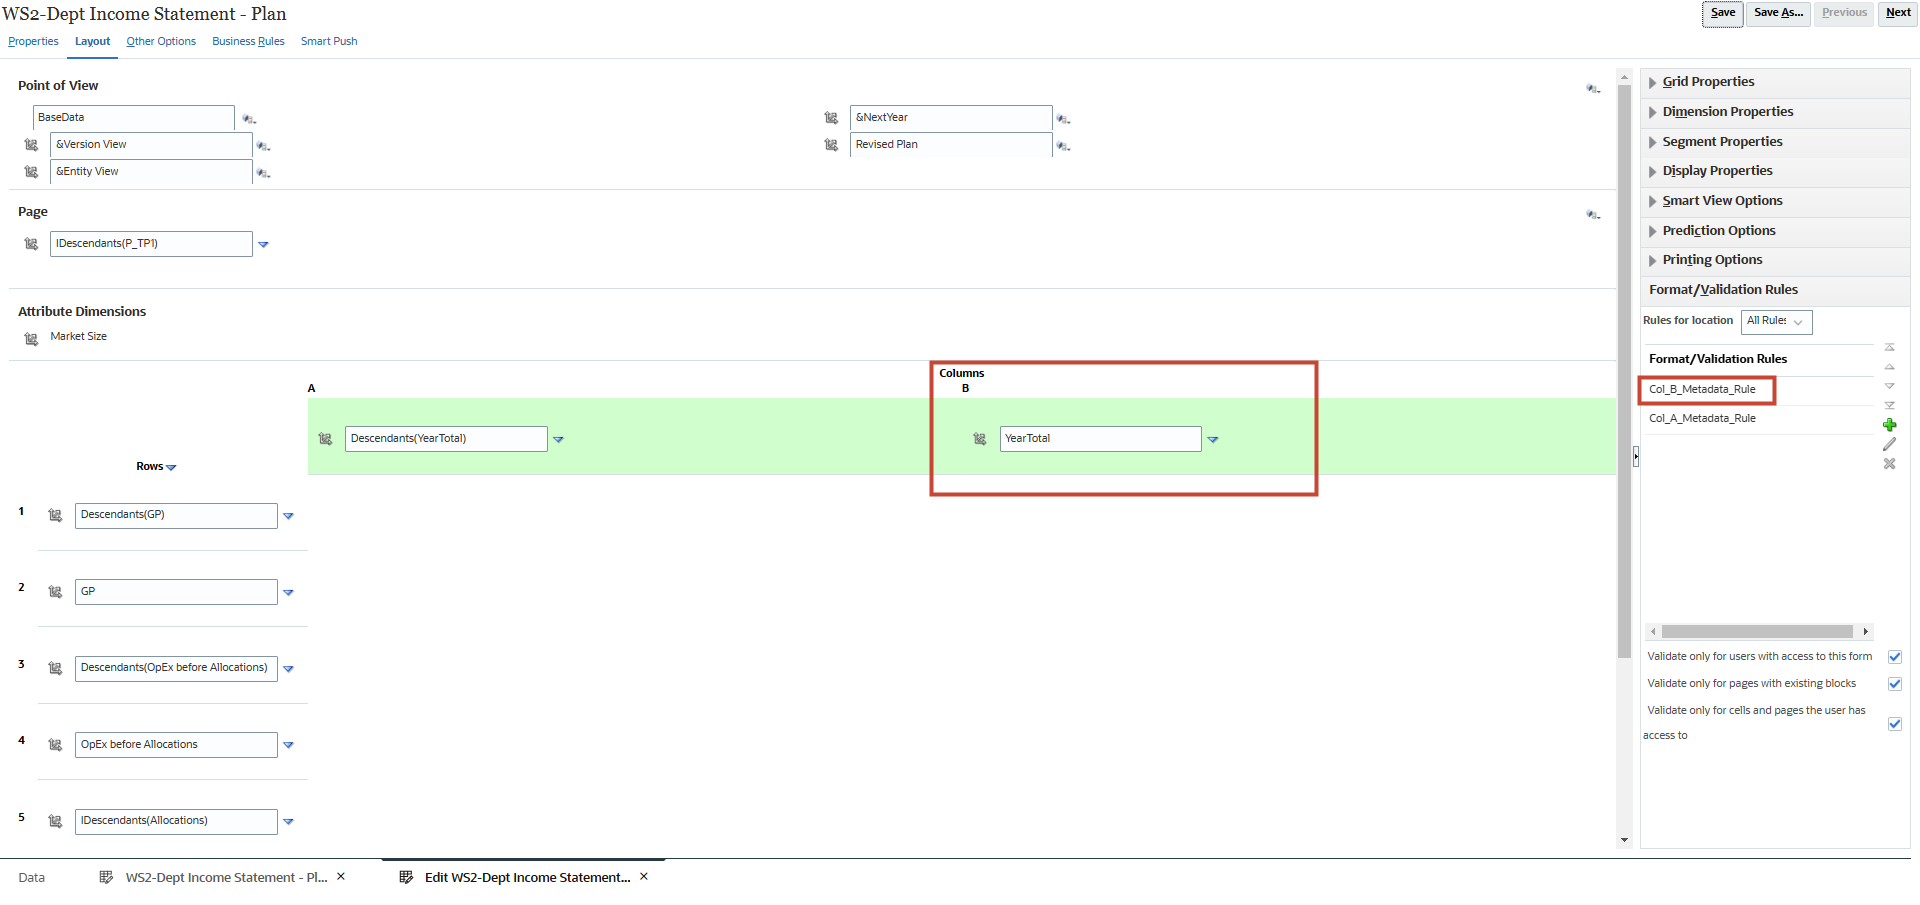
The Col_A_Metadata_Rule Format Rule is listed under Format/Validation Rules. Also, in the Layout designer canvas, the header for Column A is shown with a colored background indicating the section will be applied with the Format Rule. - In Information, click OK.
- In the bottom tabs, click WS2-Dept Income Statement - Plan.

In the runtime form, it is now easier to distinguish column headers.
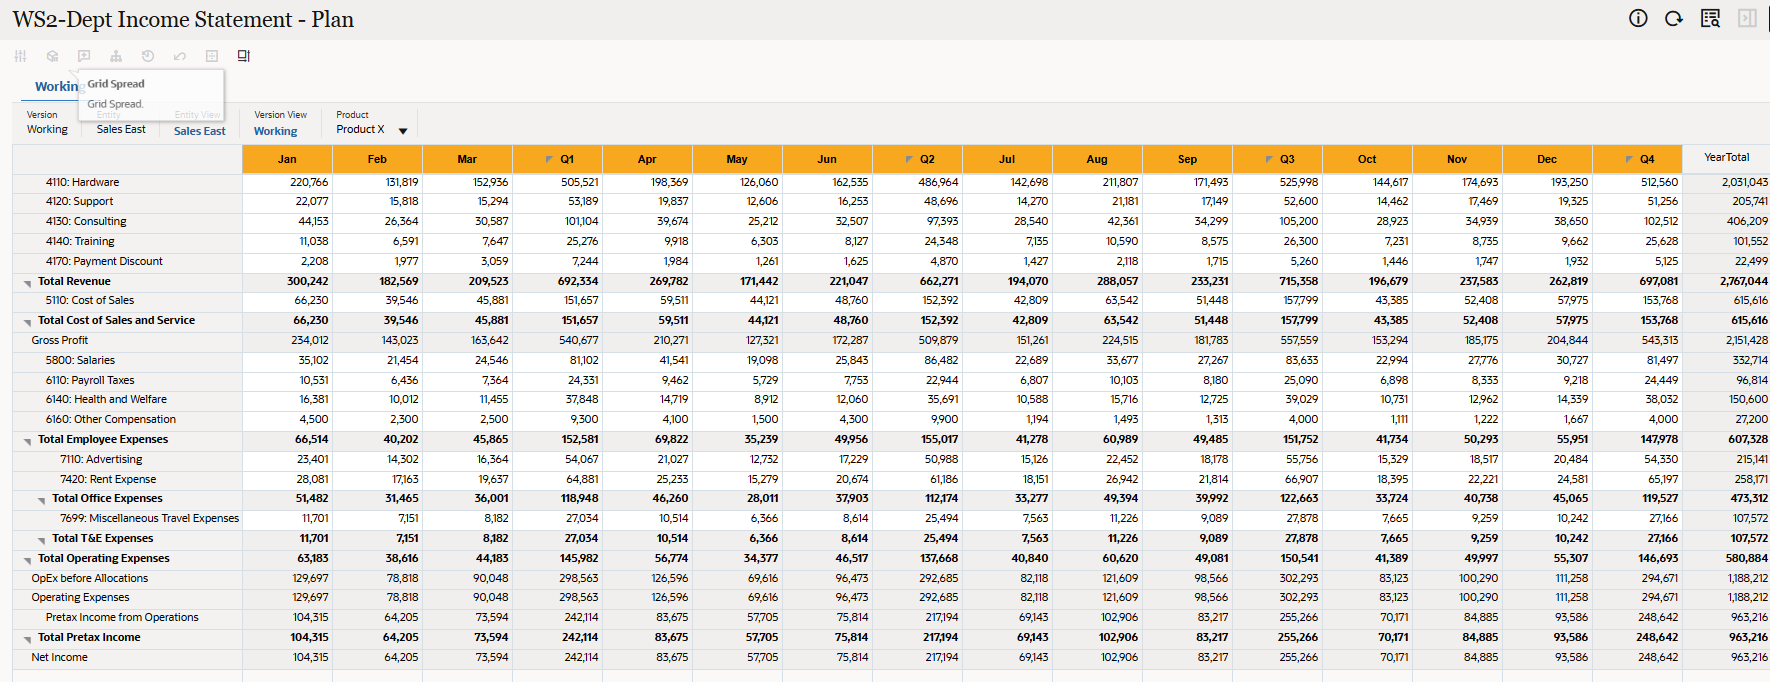
Tip:
You can use the browser zoom function or the scroll bars on the form for better visibility.
Creating Format Rule to format YearTotal Column Header
- In the bottom tabs, click Edit WS2-Dept Income Statement - Plan.

- In the right panel, click Format/Validation Rules.
- In Format/Validation Rules, for Rules for location select All Rules.
- In Format/Validation Rules, click (Create).
- In Format/Validation Rule Builder, select and enter values:
Location Column B Metadata Name Col_B_Metadata_Rule Enable format/validation rule Enabled Format only Enabled 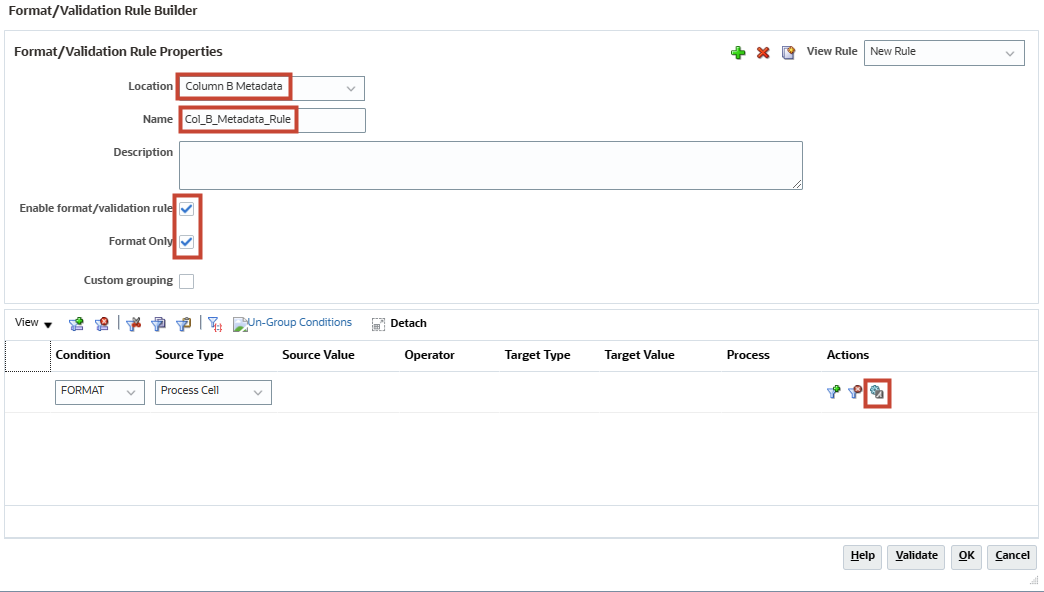
- In Format/Validation Rule Builder, under Actions click (Process Cell).
- On the right under Format Cell, under Font and Alignment, for Format click (Bold).
- On the right under Format Cell, for Background Color click (Popup selector).
- In the Color Picker, select Tomato – FF6347.

Tip:
Keep the mouse over a color to see its details as tooltip.As soon as the new background color is picked, the Current Style displays the newly picked color.
- Click OK.
- In Format/Validation Rule Builder, click OK.
- Click Save.
Note:
The newly created Format Rule is listed under Format/Validation Rules. Also, in the Layout designer canvas, the header for Column B is shown with a colored background indicating the section will be applied with the Format Rule. - In Information, click OK.
- In the bottom tabs, click WS2-Dept Income Statement - Plan.
In the runtime form, it is now easier to distinguish YearTotal header.
Tip:
You can use the browser zoom function or the scroll bars on the form for better visibility.
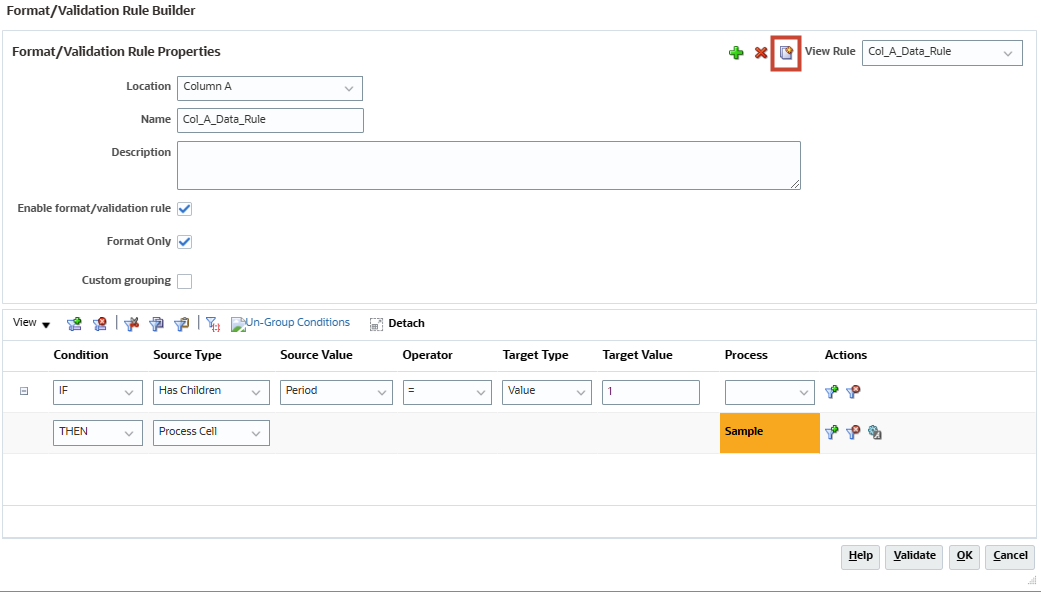
Creating Format Rule to format Quarterly Totals
- In the bottom tabs, click Edit WS2-Dept Income Statement - Plan.
- In the right panel, click Format/Validation Rules.
- In Format/Validation Rules, for Rules for location select All Rules.
- In Format/Validation Rules, click (Create).
- In Format/Validation Rule Builder, select and enter values:
Location Column A Name Col_A_Data_Rule Enable format/validation rule Enabled Format only Enabled Condition IF Source Type Has Children Source Value Period Operator = Target Type Value Target Value 1 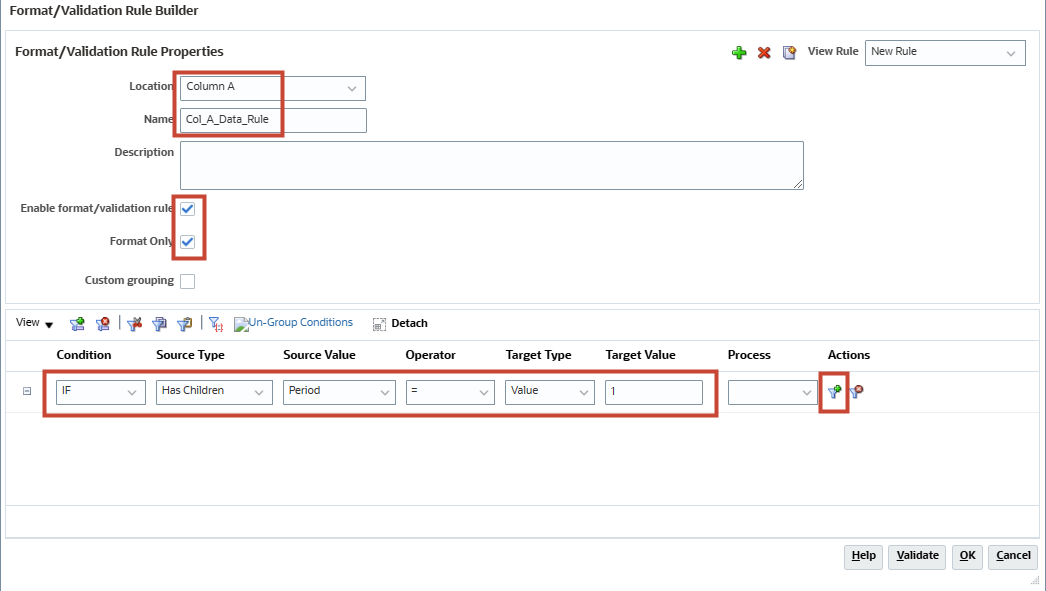
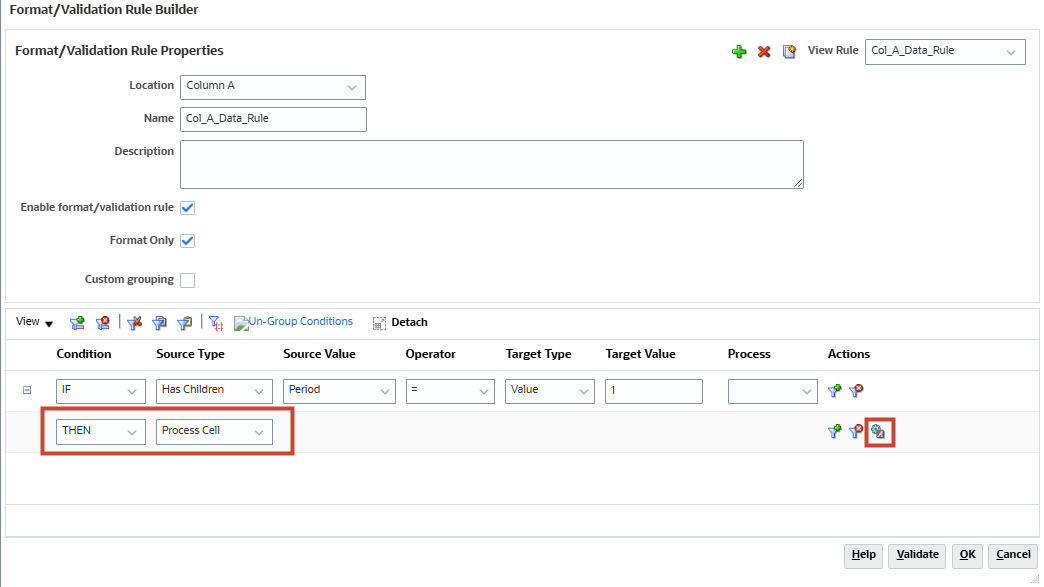
- In Format/Validation Rule Builder, under Actions click
 (Add Condition).
A new row is added for more conditions.
- For the new row, select and enter values:
Condition THEN Source Type Process Cell - For the new row, under Actions click (Process Cell).
- On the right under Format Cell, under Font and Alignment, for Format click (Bold).
- On the right under Format Cell, for Background Color click (Popup selector).
- In the Color Picker, select Orange – FFA500.
Tip:
Keep the mouse over a color to see its details as tooltip.As soon as the new background color is picked, the Current Style displays the newly picked color.
- Click OK.
- In Format/Validation Rule Builder, click OK.
- Click Save.
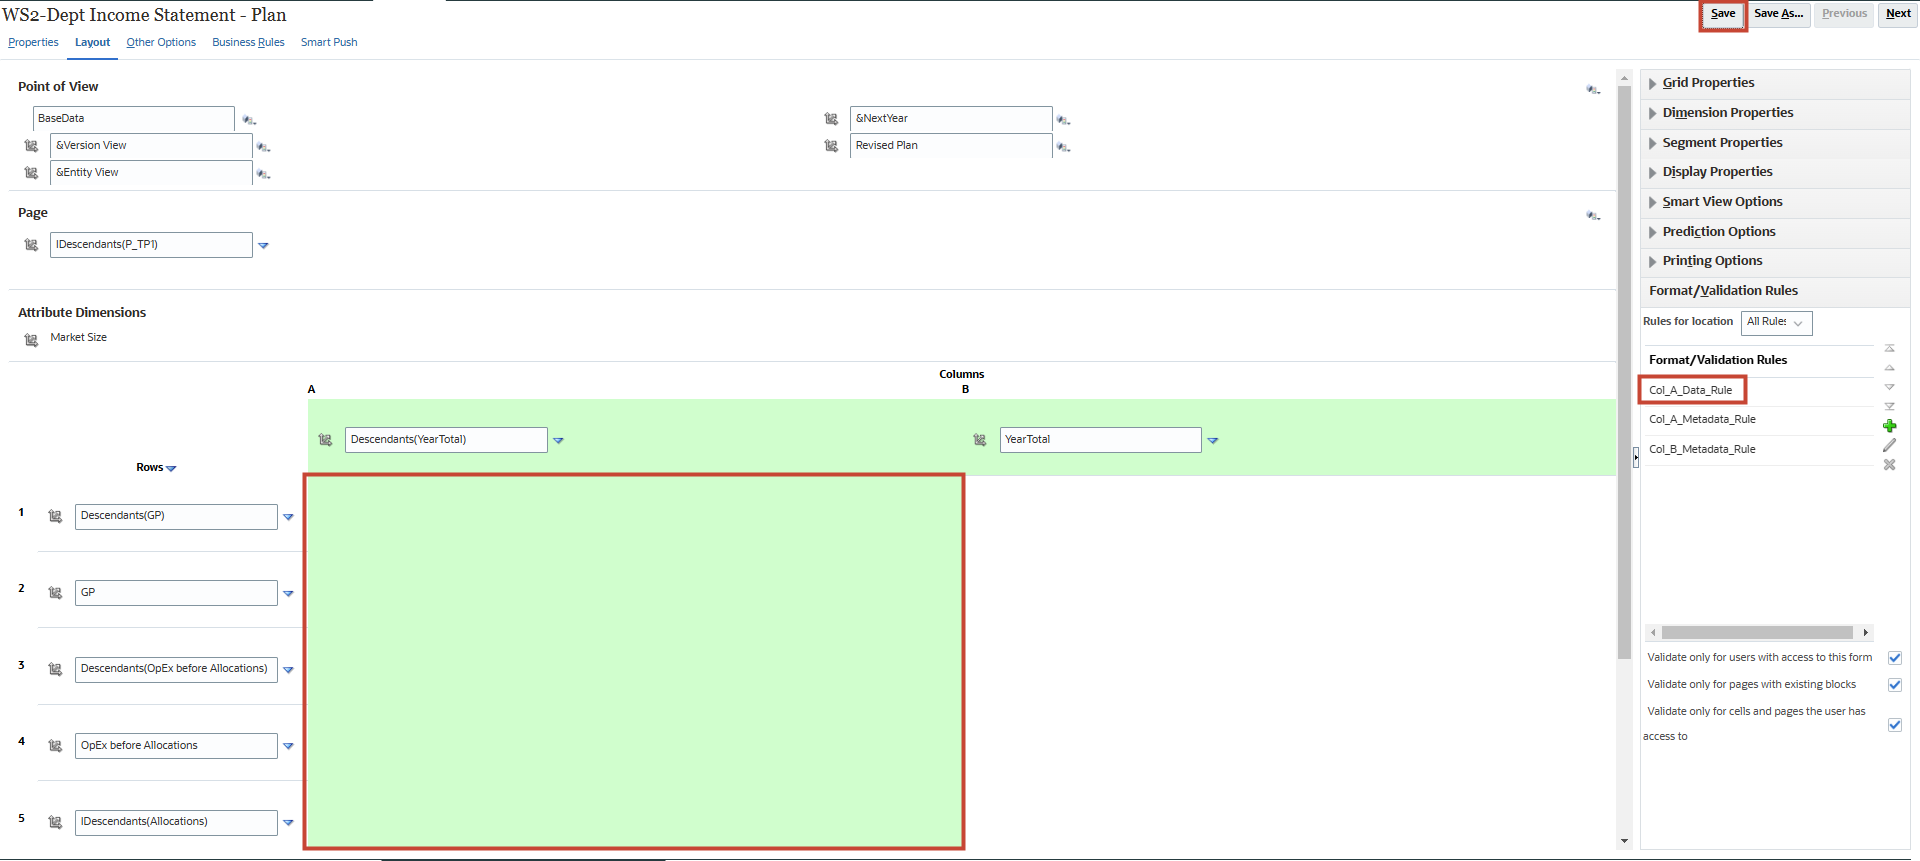
Note:
The newly created Format Rule is listed under Format/Validation Rules. Also, in the Layout designer canvas, the corresponding section is shown with a colored background indicating that the section will be applied with the Format Rule. - In Information, click OK.
- In the bottom tabs, click WS2-Dept Income Statement - Plan.
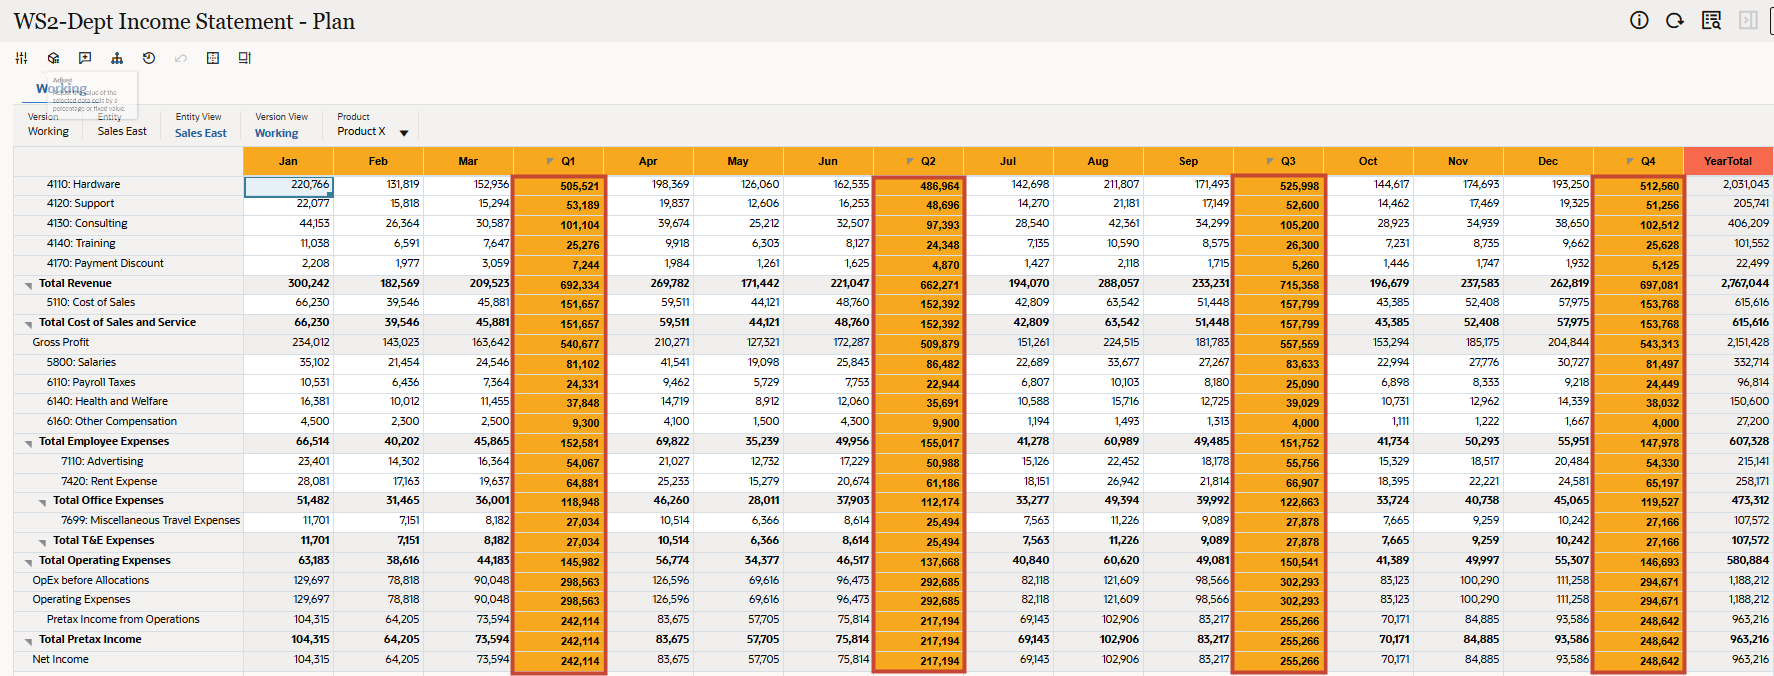
In the runtime form, it is now easier to distinguish columns with Quarterly Totals.
Tip:
You can use the browser zoom function or the scroll bars on the form for better visibility.
Duplicating a Format Rule to format YearTotal column data
- In the bottom tabs, click Edit WS2-Dept Income Statement - Plan.
- In the right panel, click Format/Validation Rules.
- In Format/Validation Rules, for Rules for location select All Rules.
- In Format/Validation Rules, select Col_A_Data_Rule and then click
 (Edit Validation Rule).
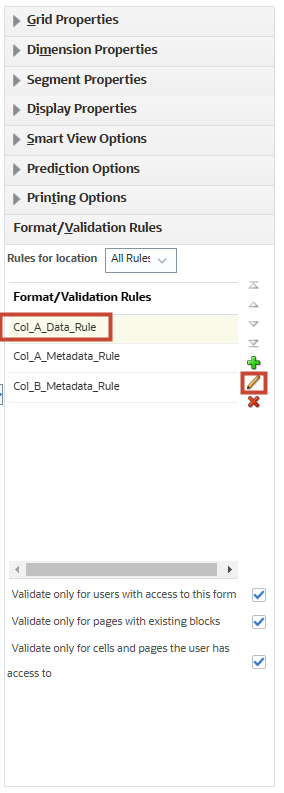
- In Format/Validation Rule Builder, click
 (Duplicate).
The Format/Validation Rule Builder page is populated with all the conditions from source Rule. However, the name for the rule changes to New Rule indicating successful duplicate rule.
- In Format/Validation Rule Builder, select and enter values:
Location Column B Name Col_B_Data_Rule Enable format/validation rule Enabled Format only Enabled 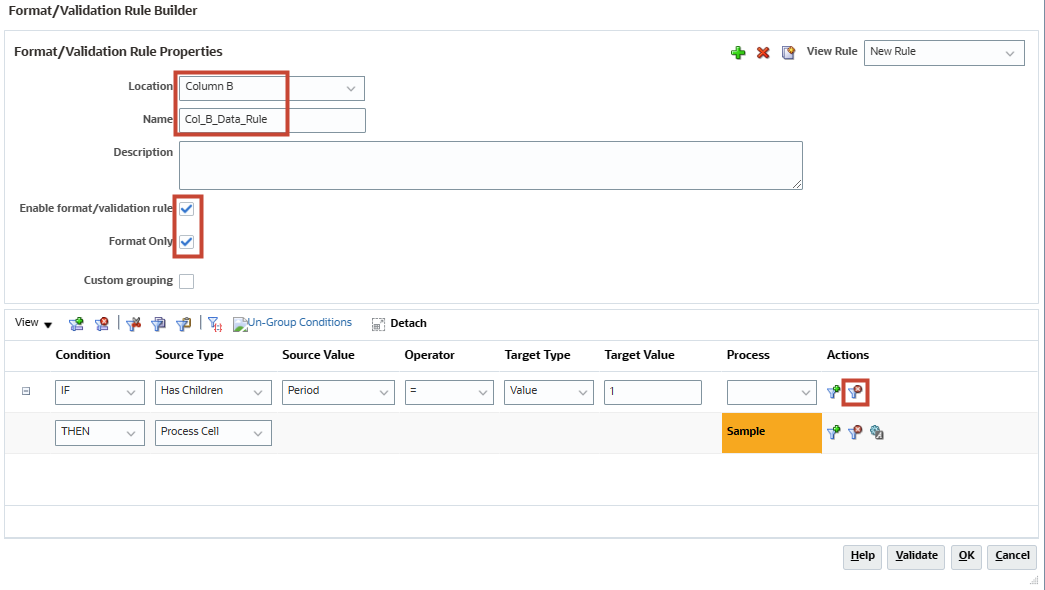
- In Format/Validation Rule Builder, under Actions click
 (Delete Condition).
Row is deleted.
- In the remaining Condition row, select and enter values:
Condition FORMAT Source Type Process Cell - For the same condition row, under Actions click (Process Cell).
- On the right under Format Cell, under Font and Alignment, for Format click (Bold).
Tip:
The Bold setting may be already enabled as this rule was duplicated. You can validate the setting under the Current Style below. - On the right under Format Cell, for Background Color click (Popup selector).
- In the Color Picker, select Tomato – FF6347.
Tip:
Keep the mouse over a color to see its details as tooltip.As soon as the new background color is picked, the Current Style displays the newly picked color.
- Click OK.
- In Format/Validation Rule Builder, click OK.
- Click Save.
The newly created Format Rule is listed under Format/Validation Rules. Also, in the Layout designer canvas, the corresponding section is shown with a colored background indicating that the section will be applied with the Format Rule.
- In Information, click OK.
- In the bottom tabs, click WS2-Dept Income Statement - Plan.
In the runtime form, it is now easier to distinguish the totals for YearTotal.
Tip:
You can use the browser zoom function or the scroll bars on the form for better visibility.
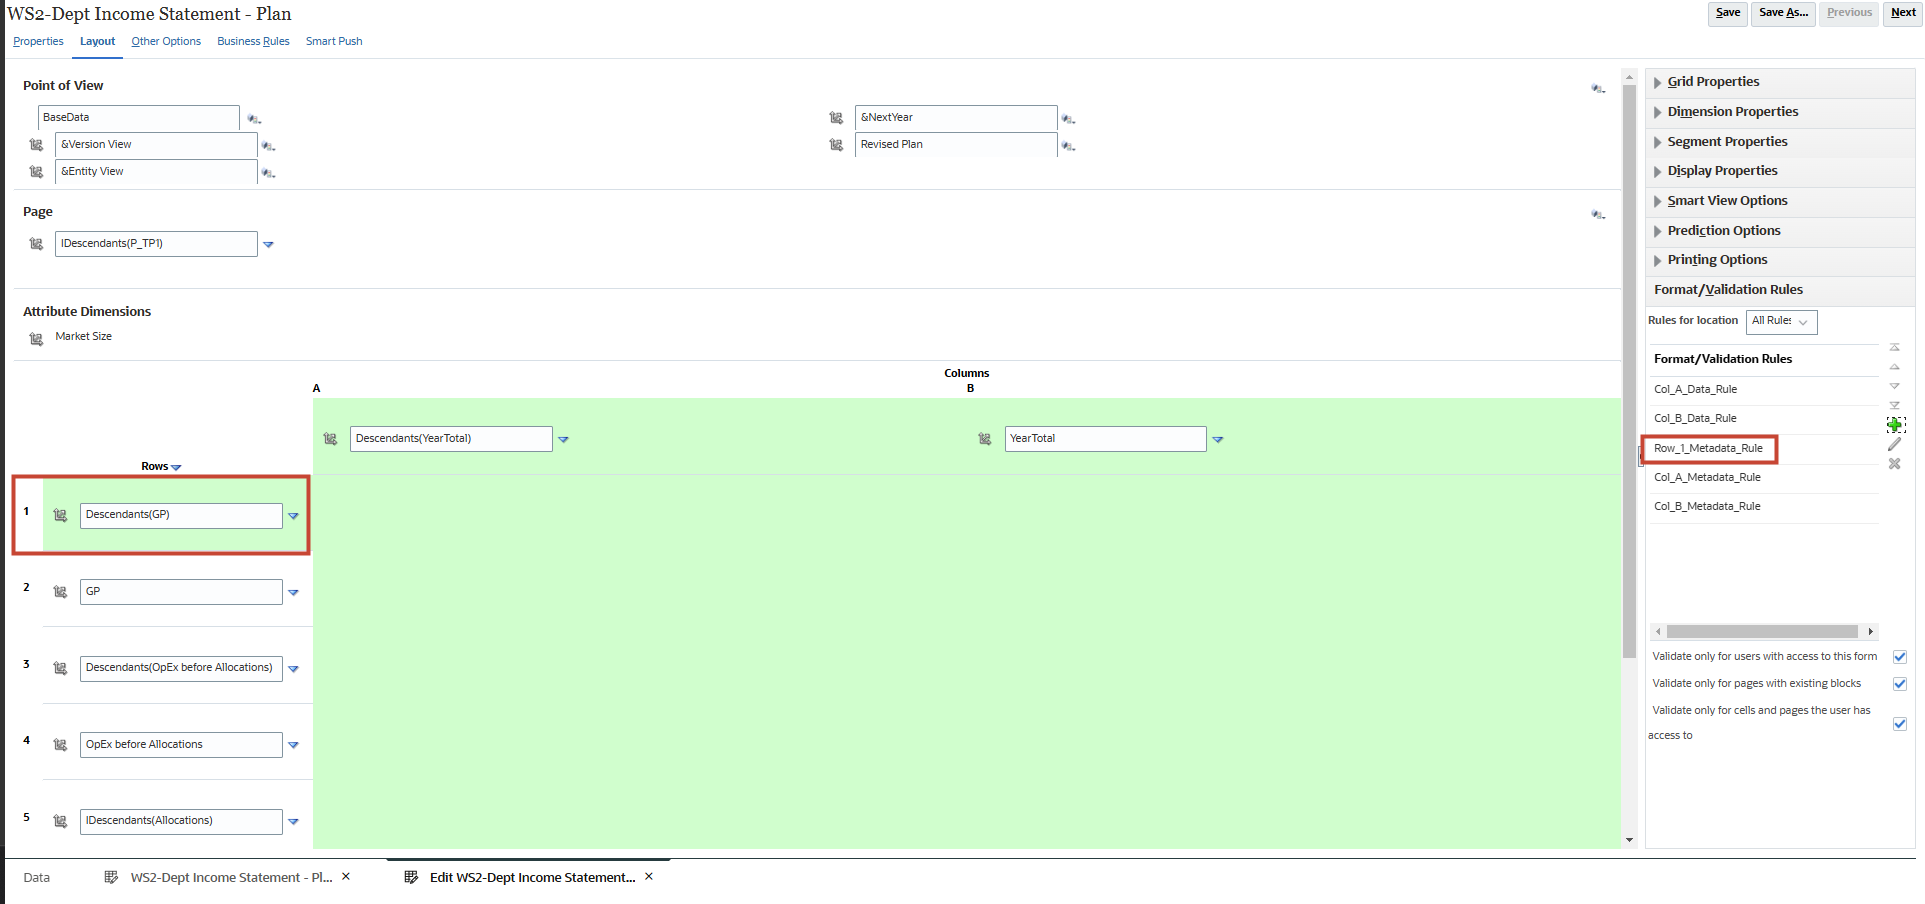
Creating Format Rule to format header for Row 1 of Account Members
- In the bottom tabs, click Edit WS2-Dept Income Statement - Plan.
- In the right panel, click Format/Validation Rules.
- In Format/Validation Rules, for Rules for location select All Rules.
- In Format/Validation Rules, click (Create).
- In Format/Validation Rule Builder, select and enter values:
Location Row 1 Metadata Name Row_1_Metadata_Rule Enable format/validation rule Enabled Format only Enabled - In Format/Validation Rule Builder, under Actions click (Process Cell).
- On the right under Format Cell, under Font and Alignment, for Format click (Bold).
- On the right under Format Cell, for Background Color click (Popup selector).
- In the Color Picker, select Orange – FFA500.
Tip:
Keep the mouse over a color to see its details as tooltip.As soon as the new background color is picked, the Current Style displays the newly picked color.
- Click OK.
- Validate the selections and in Format/Validation Rule Builder, click OK.
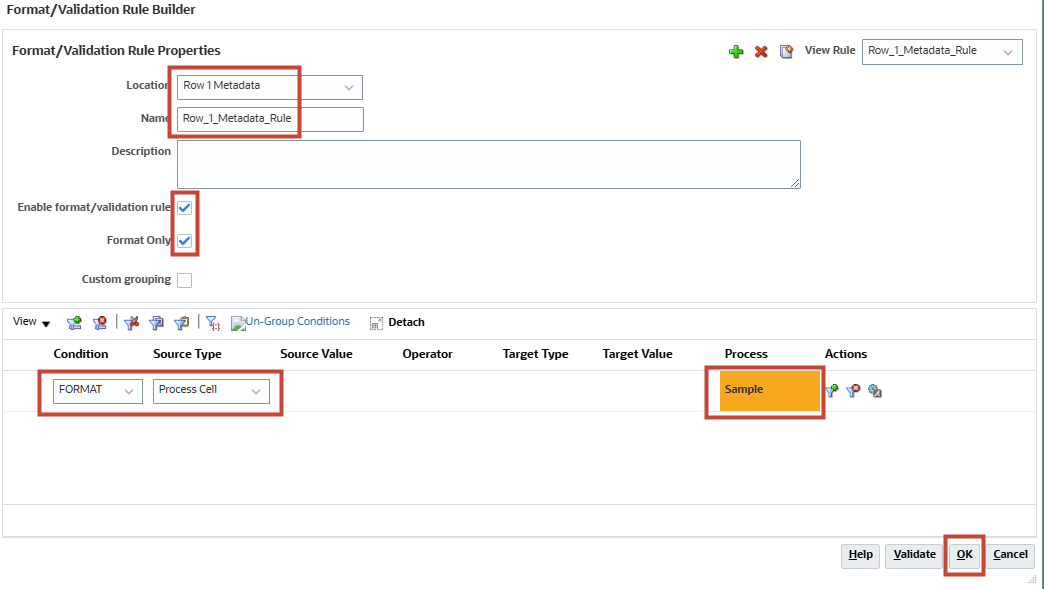
- Click Save.
Note:
The newly created Format Rule is listed under Format/Validation Rules. Also, in the Layout designer canvas, the section is shown with a colored background indicating that the section will be applied with the Format Rule. - In Information, click OK.
- In the bottom tabs, click WS2-Dept Income Statement - Plan.
In the runtime form, it is now easier to distinguish Row 1 of Account Members.
Tip:
You can use the browser zoom function or the scroll bars on the form for better visibility.
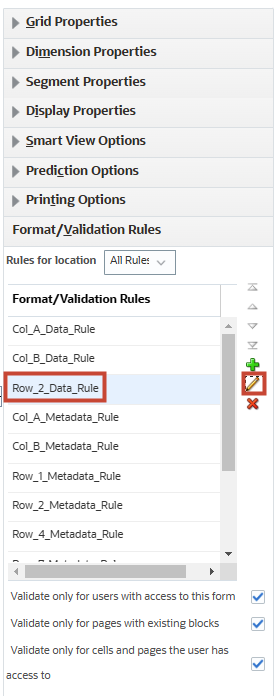
Duplicating Format Rule to format headers for Row 2 to 8 of Account Members
- In the bottom tabs, click Edit WS2-Dept Income Statement - Plan.
- In the right panel, click Format/Validation Rules.
- In Format/Validation Rules, for Rules for location select All Rules.
- In Format/Validation Rules, select Row_1_Metadata_Rule and then click (Edit Validation Rule).
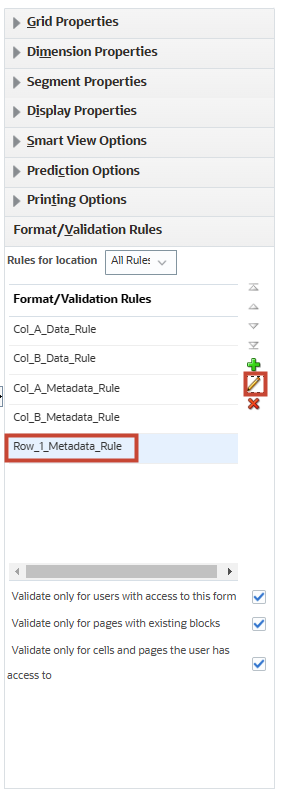
- In Format/Validation Rule Builder, click (Duplicate).
The Format/Validation Rule Builder page is populated with all the conditions from source Rule. However, the name for the rule changes to New Rule indicating successful duplicate rule.
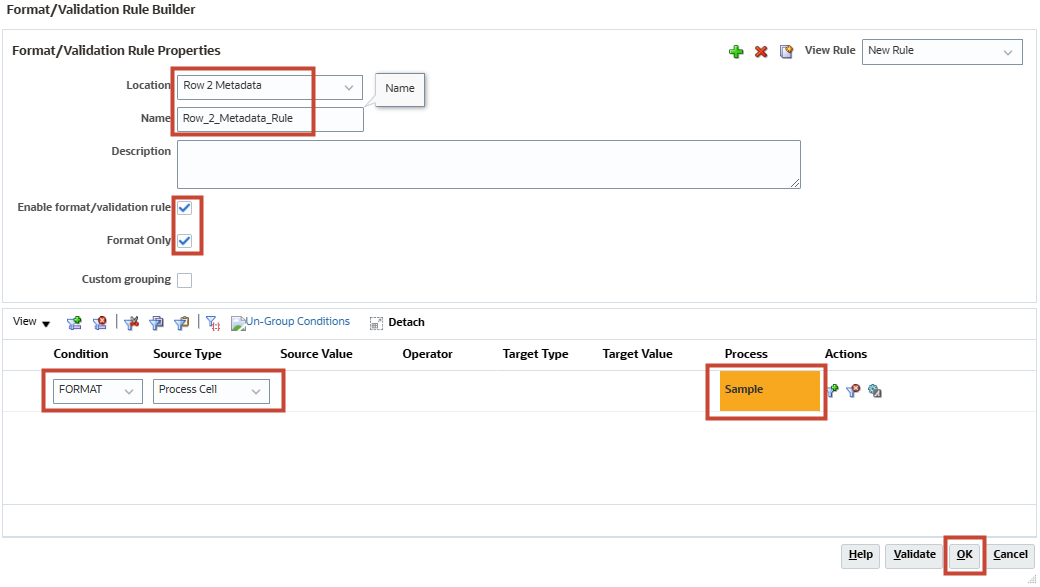
- In Format/Validation Rule Builder, select and enter values:
Location Row 2 Metadata Name Row_2_Metadata_Rule Note:
All other settings should be carried over from the source Rule used for duplication. - Validate the selections and in Format/Validation Rule Builder, click OK.
- Repeat steps 4 to 7, for duplicating all the Rules till Row_8_Metadata_Rule.
- Click Save.
Note:
The newly created Format Rules are listed under Format/Validation Rules. Also, in the Layout designer canvas, the respective sections are shown with colored backgrounds indicating that those sections will be applied with the Format Rules. - In Information, click OK.
- In the bottom tabs, click WS2-Dept Income Statement - Plan.
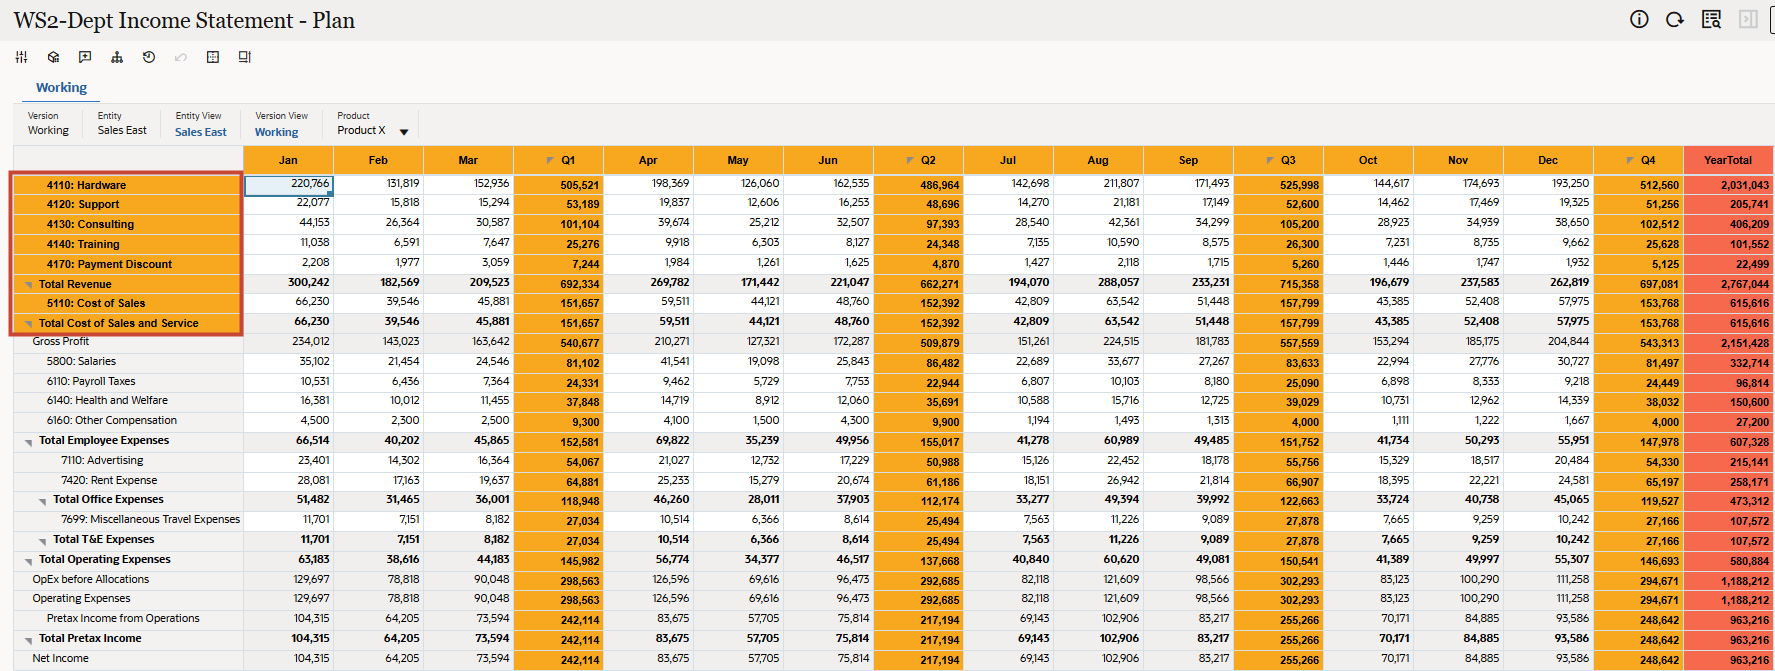
In the runtime form, it is now easier to distinguish row headers of Account Members.
Tip:
You can use the browser zoom function or the scroll bars on the form for better visibility.
Creating Format Rule to format calculations for Gross Profit
- In the bottom tabs, click Edit WS2-Dept Income Statement - Plan.
- In the right panel, click Format/Validation Rules.
- In Format/Validation Rules, for Rules for location select All Rules.
- In Format/Validation Rules, click (Create).
- In Format/Validation Rule Builder, select and enter values:
Location Row 2 Name Row_2_Data_Rule Enable format/validation rule Enabled Format only Enabled Condition IF Source Type Member Source Value Account Operator In Target Type Value Target Value GP Tip:
You can type the value GP (Gross Profit). You can also select GP using Member selector.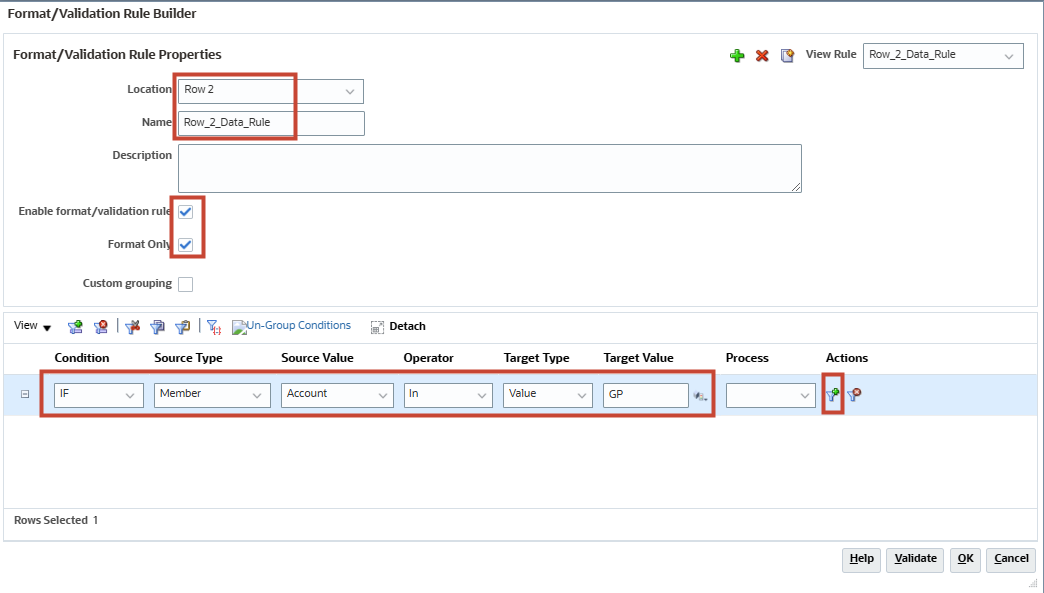
- In Format/Validation Rule Builder, under Actions click (Add Condition).
A new row is added for more conditions.
- For the new row, select and enter values:
Condition THEN Source Type Process Cell - For the new row, under Actions click (Process Cell).

- On the right under Format Cell, under Font and Alignment, for Format click (Bold).
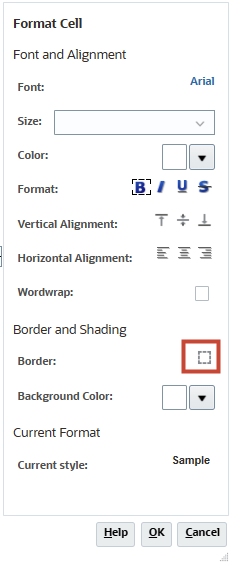
- On the right under Format Cell, for Border click
 (Border).
- In Border Selection, select Top and click
 (Top Border Width).
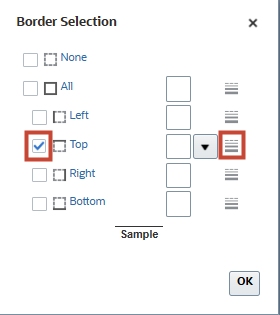
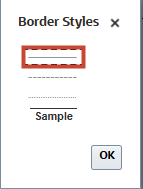
- In Border Styles, select Thin and click OK.
- In Border Selection, select Bottom and click (Top Border Width).
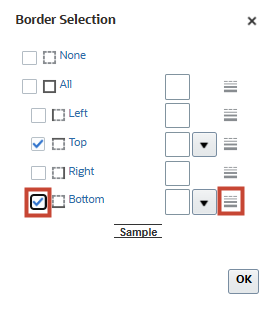
- In Border Styles, select Thin and click OK.
- In Border Styles, click OK
- On the right under Format Cell, for Background Color click (Popup selector).
- In the Color Picker, select Dark Gray – A9A9A9.
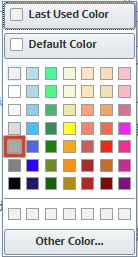
Tip:
Keep the mouse over a color to see its details as tooltip.As soon as the new background color is picked, the Current Style displays the newly picked color.
- Click OK.
- In Format/Validation Rule Builder, click OK.
- Click Save.
- In Information, click OK.
- In the bottom tabs, click WS2-Dept Income Statement - Plan.
In the runtime form, it is now easier to distinguish calculations for Gross Profit.
Tip:
You can use the browser zoom function or the scroll bars on the form for better visibility.
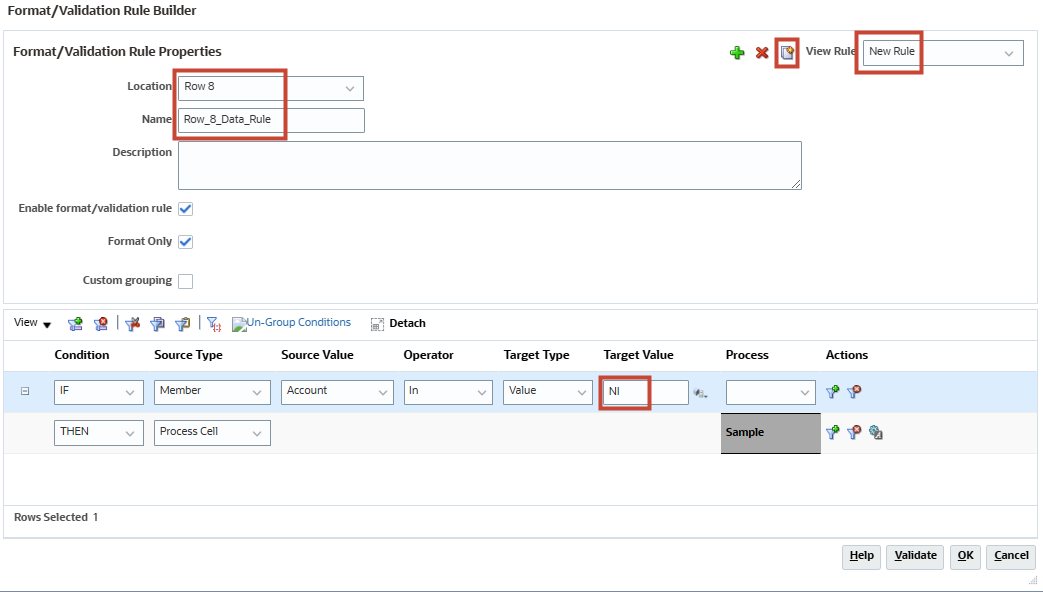
Duplicating Format Rule to format calculations for Net Income
- In the bottom tabs, click Edit WS2-Dept Income Statement - Plan.
- In the right panel, click Format/Validation Rules.
- In Format/Validation Rules, for Rules for location select All Rules.
- In Format/Validation Rules, select Row_2_Data_Rule and then click (Edit Validation Rule).
- In Format/Validation Rule Builder, click (Duplicate).
The Format/Validation Rule Builder page is populated with all the conditions from source Rule. However, the name for the Rule changes to New Rule indicating successful duplicate rule.
- In Format/Validation Rule Builder, select and enter values:
Location Row 8 Name Row_8_Data_Rule Target Value NI Tip:
You can type the value NI (Net Income). You can also select NI using Member selector.All the other format settings are same as the source used for duplication.
- Validate the selections and in Format/Validation Rule Builder, click OK.
- Click Save.
- In Information, click OK.
- In the bottom tabs, click WS2-Dept Income Statement - Plan.
In the runtime form, it is now easier to distinguish calculations for Net Income.
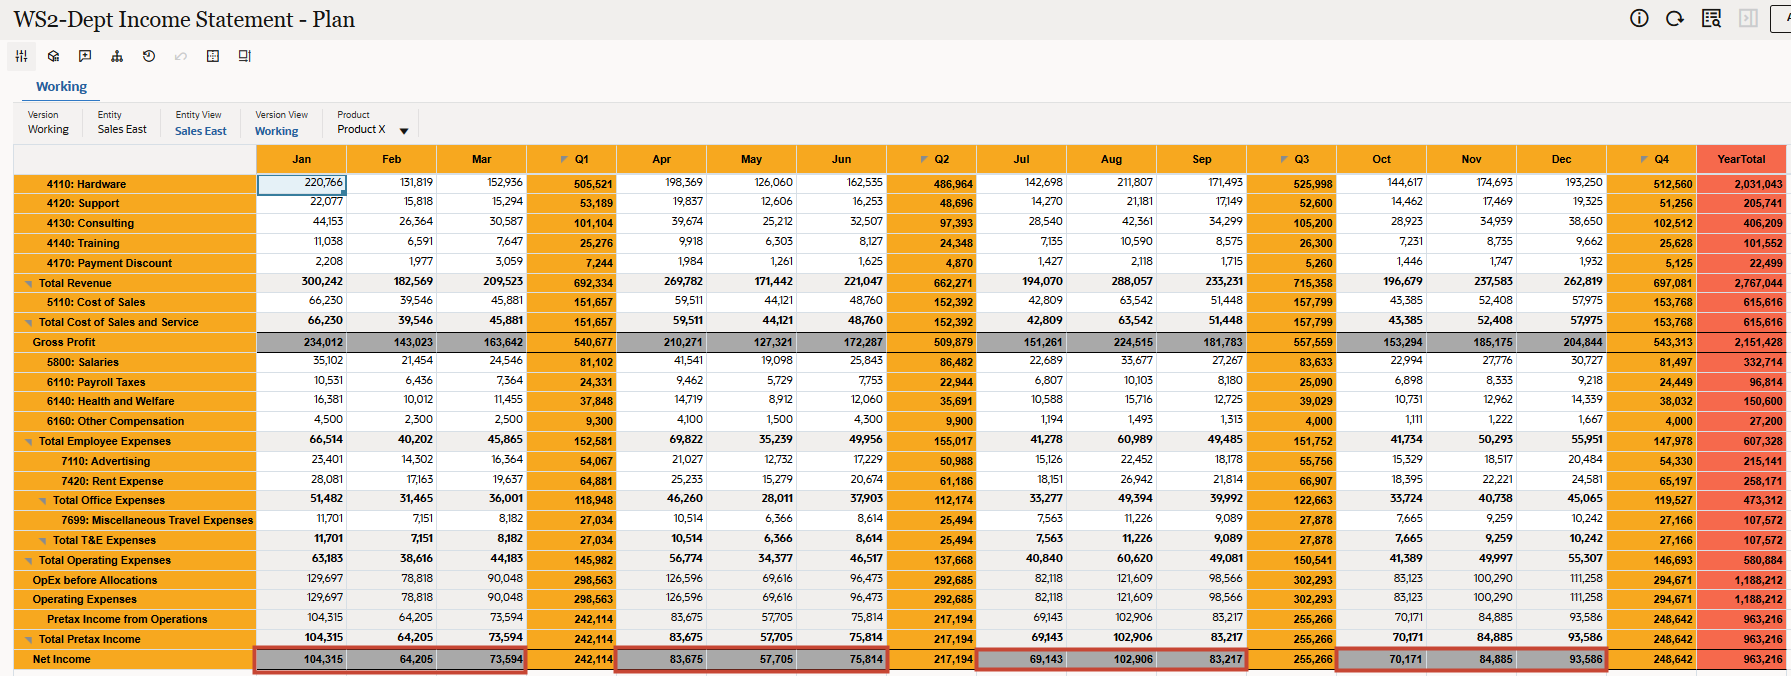
Tip:
You can use the browser zoom function or the scroll bars on the form for better visibility.
You can notice that, after applying Format Rules to the Header, Metadata cells and Data cells - readability and understandability improves significantly.
Related Links
Data Forms Design Time Formatting - Advanced
G24814-01
January 2025