Before you Begin
This 30 minute hands-on tutorial shows you how to integrate data between Projects and Workforce in EPM Planning. You learn what you need to set up in both Projects and Workforce in order to push project data to Workforce. The sections build on each other and should be completed sequentially.
Background
The goal with this tutorial is the following:
- View Job-level input from Projects to Workforce
- In Workforce, see the utilization of employees across projects, based on assignments, and reassign employees to projects as needed
- In Projects, review FTE, labor hours and expenses allocated to a project
What Do You Need?
An EPM Cloud instance allows you to deploy and use one of the supported business processes. To deploy another business process, you must request another EPM Enterprise Cloud instance or remove the current business process.
- Have Service Administrator access to EPM Enterprise Cloud. The instance should not have a business process created.
- Upload and import this snapshot into your Planning instance.
Note:
For more information on uploading and importing migration snapshots, refer to the Administering Migration for Oracle Enterprise Performance Management Cloud documentation.Reviewing Salary Grades
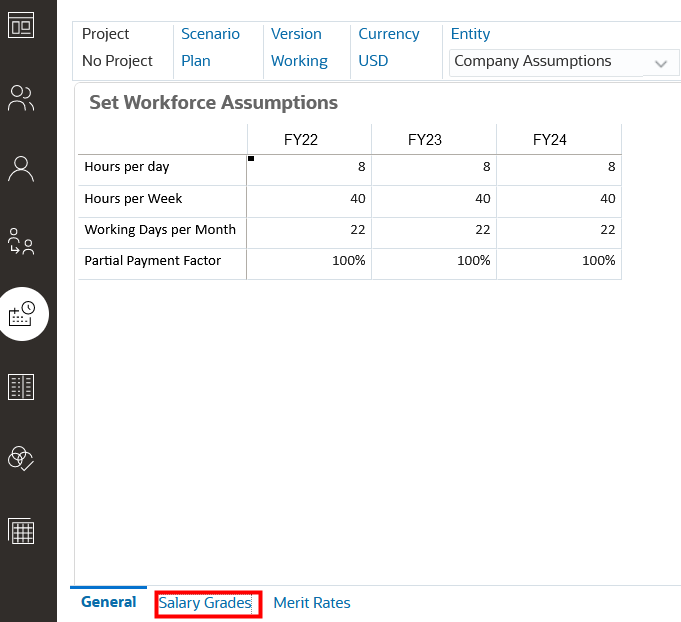
- From the Home page, click Workforce, then Compensation Planning.

- In the left vertical tab, click Assumptions
 .
. - Click the Salary Grades tab at the bottom.
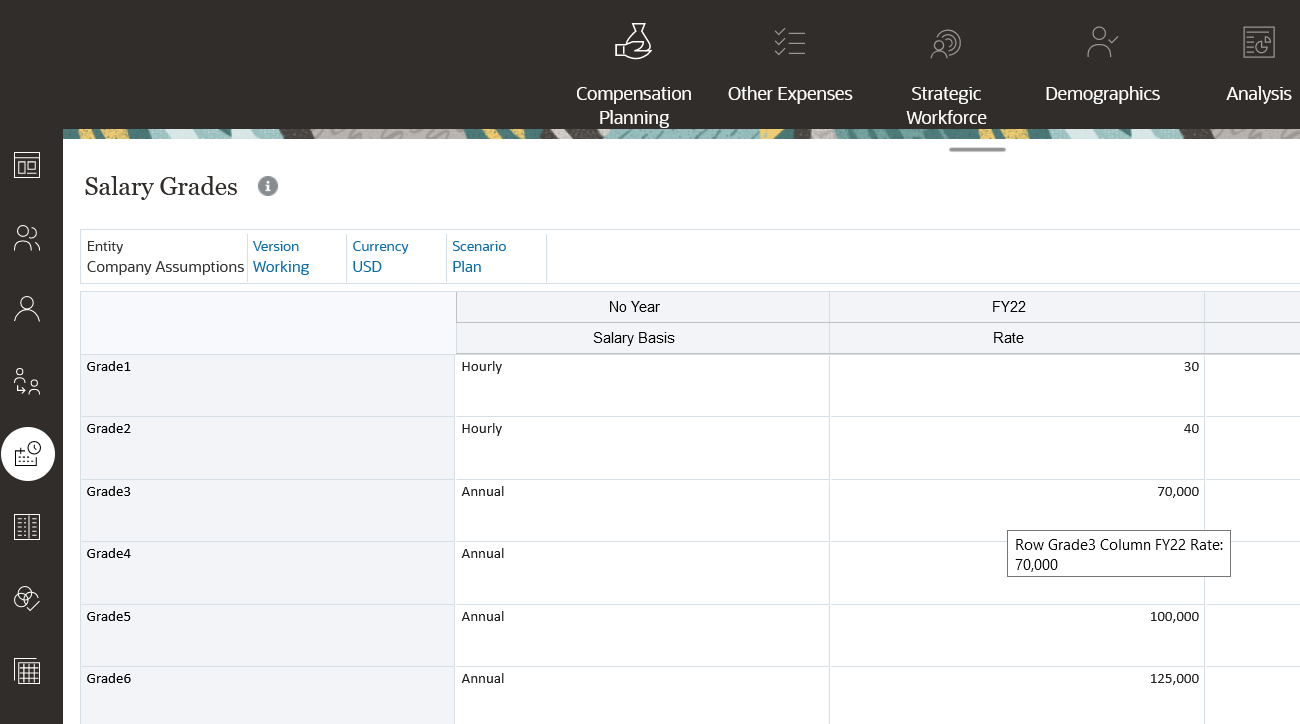
- Review existing Salary Grade data.
Adding Salary Defaults
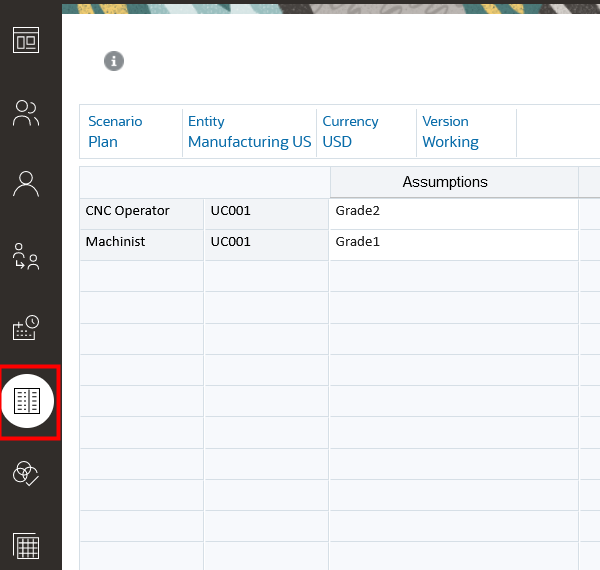
- In the vertical tab, click Defaults. Change the Entity to Manufacturing US.
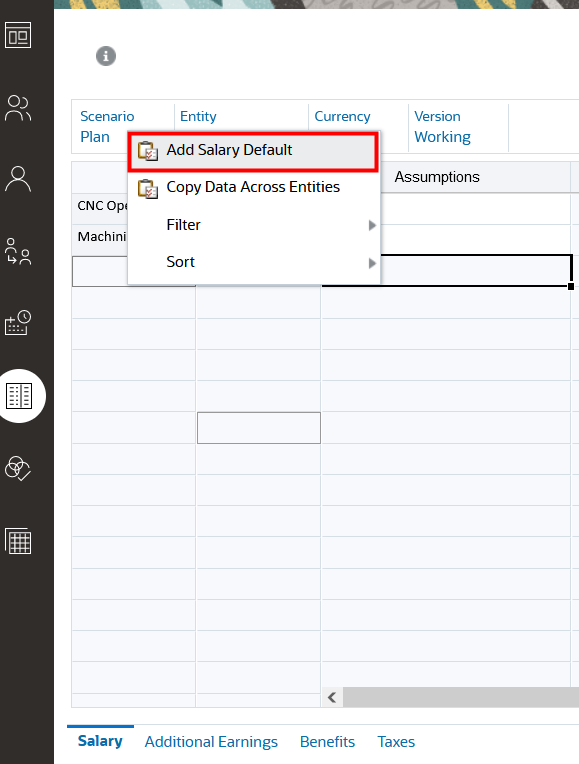
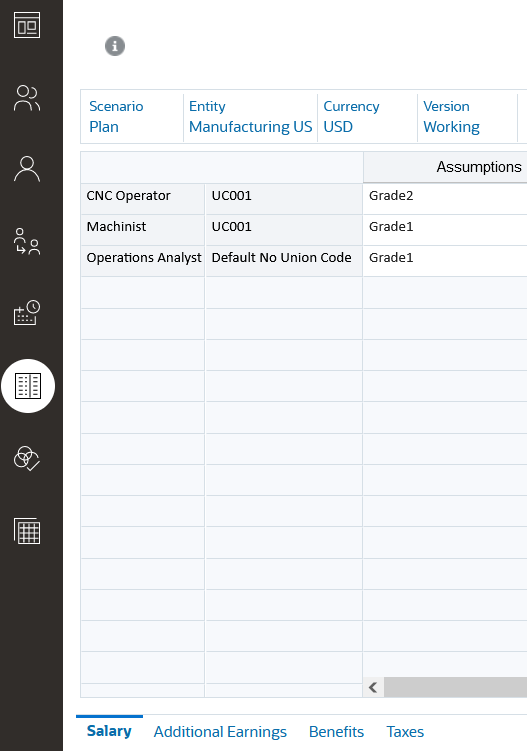
- Review existing default data. To add a Salary Default, right-click and select Add Salary Default.
- In the Add Salary Defaults screen, select a Salary Grade, Job, and Union Code, then click Launch.
- Click OK. An Operations Analyst was added.
 .
.

Creating Requisitions for Employees Through New Hire Requisitions
A Hiring Requisition adds placeholder expenses to the workforce budget until someone is hired to fill the requisition. When an employee is hired to fill the hiring requisition, the placeholder hiring requisition expense is transferred to, and associated with, the hired employee. Hiring requisitions functionality is available if these Workforce features are enabled:
When workforce demands exceed the number of available employees, you can use New Hires functionality to:
Workforce initially provides 100 blank New Employee Hiring Requisitions, which you can use and then add more when needed.
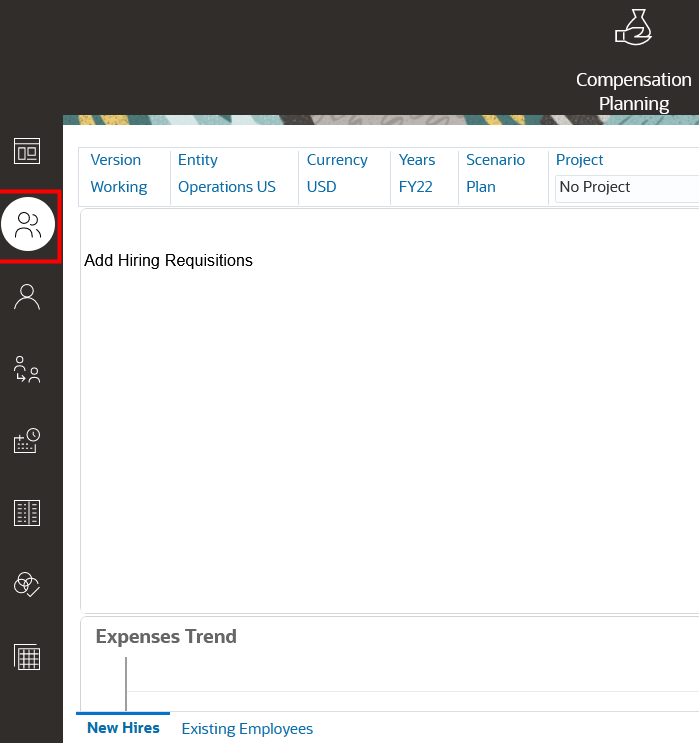
- In the vertical tab, click Manage Employees. In the POV, select Operations US for Entity, and No Project for Project. Click Go.
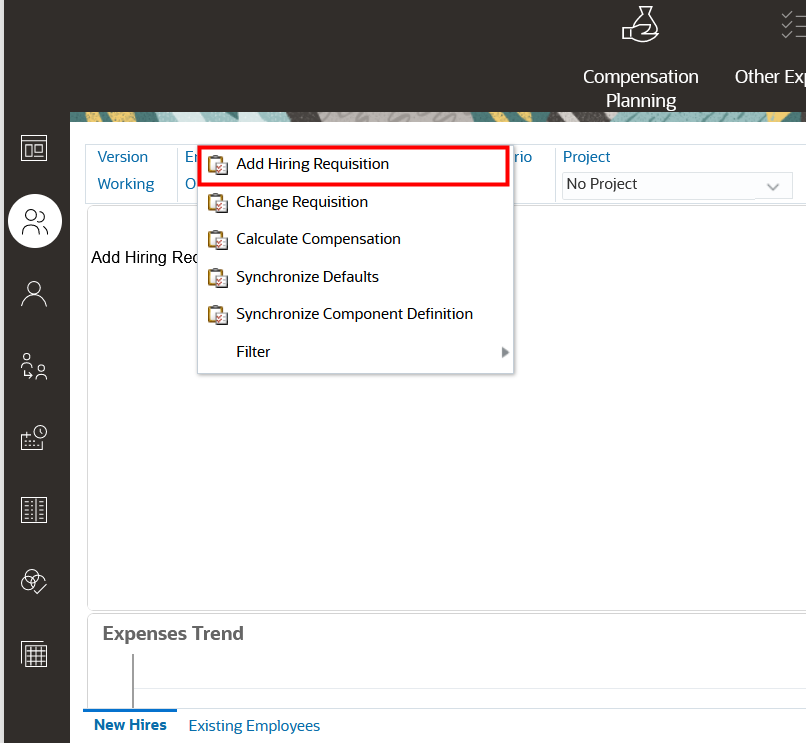
- Right-click in the form, then select Add Hiring Requisition.
- Enter the following information (click Next when needed):
- No. of requisitions = 1
- FTE for each =1
- Employee Type = Regular
- Start Year = FY22
- Start Month = Jan
- End Year = FY24
- End Month = Dec
- Job = Operations Analyst
- Union Code = Default No Union Code
- Salary Options = Salary Defaults
- Comments = Leave Blank
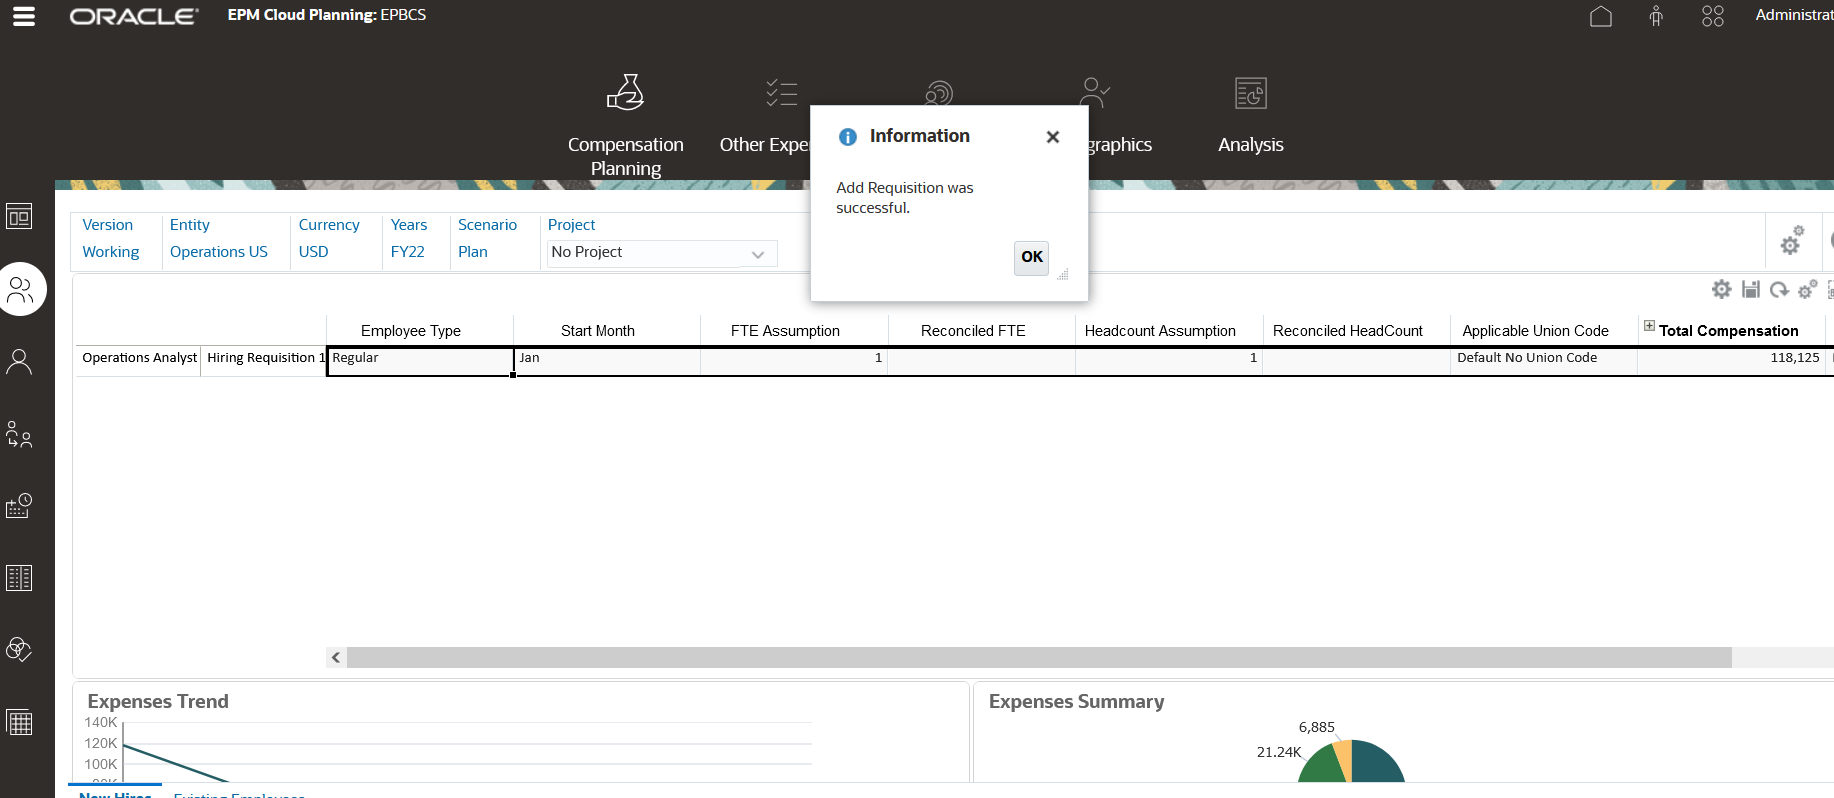
- Click Launch. Hiring requisition was added. Click OK.
Associating a Hiring Requisition to an Existing Employee
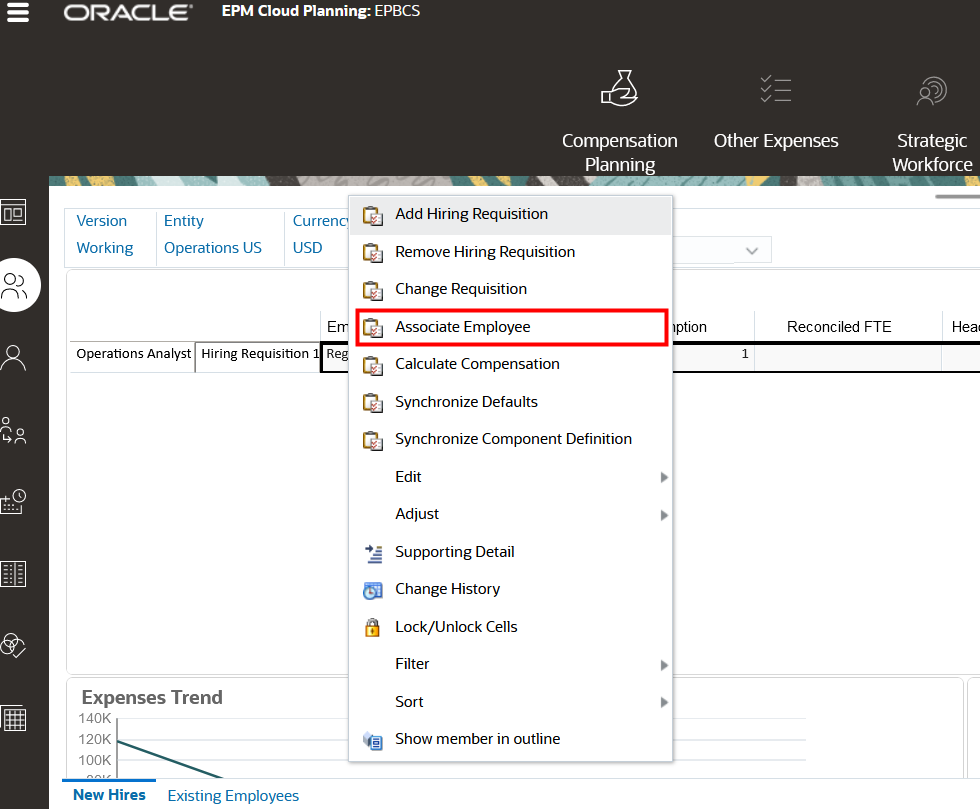
- Right-click on Hiring Requisition 1 text, then select Associate Employee.
- Click the member selector to select Ross, Dennis (E0022).
- Click Launch. Click OK.


Note:
Alternatively, you can load the existing employees FTE data from Configuration.Verifing Existing Employees data and running Calculate Compensation
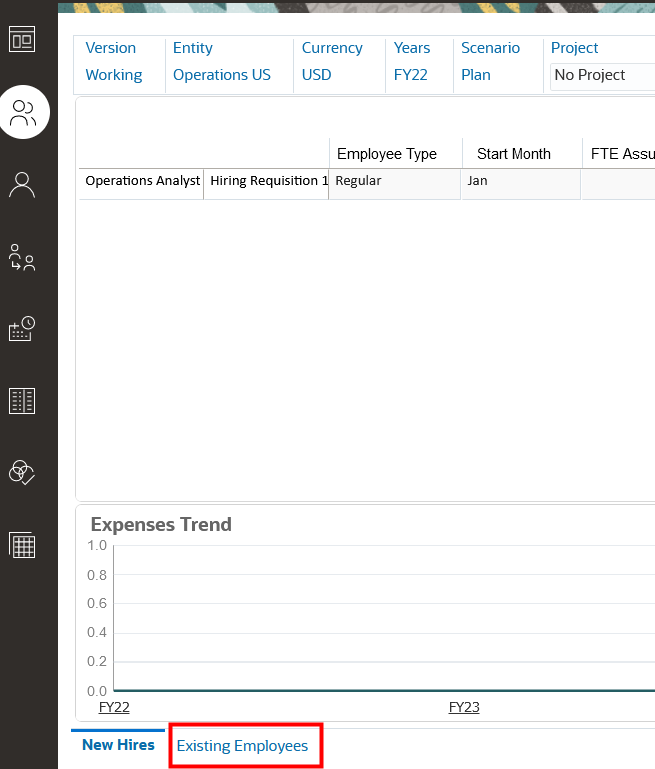
- From the Manage Employees vertical tab, click the Existing Employees tab at the bottom.
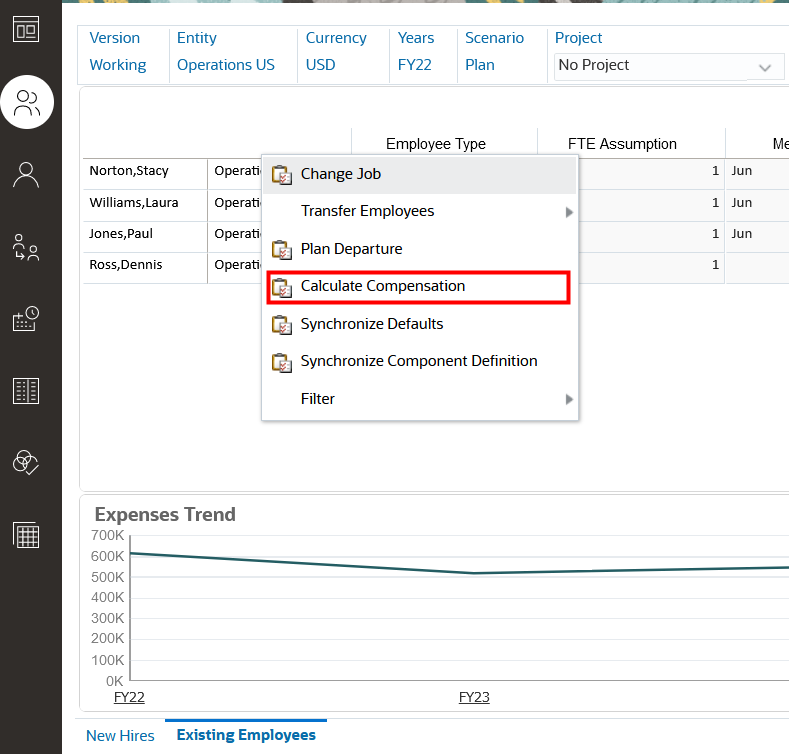
- Right-click in the form and select Calculate Compensation.
- If needed, use the Member Selector to select desired members, then click Launch. Click OK.

Setting Assumption Rates for Labor in Projects
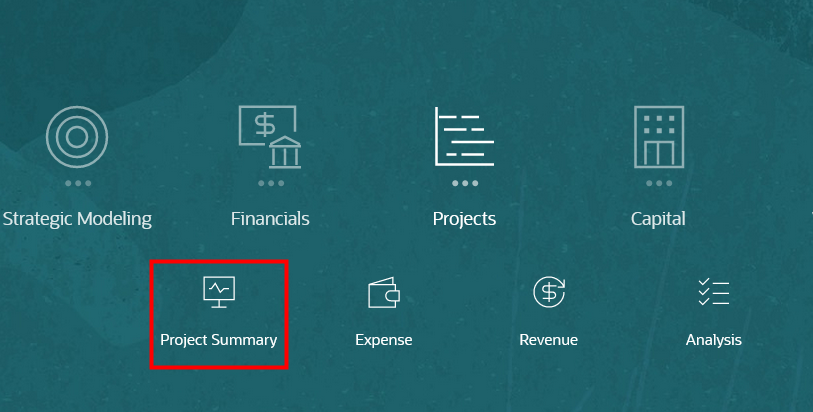
- From the Home Page, click Projects, then Project Summary.
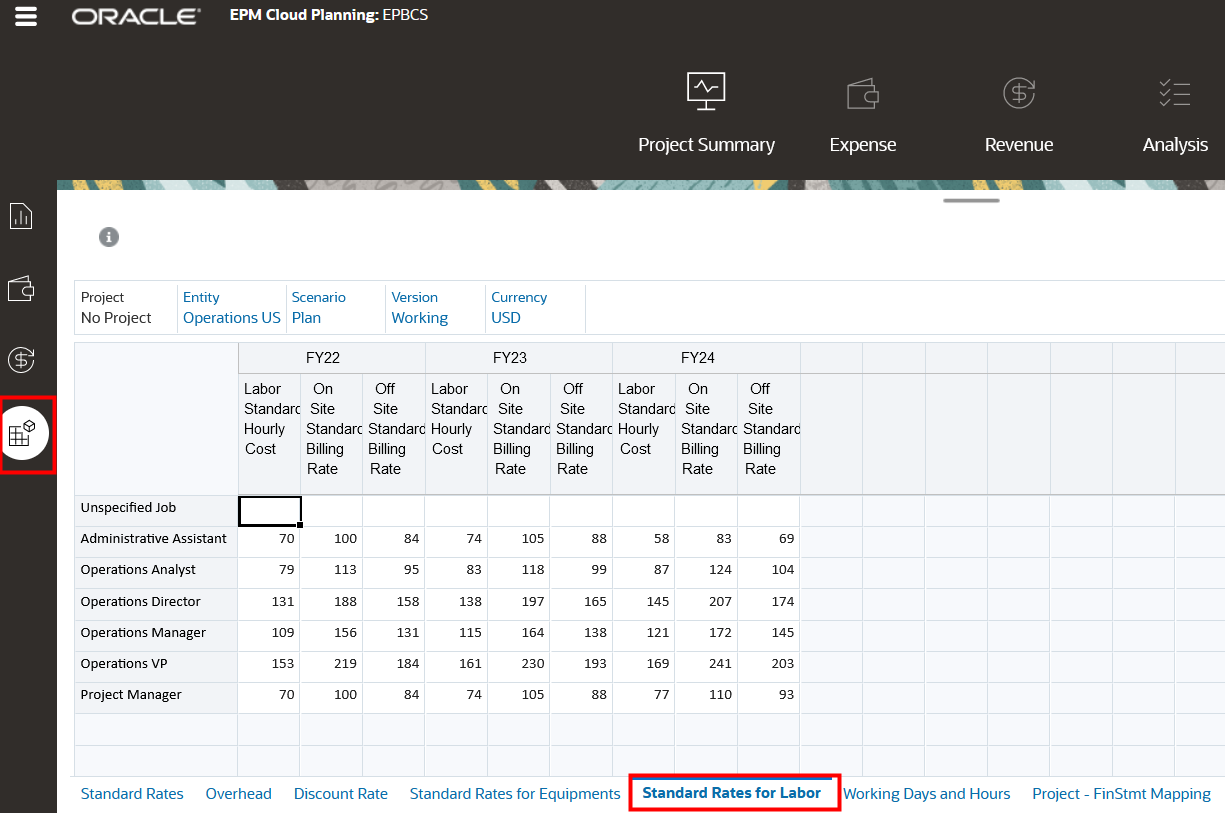
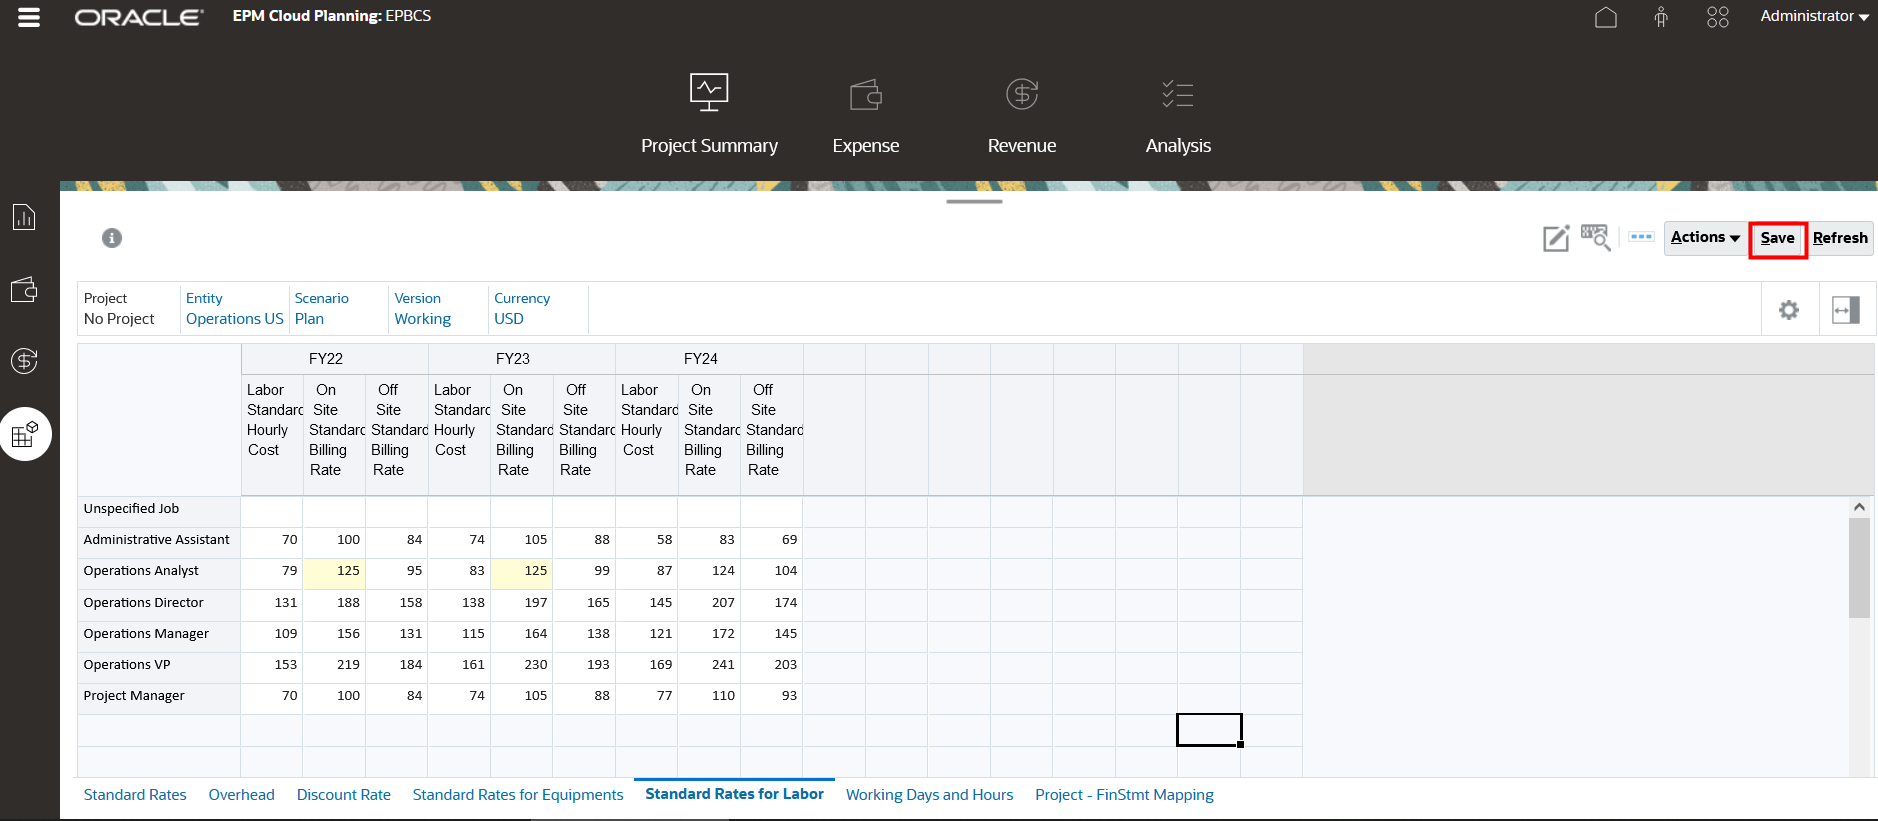
- In the vertical tab, click Assumptions, then the Standard Rates for Labor tab.
- Review and set standard rates for labor here. Change the On Site Standard Billing Rate for Operations Analyst to 125 for FY22 and FY23. Click Save.
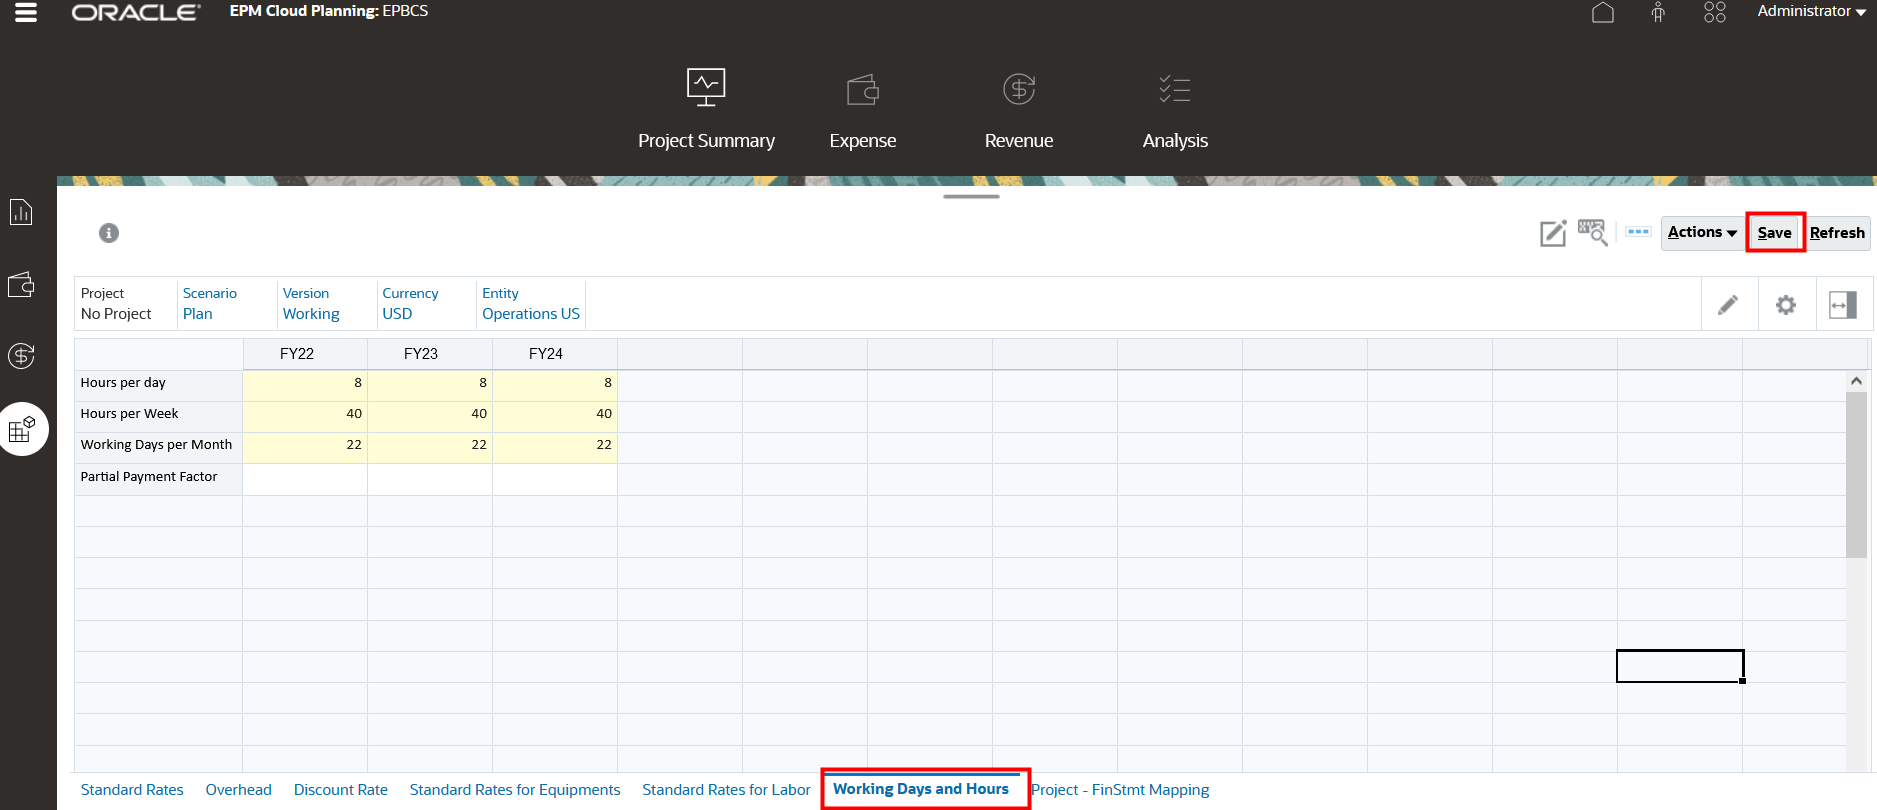
- Click the Working Days and Hours tab. Enter the data as noted in the screenshot, then click Save.
Adding Projects
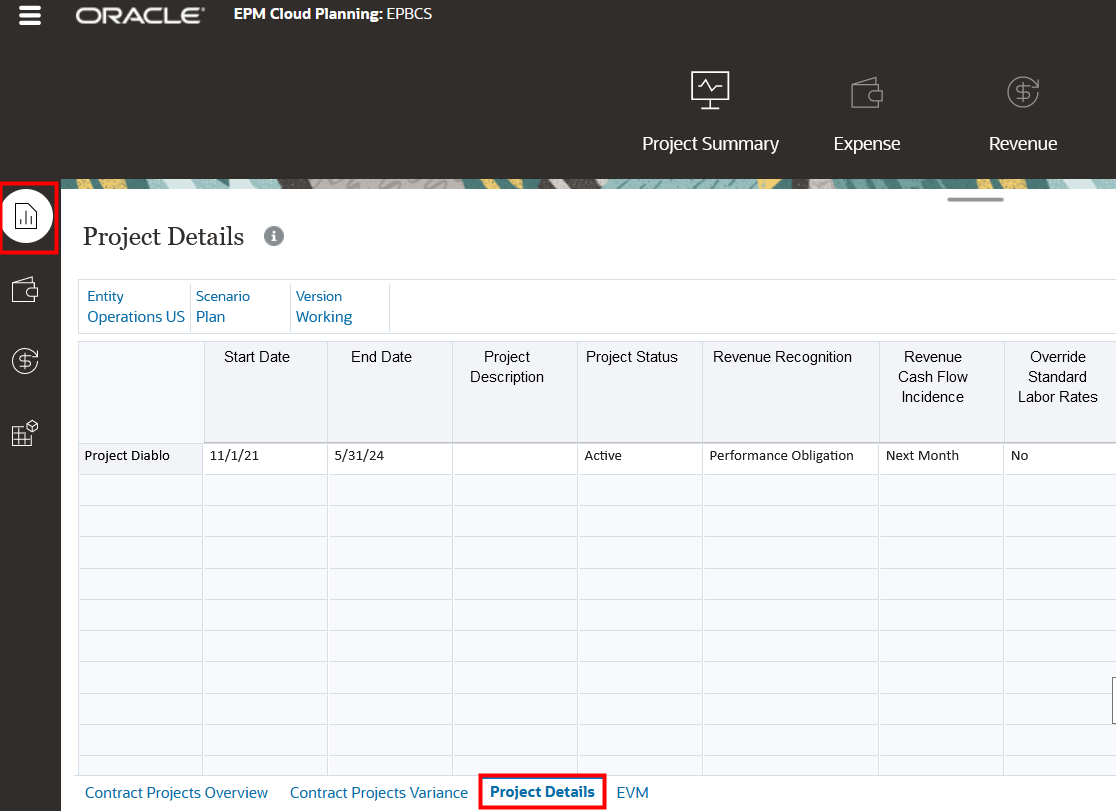
- In the vertical tab, click Contract, then Project Details tab.
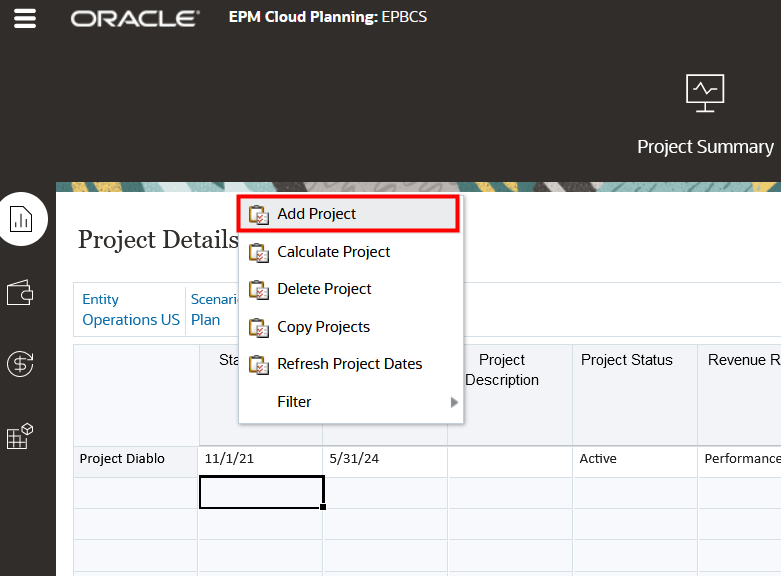
- Right-click in the form, then select Add Project. The Add Project screen is displayed.
- Enter the following project details (click Next when needed):
- Project Name = WisconsinEnergy
- Project Start Date = 1/1/22
- Project End Date = 12/31/24
- Project Type = Fixed Price
- Revenue Recognition = Monthly
- Revenue Cash Flow = Next Month
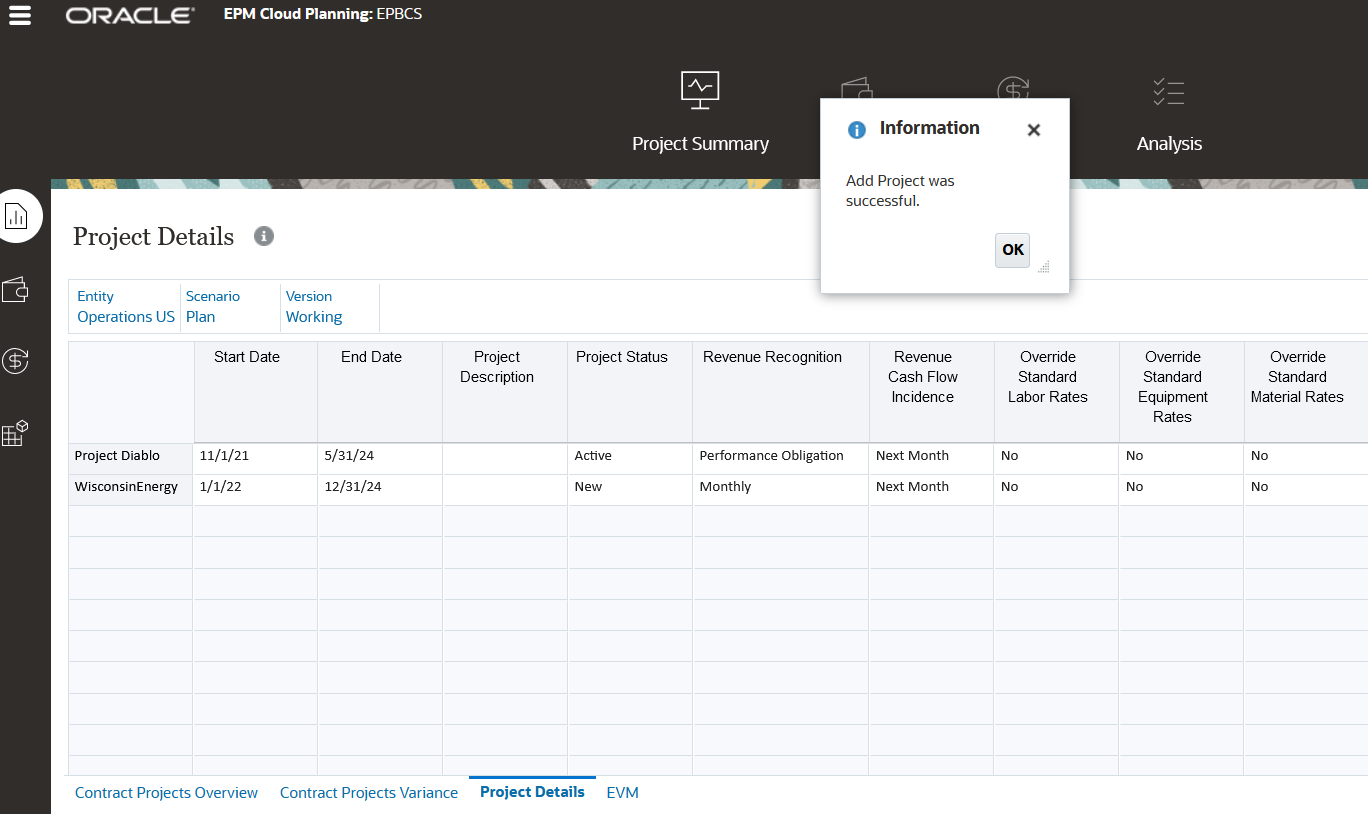
- Click Launch, then click OK at the Information prompt.
Adding Project Expenses
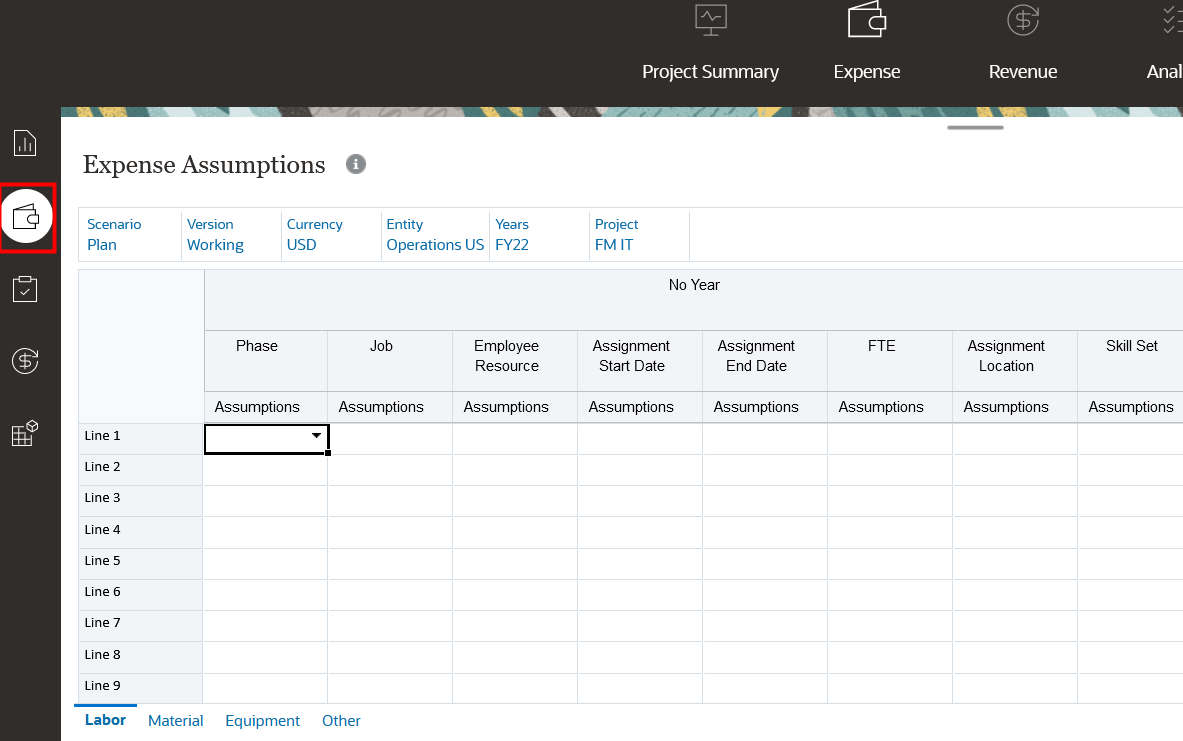
- Click the Expense card.
- In the vertical tab, click Driver Based. The Expense Assumptions screen is displayed.
- In the POV for Project, select WisconsinEnergy, then click GO
 .
.
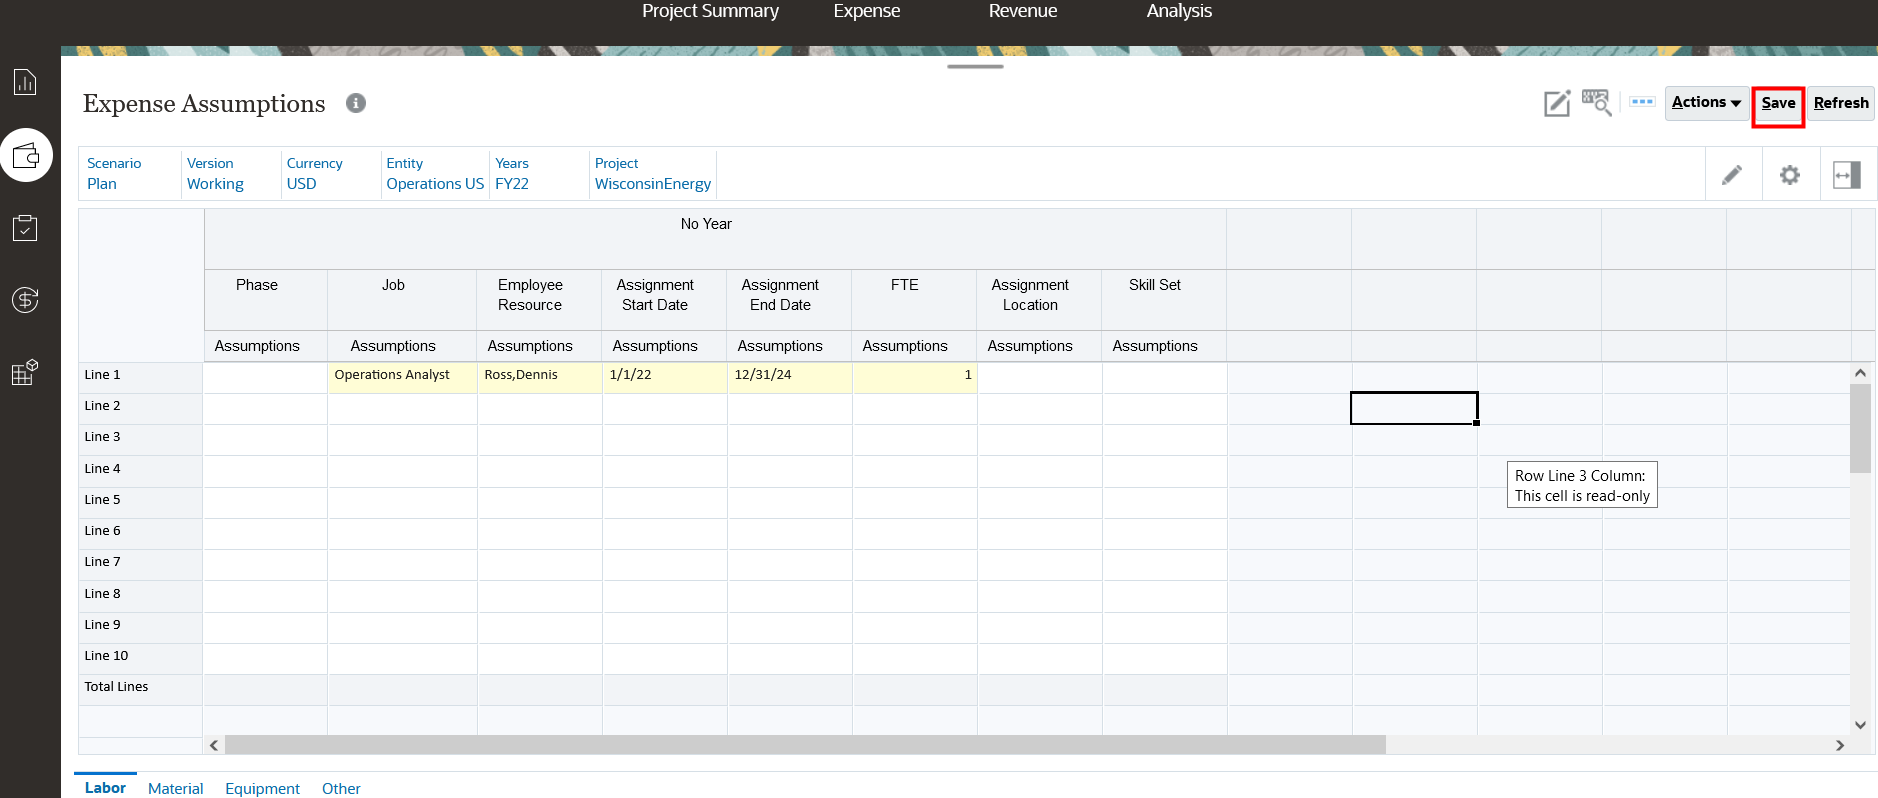
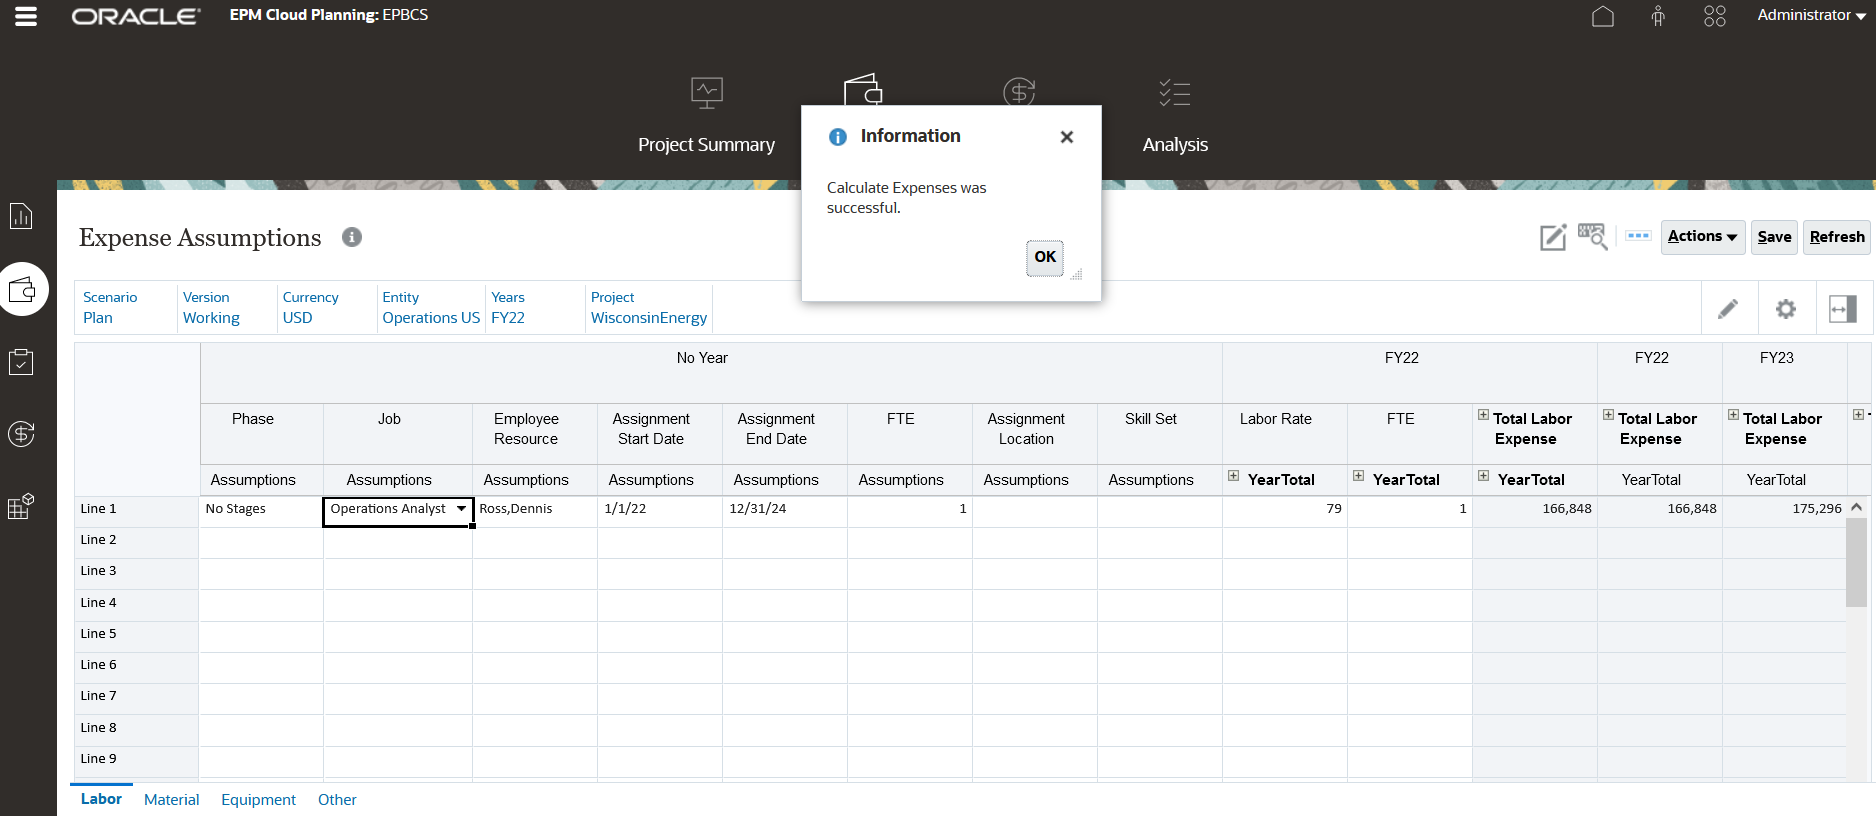
- In Line 1, enter the information noted in the screenshot below, then click Save.
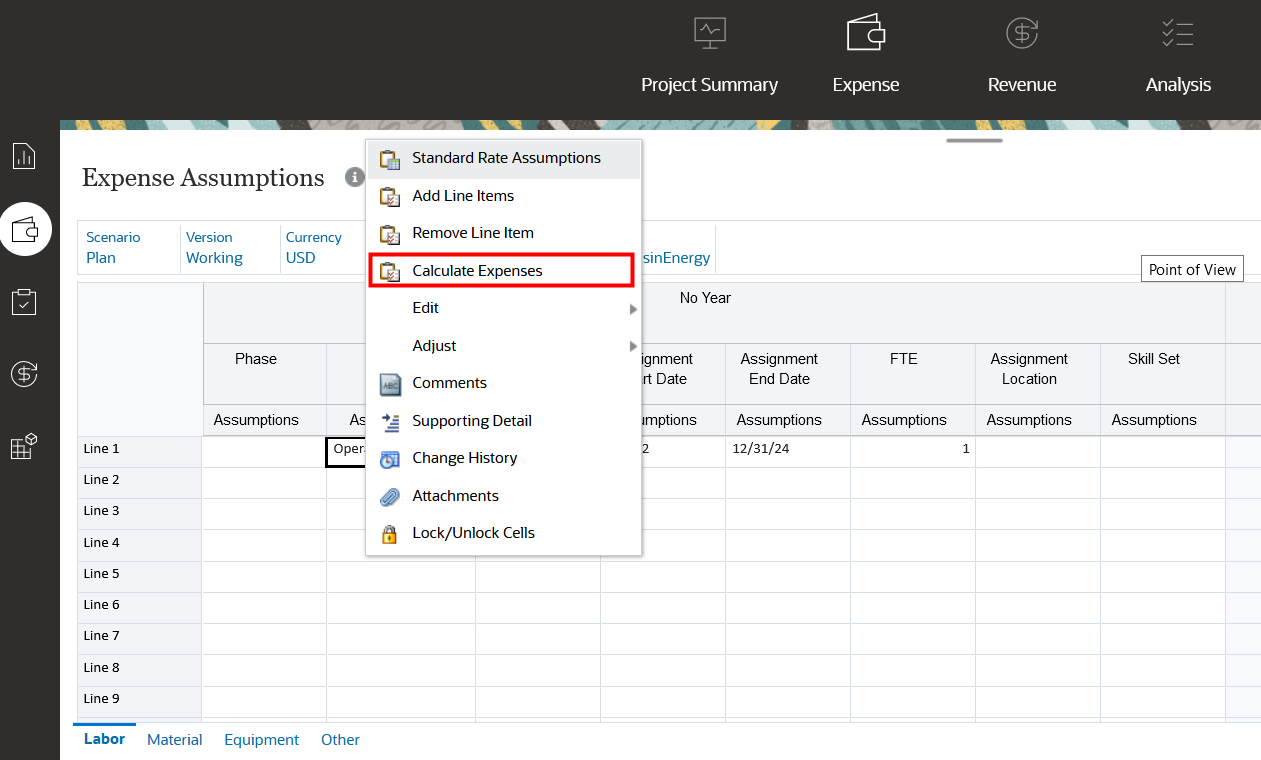
- Right-click on Line 1, then select Calculate Expenses.
- Click OK at the Information prompt, and note the expenses calcuated on the right side of form. Expense data, as well as the FTE and Labor Hours are pushed to Workforce for each project.

Analyzing Project Utilization in Workforce
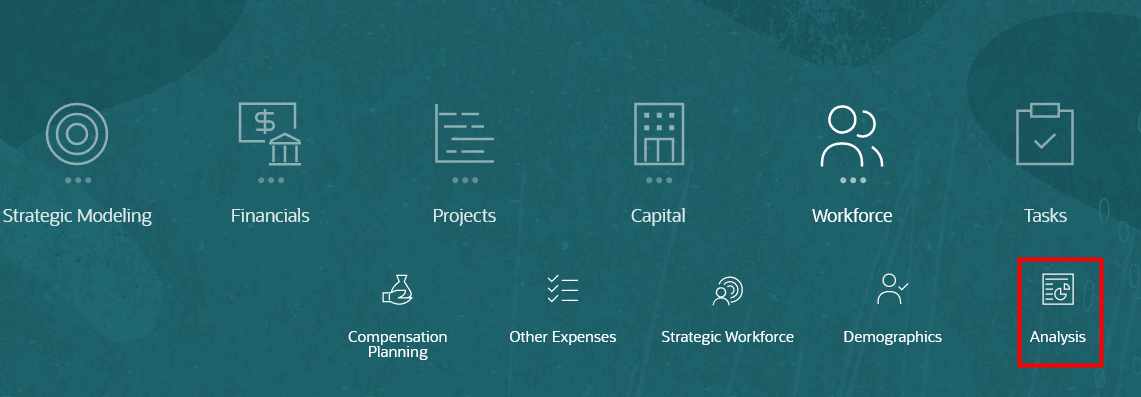
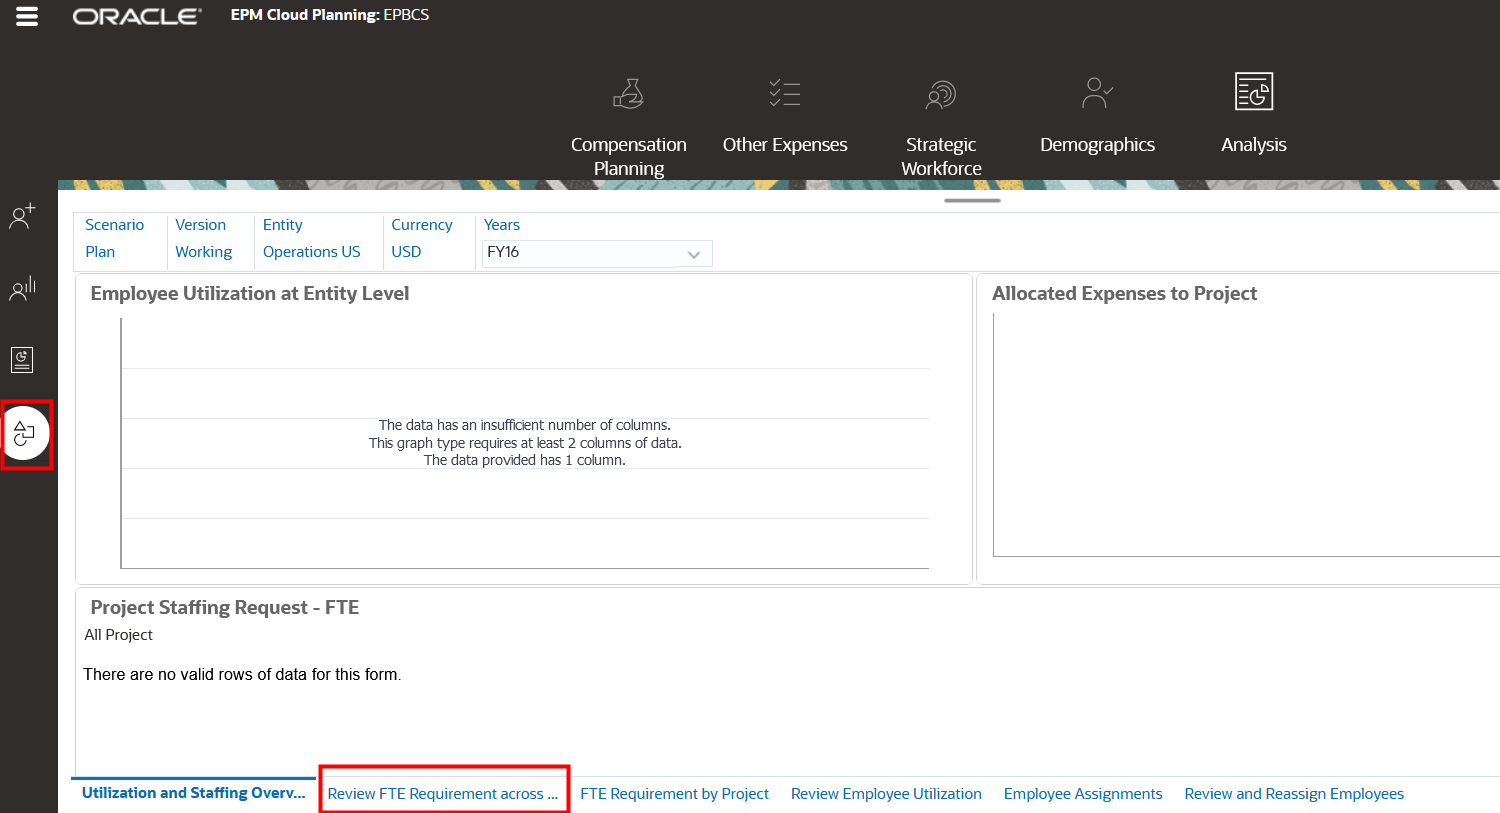
- From the Home Page, click Workforce, then Analysis.
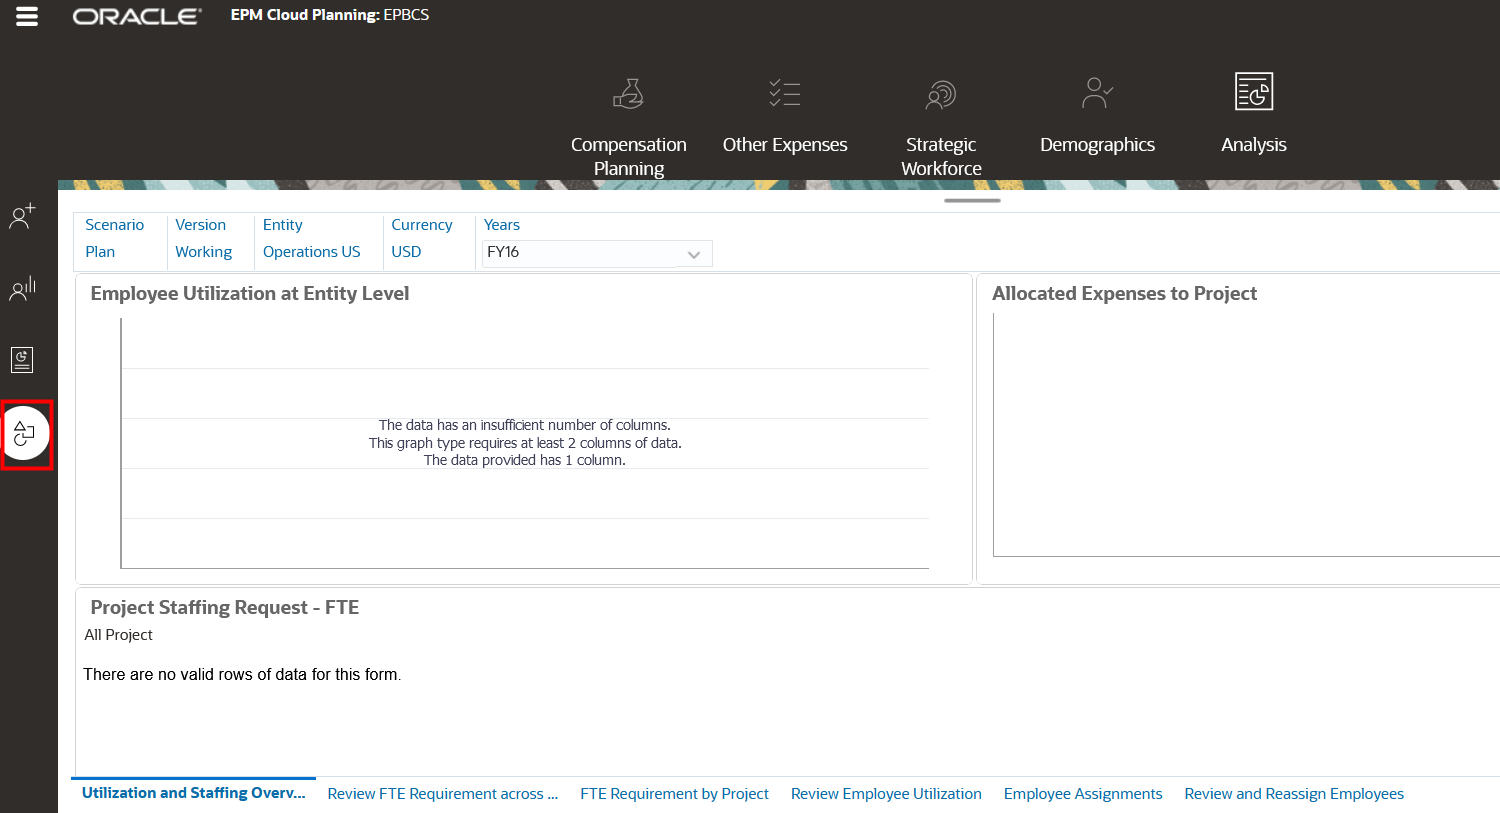
- In the vertical tab, click Project Utilization.
- Click on the Review FTE Requirement across Projects tab.
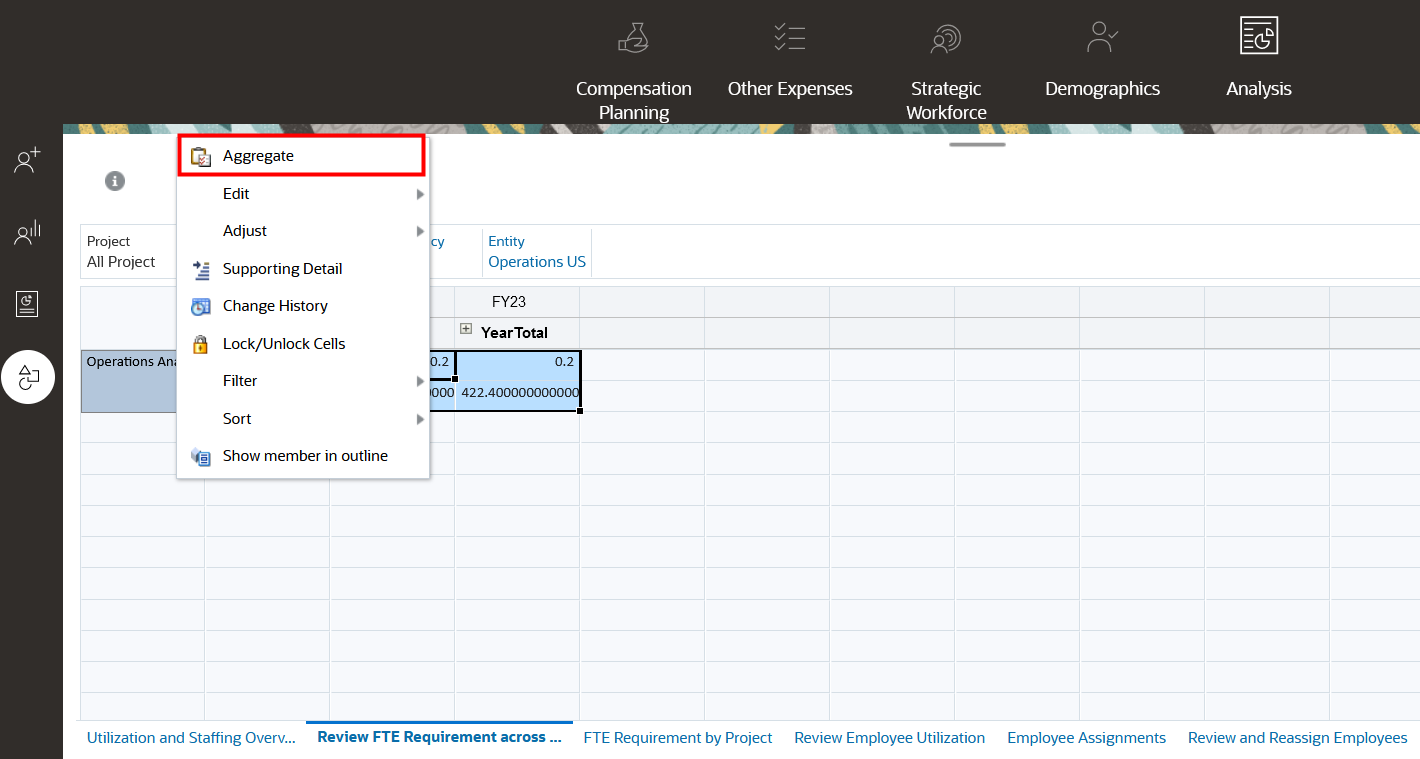
- Right-click on Operations Analyst, then select Aggregate.
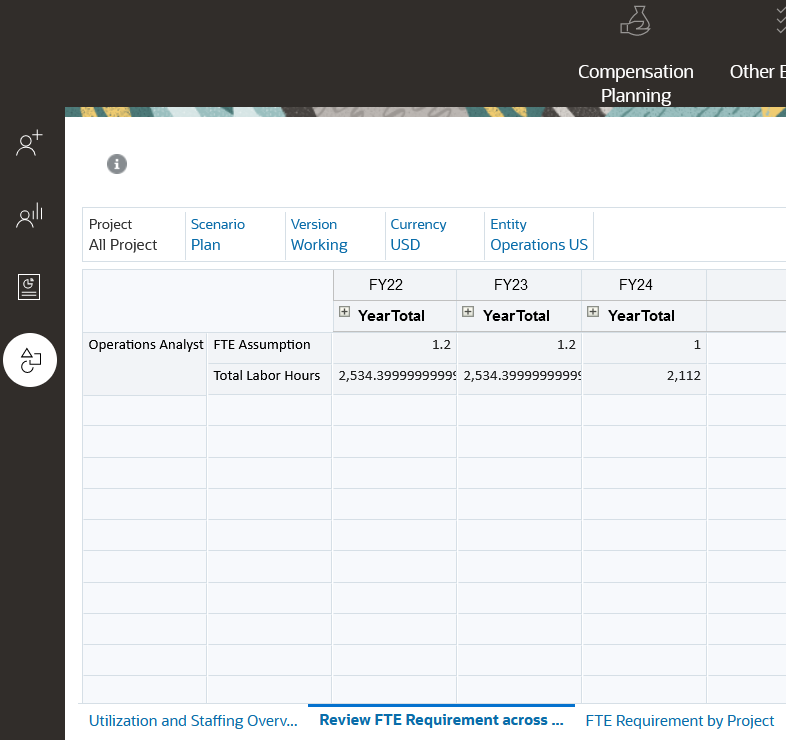
- Click OK at the Information prompt. View the FTE requirement for the Operations Analyst, across all projects.
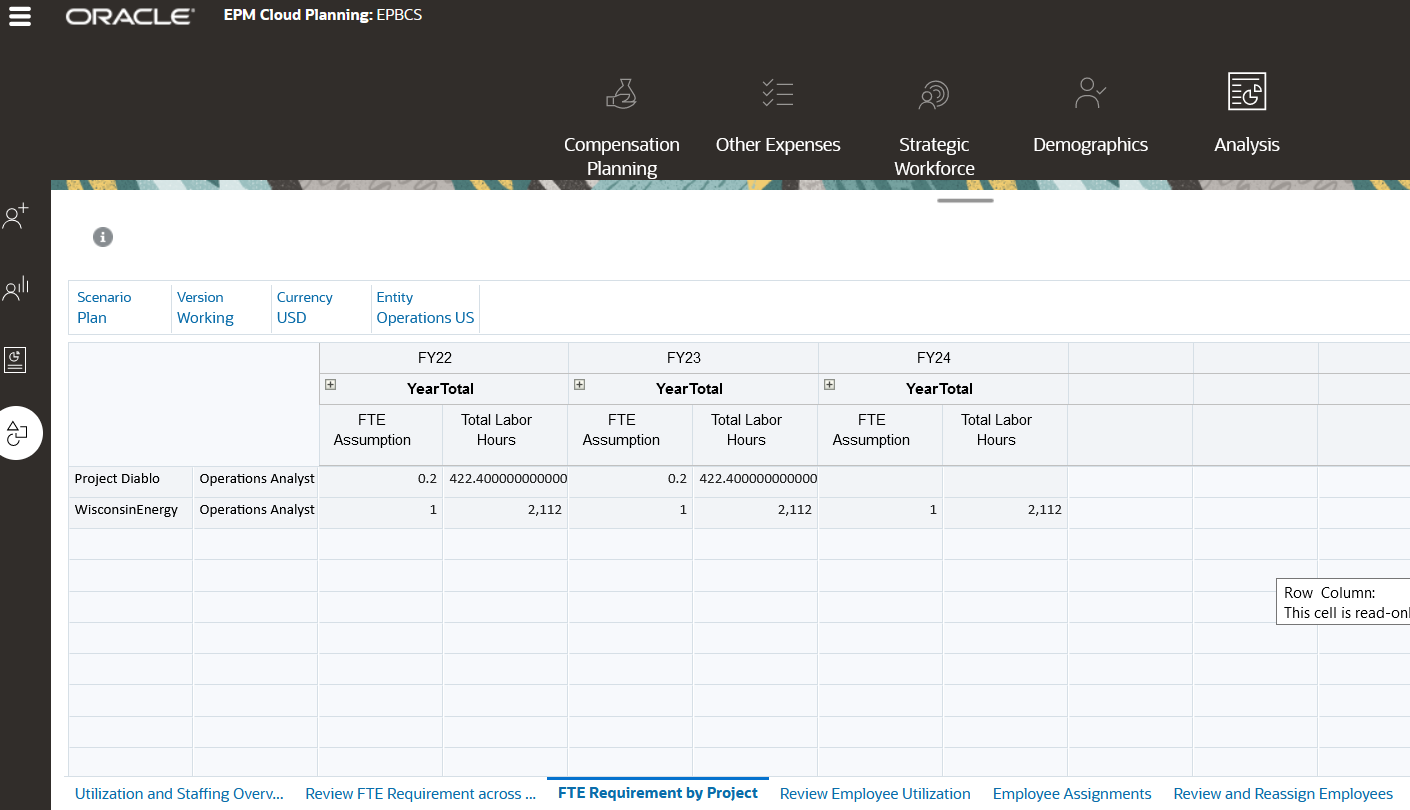
- Click the FTE Requirement by Project tab. View the FTE detail by project.
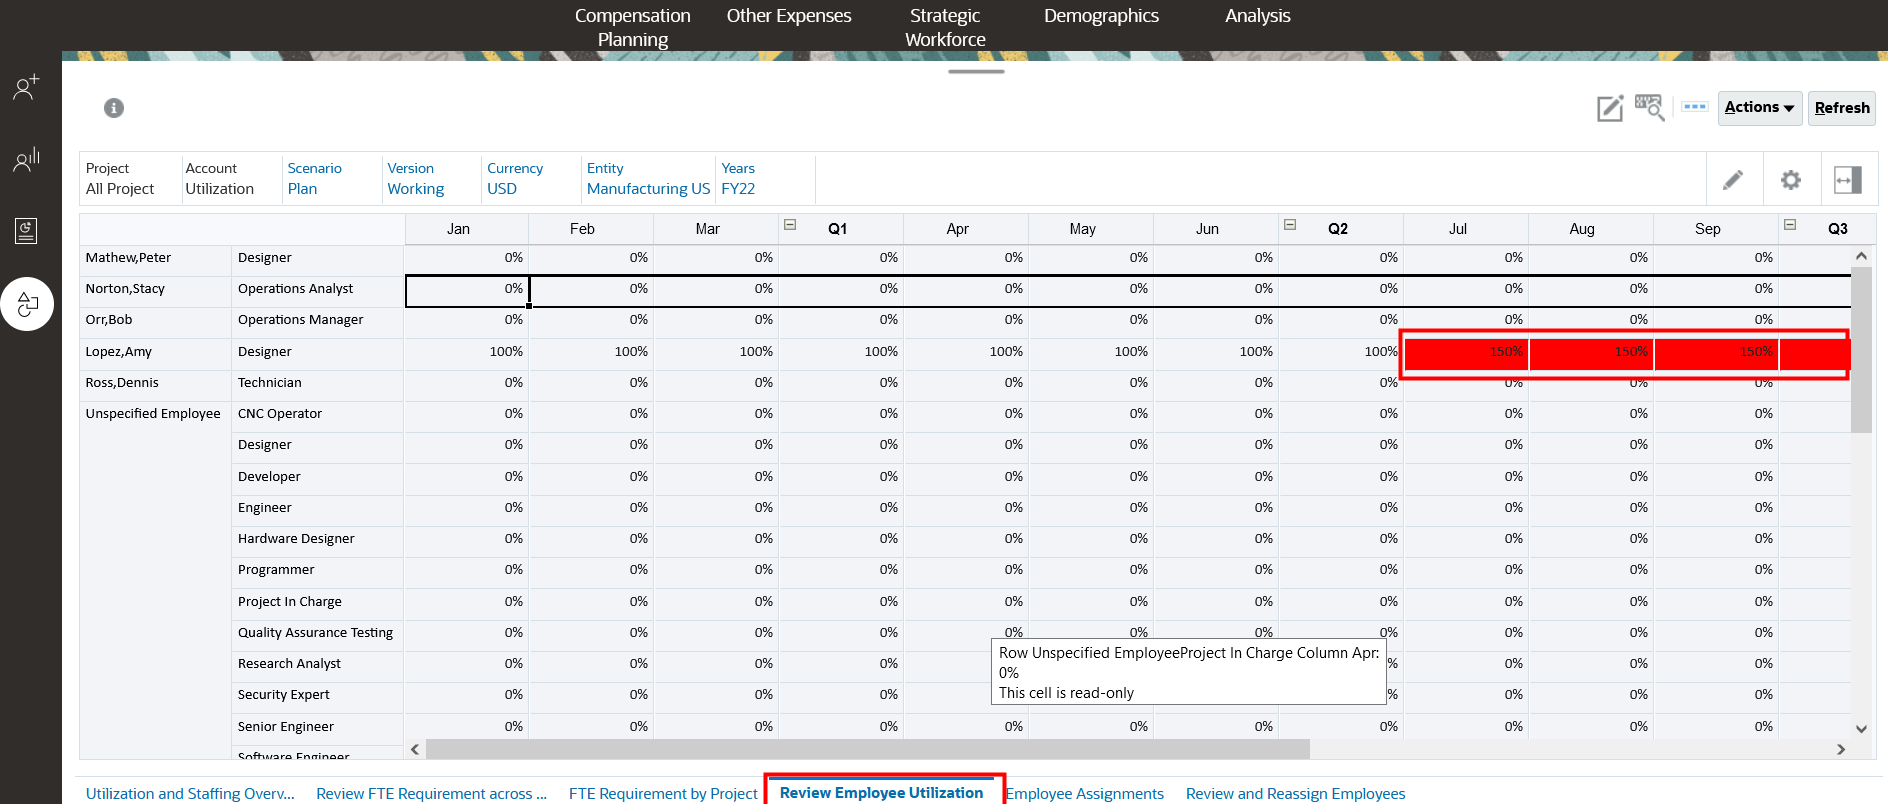
- Click the Review Employee Utilization tab. In the POV, change the Years member to FY22, and the Entity to Manufacturing US, and click Go
 . Note how employee Amy Lopez is overallocated.
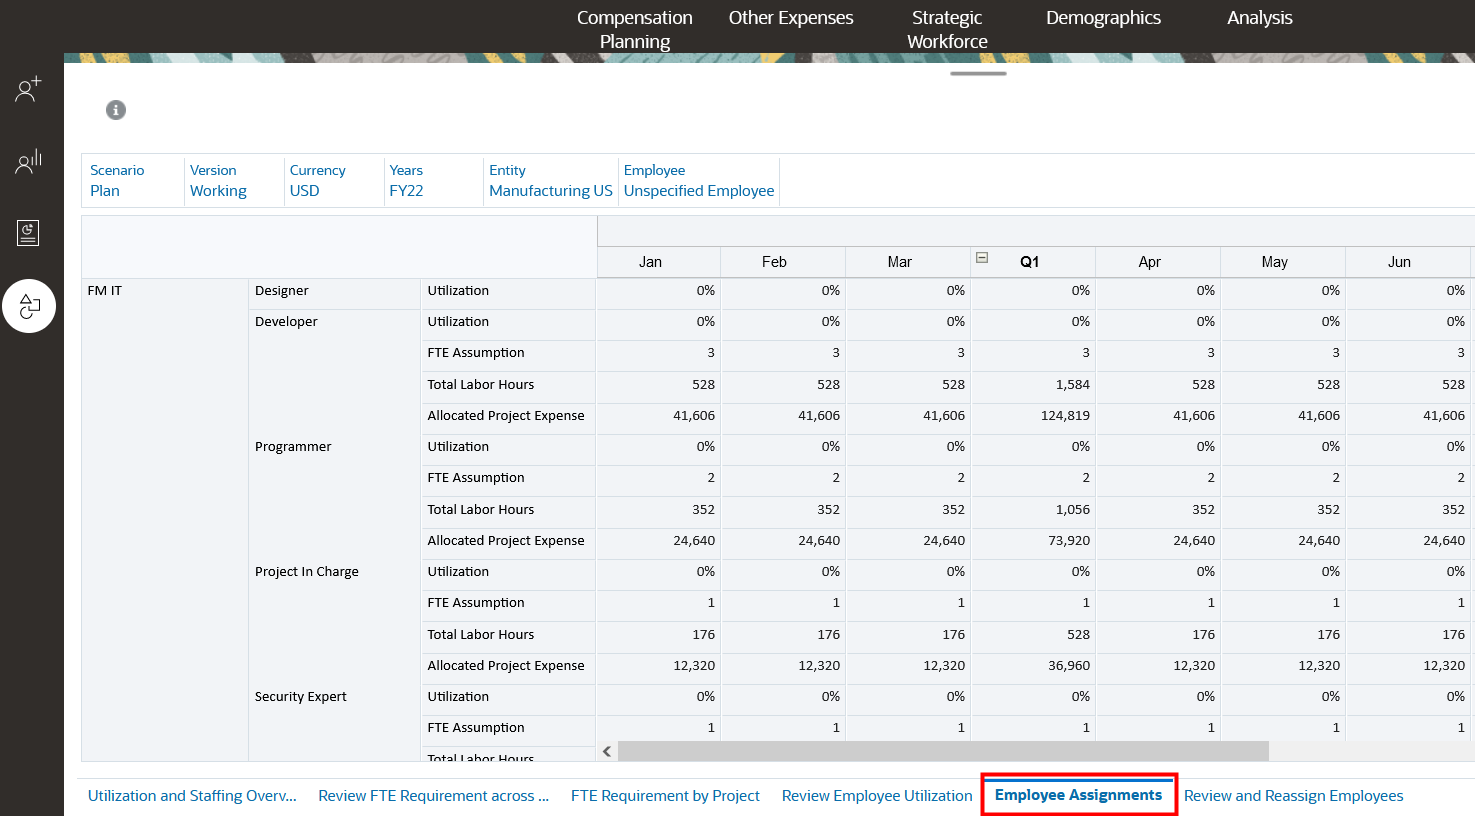
 - Modify Amy's Assignments to be no more than 100%. Click the Employee Assignments tab.
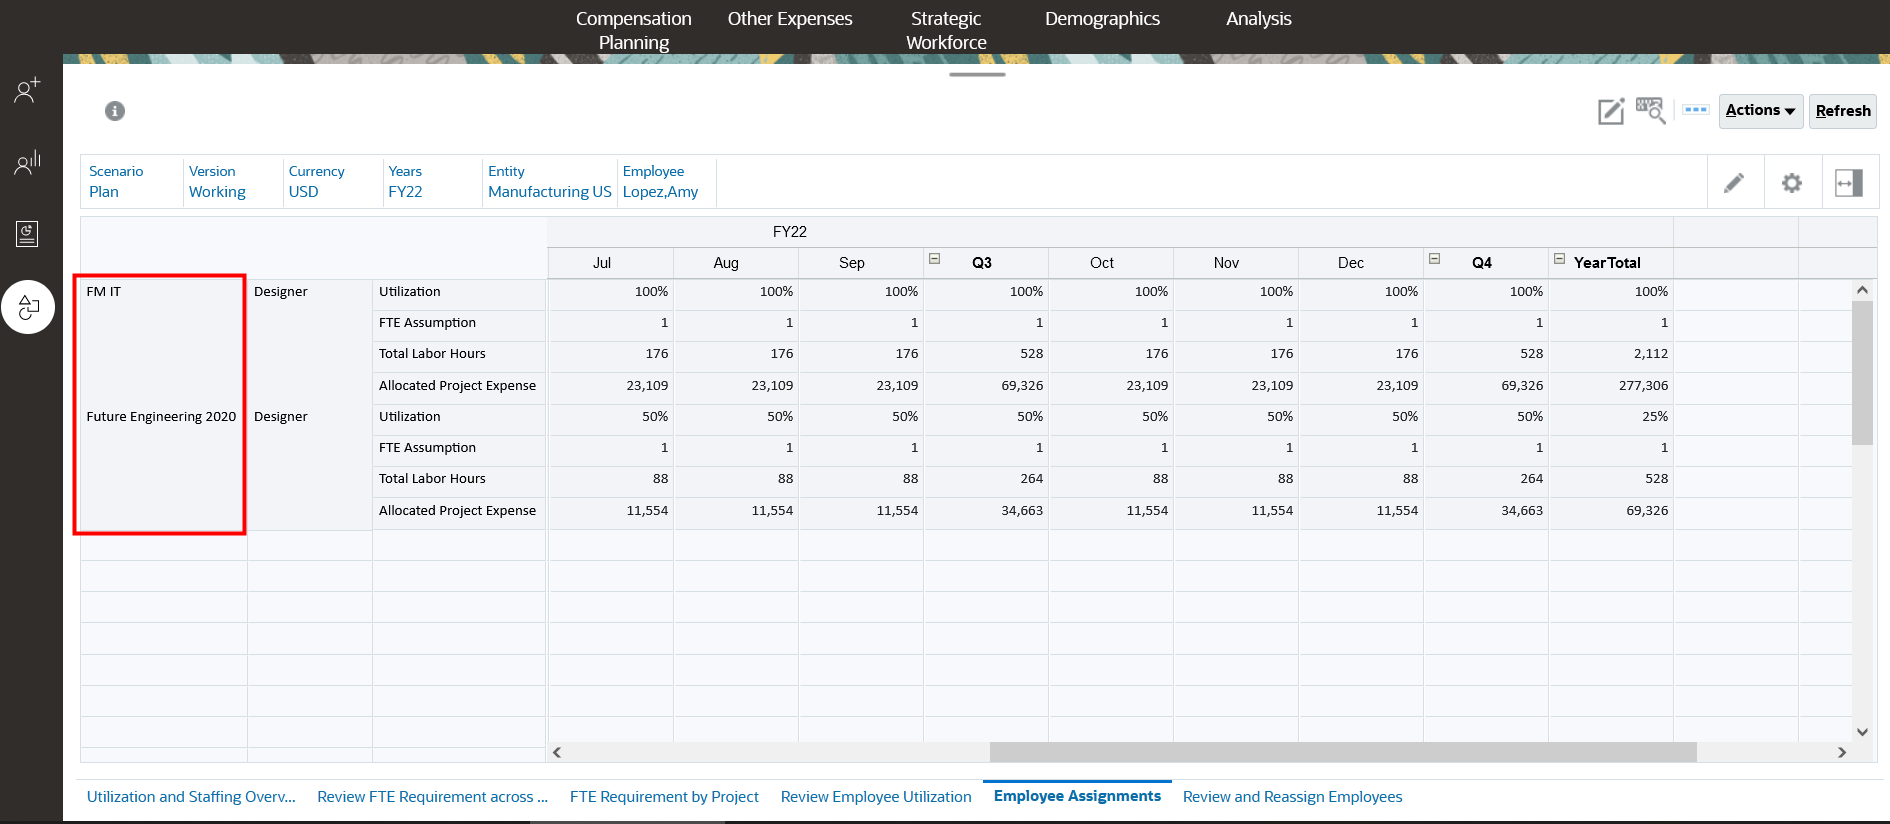
- In the POV, select the Employee dimension, then use the Member Selector to select Amy Lopez. Click Go. View the assignments.
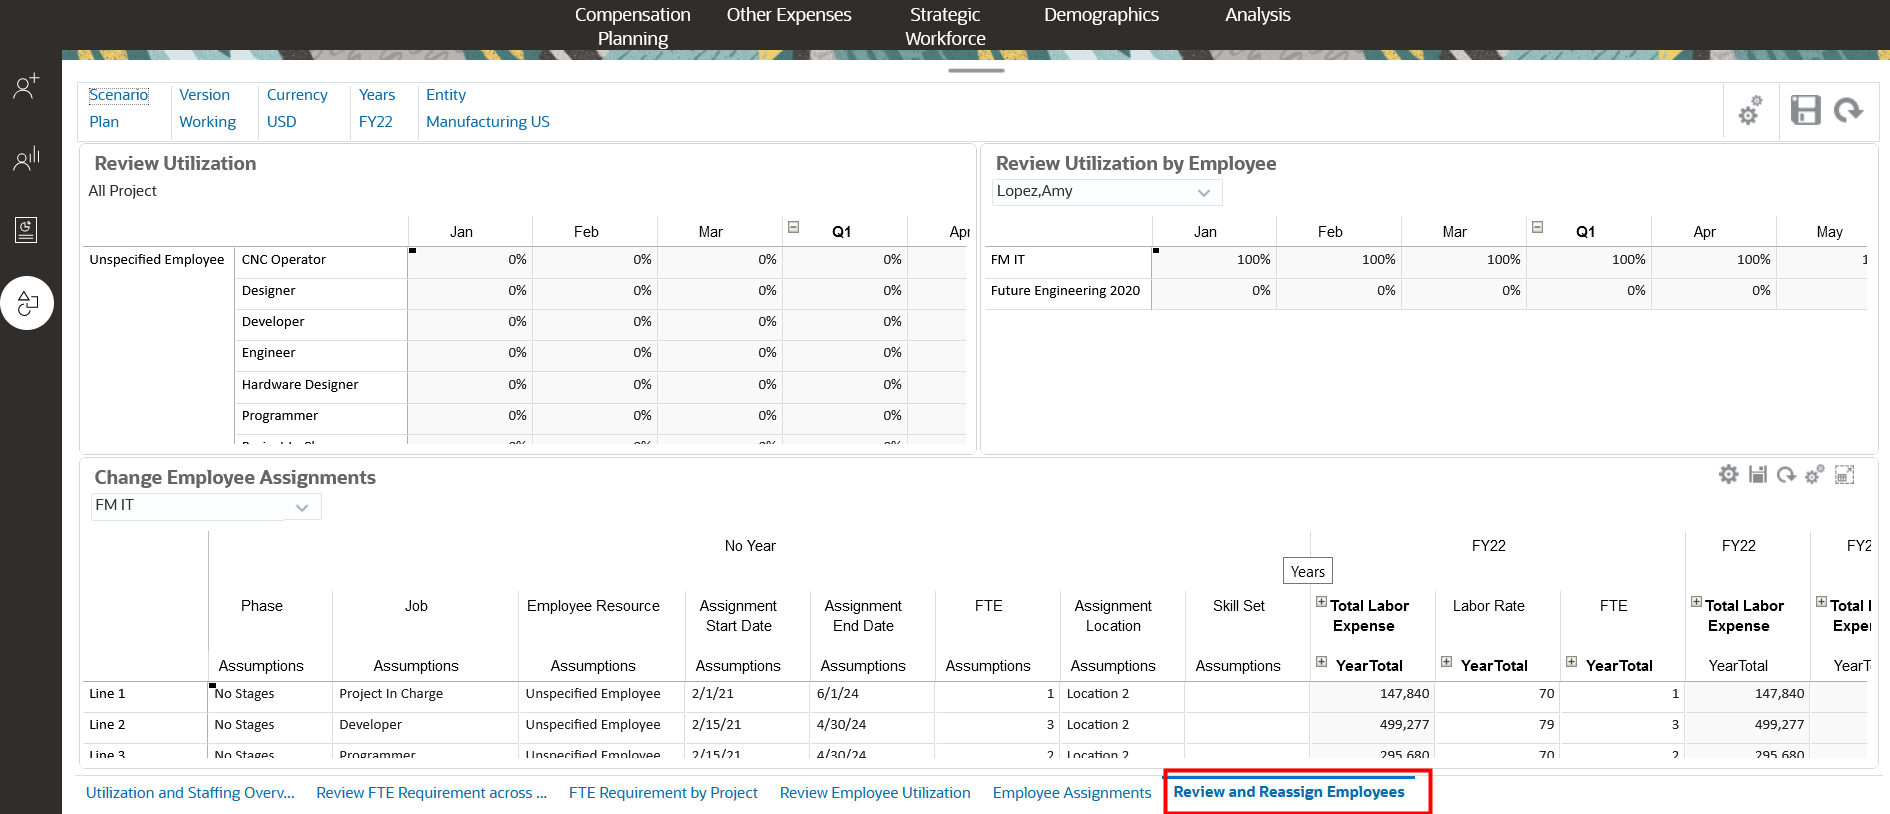
- Click the Review and Reassign Employees tab. Change the Entity to Manufacturing US.
- In the Change Employee Assignments form, click the Maximize icon at the far right.
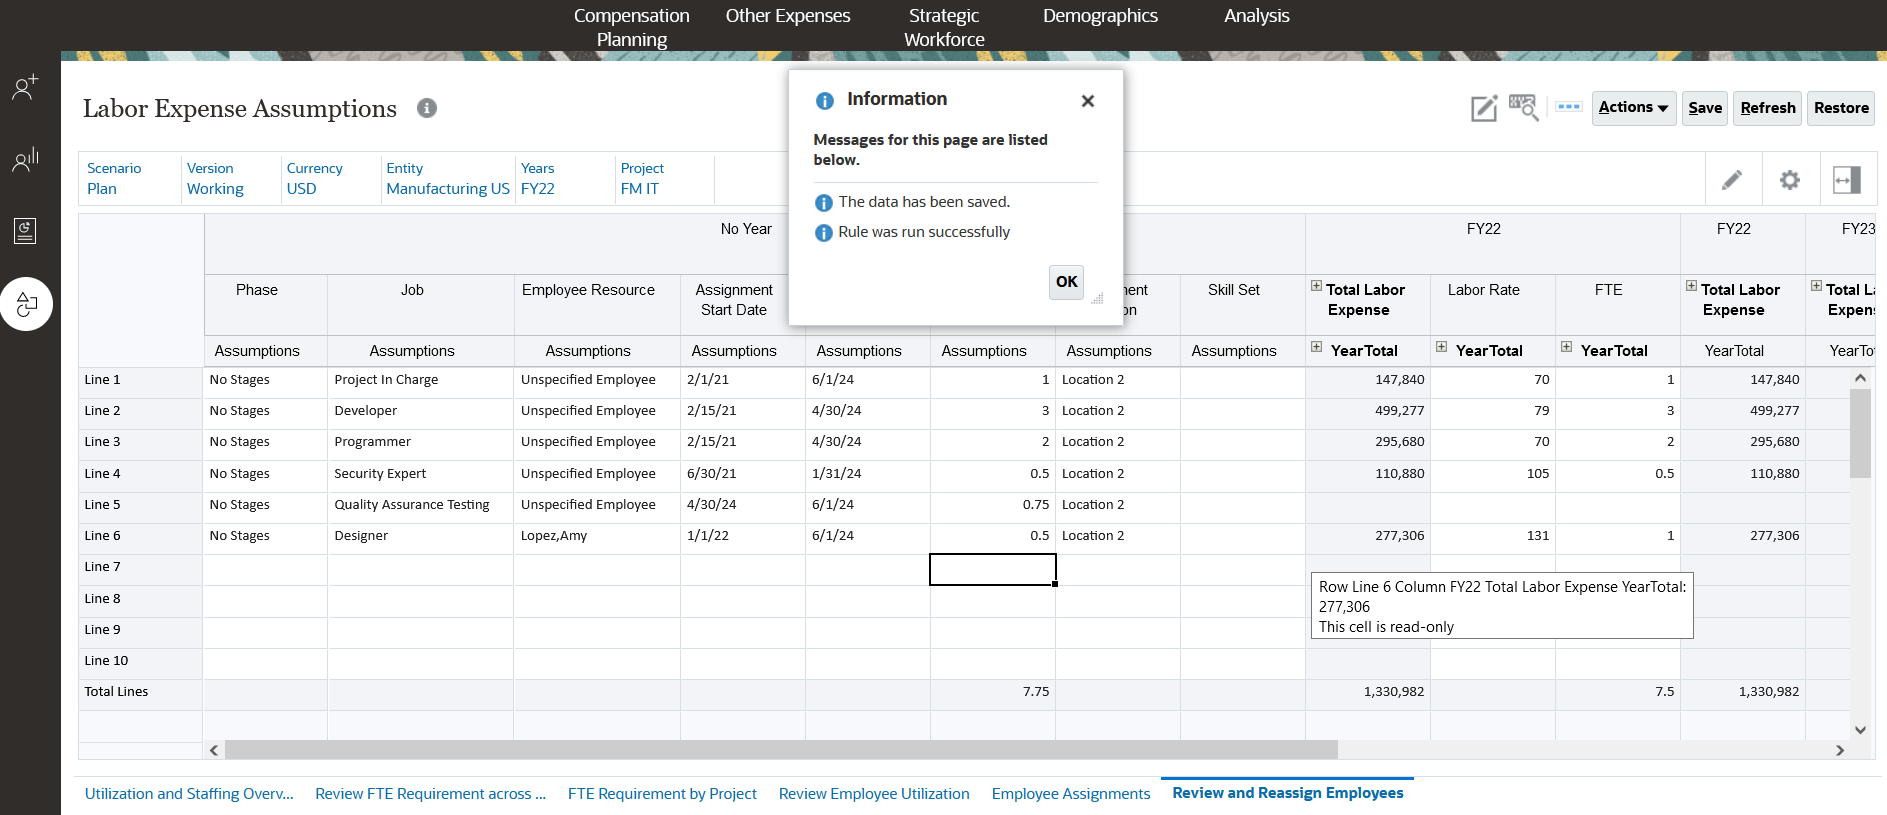
- In Labor Expense Assumptions, verify the POV as noted in the screenshot below, then change Amy's FTE for the FM IT project to .5. Click Save.
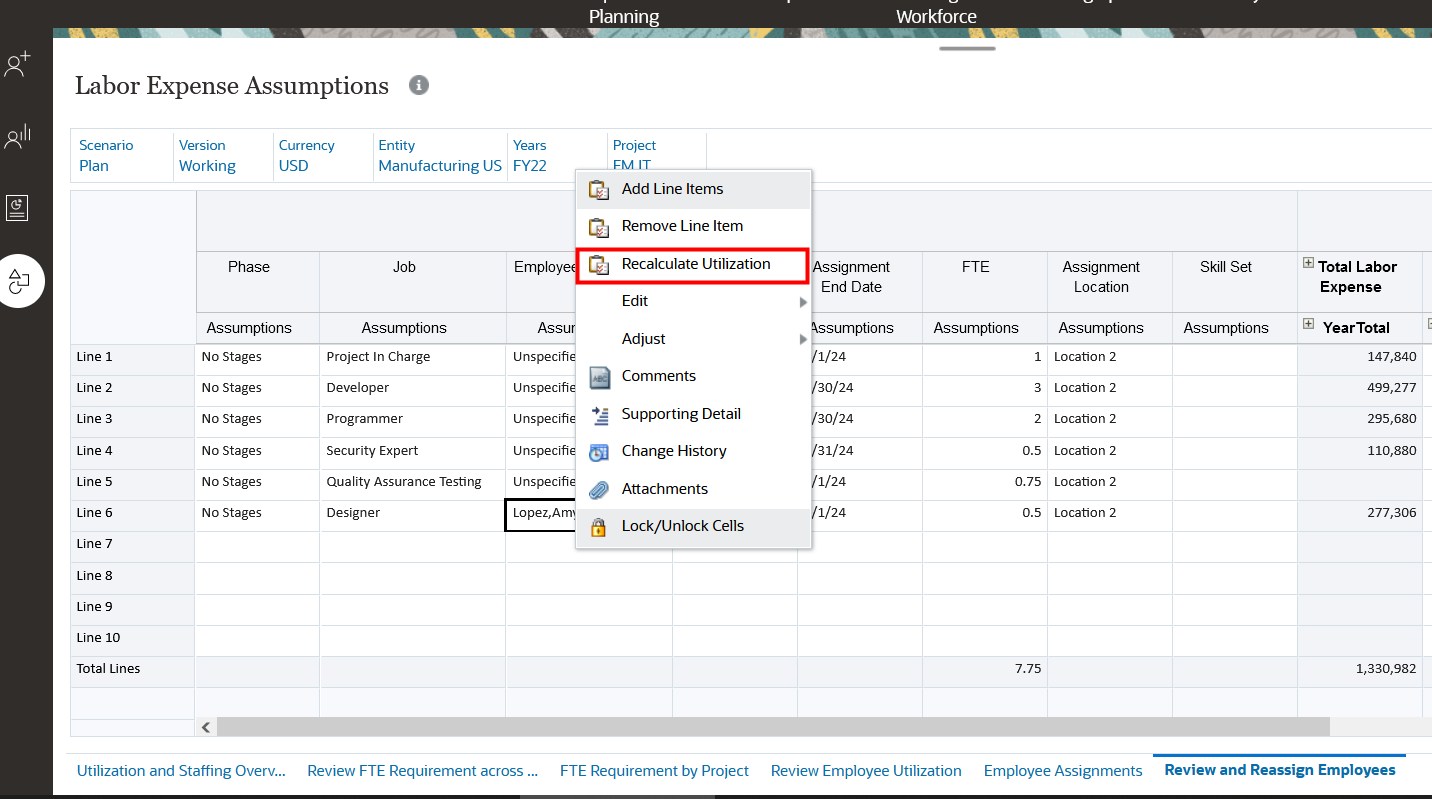
- Right-click on Amy Lopez, then click Recalculate Utilization. At the prompt, click OK. Click Restore.
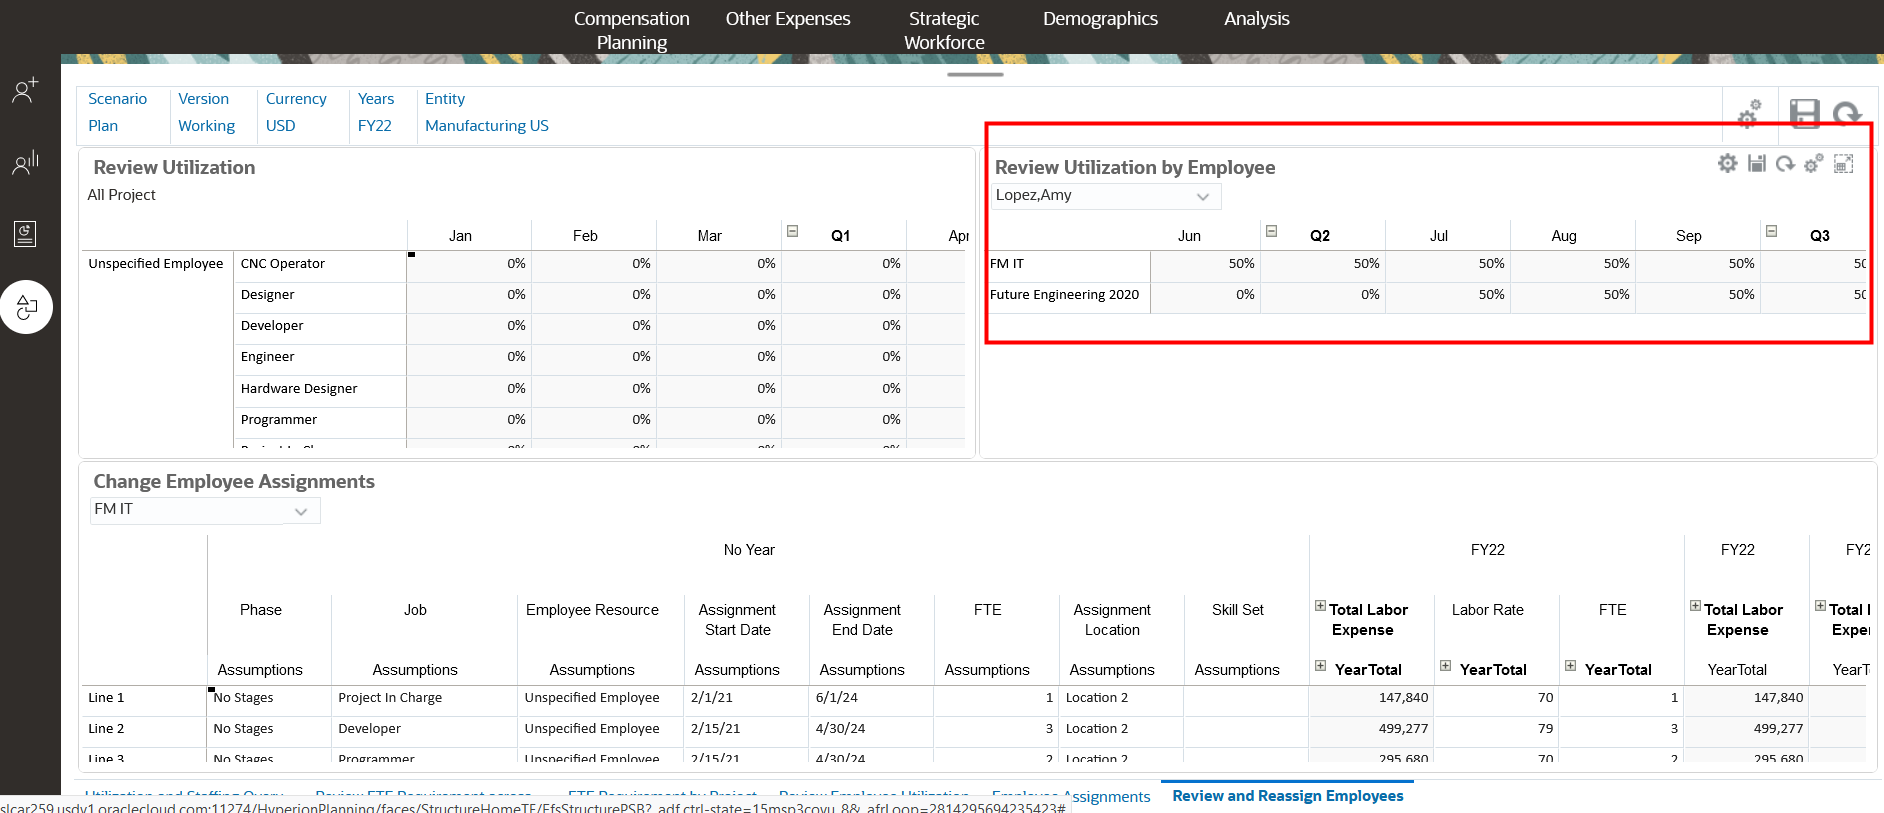
- Note how Amy is now at 100% allocated starting in July, instead of 150%.

Learn More
Integrating Projects Data with Workforce in Planning
F54435-01-01
March 2022
Copyright © 2022, Oracle and/or its affiliates.
This 30 minute hands-on tutorial shows you how to view, update and add tasks in Task Manager.
This software and related documentation are provided under a license agreement containing restrictions on use and disclosure and are protected by intellectual property laws. Except as expressly permitted in your license agreement or allowed by law, you may not use, copy, reproduce, translate, broadcast, modify, license, transmit, distribute, exhibit, perform, publish, or display any part, in any form, or by any means. Reverse engineering, disassembly, or decompilation of this software, unless required by law for interoperability, is prohibited.
If this is software or related documentation that is delivered to the U.S. Government or anyone licensing it on behalf of the U.S. Government, then the following notice is applicable:
U.S. GOVERNMENT END USERS: Oracle programs (including any operating system, integrated software, any programs embedded, installed or activated on delivered hardware, and modifications of such programs) and Oracle computer documentation or other Oracle data delivered to or accessed by U.S. Government end users are "commercial computer software" or "commercial computer software documentation" pursuant to the applicable Federal Acquisition Regulation and agency-specific supplemental regulations. As such, the use, reproduction, duplication, release, display, disclosure, modification, preparation of derivative works, and/or adaptation of i) Oracle programs (including any operating system, integrated software, any programs embedded, installed or activated on delivered hardware, and modifications of such programs), ii) Oracle computer documentation and/or iii) other Oracle data, is subject to the rights and limitations specified in the license contained in the applicable contract. The terms governing the U.S. Government's use of Oracle cloud services are defined by the applicable contract for such services. No other rights are granted to the U.S. Government.
This software or hardware is developed for general use in a variety of information management applications. It is not developed or intended for use in any inherently dangerous applications, including applications that may create a risk of personal injury. If you use this software or hardware in dangerous applications, then you shall be responsible to take all appropriate fail-safe, backup, redundancy, and other measures to ensure its safe use. Oracle Corporation and its affiliates disclaim any liability for any damages caused by use of this software or hardware in dangerous applications.
Oracle and Java are registered trademarks of Oracle and/or its affiliates. Other names may be trademarks of their respective owners.
Intel and Intel Inside are trademarks or registered trademarks of Intel Corporation. All SPARC trademarks are used under license and are trademarks or registered trademarks of SPARC International, Inc. AMD, Epyc, and the AMD logo are trademarks or registered trademarks of Advanced Micro Devices. UNIX is a registered trademark of The Open Group.
This software or hardware and documentation may provide access to or information about content, products, and services from third parties. Oracle Corporation and its affiliates are not responsible for and expressly disclaim all warranties of any kind with respect to third-party content, products, and services unless otherwise set forth in an applicable agreement between you and Oracle. Oracle Corporation and its affiliates will not be responsible for any loss, costs, or damages incurred due to your access to or use of third-party content, products, or services, except as set forth in an applicable agreement between you and Oracle.