Introduction
This 30-minute hands-on tutorial shows you how to manage time periods to include the detail required by financial models in Strategic Modeling, a solution provided by Oracle Cloud EPM.
Background
When you create a model, the model is populated with a hierarchical chart of accounts, a time structure, reports, data views, account groups, and all the metadata from the template or the model it was created from.
The model’s time structure can be defined based on different levels of granularity for different years. For example, you can set the years toward the end of your forecast period to show only annual values while years within a five year forecast can be set to show more granular details such as quarterly or monthly.
After creating your model, you can modify time period structure and settings.
Prerequisites
Cloud EPM Hands-on Tutorials may require you to import a snapshot into your Cloud EPM Enterprise Service instance. Before you can import a tutorial snapshot, you must request another Cloud EPM Enterprise Service instance or remove your current application and business process. The tutorial snapshot will not import over your existing application or business process, nor will it automatically replace or restore the application or business process you are currently working with.
Before starting this tutorial, you must:
- Have Service Administrator access to a Cloud EPM Enterprise Service instance. The instance should not have a business process created.
- If you haven't already, register for a free Oracle Cloud Customer Connect account so you can
access the required files.
- Download the latest EPBCS Sample Application LCM snapshot from this idea page.
- Upload and import the latest EPBCS Sample Application LCM snapshot into your Planning instance.
Note:
Data in the sample application may vary due to changes over time and across financial years.
Note:
If you run into migration errors importing the snapshot, re-run the migration excluding the HSS-Shared Services component, as well as the Security and User Preferences artifacts in the Core component. For more information on uploading and importing snapshots, refer to the Administering Migration for Oracle Enterprise Performance Management Cloud documentation.Opening a model
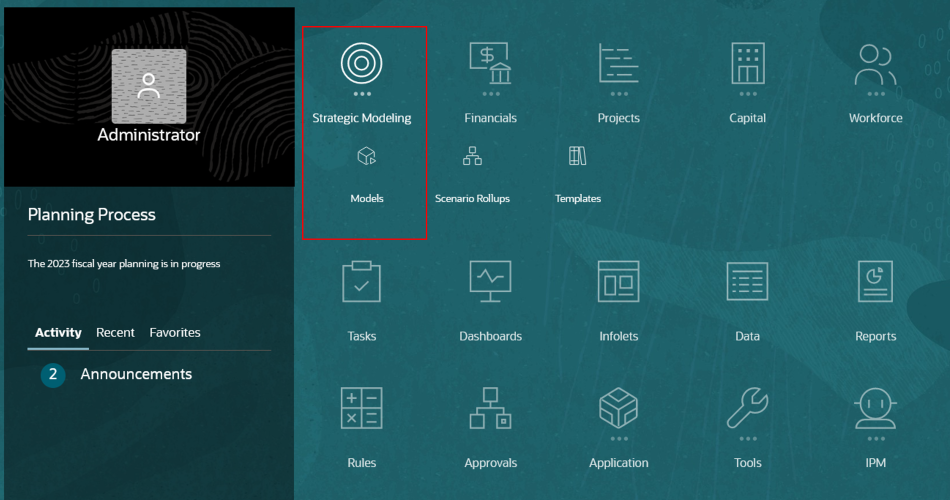
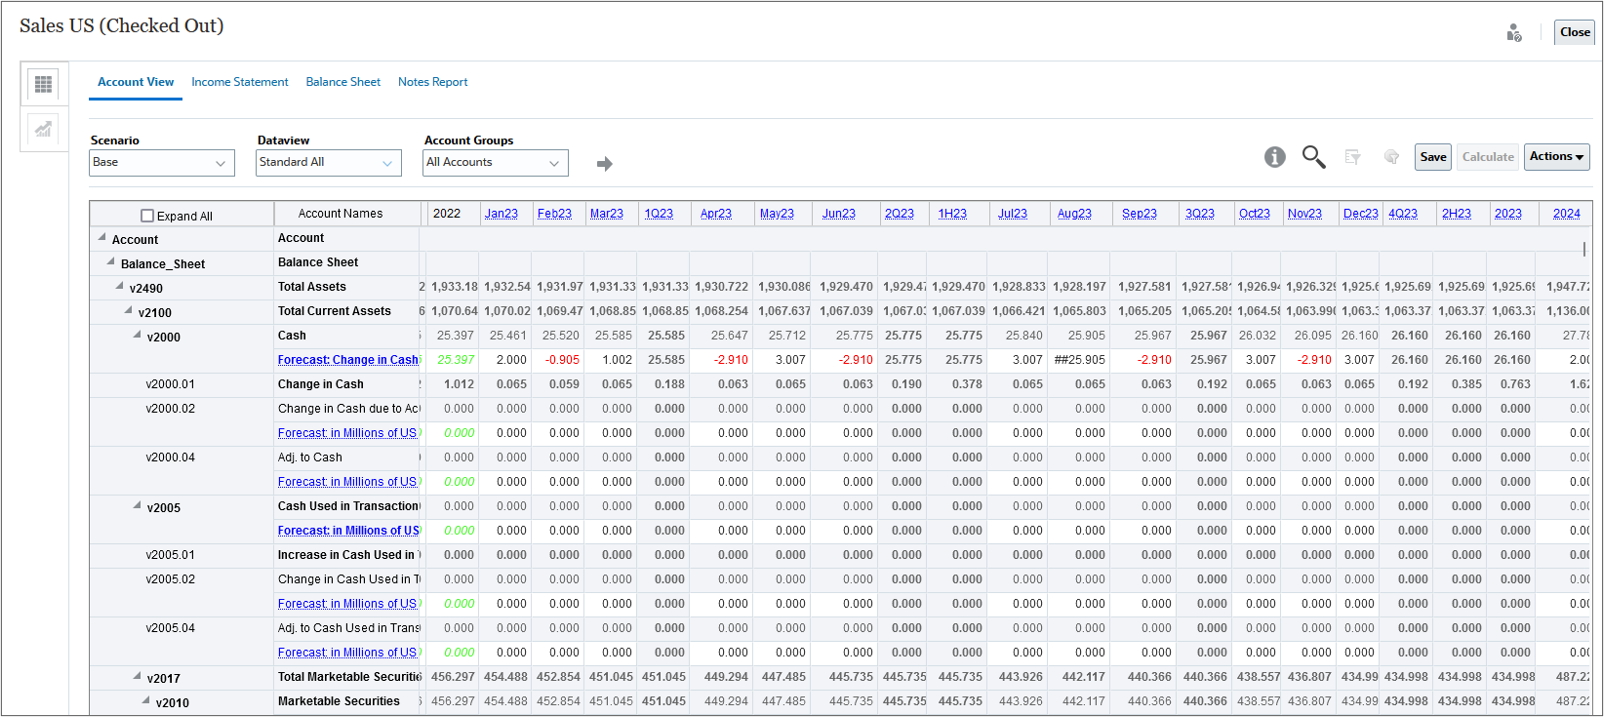
- On the Planning home page, click Strategic Modeling then Models.
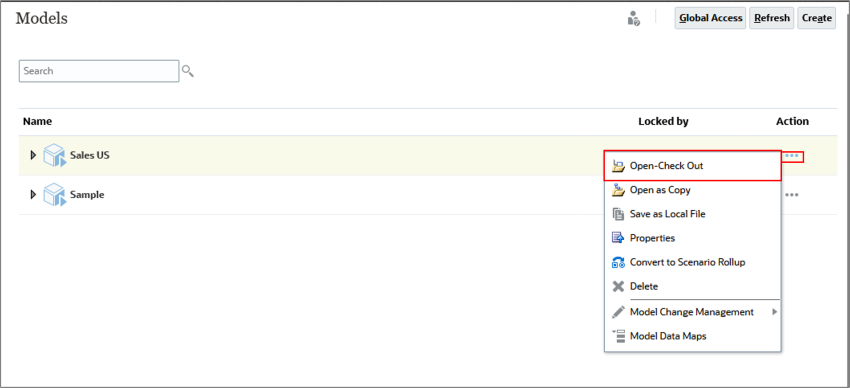
- For Sample, click (...) Action and select Open-Check Out.
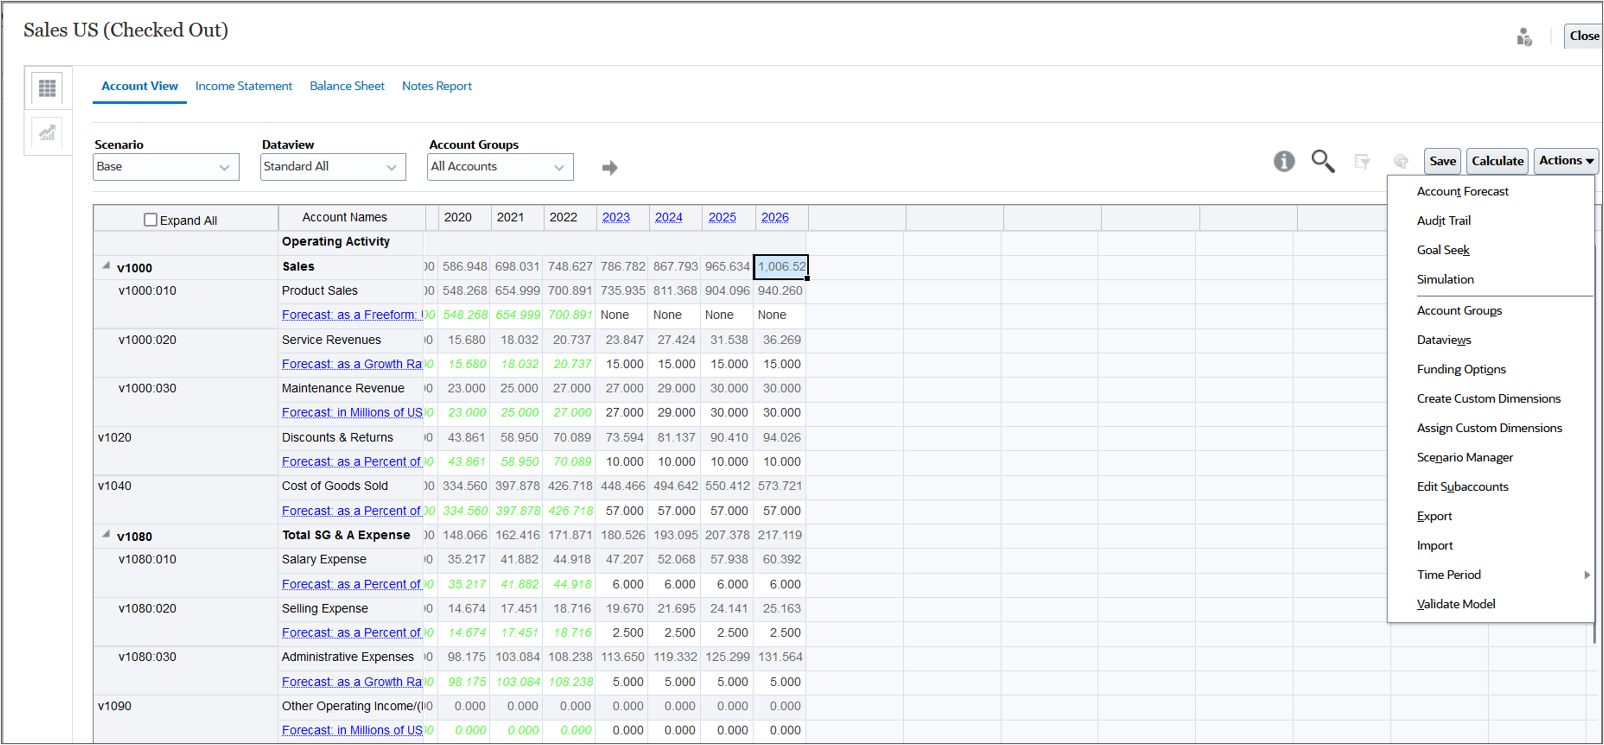
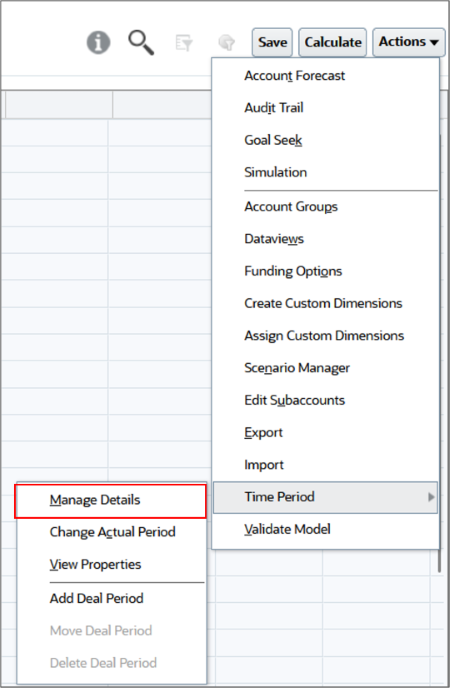
- To start managing time period details, click Actions, and then select Time Period.
- Select Manage Details.
The Models page is displayed.
Tip:
When you check out a model, you can save changes to the data and the model. When you work with a copy of a model, you can't save changes to the data or the model.The model is opened in Account View.
Note:
The Time Period menu options include Manage Details, Change Actual Period, View Properties, Add Deal Period, and, if a deal period exists, Move Deal Period and Delete Deal Period. You define and manage sub periods, trailing periods, and period-to-date in Manage Details.Managing time period details
Defining model time period parameters
- Click
 (Edit).
 - Change the end year. From the End Year dropdown list, select 2026.
- Click
 (Apply).
Note:
You can add or delete years from the beginning or end of financial model timelines, and set the last historical period, number of years to use for historical averages, and the base period.Changes to the time period parameters were saved.

Tip:
To apply or commit changes to the model, you must click Apply on the top-right area of the dialog box and run calculations. You will be performing this task in a later section.Configuring period details
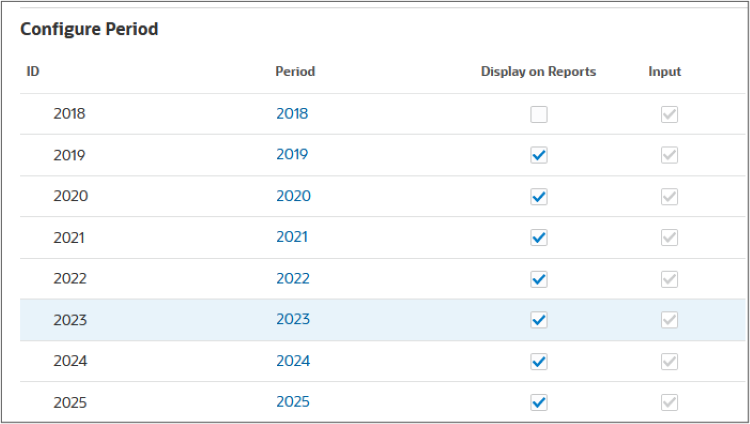
All years have “Yearly” selected by default.
For any year other than the beginning balance year, you can select and combine periods of years, halves, quarters, months, and weeks (if weekly planning is enabled) for historical and forecast data. The Input option is cleared for upper level time periods when you add time detail, because the time period becomes an aggregate.
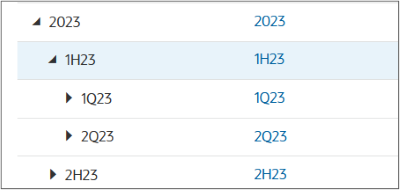
- In the Configure Period section, select the 2023 row.
- Select the 2023 row.
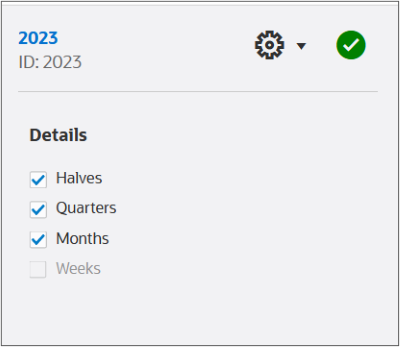
- In Details, select Halves, Quarters, and Months.
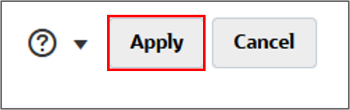
- Click
 (Apply).
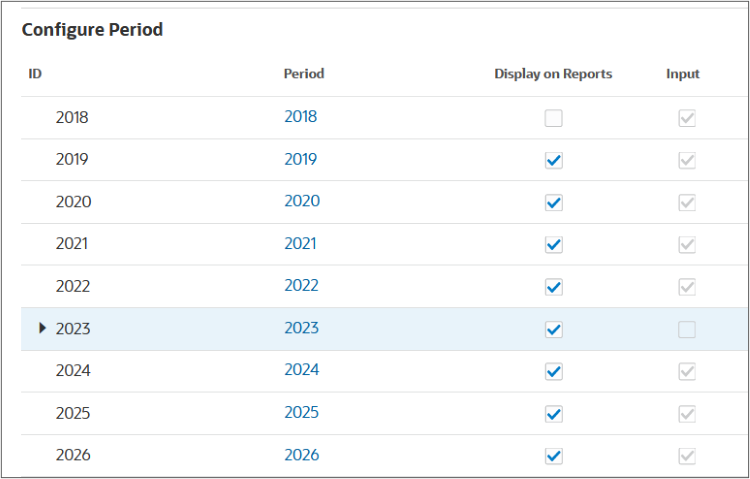
 - Click the arrow
 on the left of
the 2023 row to expand period details.
on the left of
the 2023 row to expand period details.
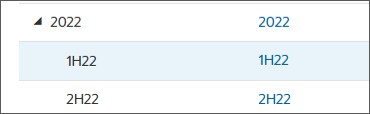
The added period halves (half year) are displayed.
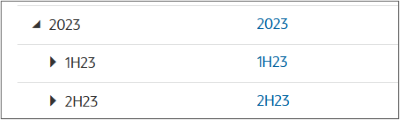
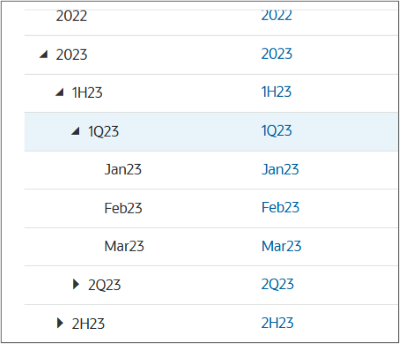
- Expand 1H23 to display quarter periods.
- Expand 1Q23 to display months.
Notice that you cannot change period details for 2023, the beginning balance year.
Applying time period details
- Click Apply.
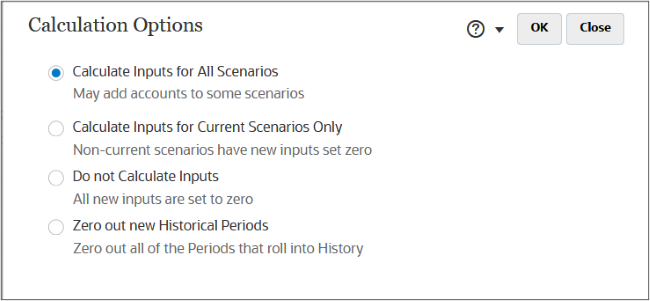
- Accept the default selection: Calculate Inputs for All Scenarios, and click OK.
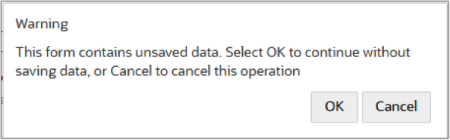
- If you are prompted with a warning message regarding unsaved data, click OK.
When you apply your changes, you can select whether to calculate inputs for all scenarios, only for the current scenario, or not to calculate any inputs.
The added time periods were calculated and displayed in Account view.
Adding time periods
Adding sub periods
Define sub periods for input periods when transactions such as acquisitions or leveraged buyouts occur.
In this section, you create sub periods for a leveraged buyout that took place on April 15, in the 2022 yearly period. The sub period length is 105 days.
- In Account view, click Actions, then select Time Period, and then Manage Details.
- Modify period details for 2022. Select the 2022 row.
- In Details, select Halves, and click (Apply).
- Expand 2022 and select 1H22.
- On the right, for 1H22, click
 (Settings), then select Sub Period.
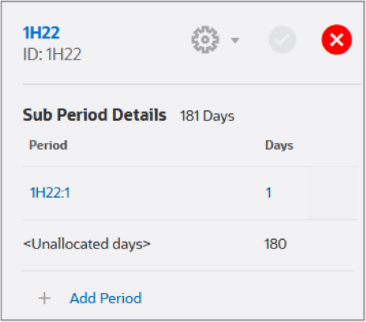
 - Click Add Period.
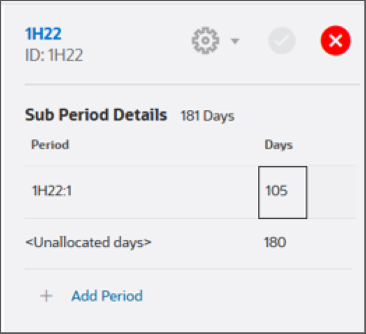
- Double-click in Days for 1H22:1, change the value to 105, and press Enter.
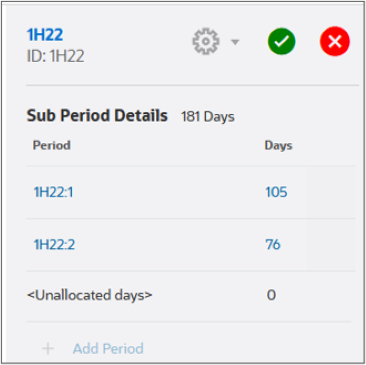
- Create more sub-periods and allocate days until Unallocated Days is zero. Click Add Period.
- For 1H22:2, double-click in Days and change it to 76, and then press Enter.
- Click (Apply).
- Expand 1H22.
- On the top-right area of the dialog box, click Apply to commit your changes to the model.
- In Calculation Options, accept default selections and click OK.
You can add sub periods only to the lowest level time period. For example, if you've defined a year to include Halves, Quarters, and Months, you can add sub periods only to months.
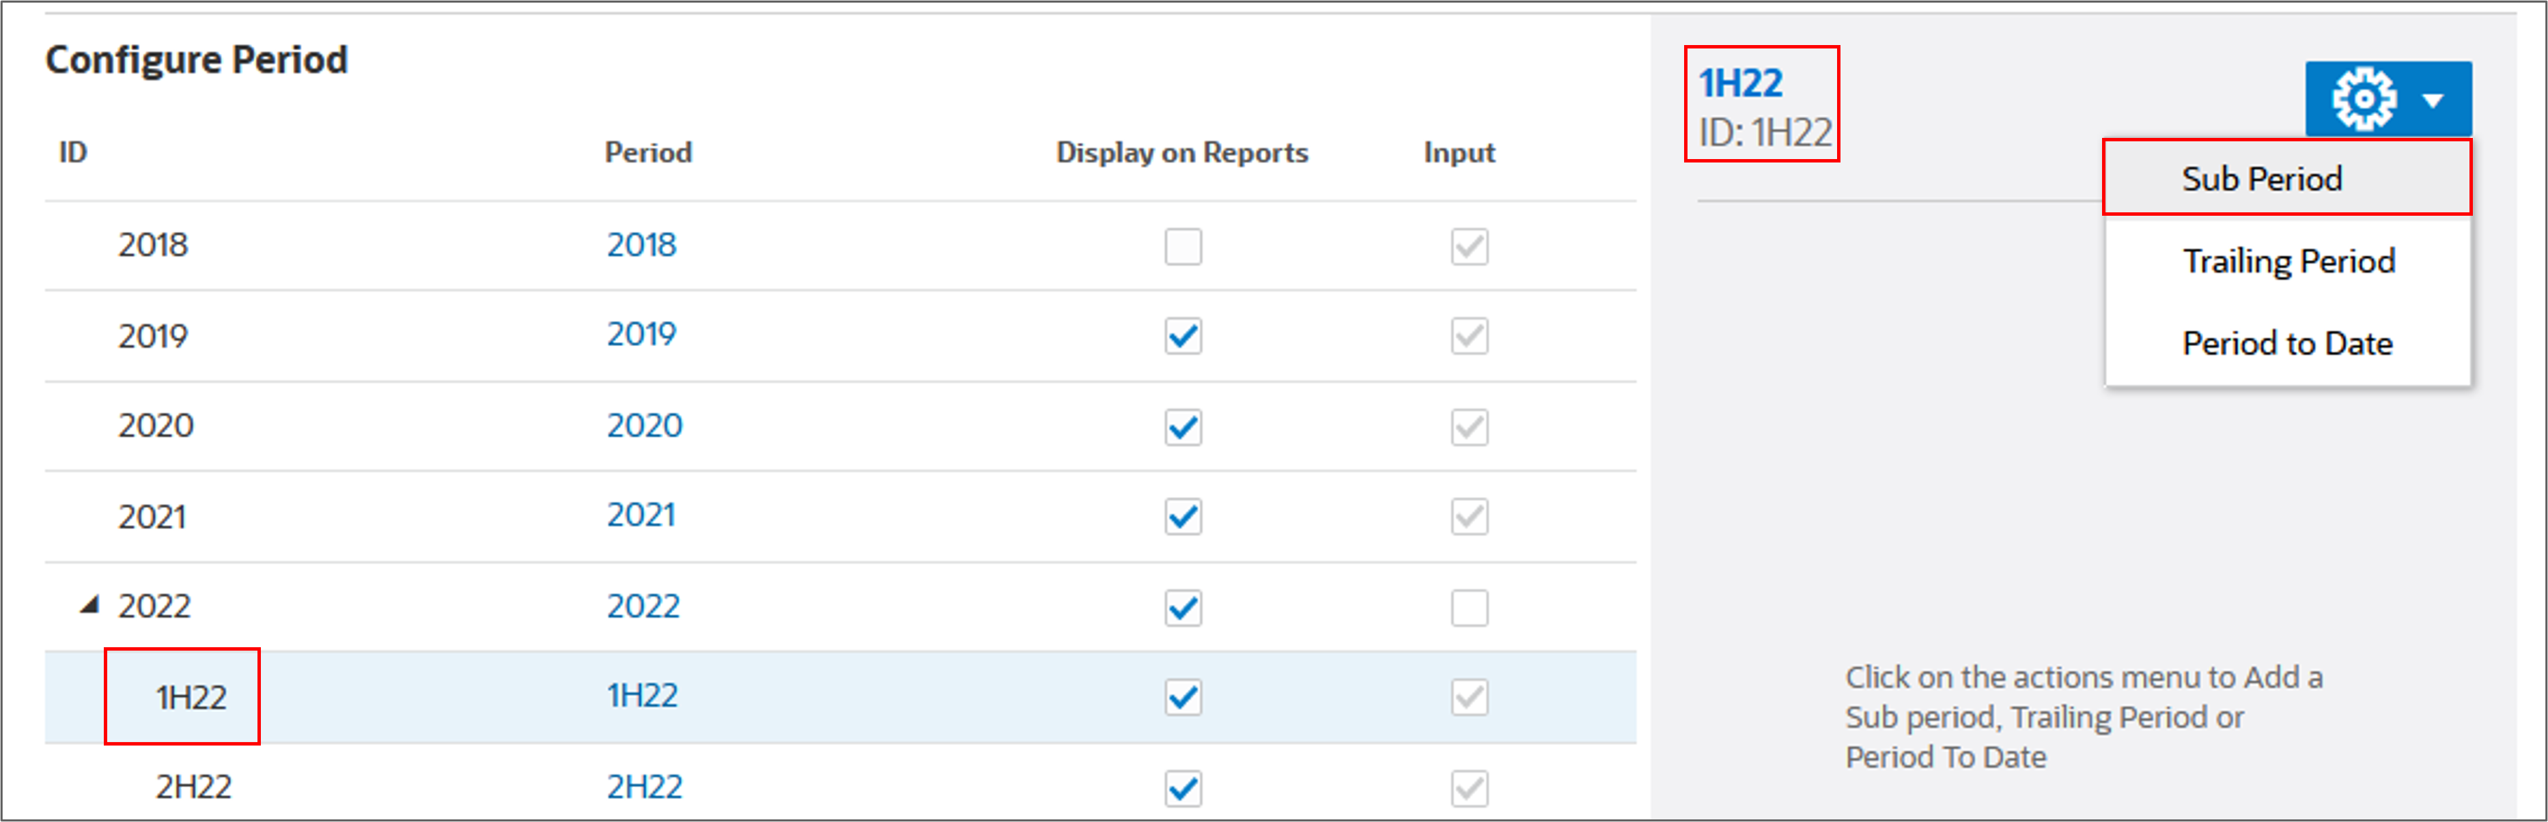
Sub Period Details are displayed. You can add sub periods and allocate days until the Unallocated Days is zero.
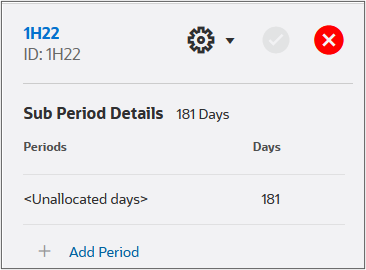
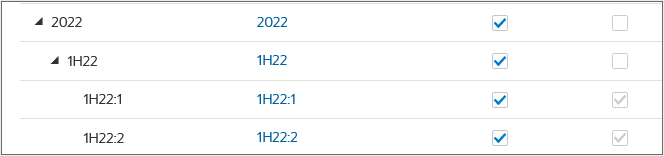
The 1H22:1 is added in Sub Period Details.
Tip:
Sub periods must be at least one day long.The final sub period allocation should allocate 105 days to 1H22:1 and 76 days to 1H22:2.
The sub periods are added under 1H22.
Tip:
If you are prompted with a warning message regarding unsaved data, click OK.Data for 2022, including the new sub periods were calculated and applied to model.

Adding deal periods
You can create deal periods in which the balance sheet is restated to reflect merger and acquisition activities. A deal period is a zero-day period that is used for transaction analysis.
To allow for transaction analysis of the buyout, you will add a deal period and attach it to the sub period.
- In Account view, click Actions, then select Time Period, and then Add Deal Period.
- In Add Deal Period, select 1H22:1 from the dropdown list, and then click Save and Close.
- Click Calculate, then select All Scenarios.
- Click Save.
Tip:
If you are prompted with a warning message regarding unsaved data, click OK.By adding deal periods, you can simulate the effects that mergers, acquisitions, or divestitures have on the organization based on the timing of the transactions.
When you add a deal period, the original period is split into three: closing, deal and the calculated period.
Tip:
If you are prompted with a warning message regarding unsaved data, click OK.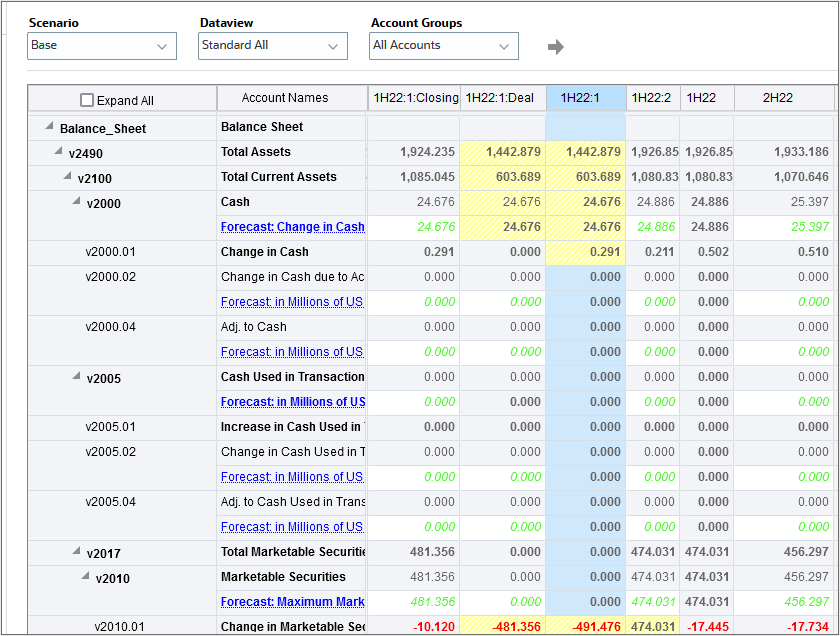
Adding trailing periods
Trailing periods are time periods that collect the most recent number of time periods. You can set up trailing periods to occur in either a historical or a forecast period. With trailing time periods, you can measure business performance over a specific time duration.
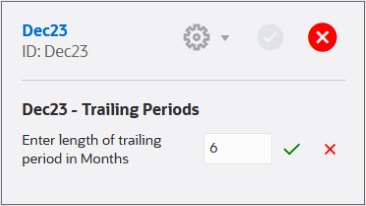
For example, if you want to track totals and increases over a six (6) month period ending in December 2023, add a 6-month trailing period to the Dec23 sub period.
- In Account view, click Actions, then select Time Period, and then Manage Details.
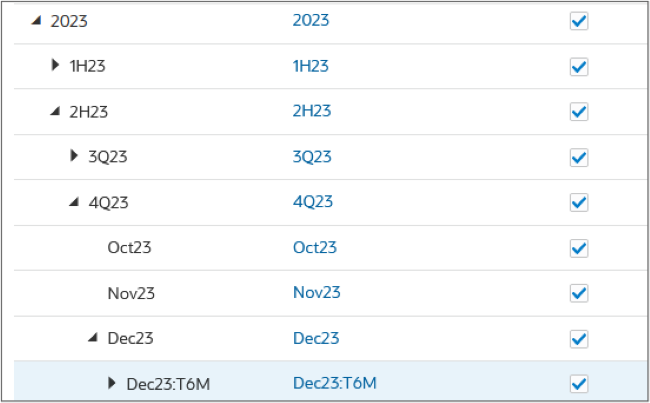
- Expand 2023, then 2H23, then 4Q23, and then select Dec23.
- Click (Settings)
and select Trailing Period.
- Click Add Trailing Period.
- For the length of trailing period in Months, enter 6 and click (OK).
- Click (Apply).
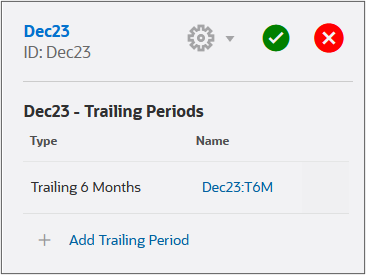
- Expand Dec23 to verify that the Dec23:T6M trailing period was added.
- On the top-right area of the dialog box, click Apply to commit your changes to the model.
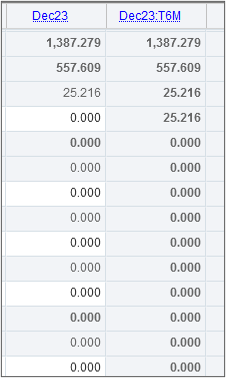
- Scroll to the right of the grid and locate the added Dec23:T6M column.
Trailing period details are displayed.
Adding period-to-date
Use period to date to create year-to-date, half-year-to-date, quarter-to-date, or month-to-date periods.
You can create a period to date on any period other than year. For example, if the time period detail for 2024 is months, you can create a period to date on months.
All financial accounts in period-to-date periods are calculated by default. You can view period-to-date periods in Account view or in Reports.
- In Account view, click Actions, then select Time Period, and then Manage Details.
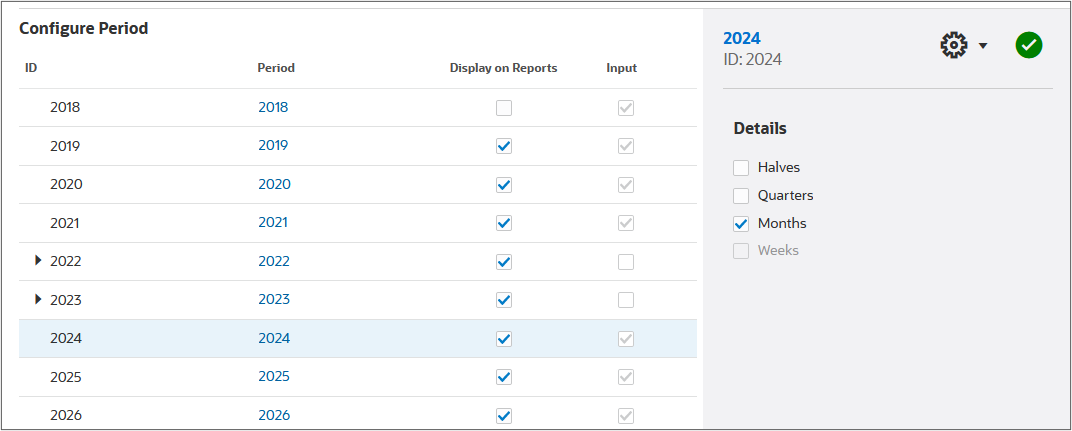
- Modify period details for 2024. Select the 2024 row.
- In Details, select Months, and click (Apply).
- Expand 2024 and verify that monthly periods were added.
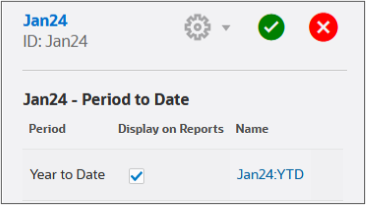
- Select Jan24.
- In Details, click
(Settings) and select Period-to-Date.
- Click Add Period To Date.
- Click (Apply).
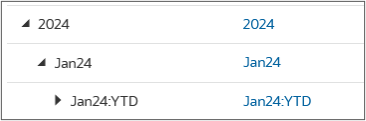
- In Configure Period, expand 2024, and then Jan24 to display the Jan24:YTD period.
- On the top-right area of the dialog box, click Apply to commit your changes to the model.
- When prompted for Calculation Options, accept the default and click OK.
- Scroll to the right of the grid and locate the added Jan24:YTD column.

The Year to Date period is added.
Tip:
If you are prompted with a warning message regarding unsaved data, click OK.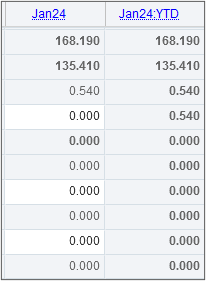
Removing time periods
To start removing periods in Account view, click Actions, then select Time Period, and then Manage Details.
Removing period to date
- To delete period-to-date in Manage Time Period Details, select the parent period. Expand 2024, then select Jan24.
- In Details, click (
Settings) and select Period-to-Date.
- Mouse-over the right side of Jan24:YTD to display and then click the
 (Delete) icon.
 - Click (Apply).
Removing trailing periods
- To remove trailing periods in Manage Time Period Details, select the parent period. Expand 2023, then 2H23, then 4Q23, and then select Dec23.
- In Details, click
(Settings) and select Trailing Period.
- Mouse-over the right side of Dec23:T6M to display and then click the (Delete) icon.
- Click (Apply).
Removing period details
- To remove period details: Halves, Quarters, Months, or Weeks, click the parent period. In Configure Period, click the 2024 row.
- In Details, clear the checkbox for Months.
- Click (Apply).
- When prompted with a warning, click OK.
Applying your changes
- On the top-right area of the dialog box, click Apply to commit your changes to the model.
- In Calculation Options, accept default selections and click OK.
Tip:
If you are prompted with a warning message regarding unsaved data, click OK.Removing deal periods
- In Account view, click Actions, then select Time Period, and then Delete Deal Period.
- Select whether to delete or keep deal period data. Accept the default selection and click OK.
Removing sub periods
- In Account view, click Actions, then select Time Period, and then Manage Details.
- To delete sub periods in Manage Time Period Details, select the parent period. Expand 2022, then select 1H22.
- In Details, click
(Settings) and select Sub Period.
- Mouse-over the right side of each sub period row to display and then click the (Delete) icon.
- Click (Apply).
- Click Apply, on the top-right area of the dialog box, to commit your changes to the model.
- In Calculation Options, accept default selections and click OK.
Tip:
If you are prompted with a warning message regarding unsaved data, click OK.Changing the actual period
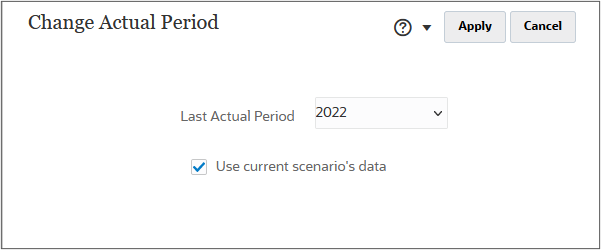
- In Account view, click Actions, then select Time Period, and then Change Actual Period.
- In Change Actual Period, select the last actual period: 2022.
- Select whether to use the current scenario's data.
- Click Apply.
- In Calculation Options, accept default selections and click OK.
Tip:
If you are prompted with a warning message regarding unsaved data, click OK.Viewing time period properties
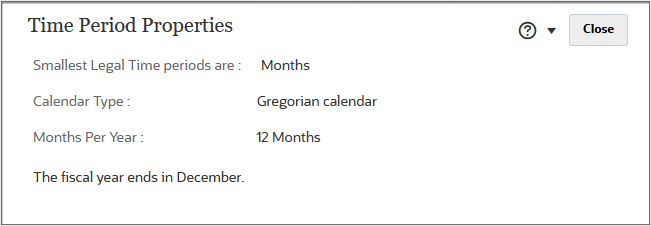
View Properties displays the model’s smallest time periods available, the calendar type, the number of months per year, and what month the fiscal year ends.
- In Account view, click Actions, then select Time Period, and then View Properties.
- When finished reviewing, click Close.
- In Account View, click Close and select Check In.
Related Links
Managing time periods in Strategic Modeling
F95950-03
March, 2026