Introduction
This tutorial is the first in a series on how to configure Predictive Cash Forecasting (PCF). In this tutorial you will create a PCF Application. Then you will review the application and setup the forecast range & time horizon. The sections build on each other and should be completed sequentially.
Background
Predictive Cash Forecasting (PCF) enables companies to make better use of their cash with data-driven continuous cash forecasting. The primary goal is to forecast for cash inflows and outflows accurately to ensure that a company has enough liquidity to meet its financial obligations and strategic goals.
Predictive Cash Forecasting is a Planning application type designed to help treasurers and cash managers perform short-term tactical (rolling ~10-15 days) or mid-term operational (~3-6 months /~12-26 weeks) cash forecasting. It allows for daily, weekly, or monthly rolling forecasts that can be generated for operational, financial, and investing cash flow line items.
PCF is built using a direct cash flow method and enables decision-making and actions for cash optimization across multiple legal entities within the business. Additionally, it provides an overview of the organization's overall cash position at each level of the legal hierarchy. With Predictive Cash Forecasting, you can:
- Forecast more accurately daily, weekly or monthly cash forecast across operating, investing and financing activities.
- Optimize cash by finding problems and opportunities earlier with increased automation and more frequent cash forecast updates.
- Take action faster by aligning stakeholders and unifying scenario planning with corrective actions.
- Enable operational improvements through deeper insights into order-to-cash and procure-to-pay.
- Data driven cash forecast by sourcing data from all finance and operational sources affecting your cash.
Predictive Cash Forecasting provides pre-built, best practice out-of-box content including a dimensional model, line items, forecast methods, forms, dashboards, rules, and role-based navigation flows.
Prerequisites
Cloud EPM Hands-on Tutorials may require you to import a snapshot into your Cloud EPM Enterprise Service instance. Before you can import a tutorial snapshot, you must request another Cloud EPM Enterprise Service instance or remove your current application and business process. The tutorial snapshot will not import over your existing application or business process, nor will it automatically replace or restore the application or business process you are currently working with.
Before starting this tutorial, you must have Service Administrator access to a Cloud EPM Enterprise Service instance.
The Rule (Reset Dates) will have to be run once the AMW (Daily Maintenance) runs in your environment. You can schedule to run it daily after your AMW (Daily Maintenance).
Creating a PCF Application
Application creation is an important step in the implementation that helps decide various aspects of how the predictive cash forecasting application is expected to be used, what features are to be turned on or off and what are the important recommendations surrounding this. Here is a snapshot of the application feature enablement that you need to implement.
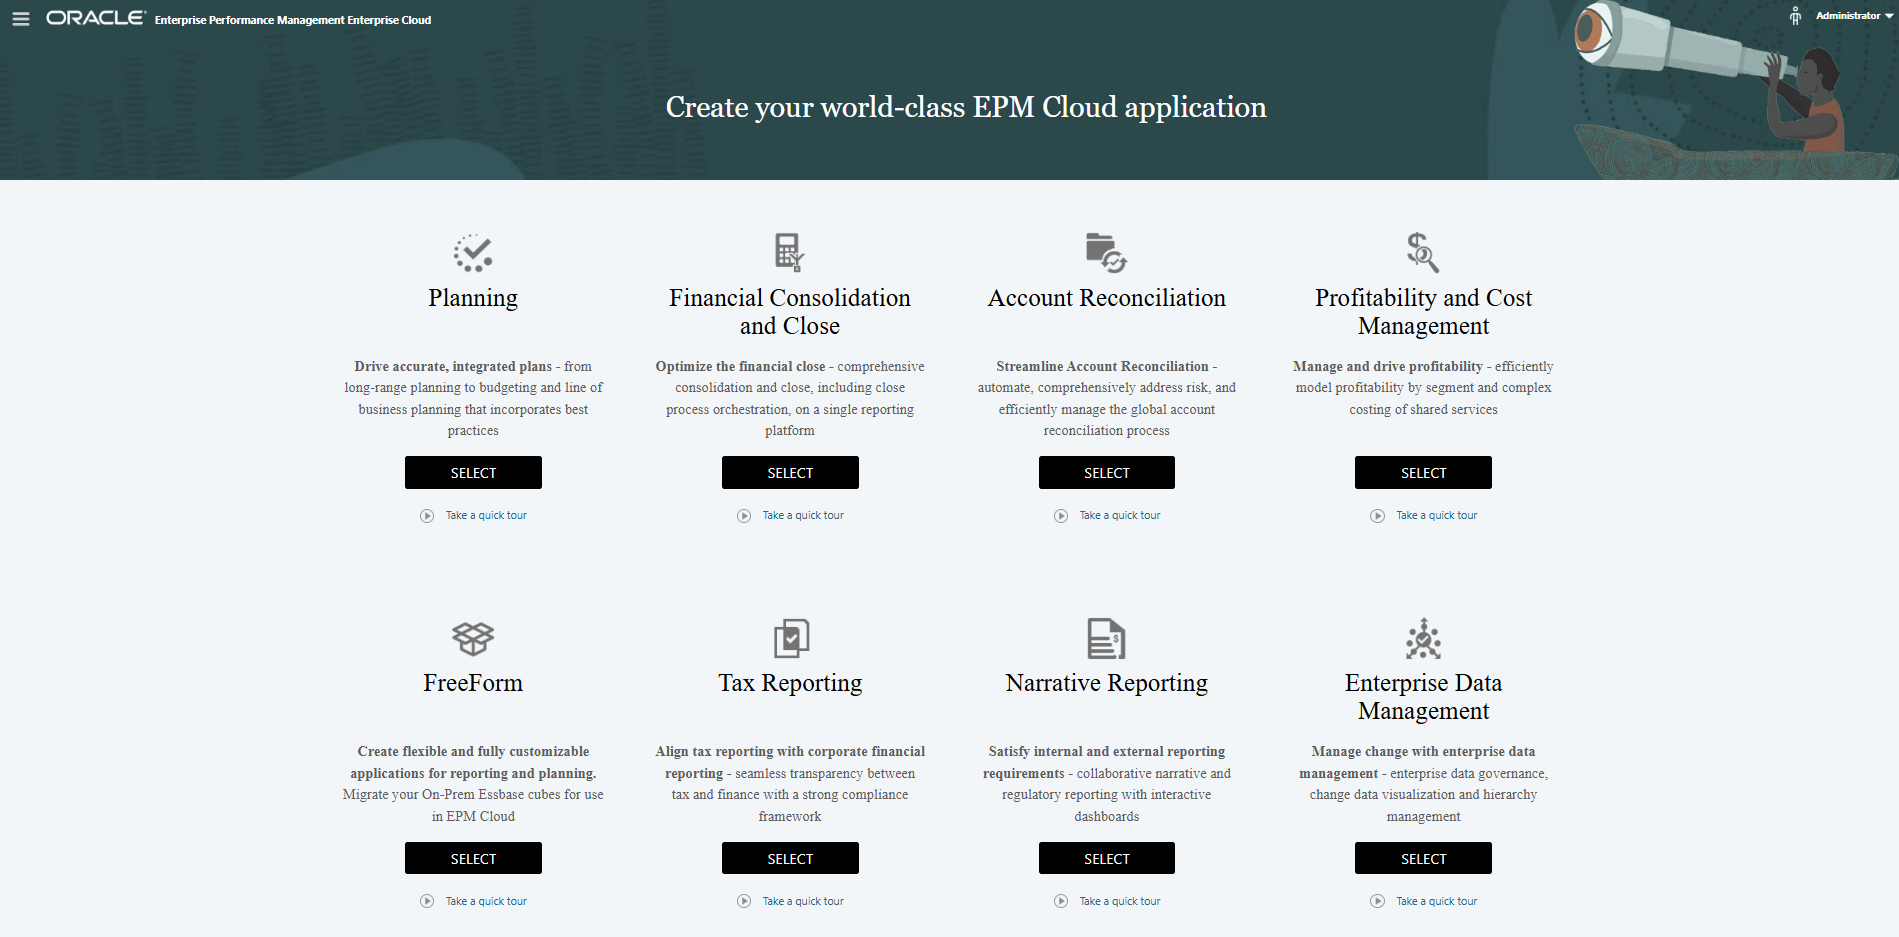
If you own Enterprise EPM, you can select Planning business process from below and click on Start button to Create a new application.
- On the landing page, click SELECT under Planning to view available options for creating a Planning application.
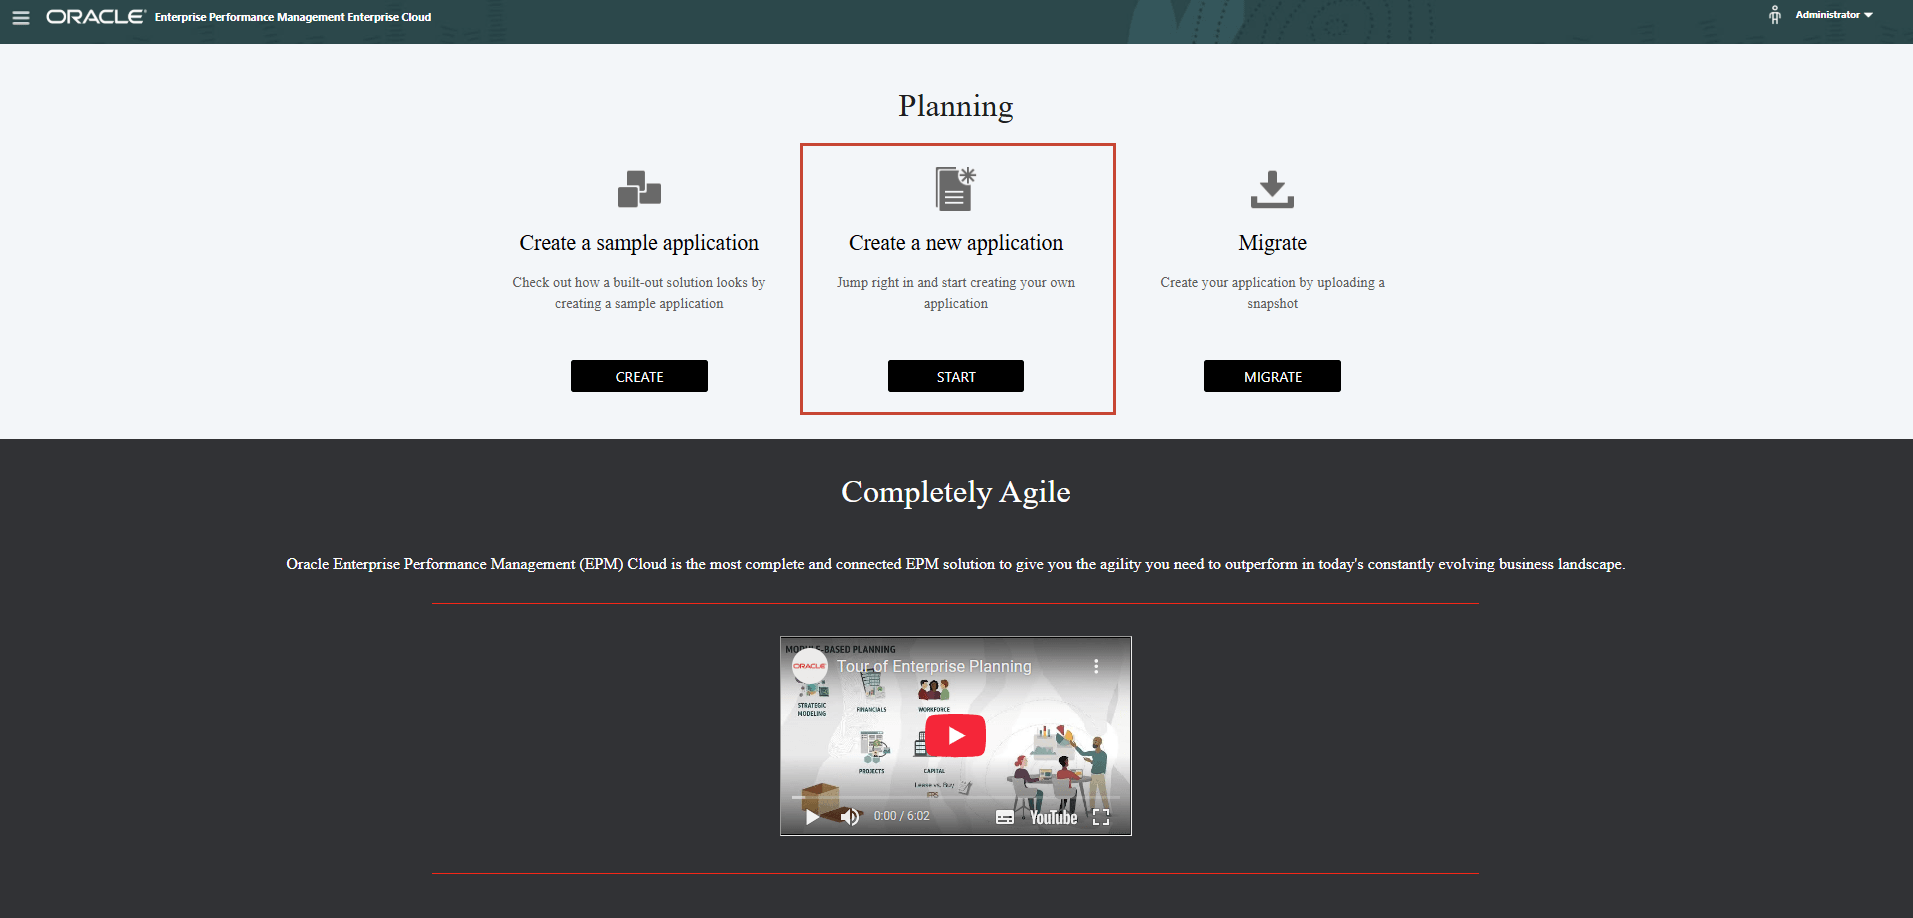
- Under Create a new application, click START.
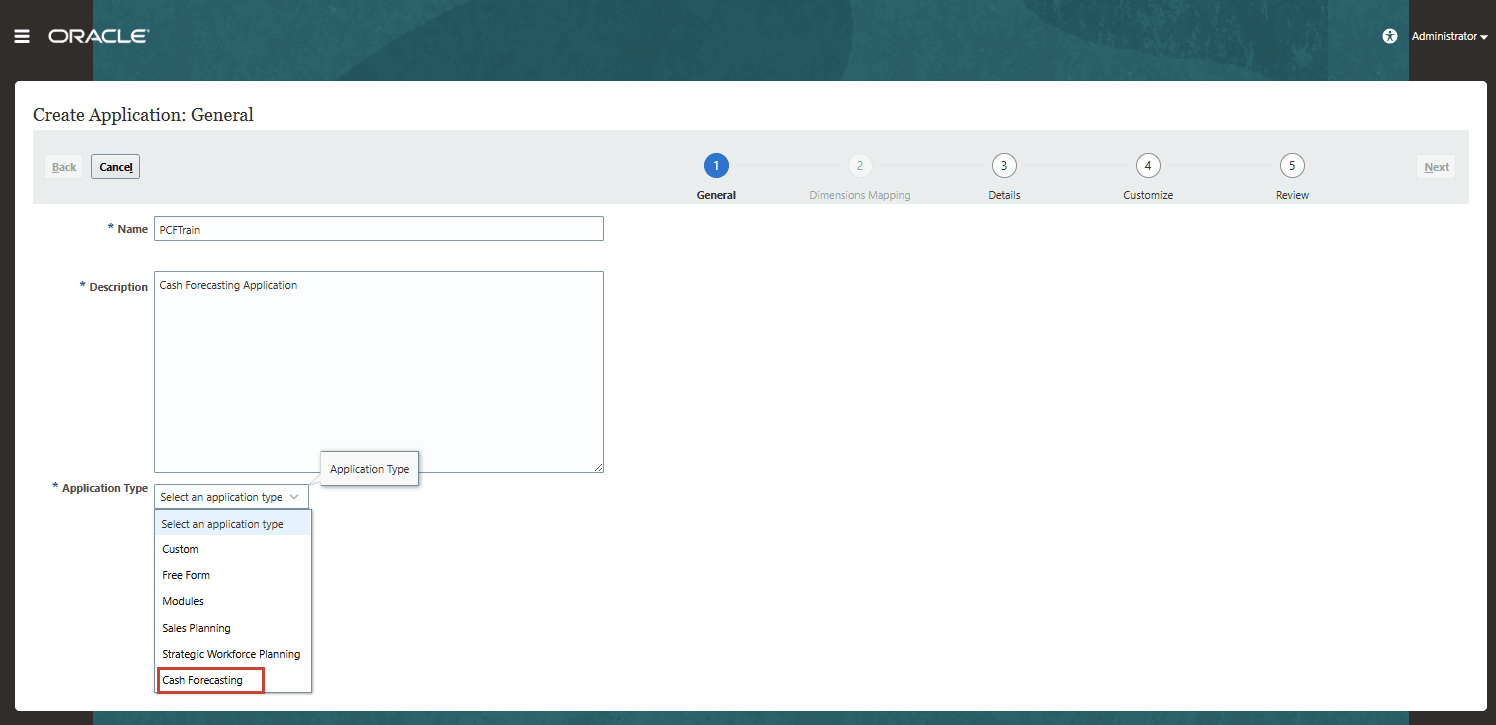
- Enter an application Name and Description, and for Application Type, select Cash Forecasting, and then click Next.
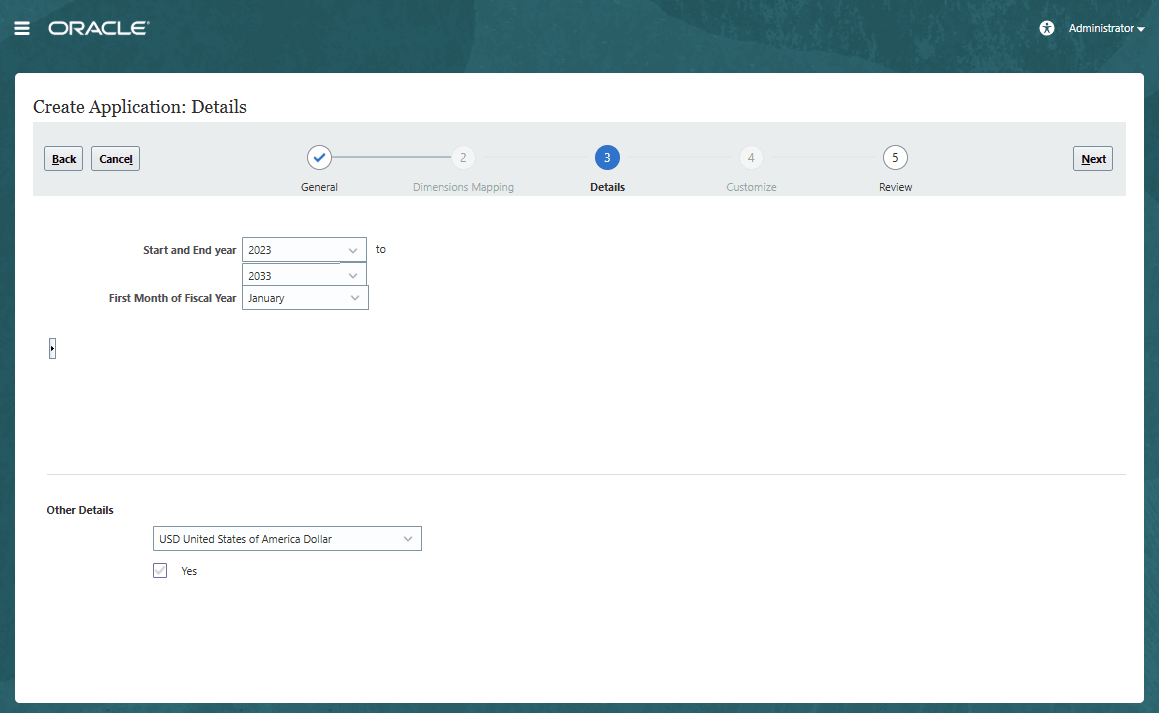
- Start and End year - Years to include in the application. Make sure to include the year that contains the historic actuals required for planning and analysis. For example, for an application beginning in 2024, select 2023 as the start year so that the latest actuals are available for setting targets using year over year growth percentage, and for reporting purposes. Keep in mind predictions as well, as for predictions you may need sufficient historical data, so accordingly you can add years. In this case we have one year added.
- First Month of Fiscal Year - Month in which your fiscal year begins. (Note: For non-calendar fiscal year you have to include the correct fiscal start year – we are not covering that in this tutorial)
- Weekly Distribution - By Default, weekly distribution pattern is set to Even distribution in Cash forecasting application.
- Main Currency - For a multicurrency application, this is the default reporting currency and the currency against which exchange rates are loaded.
- Multicurrency - Multicurrency support is provided by the Currency dimension, and enables reporting in different currencies.
- Click Next, review your selections, and then click Create.
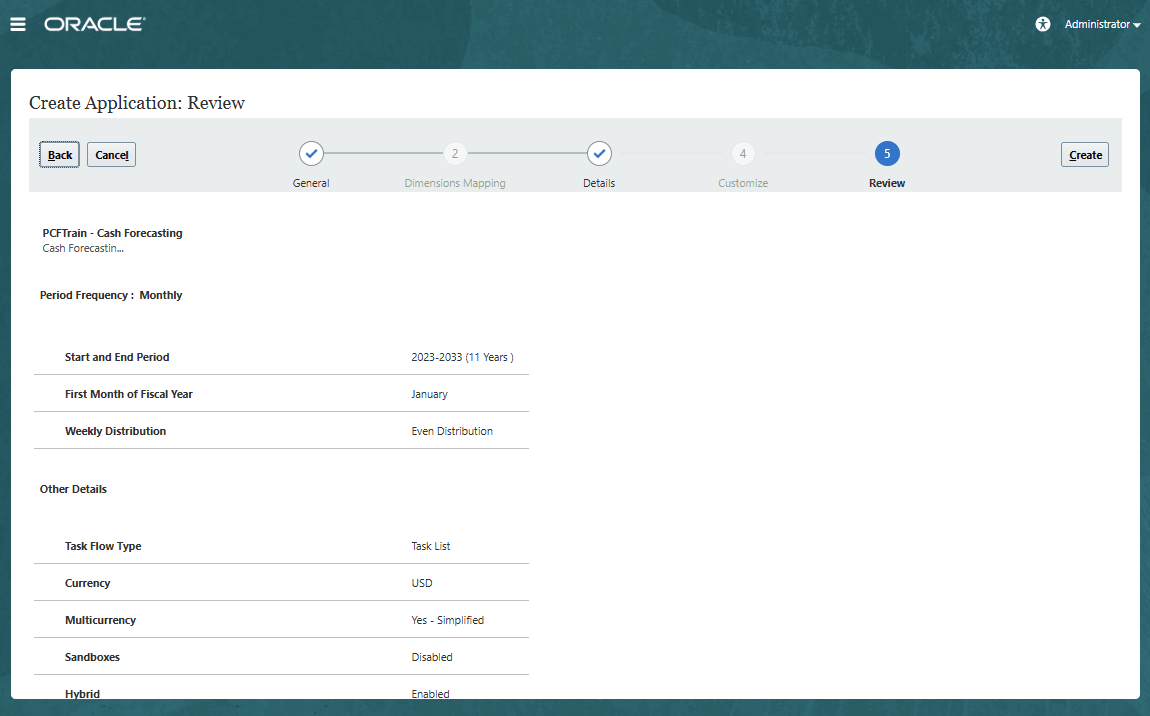
- Task Flow Type - By default, Task List is enabled. Task lists are a classic feature which guides users through the planning process by listing tasks, instructions, and end dates.
Note:
Task Manager is not yet supported yet in this application, will be supported in a future update when Task Manager supports Forms 2.0 - Sandboxes - By default, Sandboxes are disabled.
- Hybrid - By default, Hybrid cube option is enabled.
- Task Flow Type - By default, Task List is enabled. Task lists are a classic feature which guides users through the planning process by listing tasks, instructions, and end dates.
- Click Create to create the application now.
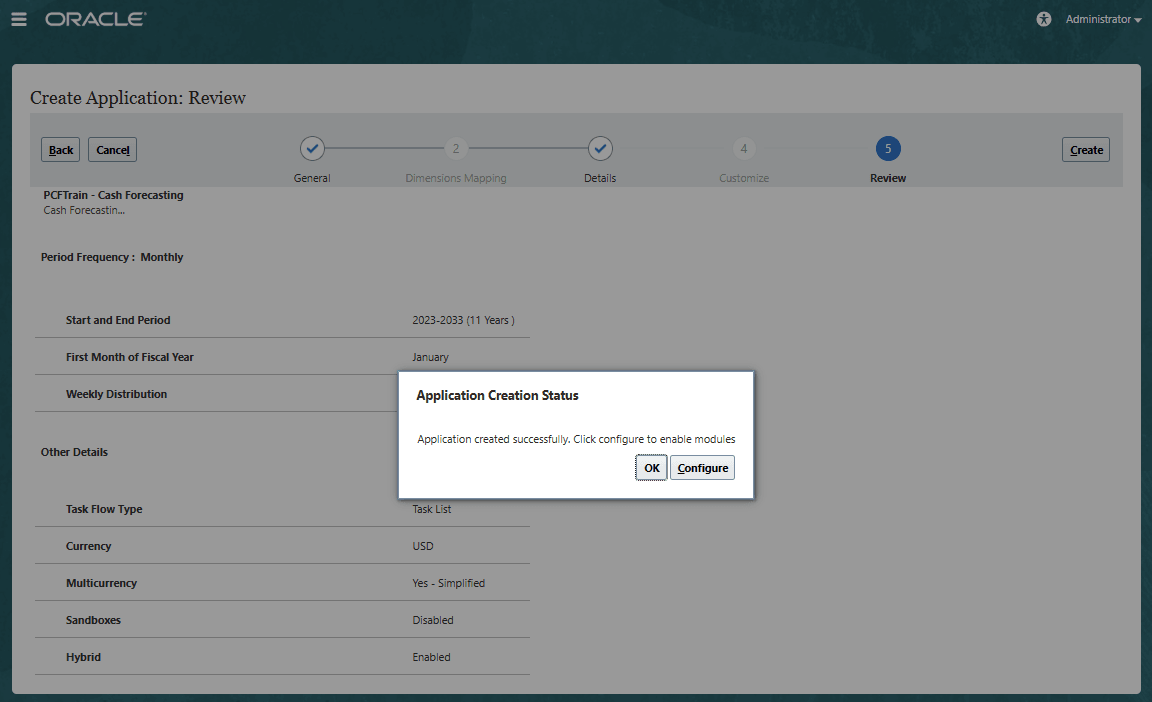
Once you click on Create button, Application creation will be initiated and the completion status displays.

- Click on Configure to enable features where various options and features for the application can be selected and enabled.
Enabling Cash Forecasting Features
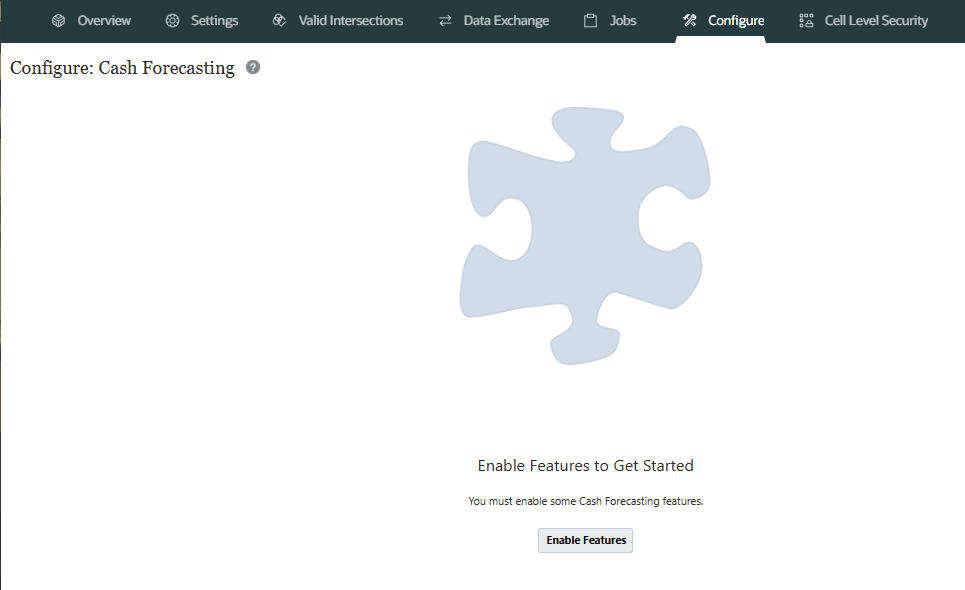
- This will bring you to the configure page where administrator can click on Enable Features to go ahead and configure the cash forecasting application.
- Select the features to be enabled here. Oracle recommends you to only enable features that the users currently require. You can start with required configurations for Cash Forecasting and then incrementally enable each section from Enable features screen as per your cash forecasting requirements.
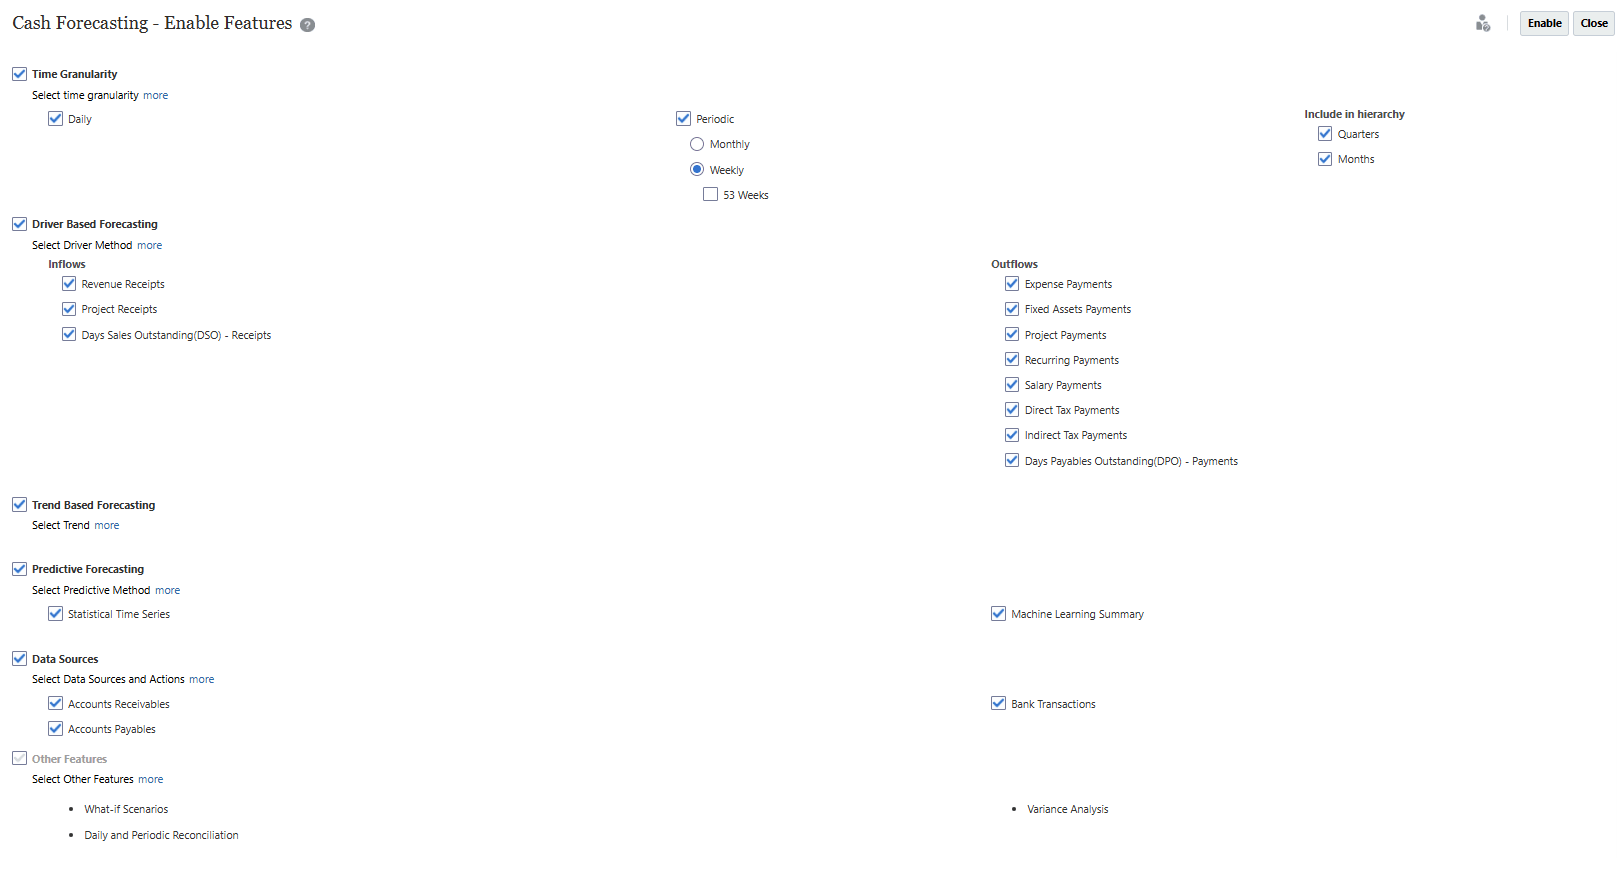
Based on your selections, dimensions, forms, dashboards, drivers and KPI measures will get created.
Enable Description Time Granularity Select the time granularity for your cash forecasting process. You can select Daily, Periodic, or both.
If you select Periodic, you can select Monthly or Weekly. If you select Weekly, you can select 53 Weeks for 53-week planning. If you select Daily, there will be a two-year rolling forecast.
Select whether to include Quarters and Months in the hierarchy.
You can also enable 53-week planning.
Forms always show level 0 members for rolling forecasts. But for reporting, you show can show quarters or months if you select that.
Oracle recommends that you enable both daily and periodic cash forecast.
Driver Based Forecasting Select the driver-based forecasting methods to use to forecast cash inflows and outflows. This enables you to forecast cash using different calculation methods for different cash line items. Based on the methods you select, Predictive Cash Forecasting creates sample line items (accounts) for you to use.
You can add your own additional line items in each category. Forms and calculations are added based on methods you select.
Trend Based Forecasting Select Trend Based Forecasting if you want to plan any of your periodic cash using different trend-based methods. You can use trend-based methods for any line items where the cash forecast can be calculated based on historical trends. Trend-based methods can be used only for Periodic forecasts.
Predictive Forecasting Select the predictive methods to use for cash forecasting: - Statistical Time Series—Use Auto Predict and Predictive Planning to predict future performance based on historical data.
- Machine Learning Summary—Use Machine Learning to predict the cash forecast using provided ML models.
Note: Although Machine Learning is not yet available, select this option if you want to use it in the future when the feature is available.
Data Sources Enable integration with Fusion ERP, and select the ERP integrations to use. If you want to enable this feature, it must be selected the first time you enable features. Enabling this option creates required dimensions, which can't be created later with incremental enablement. When selected, appropriate line items are created to support the integration. It also creates the Party and Business Unit dimensions, which are mandatory with Fusion ERP integration. Note: Although integration with Fusion ERP is not yet available, select this option if you want to use it in the future when the feature is available.
Other Features Default features included for application; they are always enabled automatically. Map/Rename Dimensions Map existing dimensions to Predictive Cash Forecasting dimensions, rename dimensions, and enable custom dimensions (Business Unit, Party, Category, and one additional custom dimension). The Business Unit and Party dimensions are mandatory if you select Data Sources. You can also associate custom dimensions with features. You must perform this configuration task the first time you enable features, although you can incrementally associate the Category or Custom dimensions with additional features at any time.
Predictive Cash Forecasting comes with the following dimensions (Map/ Rename Dimension):
# Dimensions Fusion ERP Description Standard, PCF Specific or Optional 1 Line Item Yes Covers the cash flow structure Standard 2 Entity Yes Entity structure – maps to Fusion ERP Legal Entity Standard 3 Period Yes Covers the daily, weekly and monthly periods Standard 4 Year Yes Covers the multiple calendar or fiscal years Standard 5 Scenario Yes Covers Forecast, Actual, Variance, Reporting Scenarios and more can be added Standard 6 Version Yes Covers Working, Whatif and more can be added Standard 7 Currency Yes PCF is always multi currency – Input and Reporting currencies Standard 8 Forecast Method Yes Multiple Forecast Methods and also covers sources PCF Specific 9 Business Unit Yes Business Units is dimension that maps to Fusion ERP BU PCF Specific Optional for Non-Fusion ERP* 10 Bank Yes Bank is a seeded dimension, covers Banks and Bank Accounts under it PCF Specific 11 Party Yes Represents the Customers and Suppliers – maps to Fusion ERP. Party Covers Top N Customers / Suppliers and rest are bucketed into others PCF Specific Optional for Non-Fusion ERP* 12 Category Yes Generic custom dimension used for driver based or can be used for multiple purposes – source details from Fusion ERP PCF Specific 13 Custom No Additional custom dimension required for business Optional Map existing dimensions to Predictive Cash Forecasting dimensions, rename dimensions, and enable custom dimensions (Business Unit, Party, Category, and one additional custom dimension). The Business Unit and Party dimensions are mandatory if you select Fusion ERP Integration and Actions. You can also associate custom dimensions with features. You must perform this configuration task the first time you enable features For each of the dimension, you can assign selected features such as driver or trend methods e.g. Category dimension can be enabled Project Receipts, Project Payments which will seed the category dimension into the project receipts/payments forms and rules. These feature selection to dimensions can be done during initial enablement or you can incrementally associate these dimensions with additional features at any time.
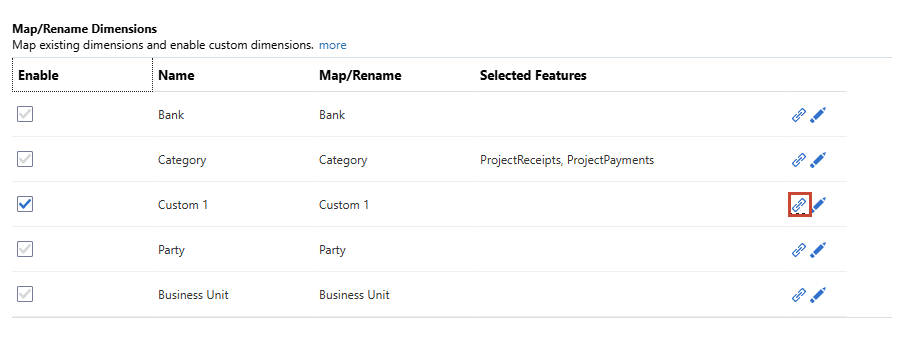


Cash forecasting dimensions can be enabled only for relevant cash flow line items. This will drive having those dimensions as part of driver-based methods (this is done in the background through valid intersections and hiding dimensions in forms). You can start with minimal configurations and then incrementally enable each section from enable features screen as per business requirements. Once enabled, you cannot disable the features. So, be cautious while enabling the features considering all the business requirements.
- Once all the selections are done, click on Enable to enable all the selected features and auto configure the seeded artifacts based on selections done.

Once you click on Enable, System will show “Feature enablement in progress…”


- Once enablement completes, sign out and sign in to start using the cash forecasting application.
Reviewing the Application Cubes and Dimensions
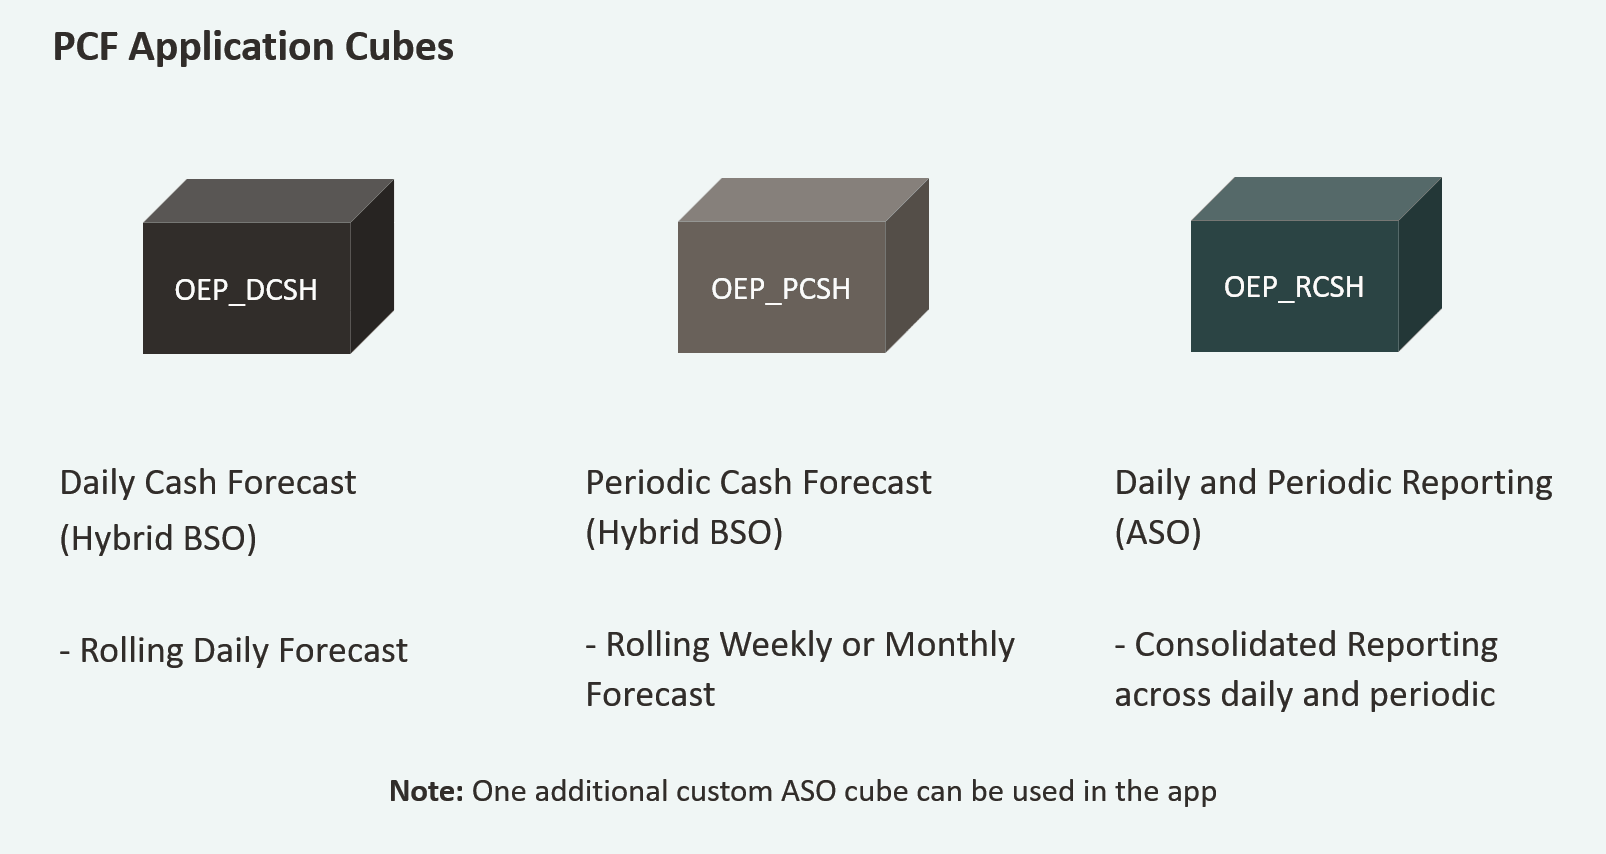
Predictive Cash Forecasting application has a multi-cube architecture. The cubes that the application consists of are:
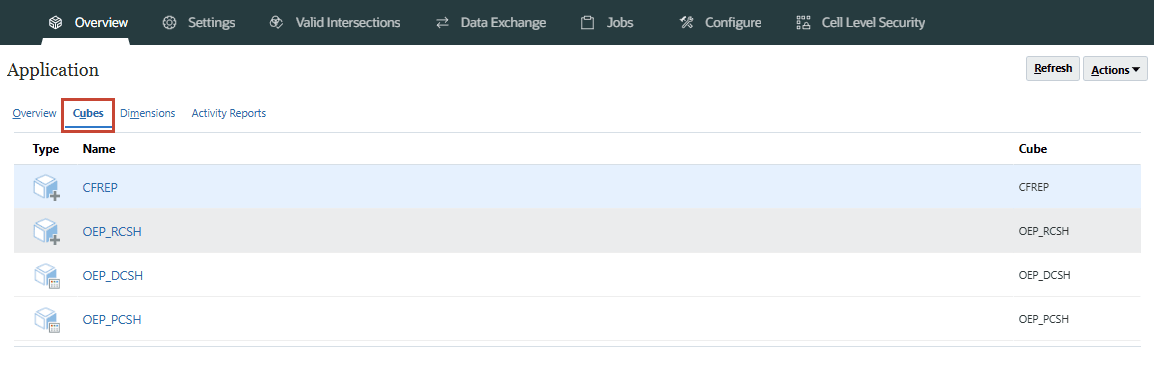
Review the application and cube details from the Application -> Overview screen.

PCF application contains 2 Hybrid BSO cubes(OEP_DCSH, OEP_PCSH) for Daily & Periodic and 1 ASO reporting cube(OEP_RCSH). Both daily and periodic BSO cubes data gets pushed into reporting cube for centralized dashboarding and reporting. CREP is a seeded ASO cube created by default and this cube is not being used.

Setting up Forecast Range and Time Horizon
Deciding the time granularity of cash forecasting application is a very important step to be made during implementation. There is both the short-term forecast and medium-term forecast that can be implemented in Predictive Cash Forecasting. These two are independent models to satisfy different needs for managing cash. Customers can implement short term (daily) and medium-term (periodic) forecast independently based on their most key need, while we do recommend that they enable both daily and periodic cash forecast to get best value out of Predictive Cash Forecasting.
Short Term Cash Forecast (Daily)
Short term forecast is focused on making sure there is enough cash in the next few days and is mainly catering to the immediate cash needs, The goal is to setup this up in a way that the process is completely automated, the accuracy levels are near to 100% and there are no surprises for both working capital operational cash as well as important and significant investments or financing cash flows in the next few days. Especially it’s important to review cash forecast in more details during month end or payroll payment dates, tax payment dates and material pay-outs happening for capital expenditure, financing activities.
We recommend setting the Rolling forecast to be for 15 days that will give a great view for the cash manager to understand the cash positions for each entity. There are no restrictions to go beyond 15 days especially for a more cyclical business where cash inflows and outflows happen in a longer cycle. But to take right actions, it would be ideal to go with 15 days forecast, as that would give a good view of the cash forecasts and balances through the forecast cycle. Predictive Cash Forecasting is a rolling forecast application, so every day the cash forecast rolls forward by a day, and you can review the cash forecast based on the latest data.
Cash Managers in-charge for a certain entity or multiple entities that they manage are the key users of the short-term forecast. They work with different stakeholders such as Receivables, Payables, Banks and Regional / HQ Treasury to ensure the cash forecast reflects. Treasury Managers usually take care of the financing cash inflows and outflows, and they too may need visibility into material receipts and payments.
Standardization of the cash forecasting process across entity is an important objective of Predictive Cash Forecasting. Setting up a consistent daily rolling forecast will help in a consistent review and collaboration cycle across all the entities and users at various levels – Controllers or HQ Treasurer can get the necessary cash position for the next few days.
Holidays and weekends are not excluded in the cash forecast. While it is not likely that cash inflows or outflows happens on a holiday, this would be a responsibility of the cash manager to adjust the cash forecasts that occur on holidays or weekends, based on automated data flow due to the reasons of due dates or payment term falling on these days.
Daily cash forecast allows to also introspect the previous days actuals and compare with what was forecasted. This enables taking swift adjustments for the immediately following days of cash forecasts.
Medium Term Cash Forecast (Periodic)
Medium term cash forecast is a very important decision supporting process to optimize cashflow decisions. Medium term forecast paves the way to ascertaining both working capital operational cash flow needs as well as investing / financing needs. Preparing a medium-term cash forecast allows for better view of the cash over the next few periods.
Monthly or Weekly – one of the implementation considerations is to create a monthly or weekly cash forecasting.
Monthly is useful for companies that have a more longer cash cycle or based on the stage of their business e.g., projects based business or less volatile industry, whereas weekly is more suitable for more volatile and ongoing businesses such as consumer goods, products or services business. Predictive Cash Forecasting supports both monthly and weekly rolling forecast options, but we recommend that companies create weekly forecasts as it allows for more flexibility for changes to the forecasts and allows for adjusting decisions based on the weekly progress. Also, care should be taken to ensure the right periodic (monthly or weekly) forecast is picked based on the needs, as it would not be possible to swap from weekly to monthly or monthly to weekly later.
We recommend that the application is set to a 13-week rolling forecast. This is considered a reasonable time horizon as it covers a quarter. Predictive Cash Forecasting does not restrict to go beyond that as well, but too long a forecast may not be ideal. While forecasting cash especially from customer invoices, the likely accuracy of the cash forecasts is high in the initial 4-6 weeks, and it reduces as we forecast for further periods. If a monthly option is chosen, we recommend that the application is set to a maximum of 6-month rolling forecast. This would get enough coverage of the cash forecast you would like to create for medium term.
Controllers are key users of medium-term forecasts, as they can review the forecast and suggest important actions such as accelerating collections, manage payment expectations especially large capital expenditure payments, plan for tax payments, inter entity transfers for optimizing cash across the entities under a region. Controllers can view cash forecast across entities as well as drill into the cash forecast of each entity.
HQ Treasury will also benefit from medium term forecasts, as they would get a good view of high cash inflows and outflows in certain weeks and can plan for necessary investments and financing decisions based on the same.
Forecase Range setup
In this section, you will configure the time frame for forecasts.
- From the Home page, click Application and then click Configure.
- Click Forecast Range Setup.

- In Forecast Start Day, select an option:
- System Date - The default. In general, Oracle recommends that you use the system date for your production environment.
- Specific Date - Specify a different start date, for example, if you are in the implementation phase and you want a future start day for your production phase, or when the forecast start day is a future date due to holidays. The specific date can't be beyond 30 days of the system date.
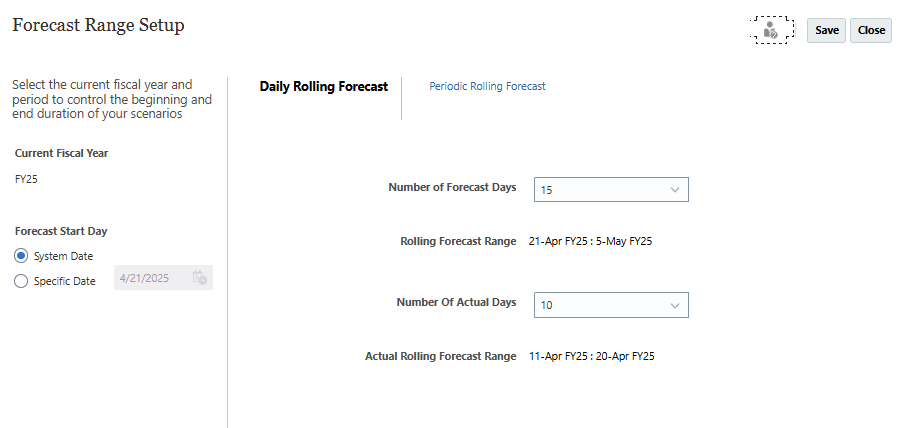
- In Daily Rolling Forecast, if your application was enabled for daily forecasting:
- Select the Number of Forecast Days. The Rolling Forecast Range is updated based on the Forecast Start Day and the Number of Forecast Days.
- Select the Number of Actual Days to define the number of actual days for variances and reporting. The Actual Rolling Forecast Range is updated based on the Forecast Start Day and the Number of Actual Days.
- Even though the actual date range displays based on your selection, you can upload more historical periods for actual data if you have it.
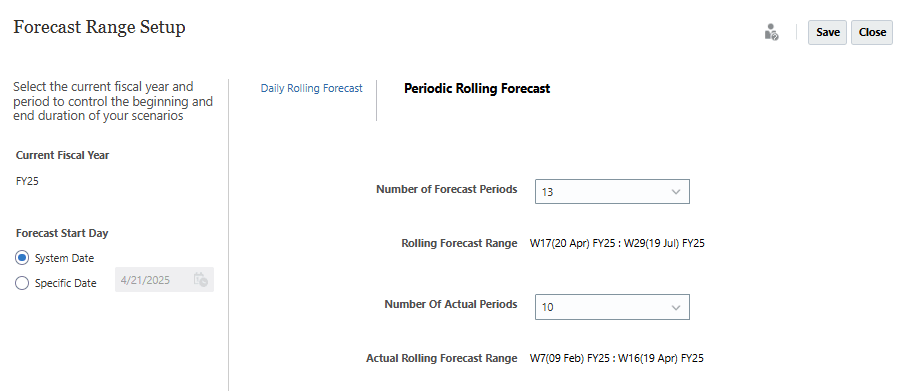
- In Periodic Rolling Forecast, if your application was enabled for periodic forecasting:
- Select the Number of Forecast Periods. The Rolling Forecast Range is updated based on the Forecast Start Day and the Number of Forecast Periods.
- Select the Number of Actual Periods to define the number of actual periods for variances and reporting. The Actual Rolling Forecast Range is updated based on the Forecast Start Day and the Number of Actual Periods.
- Once you setup the Time granularity, click Save.
- In the validation message, click OK to proceed saving the Forecast Range setup configuration.

- Based on the forecast range, substitution variables and valid intersection combinations are updated.
- Additionally, the rolling forecast form and some of the historical variance forms and dashboards are defaulted with date ranges based on the forecast range setup.
- If you change the forecast range, you must run the Daily Process Forecast / Periodic Process Forecast rules again to see the change reflected in the Rolling Forecast form.
With every daily maintenance window, the date rolls over. The current rolled over date and data becomes the forecast start date, and the previous day becomes the Actuals. These changes are reflected in the Rolling Forecast form.
Reset Dates
Once the AMW (Daily Maintenance) runs in your environment, system will move forward the dates to today’s date and substitution variables will get updated automatically based on system date(today’s date).
Note:
This section of the tutorial is optional. If you want to retain fixed forecast period range for the tutorial or trial purpose, you can create Reset Dates groovy rule in Daily cube and deploy and validate it.Once the rule is deployed and validated, you can run this rule to reset the substitution variables to fixed date range as mentioned in the rule. You can update the dates as needed in this rule and it can also be scheduled to run periodically so that it automatically runs and you see your data based on fixed date range, if needed.
If you want to manually execute this rule, click Rules and search for Reset Dates.
From the rules list select the rule ‘Reset Dates’ & and then click Launch.

Once you launch this rule, you can check the substitution variables to see the updates there. Go to Navigator -> Variables -> Substitution Variables.
You can also schedule to run this rule on a daily basis so that the substitution variables gets updated automatically and date will not move forward based on AMW (Daily maintenance) run.
Note:
This Rule (Reset Dates) will have to be run for the remaining tutorials in the series (listed below in Related Links) once the AMW (Daily Maintenance) runs in your environment. You can schedule to run it daily after your AMW (Daily Maintenance).Related Links
- Documentation: Administering Predictive Cash Forecasting
- Oracle EPM Tutorials YouTube Channel
- Video: Creating Predictive Cash Forecasting Applications in Cloud EPM Planning
- Second tutorial: Loading Metadata and Data in Predictive Cash Forecasting
- Third tutorial: Setting up Users, User Groups, Roles and Security in Predictive Cash Forecasting
- Fourth tutorial: Setting up Forecast Methods and Configuring Driver Methods in Predictive Cash Forecasting
- Fifth tutorial: Setting up User Preferences and Verifying as End User in Predictive Cash Forecasting
- Sixth (last) tutorial: Setting up Multi-currency in Predictive Cash Forecasting
Creating Predictive Cash Forecasting Applications
G32349-01
July 2025