Introduction
This tutorial is the fifth in a series on how to configure Predictive Cash Forecasting (PCF) and expects the application to be in the state as the preceding tutorial. This tutorial shows you how to setup User Preferences and enable Forms 2.0. Then you verify dashboard and forecast grid by using the Cash Manager Navigation Flow. The sections build on each other and should be completed sequentially.
Background
Cash managers and Controller users can set user preferences such as General options, Display, Notification preferences, Adhoc options, User variables, Reports and Form printing.
You can verify the configurations and setups done by you by using the associated Navigation Flow or login and then launching the Dashboards and Forms.
Prerequisites
Cloud EPM Hands-on Tutorials may require you to import a snapshot into your Cloud EPM Enterprise Service instance. Before you can import a tutorial snapshot, you must request another Cloud EPM Enterprise Service instance or remove your current application and business process. The tutorial snapshot will not import over your existing application or business process, nor will it automatically replace or restore the application or business process you are currently working with.
Before starting this tutorial, you must:
- Have Service Administrator access to a Cloud EPM Enterprise Service instance.
- Download the LCM snapshot from here - FourthTutorialCompleted.zip. Upload and import this LCM snapshot into your Planning instance.
- Use the Cash Manager Navigation Flow and associated access for the tutorial.
The Rule (Reset Dates) will have to be run once the AMW (Daily Maintenance) runs in your environment. You can schedule to run it daily after your AMW (Daily Maintenance).
Note:
If you run into migration errors importing the snapshot, re-run the migration excluding the HSS-Shared Services component, as well as the Security and User Preferences artifacts in the Core component. For more information on uploading and importing snapshots, refer to the Administering Migration for Oracle Enterprise Performance Management Cloud documentation.Setting up User Preferences and Forms 2.0
Setting up User Preferences
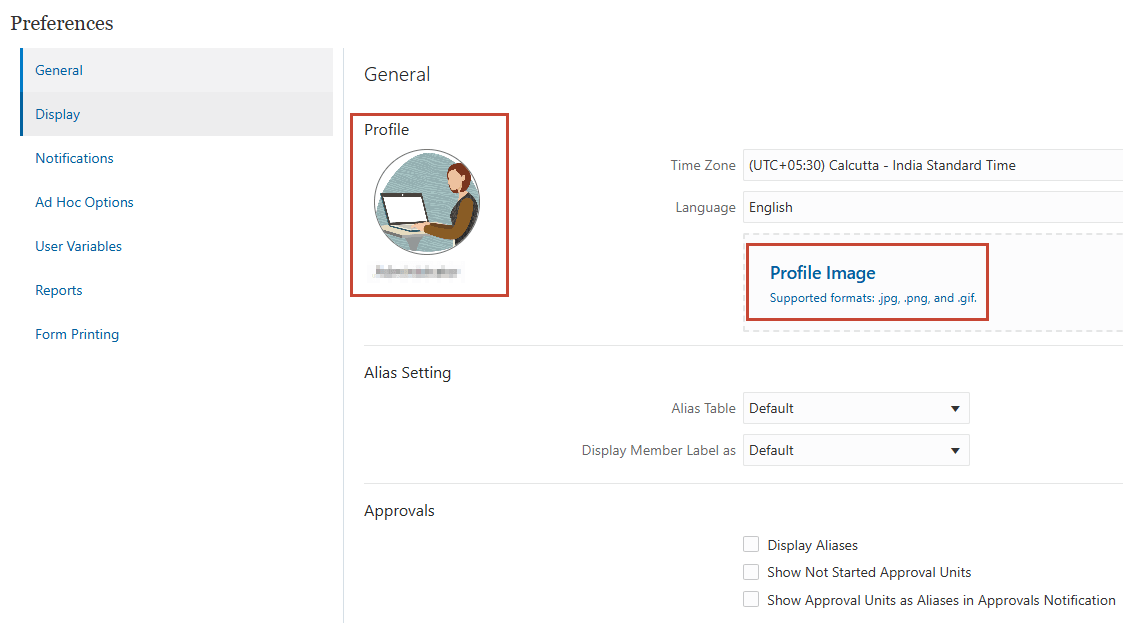
Users can upload their profile picture from General options. User variables define the context for forms and dashboards.
- On the Home page, click Tools, then click User Preferences, and then click User Variables.
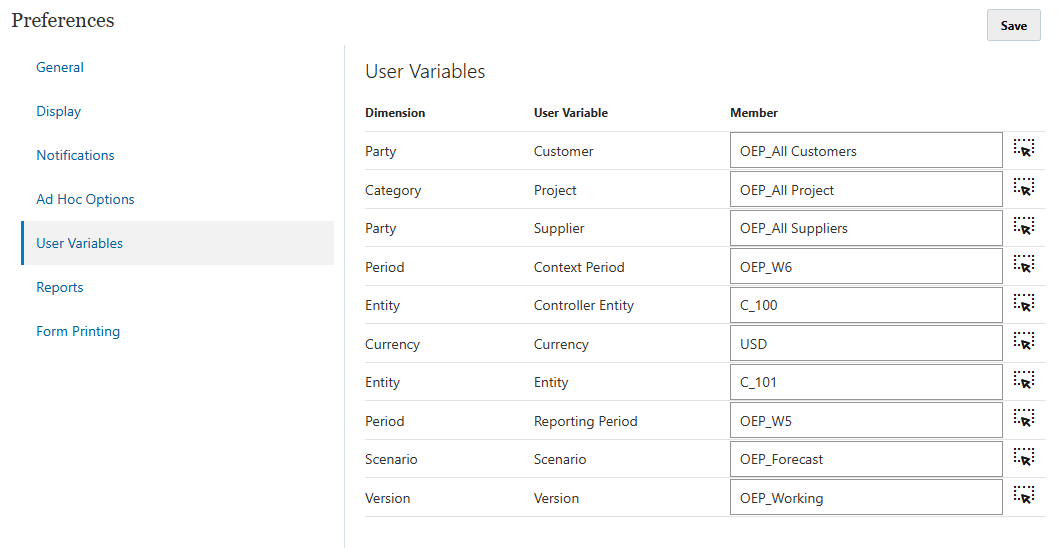
- Select members for these user variables:
- Customer
- Project
- Supplier
- Context Period - Weekly only
- Controller Entity - For controllers, who have access to multiple entities. Select the entity to use.
- Currency
- Entity - For users other than controllers.
- Reporting Period - Weekly only
- Scenario
- Version
- Once the navigation flow security is assigned, Cash manager & controller users should also setup user variables when they login for first time. This sets the default values for each of the dimensions for users to see when they login. Below is the user variable setup step.
- You can also upload the profile image from User preferences -> General Tab as shown below.
Enabling Forms 2.0
Note:
Forms 2.0 is by default enabled in Cloud EPM. So this section is optional.It is recommended to change the application settings to use Forms 2.0 so as to leverage the latest features and functionalities released in Forms 2.0 and Dashboards 2.0. Admin user can enable Forms 2.0 from Application - > Settings. Below is the application settings setup for Forms 2.0.
Note:
Administrator Navigation Flow required for enabling Forms 2.0 .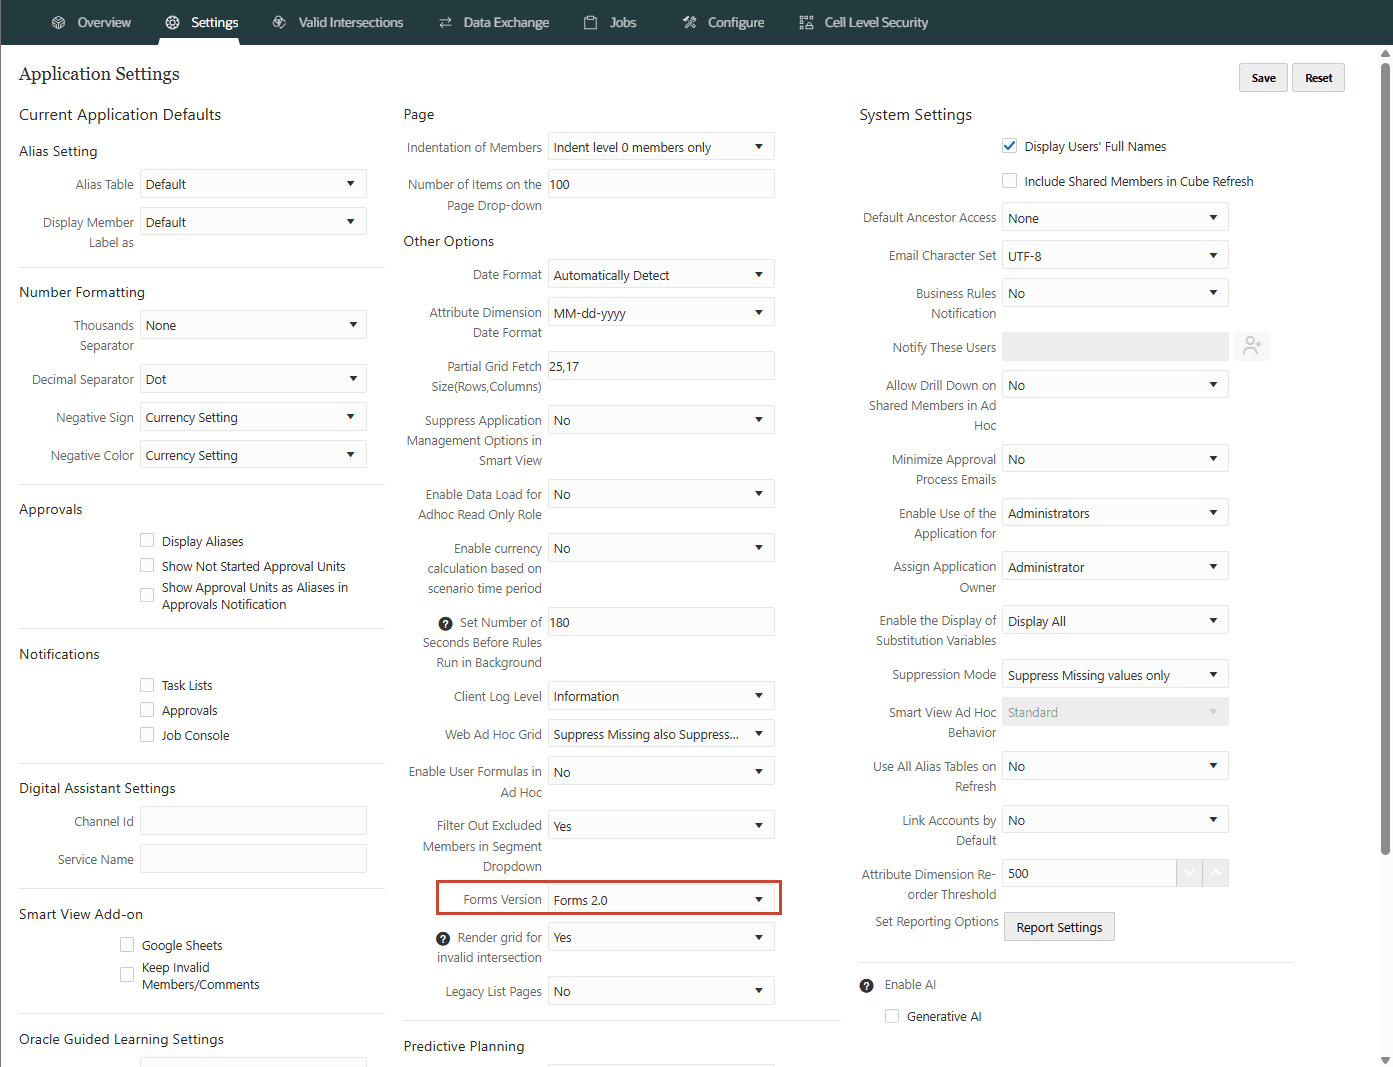
Verifying End User
By now you should have completed the meta data import and data import. You should have also set the driver methods and processed the rules. Now your cash managers can login and check the Summary Dashboard and the Rolling forecast grid to start with their forecasting process.
Verifying Dashboards & Rolling Forecast Grid
When cash managers login, their home page contains cards for Periodic and Daily cash forecast, Analysis dashboards and Insights. Let us review below how the periodic cash forecasting flow goes with the Cash Manager Navigation Flow.
Summary Dashboard
Cash Managers use the Summary Dashboard to Periodic rolling cash forecast, operating and non operating cashflow, Periodic cash position by entity, along with key KPIs. This dashboard shows the inflow/outflow during the forecast period as well as how the Cash position moves period by period. The Tile at the top of the dashboard shows the Net cash flow current period, Forecasted Net Cash flow, Operating & Non-Operating cash flow, Cash Inflow, Cash Outflow & Quick ratio. The Operating and Non-Operating Cashflow chart shows where the money is spent. The Periodic Cash Position is a waterfall chart depicting the movement of cash.
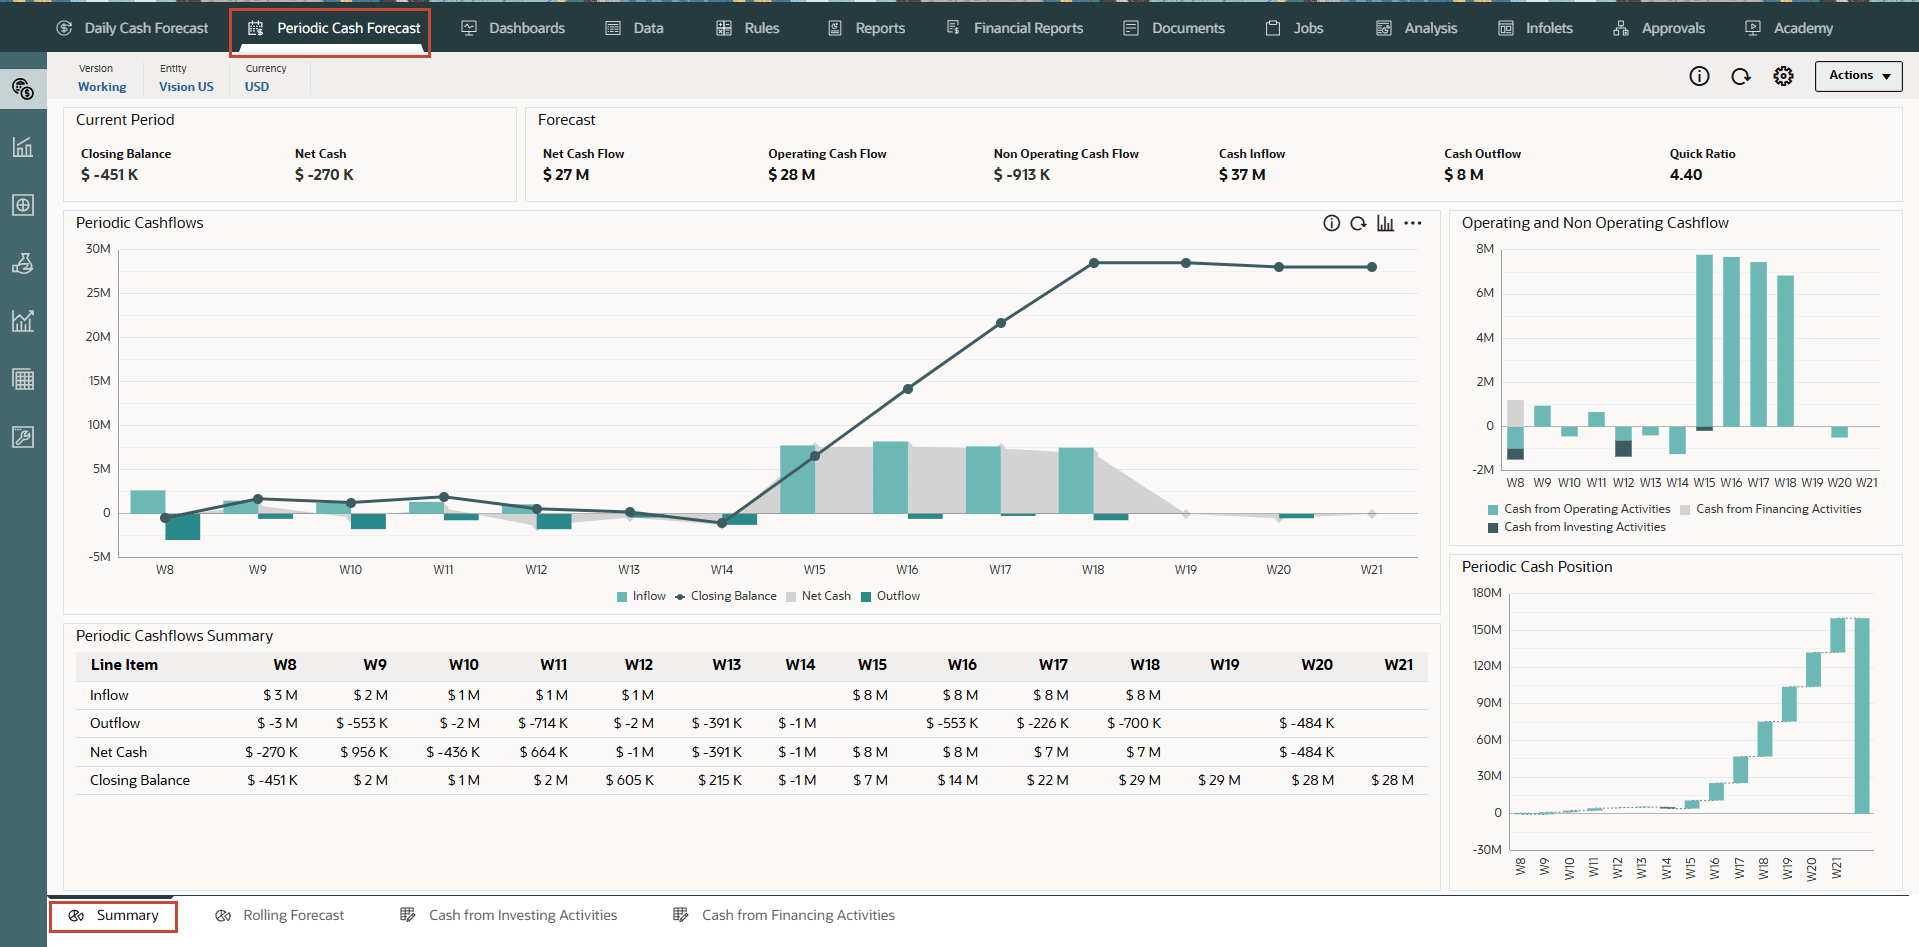
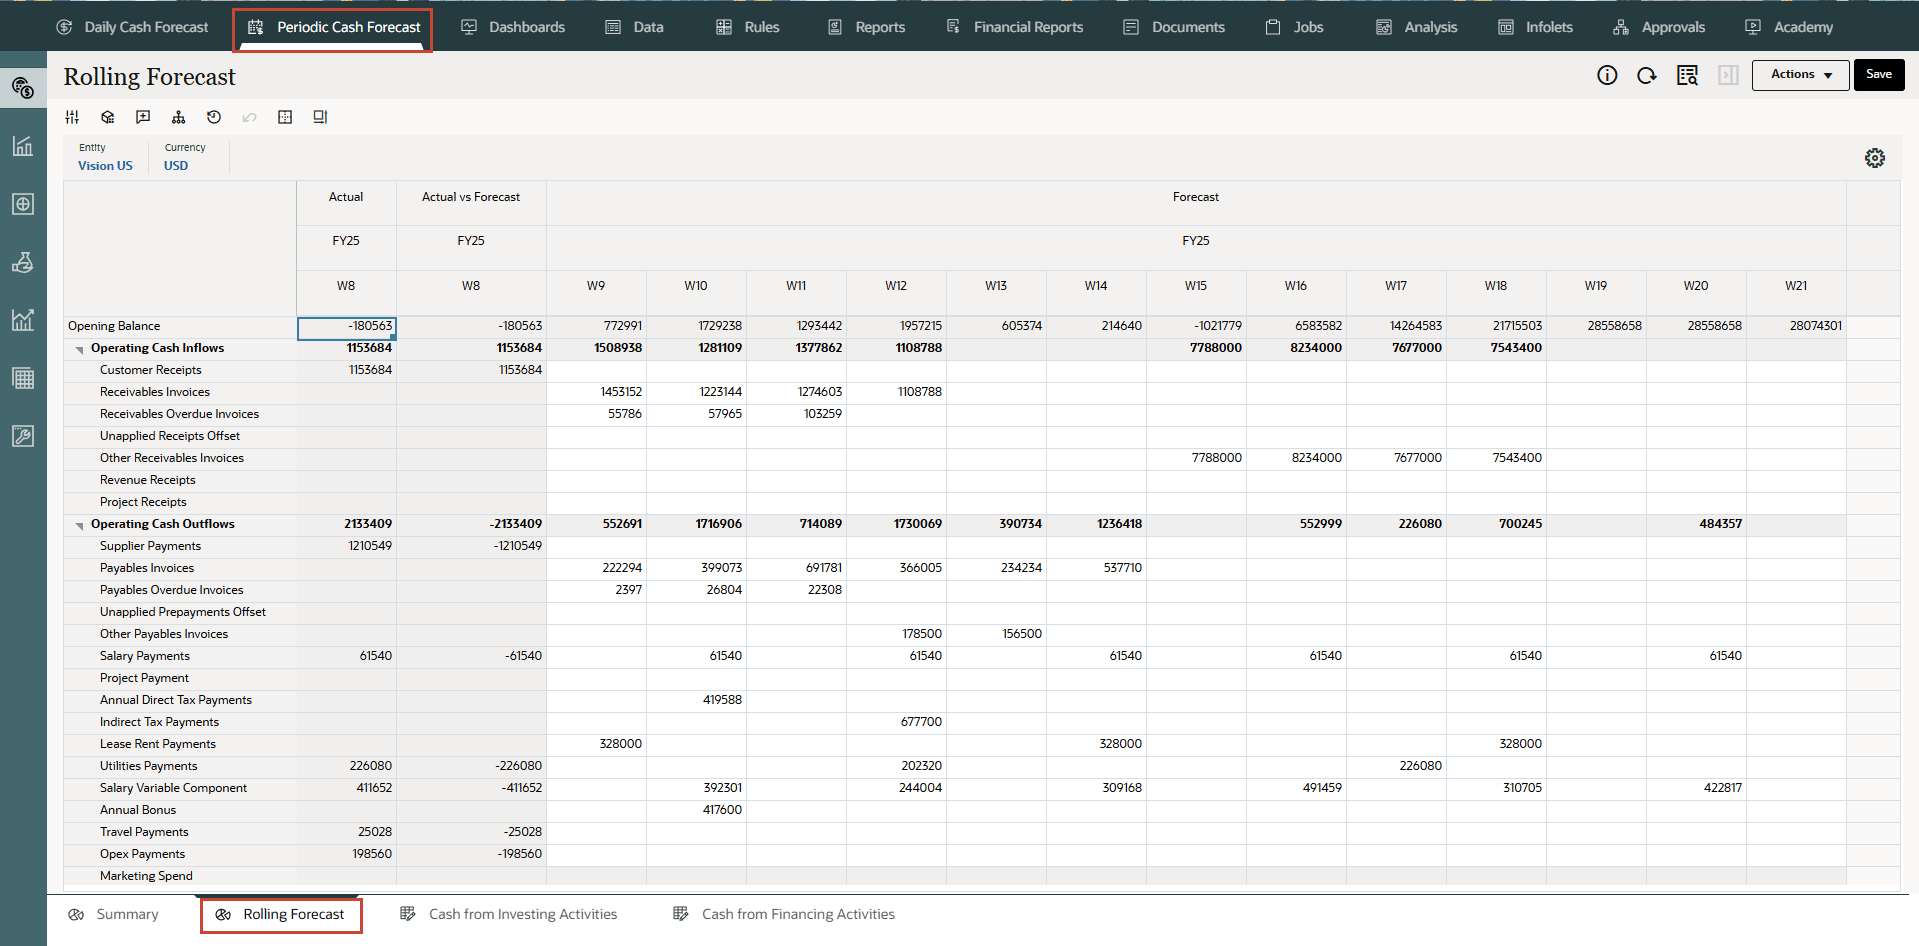
Rolling Forecast
Cash Manager reviews the detailed cash forecast for each of the weeks. The Cashflow for any week is calculated using ‘Direct Method’ across Operating, Investing and Financing activities of the business. This template shows the details of operating cash flow with each of the lines calculated automatically based on the Forecast Methods defined. Cash Managers use the Rolling Forecast form to review and modify the forecast for cash inflows and cash outflows for their entity. They can review actuals, the rolling forecast, and actuals versus daily/periodic forecast in this form.
Similarly, Cash Manager can also review the Daily cash forecast Summary dashboard and Rolling forecast form as shown below.
Related Links
- Documentation: Administering Predictive Cash Forecasting
- Oracle EPM Tutorials YouTube Channel
- Video: Setting up Navigation Flows, Roles, and User Preferences in Predictive Cash Forecasting
- First tutorial: Creating PCF Applications
- Second tutorial: Loading Metadata and Data in Predictive Cash Forecasting
- Third tutorial: Setting up Users, User Groups, Roles and Security in PCF
- Fourth tutorial: Setting up Forecast Methods and Configuring Driver Methods in Predictive Cash Forecasting
- Last tutorial in the series:
Setting up User Preferences and Verifying as End User in Predictive Cash Forecasting
G33804-02
March 2026