Introduction
This tutorial is the sixth and final in a series on how to configure Predictive Cash Forecasting (PCF) and expects the application to be in the state as the preceding tutorial. This tutorial shows you how to load Data in multiple currencies. The tutorial then covers the Rules for Currency Translation. The sections build on each other and should be completed sequentially.
Background
PCF supports multi-currency forecasting and reviewing the cash forecast by entity or reporting currency. Customers can load actual and forecast data in Input (transaction) Currency and this can be translated to Entity Currency and Reporting Currency based on exchange rates.
Once the data is loaded in the transaction currency, you can do adjustments to the cash forecast in the Rolling Forecast form. The adjusted values get translated to Entity Currency and Reporting Currency based on the exchange rates. Once you enable multi-currency planning and provide the main currency while creating the application, the system automatically creates the Currency dimension, the Exchange Rates Table form and the standard rules for currency conversion. Do not create any custom currency conversion rules as the system already has a pre-built rule and exchange rates form.
Note:
Each application has one main Currency and is allowed to have many Reporting Currencies.Prerequisites
Cloud EPM Hands-on Tutorials may require you to import a snapshot into your Cloud EPM Enterprise Service instance. Before you can import a tutorial snapshot, you must request another Cloud EPM Enterprise Service instance or remove your current application and business process. The tutorial snapshot will not import over your existing application or business process, nor will it automatically replace or restore the application or business process you are currently working with.
Before starting this tutorial, you must:
- Have Service Administrator access to a Cloud EPM Enterprise Service instance.
- Download the LCM snapshot from here - FifthTutorialCompleted.zip. Upload and import this LCM snapshot into your Planning instance.
- Download the following data load files with sample data:
- Use the Administrator Navigation Flow and associated access for the tutorial.
- Only the Vision Australia entity is setup for multi-currency. For Vision Australia only the AUD input currency data will be available.
The Rule (Reset Dates) will have to be run once the AMW (Daily Maintenance) runs in your environment. You can schedule to run it daily after your AMW (Daily Maintenance).
Note:
If you run into migration errors importing the snapshot, re-run the migration excluding the HSS-Shared Services component, as well as the Security and User Preferences artifacts in the Core component. For more information on uploading and importing snapshots, refer to the Administering Migration for Oracle Enterprise Performance Management Cloud documentation.Loading Data and Exchange Rates
Loading Data to Entity
Only the Vision Australia entity is setup for multi-currency. In the previous tutorials, we did not load data for this entity. The data load process was covered in detail in the second tutorial of the series. In this section, we will load the actual and forecast periodic data to the Vision Australia entity.
- On the home page, click Application, then Overview.
- On the right, click Actions then Import Data.
- In Import Data, click Create.
- Ensure your selections match the following:
Location Local Source Type Default File Type Comma delimited Note:
You can also import the files to Inbox (Location) and then save all the import data jobs, so that they can be scheduled to run automatically or can also be used in Pipeline jobs. - In Import Data, for Source File click Choose File.
Note:
Depending on your browser, the button label may display Choose File or Browse. - On your local computer, navigate to where you saved PeriodicActualDataLoadAustralia.csv and open it.
Note:
The data file is provided in the Prerequisites section of this tutorial. - On the right, click Import.
- In the Information dialog, click OK.
- In Import Data, for Source File click Update.
- In Update File, click Choose File.
Note:
Depending on your browser, the button label may display Choose File or Browse. - On your local computer, navigate to where you saved PeriodicForecastDataLoadAustralia.csv and open it.
Note:
The data file is provided in the Prerequisites section of this tutorial. - In Update File, click OK.
- On the right, click Import.
- In the Information dialog, click OK.
- Click Close twice.
Tip:
You can verify the success for the import jobs from the Jobs page.Loading Exchange Rates for Multiple Currencies
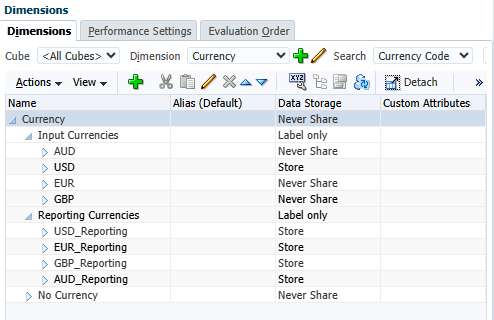
- Main Currency is automatically picked from application creation stage and there is a Reporting Currency associated to it. This will be the Global Reporting Currency.
- Admin has to create all the required Input Currencies. Admin can turn on a Reporting Currency against each of the Input Currency.
- Different Reporting Currencies will be available as Reporting Currencies with Currency Code Reporting.
- Entity Currency is derived based on the Base Currency Attribute defined for the Entity. For example, AUD is the Base Currency for Vision Australia(C_451):
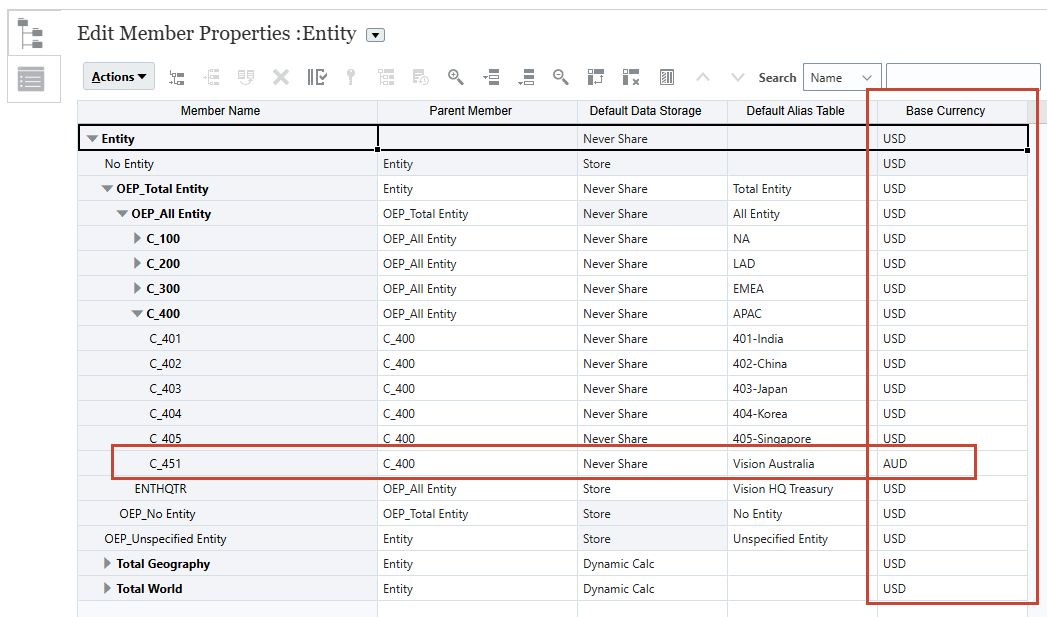
Note:
Administrators can launch Dimension Editor from the top-left (Navigator) >> Create and Manage >> Dimensions.
 - Exchange rates are defined to the main Global Reporting Currency e.g. USD.
- Triangulation calcs are performed to determine exchange rates between other currency e.g. AUD to EUR.
- Set Currency Precision from Currency Dimension member properties. Once this is set, you can go to other options in Form designer and enable the check box “Use Currency precision settings” (see next step). System will automatically use the Precision settings from Currency Dimension member properties once you enable this checkbox.
Note:
This should be already set in your environment, so you can skip directly to the numbered steps below.To set Currency precision:
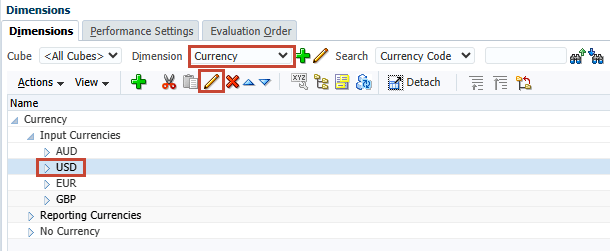
- Administrators can launch Dimension editor from the top-left (Navigator) >> Create and Manage >> Dimensions. Then select Currency from the drop-down.
- Select USD under Input Currencies and click Edit.
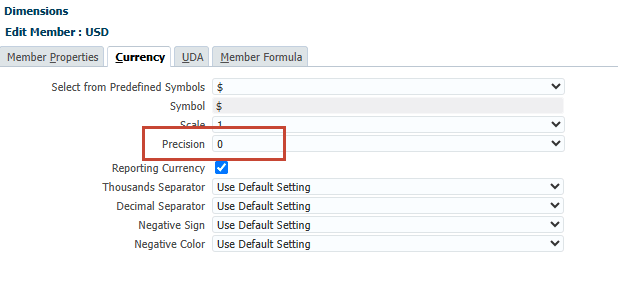
- Select the Currency tab and set Precision to 0.
- Administrators can launch Dimension editor from the top-left
- Once the above Currency Precision setting is done, enable “Use Currency member precision setting” check box in the form designer from Other Options tab:
Tip:
This should be already set in your environment, so you can skip directly to the numbered steps below. You can use the Cash Manager flow to quickly open the Rolling Forecast form (Under Daily or Periodic) and then edit it.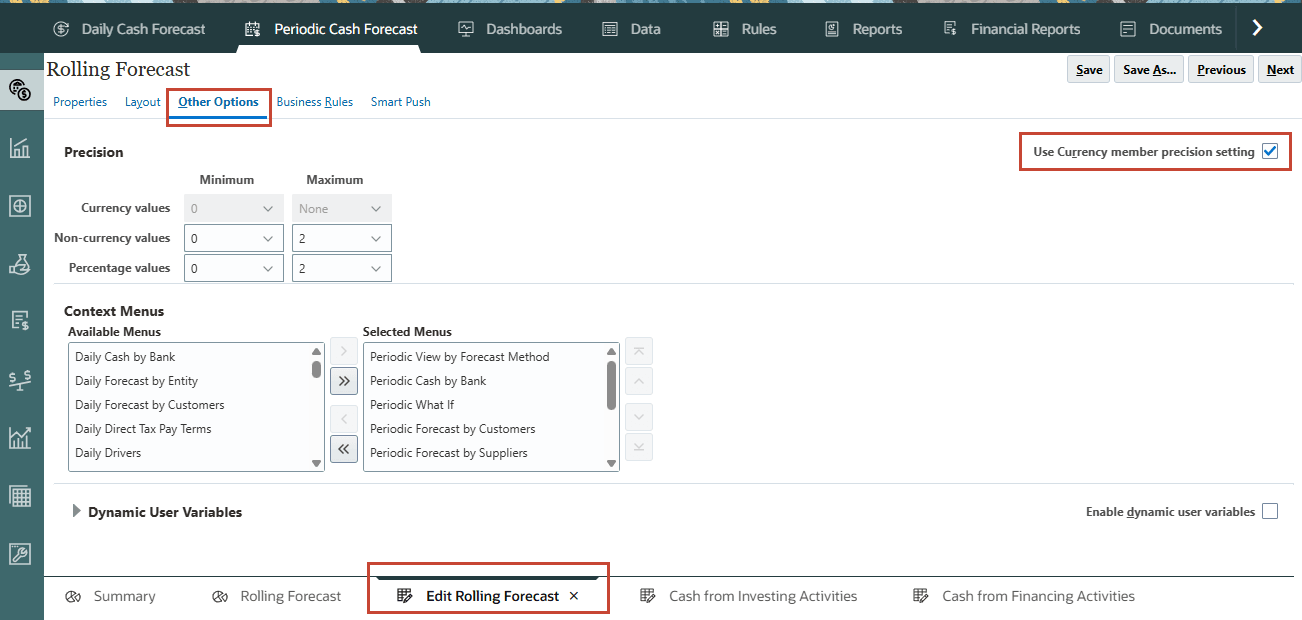
In this section, you will upload the exchange rates to your PCF application.
- On the home page, click Application, then Overview.
- On the right, click Actions then Import Exchange Rates.
- In Import Exchange Rates, click Create.
- Ensure your selections match the following:
Location Local Source Type Default File Type Comma delimited Note:
You can also import the files to Inbox (Location) and then save all the import data jobs, so that they can be scheduled to run automatically or can also be used in Pipeline jobs. - In Import Data, for Source File click Choose File.
Note:
Depending on your browser, the button label may display Choose File or Browse. - On your local computer, navigate to where you saved WeeklyRatesLoad.csv and open it.
Note:
The data file is provided in the Prerequisites section of this tutorial. - In Update File, click OK.
- On the right, click Import.
- In the Information dialog, click OK.
- Click Close twice.
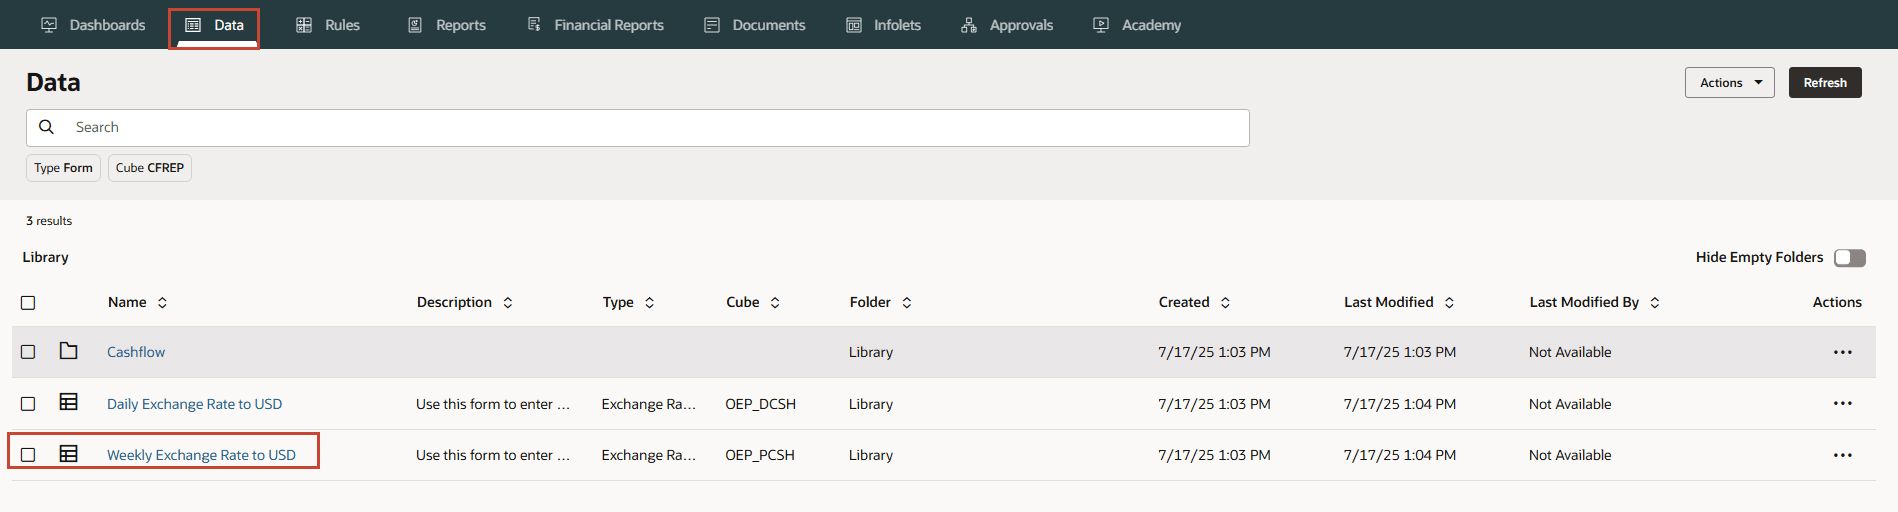
- On the home page, click Data, then Weekly Exchange Rate to USD.
Rates can be captured both as Average Rates or End of Period Rates.
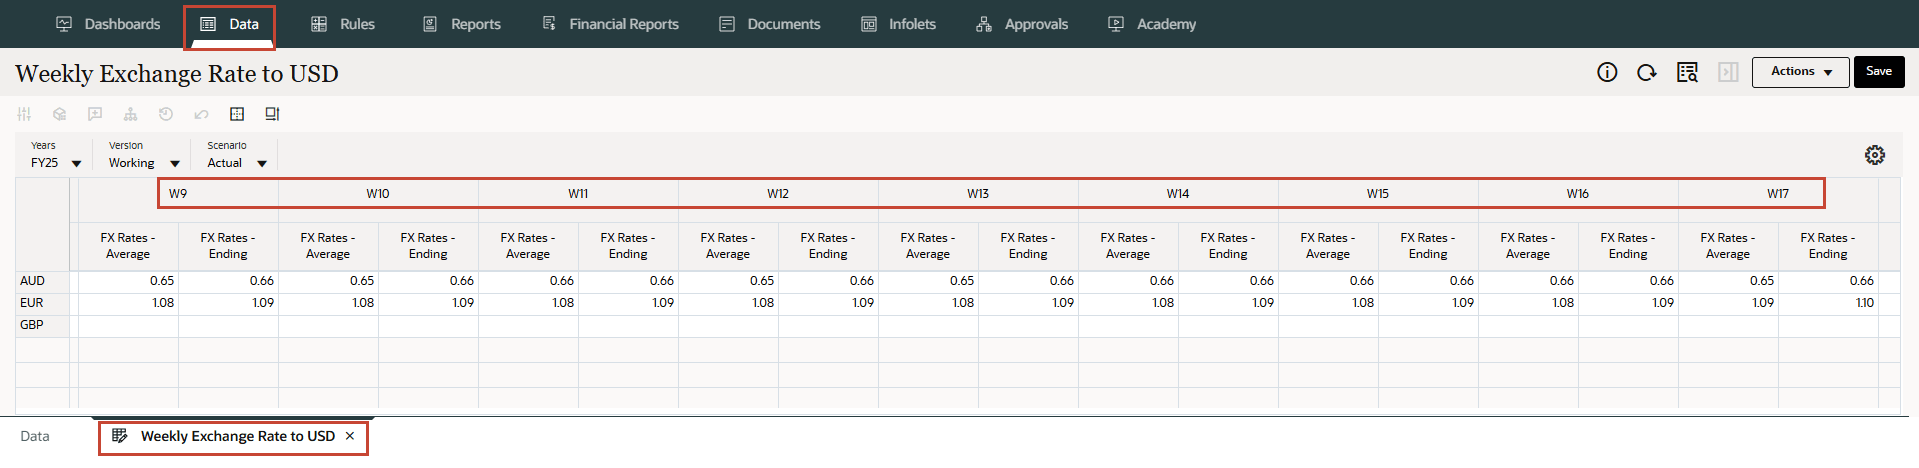
Note:
In the sample data file, the rates were loaded only for certain weeks and currencies for the tutorial.
Tip:
You can verify the success for the import job from the Jobs page.Running Rules for Forecasting and Currency Translation
Running the Rules for Forecasting
In this section, you run the three rules for the Periodic Cube to forecast data for the Vision Australia entity. These three rules are detailed in the second tutorial of the series.
- On the home page, click Rules.
- In the search box, enter Periodic Process and press Enter key.
- Under Actions, for Periodic Process Actuals, click
 (Actions) and then Launch.
 - In Periodic Process Actuals, for Enter Entity select or type Vision Australia(C_451).
Tip:
You can type the value or use the (Member Selector) to search the values.
 - Verify your selection and click Launch.
- In Information, click OK.
- Under Actions, for Periodic Process Forecast, click (Actions) and then Launch.
- In Periodic Process Forecast, for Enter Entity select or type Vision Australia(C_451).
Tip:
You can type the value or use the (Member Selector) to search the values. - Verify your selection and click Launch.
- In Information, click OK.
- In the search box, enter Rollup and press Enter key.
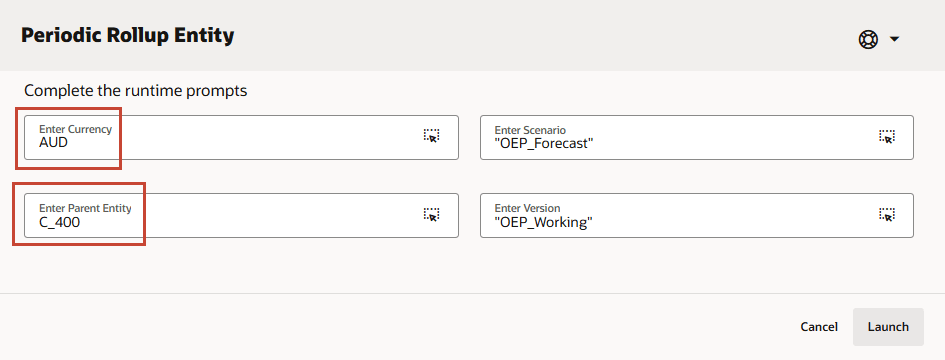
- Under Actions, for Periodic Rollup Entity, click (Actions) and then Launch.
- In Periodic Rollup Entity, for Enter Currency select or type AUD and for Enter Parent Entity select or type APAC(C_400).
Tip:
You can type the value or use the (Member Selector) to search the values. - Verify your selection and click Launch.
- In Information, click OK.
Note:
You can validate the successful completion of the Rules from the Jobs section.Running the Rules for Currency Translation
After data is loaded and the Cash Managers or Controllers make any adjustments in the Input Currency, you must run Currency Conversion Rules in order to see values in the Reporting Currency. The Input Currencies are first converted to Entity Currencies (by Periodic Currency Translation to Entity Currency Rule) and then to Reporting Currencies (by Periodic Currency Translation to Reporting Currency Rule). For each Rule, select the entity or entities, scenario (for example, forecast or actuals), and version to run the rule for. You can run the rule for a specific entity, multiple entities, or all children of a parent entity.
Currency Translation Rules:
- You can view data in the Input Currency or the Reporting Currency in the following forms: Rolling Forecast, Cash From Investing Activities, and Cash From Financing Activities.
- You can enter values only in the Input Currency in the Rolling Forecast, Cash From Investing Activities, and Cash From Financing Activities forms.
- You can make adjustments to values only in the Input Currency. If you select a different currency, the form becomes read-only.
- Driver-based forecasting, Trend-based forecasting, Manual input, and Predictive forecasting is always done using the Input Currency.
- You can run Currency Conversion Rules to convert to the Entity Currency. Entity Currency is identified by the Entity Currency Attribute for each of the entities. It is represented as the Reporting Currency.
- Separate Reporting Currency and Entity Currency Rule is required as all numbers need be translated to all Entity Currencies.
- Administrator must run Currency Conversion Rules in order for end-users to see the Input Currencies in the Reporting Currency.
- Administrators must run a Rollup Rule in order for Controllers to see the rolled up converted data at a higher level of the hierarchy.
- Translates Transaction Currency to Reporting Currency based on Currency of Entity selected.
- Can be done for specific Entity or multiple entities or all children of parent Entity selected.
- Translates Transaction Currency to selected reporting currency – can be done for multiple reporting currency. This is mainly intended for Head Quarters level reporting in unified reporting currency.
- Can be done also for specific Entity or all entities, or all children of a parent Entity.
Currency Translation to Entity Currency
Currency Translation to Reporting Currency
In this section, you run the Periodic Rules for currency translation. Finally for the Controllers to see currency converted data at a higher level in the hierarchy, run a rule (Periodic Rollup Entity) to roll up the converted data.
- On the home page, click Rules.
- In the search box, enter Periodic Currency Translation and press Enter key.
- Under Actions, for Periodic Currency Translation to Entity Currency, click (Actions) and then Launch.
- In Periodic Currency Translation to Entity Currency, for Enter Entity select or type Vision Australia(C_451).
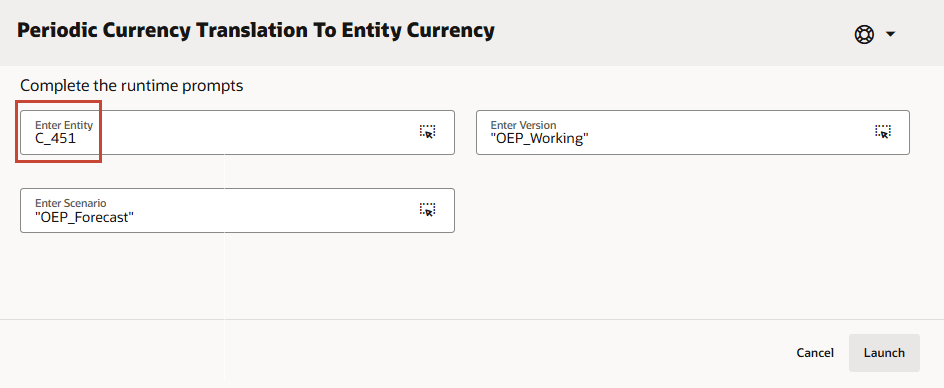
Tip:
You can type the value or use the (Member Selector) to search the values. - Verify your selection and click Launch.
- In Information, click OK.
- Under Actions, for Periodic Currency Translation to Reporting Currency, click (Actions) and then Launch.
- In Periodic Currency Translation to Reporting Currency, for Enter Parent Entity select or type Vision Australia(C_451) and for Enter Reporting Currency select or type USD_Reporting.
Note:
For this tutorial, we are covering only USD_Reporting. You can load the exchange rates for other currencies and do the translation to other respective currencies.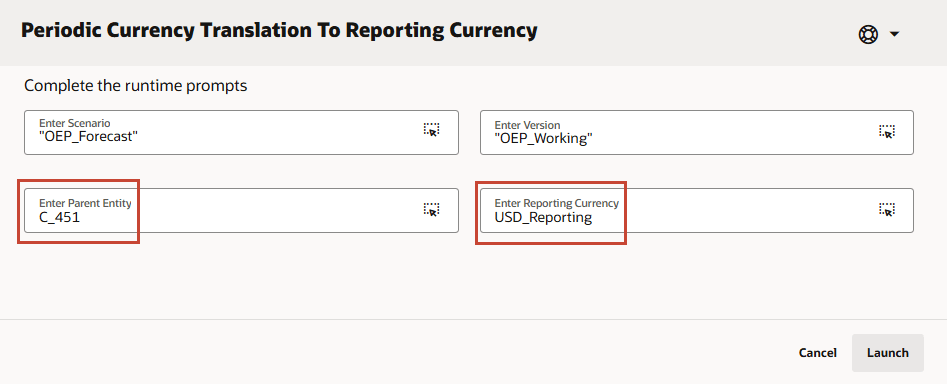
Tip:
You can type the value or use the (Member Selector) to search the values. - Verify your selection and click Launch.
- In Information, click OK.
- In the search box, enter Rollup and press Enter key.
- Under Actions, for Periodic Rollup Entity, click (Actions) and then Launch.
- In Periodic Rollup Entity, for Enter Currency select or type USD_Reporting and for Enter Parent Entity select or type APAC(C_400).
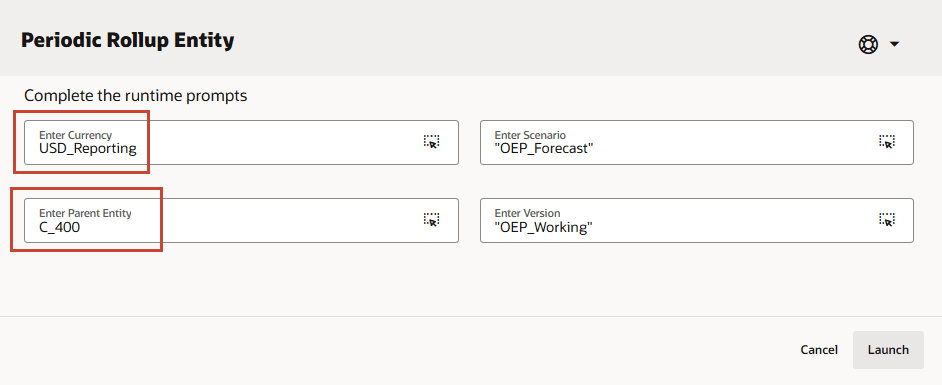
Tip:
You can type the value or use the (Member Selector) to search the values. You can run this rule by each entity or at parent entity level. - Verify your selection and click Launch.
- In Information, click OK.
Note:
You can validate the successful completion of the Rules from the Jobs section.Verifying Data Loads and Currency Translations
You can view data in the Input Currency or the Reporting Currency in the following forms: Rolling Forecast, Cash From Investing Activities, and Cash From Financing Activities.
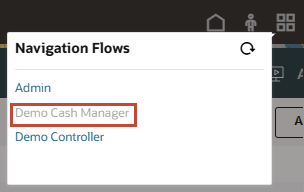
In this section, you will verify the data loads and currency translations using the Cash Manager Navigation Flow.
- From the top right, select Demo Cash Manager Navigation Flow.
- On the home page, click Periodic Cash Forecast.
- From the bottom tabs, select Rolling Forecast.
- For the POV, select Vision Australia for Entity and AUD for Currency.
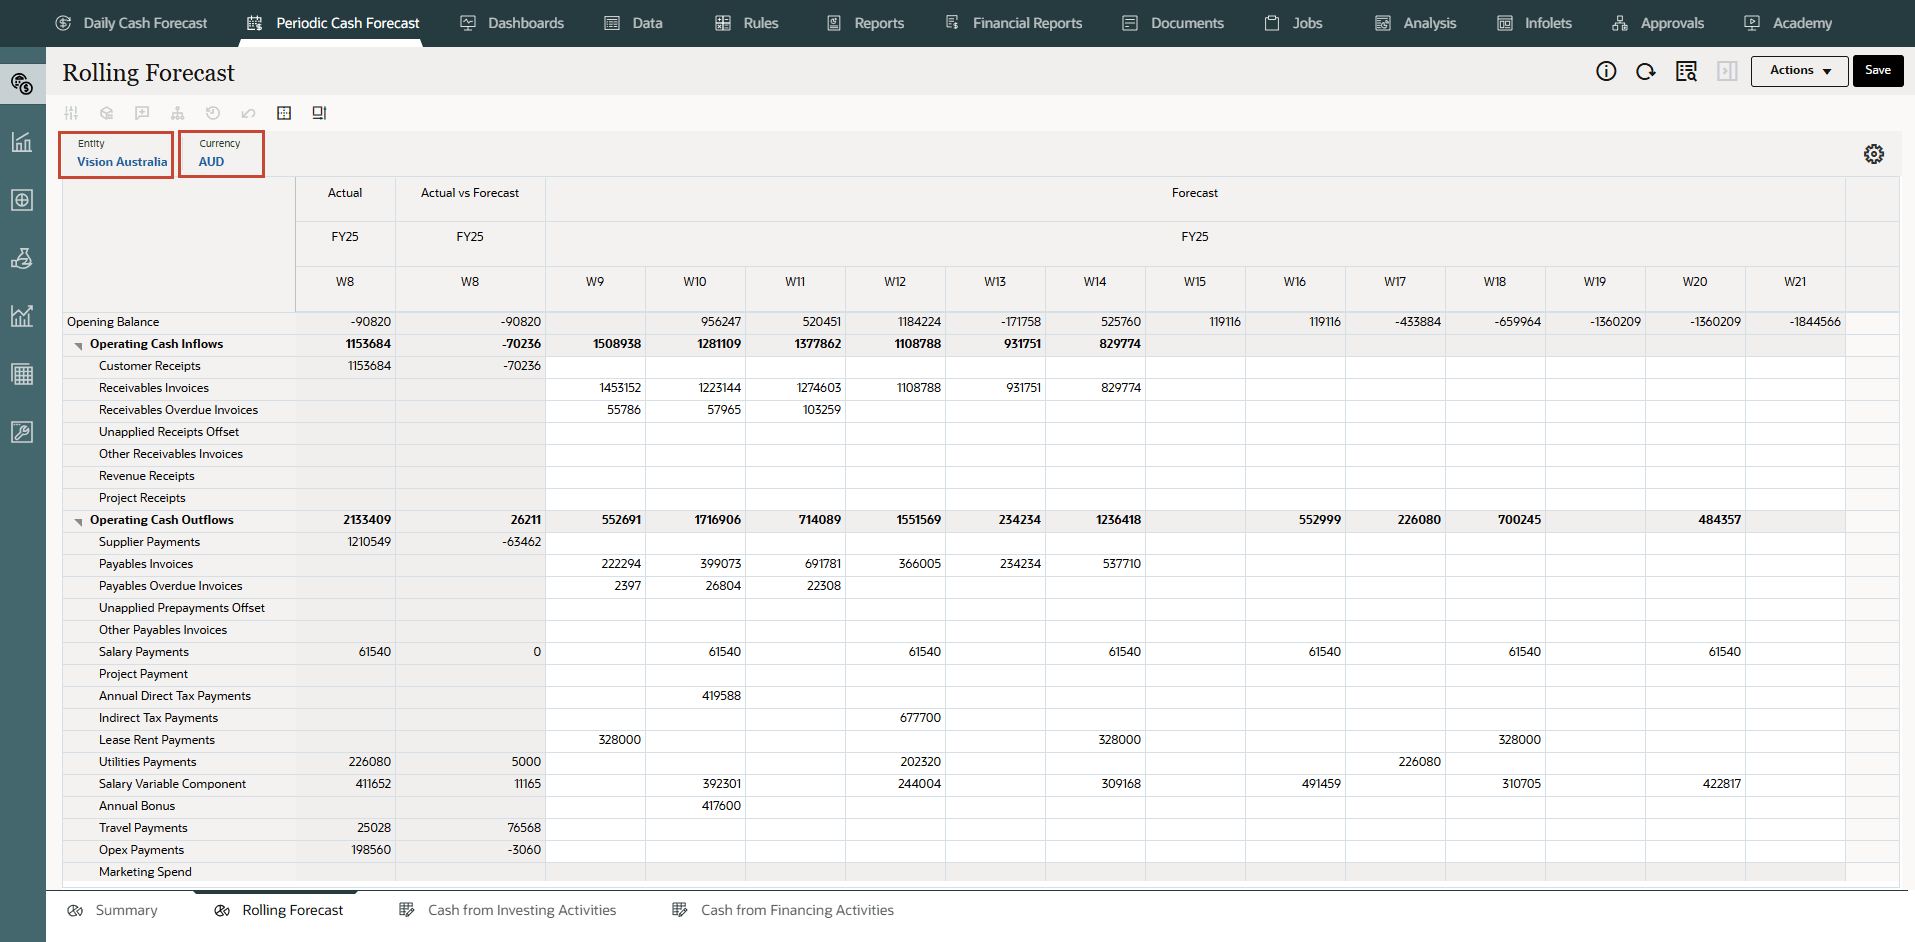
You can see the actual and forecast data loaded in AUD using the data load files for Vision Australia.
- For the POV, select USD_Reporting for Currency.
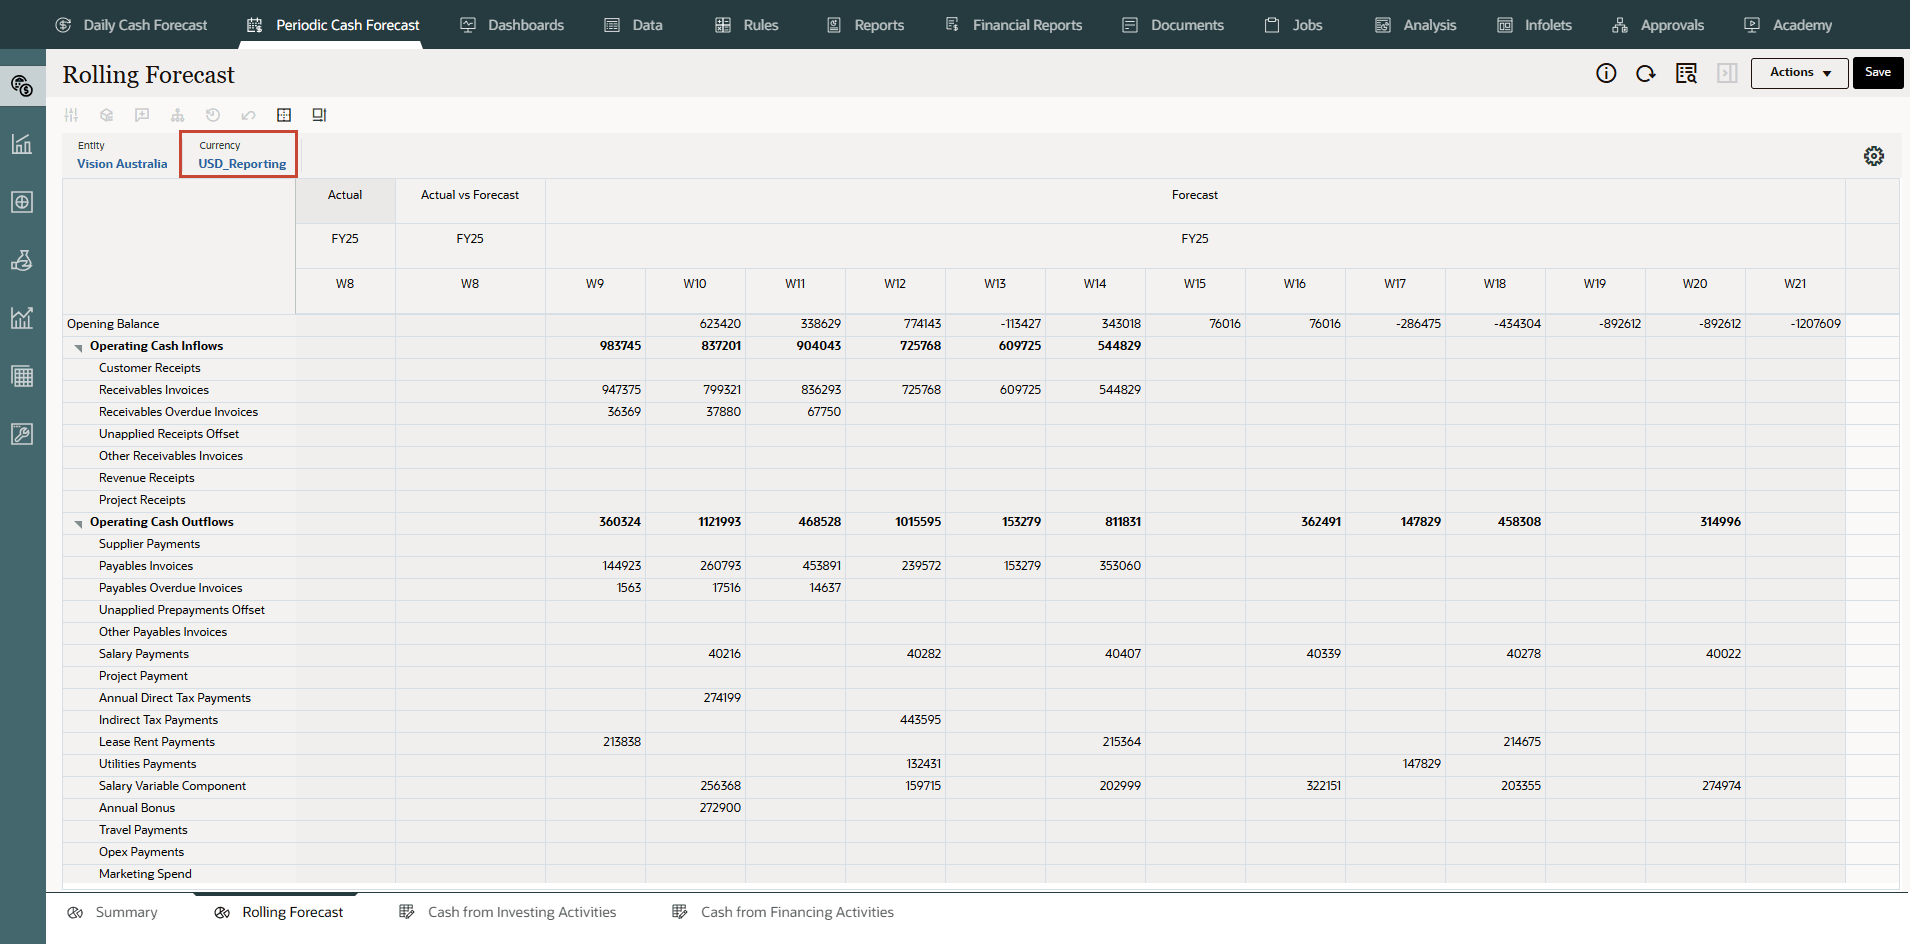
You can see the currency translation done to USD_Reporting for Vision Australia.
Note:
For this tutorial, we are covering only USD_Reporting. You can load the exchange rates for other currencies and do the translation to other respective currencies.
Related Links
- Documentation: Administering Predictive Cash Forecasting
- Oracle EPM Tutorials YouTube Channel
- First tutorial: Creating PCF Applications
- Second tutorial: Loading Metadata and Data in Predictive Cash Forecasting
- Third tutorial: Setting up Users, User Groups, Roles and Security in PCF
- Fourth tutorial: Setting up Forecast Methods and Configuring Driver Methods in Predictive Cash Forecasting
- Fifth tutorial: Setting up User Preferences and Verifying as End User in Predictive Cash Forecasting
Setting up Multi-currency in Predictive Cash Forecasting
G33805-02
March 2026