Introduction
This 60-minute tutorial shows you how to import and export data in Planning, including importing exchange rates into multicurrency business processes.
Background
Planning allows you to import and export plan data. You can load data into Planning using these options:
- Data Integration and Management, for complex data mappings
- REST APIs
- EPM Automate
- Migrations, using snapshots that include Essbase data
- Import Data and Export Data in the Application cluster of Planning
This tutorial shows you how to load data using Import Data and Export Data in the Application cluster of Planning.
Importing data requires a file formatted using supported delimiters. If you need a sample, refer to the import file included in this tutorial or run the export process and use that as a template.
For a list of supported delimiter characters and exceptions, see the Other Supported Delimiter Characters topic in the Administering Planning documentation.
You export data into a flat file. You can use the exported file:
- When you need to load data to a migrated or new Planning business process
- As a backup of your Planning data
- As a template for importing data into multiple dimensions
Prerequisites
Cloud EPM Hands-on Tutorials may require you to import a snapshot into your Cloud EPM Enterprise Service instance. Before you can import a tutorial snapshot, you must request another Cloud EPM Enterprise Service instance or remove your current application and business process. The tutorial snapshot will not import over your existing application or business process, nor will it automatically replace or restore the application or business process you are currently working with.
Before starting this tutorial, you must:
- For the loading data sections of this tutorial:
- Have Service Administrator access to Planning for EPM Enterprise Cloud Service.
- Upload and import this snapshot into your Planning business process. This snapshot includes the Operating Expenses - Overhead Depts FY23 form.
- Download this data import file and save it locally.
- For the importing exchange rate sections of this tutorial:
- Have Service Administrator access to EPM Enterprise Cloud Service.
- Remove the Planning business process used in the loading data sections of this tutorial.
- Upload and import the snapshot into your Planning instance.
- Download this exchange rates import file and save it locally.
Note:
The snapshot includes a multicurrency Planning business process.
Note:
An EPM Cloud Service instance allows you to deploy and use one of the supported business processes. To deploy another business process, you must request another EPM Enterprise Cloud Service instance or remove the current business process.Note:
If you run into migration errors importing the snapshot, re-run the migration excluding the HSS-Shared Services component, as well as the Security and User Preferences artifacts in the Core component. For more information on uploading and importing snapshots, refer to the Administering Migration for Oracle Enterprise Performance Management Cloud documentation.Reviewing the Data Point-of-View
Before importing data, review the data point-of-view (POV) in the form and the contents of the import file used in this tutorial.
Reviewing the Imported Form
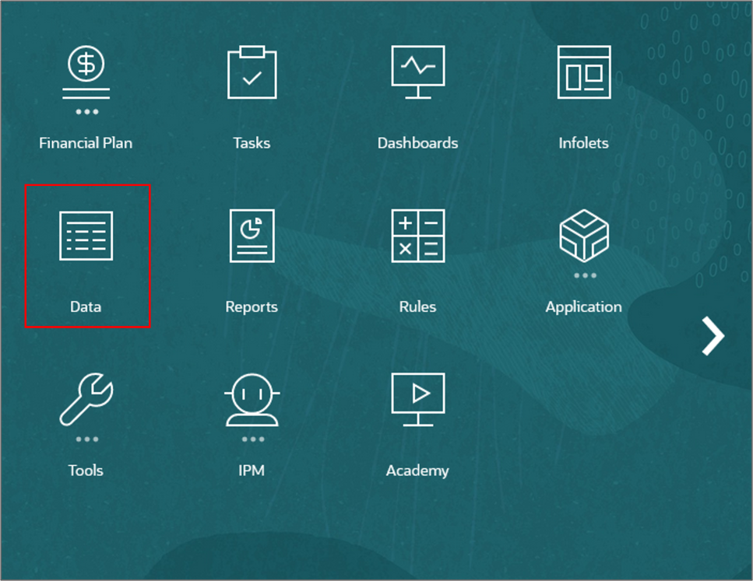
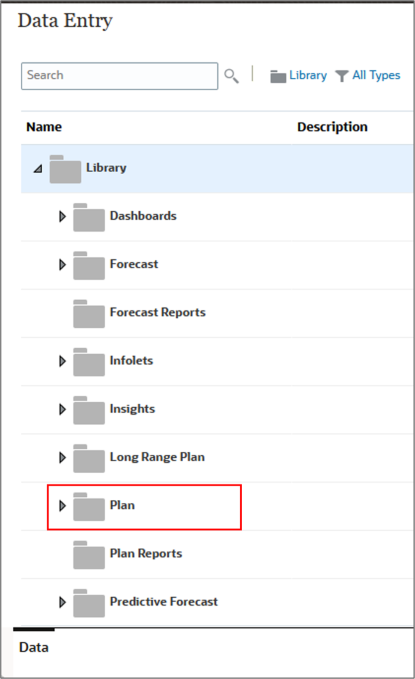
- Locate the form you imported using the provided migrated snapshot. From the Planning home page, click Data.
- Expand Plan.
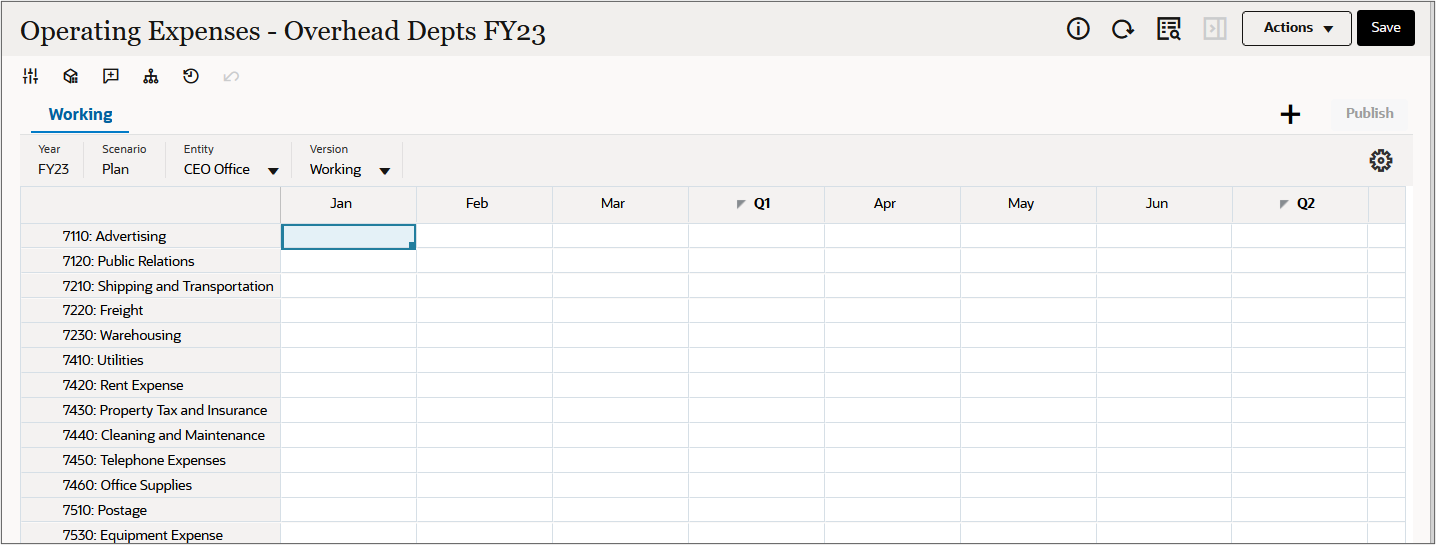
- Locate and click Operating Expenses - Overhead Depts FY23.
- Review and take note of the data point-of-view on the form.
- Click Close.
The Data Entry page is displayed.
The import file used in this tutorial imports data into this form's point-of-view.
Reviewing the Import File
Make sure you downloaded a local copy of the import file mentioned in the Prerequisites section of this tutorial.
- Open the comma-separated values file.
- Do not make any changes.
- Review the contents of the file.
- Close the file.

Importing Data
In this section, you validate the import data file and run the import data process in Planning.
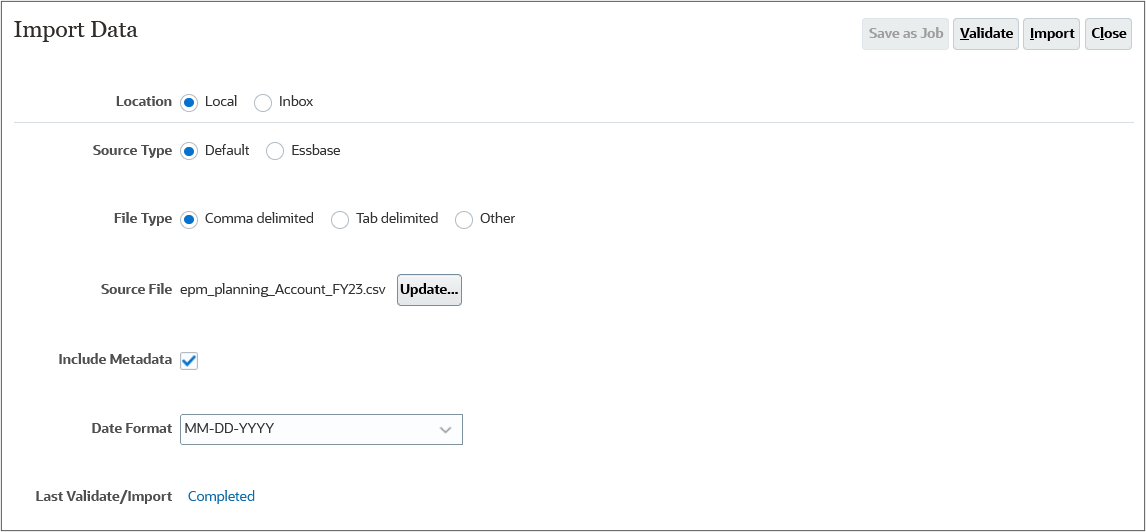
Validating Import Data Files
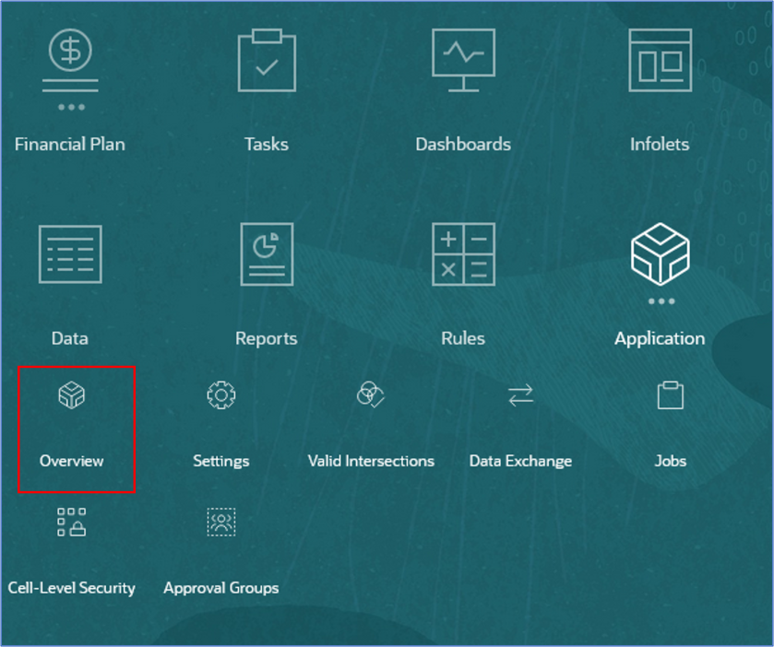
- From the Planning home page, click Application.
- Click Overview.
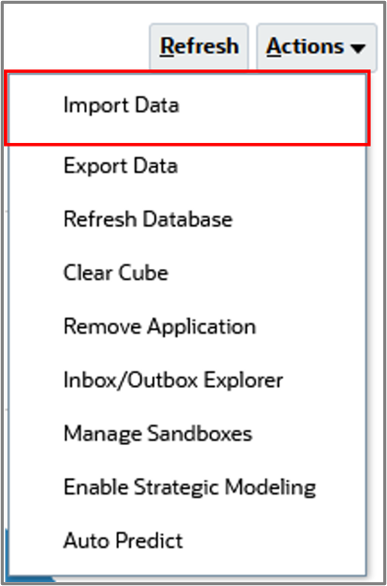
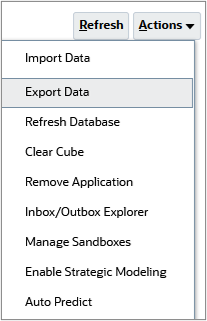
- On the Application page, click Actions.
- Select Import Data.
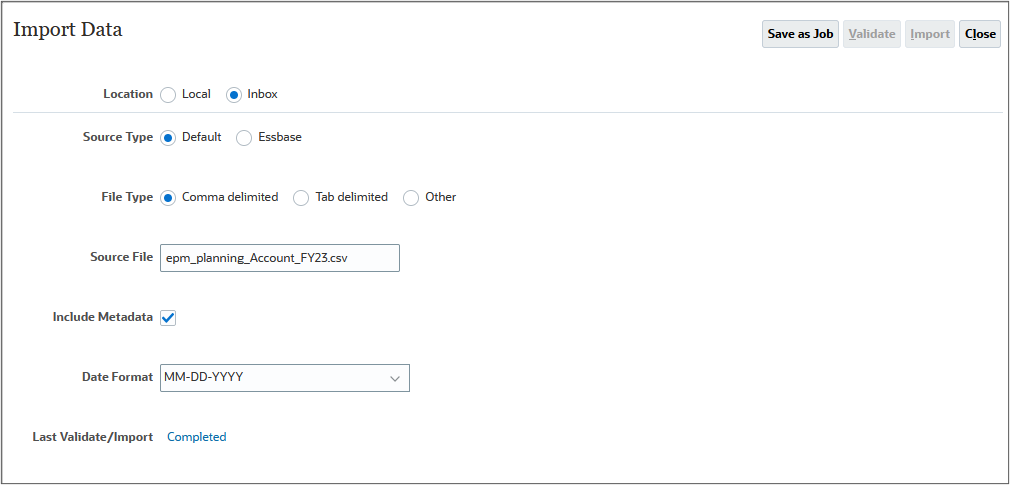
- On the Import Data page, click Create.
- Accept the default selection, Local, as the Location.
- Accept the selection, Default, as the Source Type.
- Accept the default selection, Comma delimited, as the File Type.
- For Source File, click Browse.
- Navigate to the location of the import file, select it, and click Open.
- Select Include Metadata.
- For Date Format, accept the default selection: MM-DD-YYYY.
- Click Validate.
- Click OK.
- Click Close twice to close the Import Data pages.
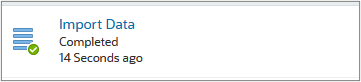
- From the cards displayed on top of the Application page, click Jobs.
- Locate the Validate Import Data job and verify that it completed successfully.
You select or enter the required file information on the Import Data page.
If you select Local, you can browse for a data file stored on your local folder. If you select Inbox, you must specify the exact name of the data file stored on the server.
Source types depend on how your data file is structured.
For a list of supported delimiter characters and exceptions, see the Other Supported Delimiter Characters topic in the Administering Planning documentation.
Note:
You can import and modify metadata the same time you import data. Clearing this option prevents members from changing positions in the outline during the import process. If you do not select this option, you must make sure the required metadata already exists in the business process prior to running the import process.As a precaution, always validate your data files before running the import process.
You check the status of the validation process in Job Scheduler. If errors are found, you can modify the file and revalidate it.
The current state of all submitted and scheduled jobs are displayed on the Jobs page.
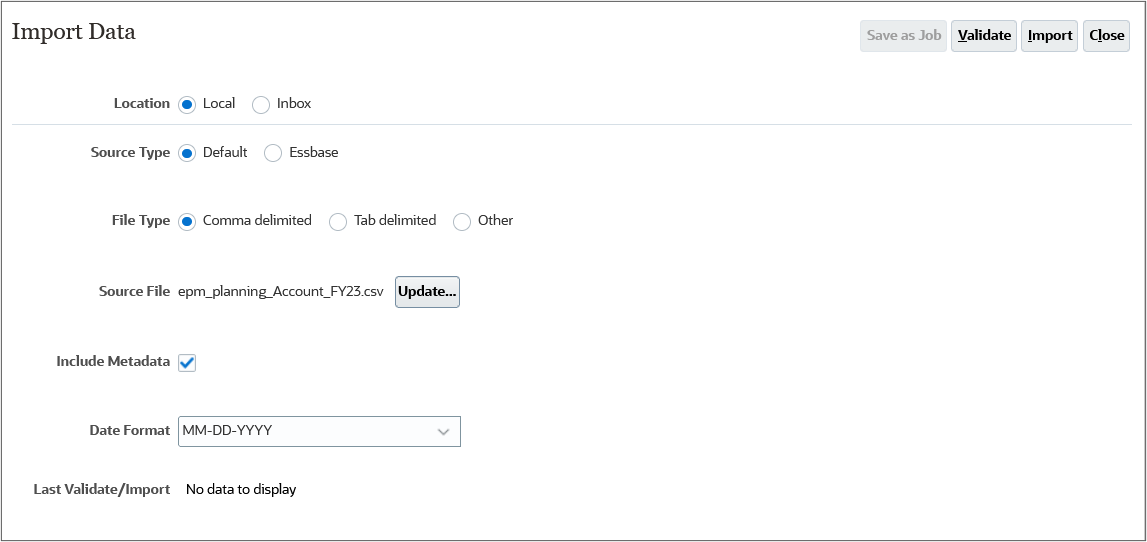
Running the Import Process
After validating your import data file, you can run the import process.
Return to the Import Data page. You will re-enter the same selections from when you validated the import data file.
- From the cards displayed on top of the Jobs page, click Overview.
- On the Application page, click Actions.
- Select Import Data.
- On the Import Data page, click Create.
- Accept the default selection, Local, as the Location.
- Accept the selection, Default, as the Source Type.
- Accept the default selection, Comma delimited, as the File Type.
- For Source File, click Browse.
- Navigate to the location of the import file, select it, and click Open.
- Select Include Metadata.
- For Date Format, accept the default selection: MM-DD-YYYY.
- Review your selections.
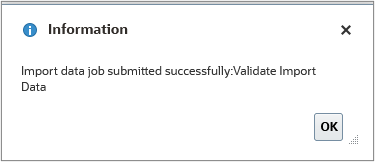
- Click Import.
- On the Information dialog box that confirms that the import data job was submitted successfully, click OK.
- Return to Jobs to view the job status. Click Close twice to close the Import Data pages.
- From the cards displayed on top of the Application page, click Jobs.
- Locate the Import Data job and verify that it completed successfully.
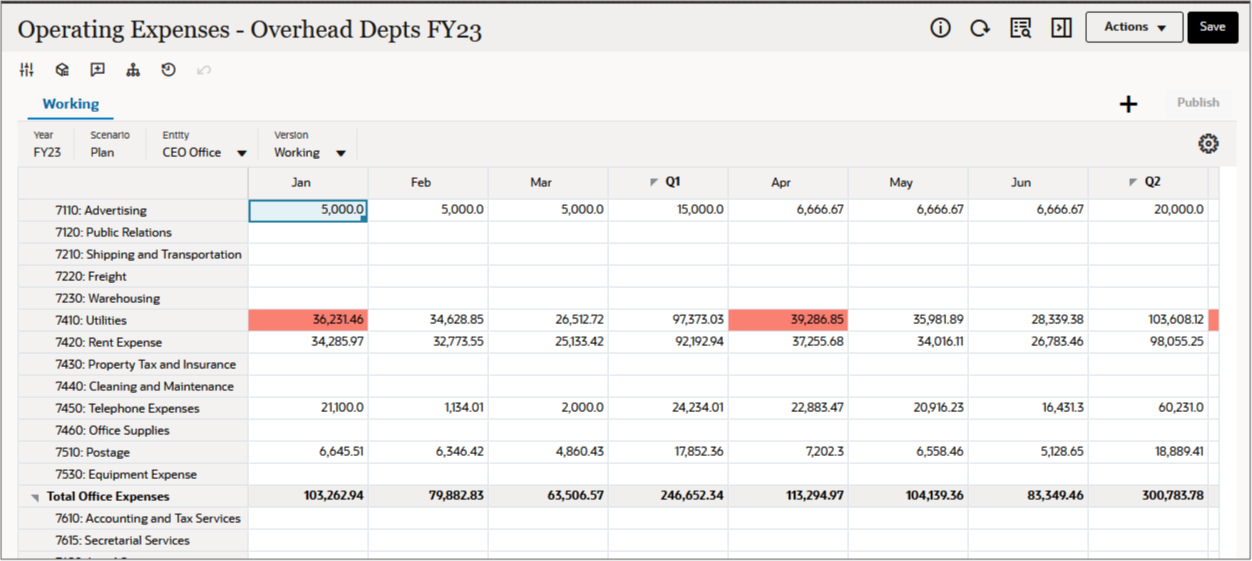
Verifying the Data Load in the Form
After validating your data file, running the import process, and checking the job status, verify the data load by viewing the data in a form.
- Return to the Planning home page. Click the Home icon on the top right portion of the page.
- Click Data.
- Expand Plan.
- Locate and click Operating Expenses - Overhead Depts FY23.
- Click Close.
- Return to the Planning home page. Click the Home icon on the top right portion of the page.

The imported data is displayed on the form.
Exporting Data
In this section, you export data from your Planning business process.
Running the Export Process
- From the Planning home page, click Application.
- Click Overview.
- On the Application page, click Actions.
- Select Export Data.
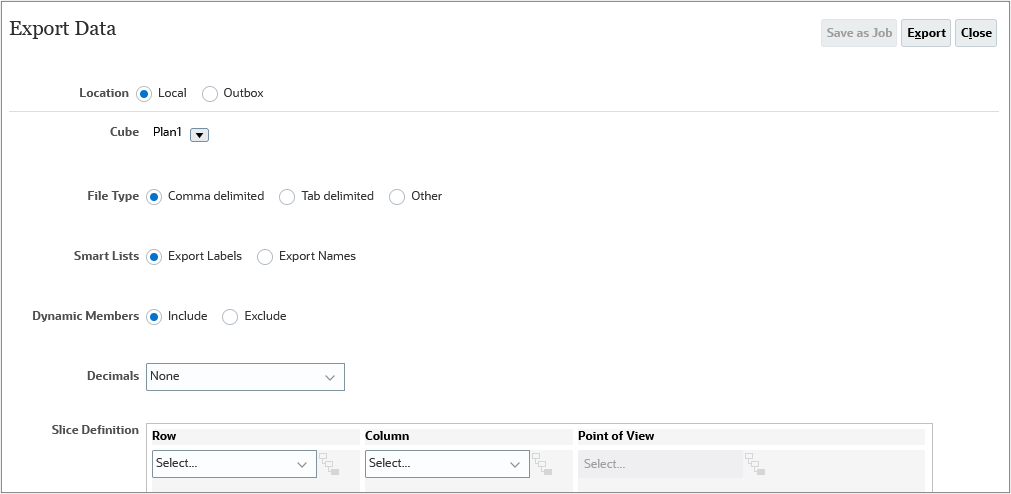
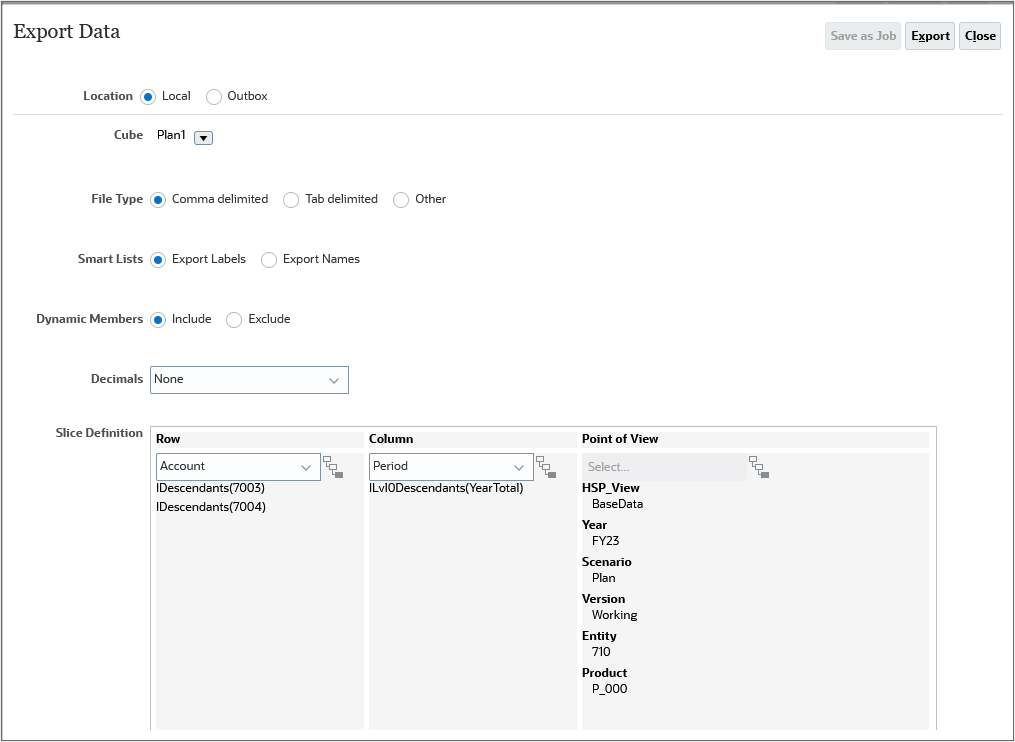
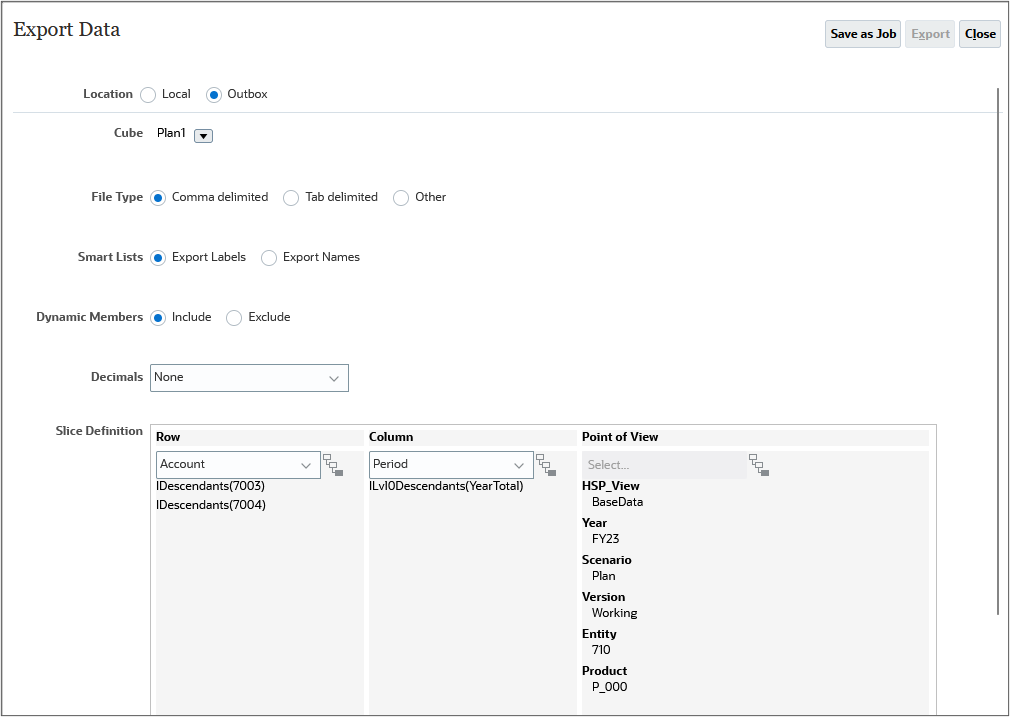
- On the Export Data page, click Create.
- For Location, accept the default selection: Local.
- For Cube, accept the default selection: Plan 1.
- Accept the default selection, Comma delimited, as the File Type.
- For Smart Lists, select Export Names.
- For Dynamic Members, accept the default selection: Include.
- For Row, select Account.
- Click Member Selector next to the Row dropdown list.
- In Member Selector, select the following accounts: Descendants inclusive of Total Office Expenses (7003) and Descendants inclusive of Total Facility Services Expenses (7004).
- Click OK.
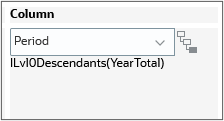
- For Column, select Period and open Member Selector.
- Select Level 0 Descendants of YearTotal, and click OK.
- For Point of View, open Member Selector and select members for the following dimensions:
- HSP_View: BaseData
- Year: FY23
- Scenario: Plan
- Version: Working
- Entity: CEO Office (710)
- Product: No Product (P_000)
- Click OK.
- Review your selections for the slice definition.
- Click Export.
- When prompted where to save the file, navigate to your local folder and click Save.
- Click Close twice to close the Export Data pages.
- Return to the Planning home page. Click the Home icon on the top right portion of the page.
You enter export details on this page.
In the Slice Definition section, you select members for the row, column, and POV.
You export asymmetric data sets. You select a dense dimension for the row, a dense dimension for the column, and the rest of the dimensions in the POV.

Member Selector is displayed.

Note:
For more information on using Member Selector, see the Using the Member Selector section in the Adminstering Planning documentation.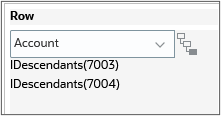
The Data Export status dialog box is displayed.
Viewing the Exported Data File
- In your local machine's file system, locate the exported compressed (zip) file.
- Extract the compressed file.
- Double-click to open the extracted CSV file.

Scheduling Data Loads
To start scheduling import and export data jobs, you must work with the Inbox/Outbox Explorer and save the import and export process when you first create them.
Uploading your Data File to the Inbox/Outbox Explorer
Before uploading your file to the Inbox/Outbox Explorer, make sure you validate it. See the Validating Import Data Files section of this tutorial.
- From the Planning home page, click Application.
- Click Actions and select Inbox/Outbox Explorer.
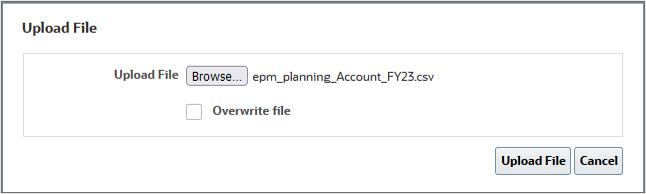
- Click Upload.
- In the Upload File dialog box, click Browse.
- Locate the import data file in your file system, select it, and click Open.
- Click Upload File.
- When the message File upload completed successfully displays, click OK.
- Click Close.
The Inbox/Outbox Explorer dialog box is displayed.

The import data file is now listed in Inbox/Outbox Explorer.

Saving Import Data Jobs
- On the Application page, click Actions and select Import Data.
- On the Import Data page, click Create.
- For Location, select Inbox.
- Accept the selection, Default, as the Source Type.
- Accept the default selection, Comma delimited, as the File Type.
- For Source File, enter the full name of the import data file: epm_planning_Account_FY23.csv.
- Select Include Metadata.
- For Date Format, accept the default selection: MM-DD-YYYY.
- Click Save as Job.
- Enter a name for the job: Import Accounts FY23.
- Click Save.
- When the message box confirming that the job was saved displays, click OK.
- Click Close.
- Click Close.
You select or enter the required file information on the Import Data page.
Note:
You can import and modify metadata the same time you import data. Clearing this option prevents members from changing positions in the outline during the import process. If you do not select this option, you must make sure the required metadata already exists in the business process prior to running the import process.The Save as Job dialog box is displayed.
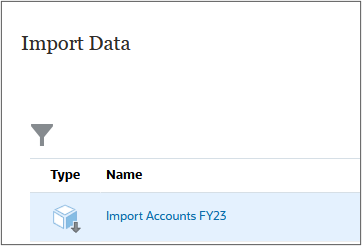
The Import Data page lists the saved job.
Scheduling Import Data Jobs
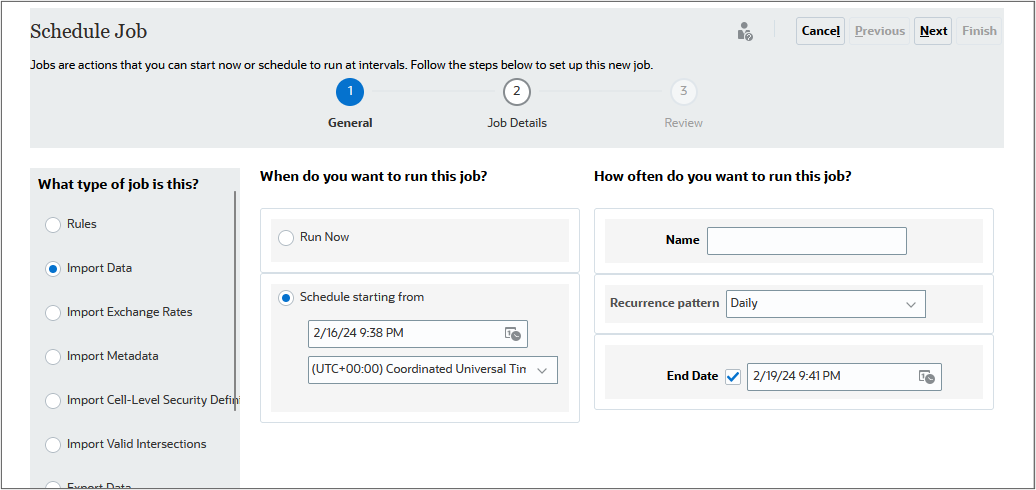
- From the cards displayed on top of the Application page, click Jobs.
- Click Schedule Jobs.
- From the list of job types, click Import Data.
- Select to run the job now or schedule it at a later time.
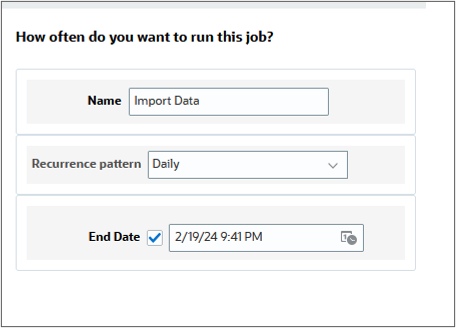
- Determine how often you want to run the job.
- Enter a name
- Select a pattern
- Optionally, select an End Date
- Click Next.
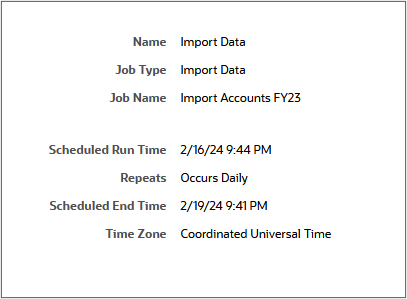
- Review the job details, make sure the Import Accounts FY23 job is listed and selected, then click Next.
- Review your selections.
- Click Finish.
The Schedule Job wizard is displayed.
Note:
The dropdown list allows you to select a time zone.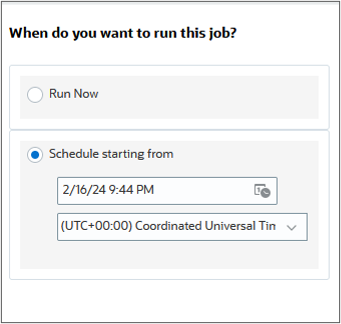
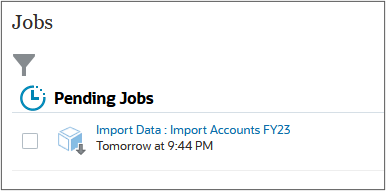
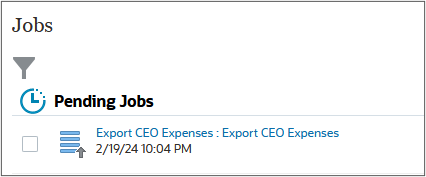
The scheduled job is listed under Pending Jobs.
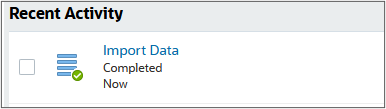
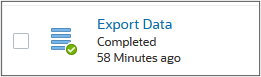
When the job runs or completes, its status is displayed under Recent Activity.
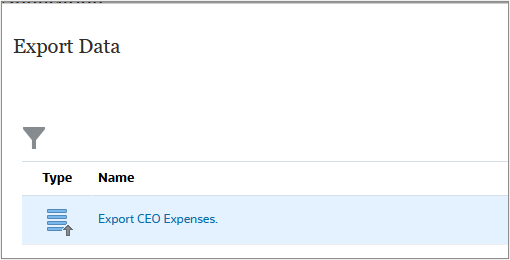
Saving Export Data Jobs
- From the cards displayed on top of the Application page, click Overview.
- Click Actions and select Export Data.
- On the Export Data page, click Create.
- For Location, select Outbox.
- For Cube, accept the default selection: Plan 1.
- Accept the default selection, Comma delimited, as the File Type.
- For Smart Lists, select Export Names.
- For Dynamic Members, accept the default selection: Include.
In the Slice Definition section, you select members for the row, column, and POV.
- For Row, select Account and click Member Selector next to the Row dropdown list.
- In Member Selector, select the following accounts: Descendants inclusive of Total Office Expenses (7003) and Descendants inclusive of Total Facility Services Expenses (7004),
- Click OK.
- For Column, select Period and open Member Selector.
- Select Level 0 Descendants of YearTotal, and click OK.
- For Point of View, open Member Selector and select members for the following dimensions:
- HSP_View: BaseData
- Year: FY23
- Scenario: Plan
- Version: Working
- Entity: CEO Office (710)
- Product: No Product (P_000)
- Click OK.
- Review your selections for the slice definition.
- Click Save as Job.
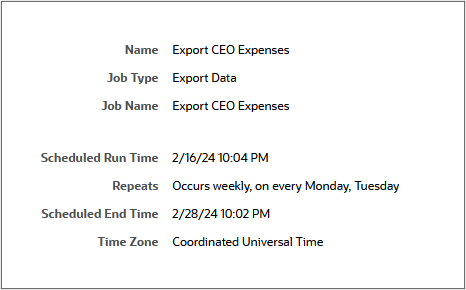
- Enter a name for the job: Export CEO Expenses.
- Click Save.
- When the message box confirming that the job was saved displays, click OK.
- Click Close.
- Click Close.
The Save as Job dialog box is displayed.
The Export Data page lists the saved job.
Scheduling Export Data Jobs
- From the cards displayed on top of the Application page, click Jobs.
- Click Schedule Jobs.
- From the list of job types, click Export Data.
- Select to run the job now or schedule it at a later time.
- Determine how often you want to run the job.
- Enter a name
- Select a pattern
- Optionally, select an end date
- Click Next.
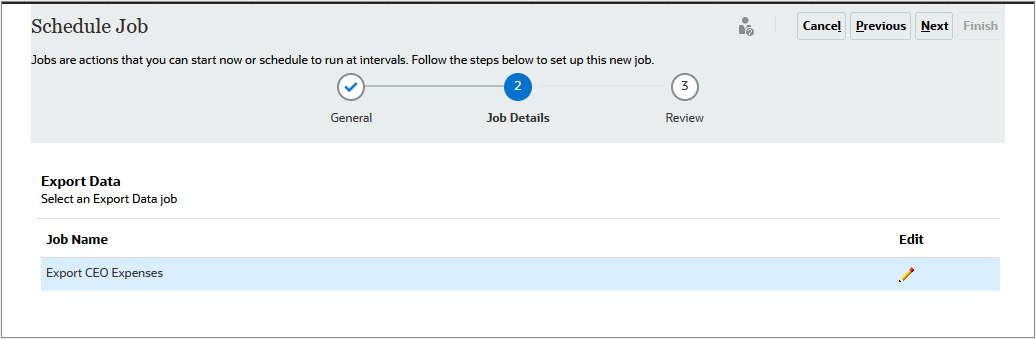
- Review the job details, make sure the Export CEO Expenses job is listed and selected, then click Next.
- Review your selections.
- Click Finish.
- Return to the Planning home page. Click the Home icon on the top right portion of the page.
The Schedule Job wizard is displayed.
The dropdown list allows you to select a time zone.
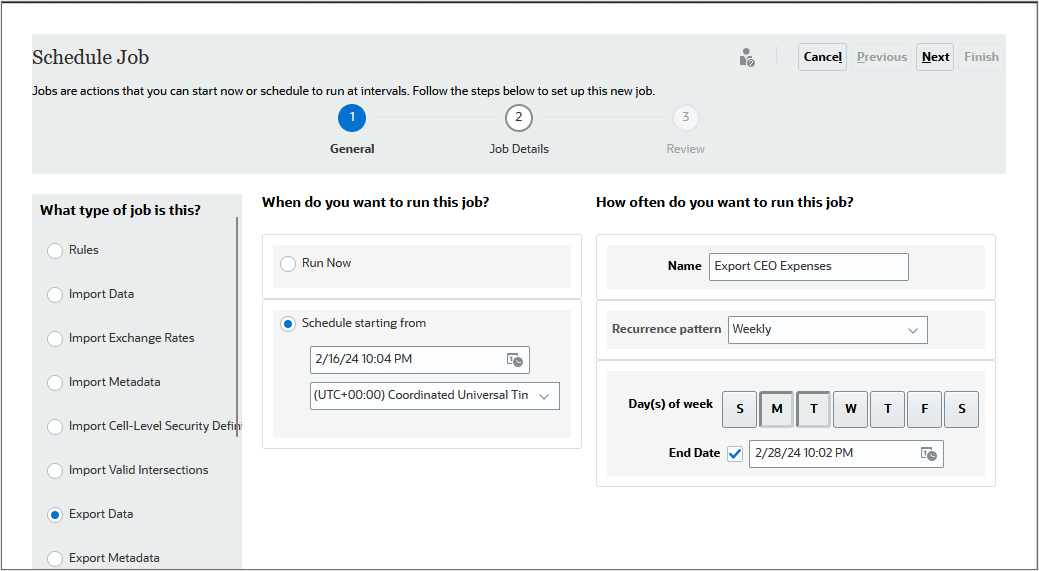
The scheduled job is listed under Pending Jobs.
When the job runs or completes, its status is displayed under Recent Activity.
Downloading your Exported Data File from Inbox/Outbox Explorer
- From the cards displayed on top of the Application page, click Overview.
- Click Actions and select Inbox/Outbox Explorer.
- For "Export CEO Expenses.zip", click Actions and select Download File.
- Navigate to where you want to save the file locally, then click Save.
- Close Inbox/Outbox Explorer.
Inbox/Outbox Explorer is displayed with exported files listed on the page.
Note:
Extract the csv or txt file if you want to view or edit the contents. You can also use the csv or txt file as an import file.Importing Exchange Rates for Multicurrency Business Processes
In this section, you import exchange rates into a multicurrency business process.
Before proceeding with the tasks in this section, you must remove the business process used in the loading data sections of this tutorial and import the required snapshot for this section, as specified in the Prerequisites section of this tutorial.
Accessing the Exchange Rates to <Main Currency> form
Exchange rates are stored in the Account dimension and contain the ending and average rates used to convert foreign currencies into the main currency. These rates are in FX Rates-Average and FX Rates-Ending. These rates are locked and can't be deleted. Users with view permissions can view or enter the rates for the currencies on the Exchange Rates to <main currency> form (For example, Exchange Rates to USD).
From the Planning home page, click Data.
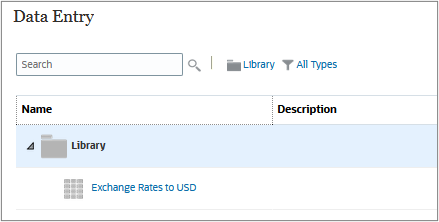
Click the form name to open it.

You add exchange rates by period for all input currencies against the main currency. You must add values across all intersections under which you wish to see the converted data. In this example, my Planning business process has multiple input currencies: USD (default), GBP, EUR, JPY, SGD.
Exporting the Exchange Rate Template
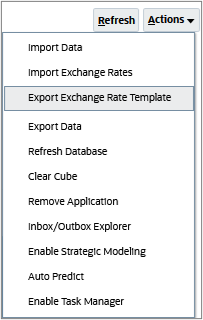
- From the Planning home page, click Application, and then Overview.
- On the Application page, click Actions, and then select Export Exchange Rate Template.
- Open ExchangeRateTemplate.csv or save it locally.
- In the template file:
- Enter average and ending currency exchange rates for each period and each currency.
- Specify members for the POV.
- Save the file.
Validating and Importing Exchange Rates
In this section, you import exchange rates using the sample import file from the What Do You Need? section of this tutorial.
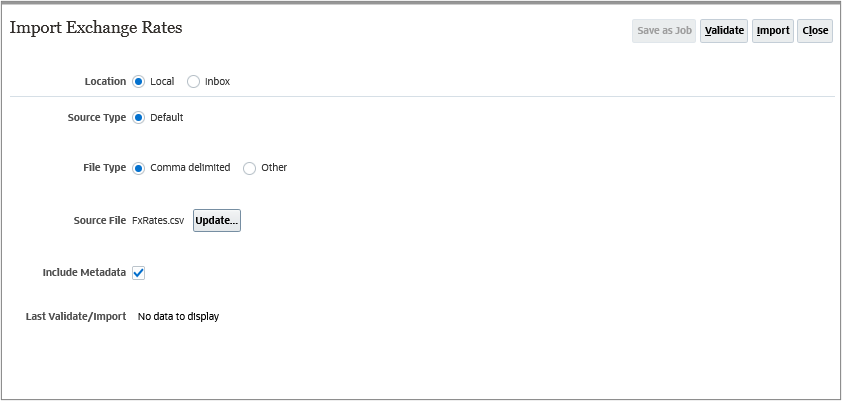
- On the Application page, click the Actions menu and select Import Exchange Rates.
- Click Create.
- Accept the default selection, Local, as the Location.
- Accept the selection, Default, as the Source Type.
- Accept the default selection, Comma delimited, as the File Type.
- For Source File, click Browse.
- Navigate to the location of your exchange rate file, select it, and click Open.
- Select Include Metadata.
- Click Validate.
- Click OK.
- Click Close twice to close the Import Data pages.
- From the cards displayed on top of the Application page, click Jobs.
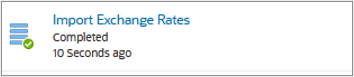
- Locate the Validate Import Exchange Rates job and verify that it completed successfully.
- Return to the Application page. From the cards displayed on top of the Jobs page, click Overview.
- Repeat steps 1 to 8 in this section to complete the information required on the Import Exchange Rates pages.
- Review your selections and click Import.
- When the Information message box is displayed, click OK.
- Click Close twice to close the Import Data pages.
- From the cards displayed on top of the Application page, click Jobs.
- Locate the Import Exchange Rates job and verify that it completed successfully.

Reviewing the Imported Exchange Rates
- Return to the Planning home page. Click the Home icon on the top right portion of the page.
- Click Data.
- Click the Exchange Rates to USD form.
The form displays the imported exchange rates.
